Physical Machines
A physical machine is a physical server registered with IPMI information on the cloud management platform and fully managed and controlled by the platform. Physical machines are used to create bare metal devices; bare metal exclusively uses physical machine resources.
Supported server vendors and models for management include Dell, HP, Huawei, Inspur, Lenovo, Super Micro, and other mainstream x86 servers.
Entry: Left menu → Resource Management / Compute / Basic Resources / Physical Machines
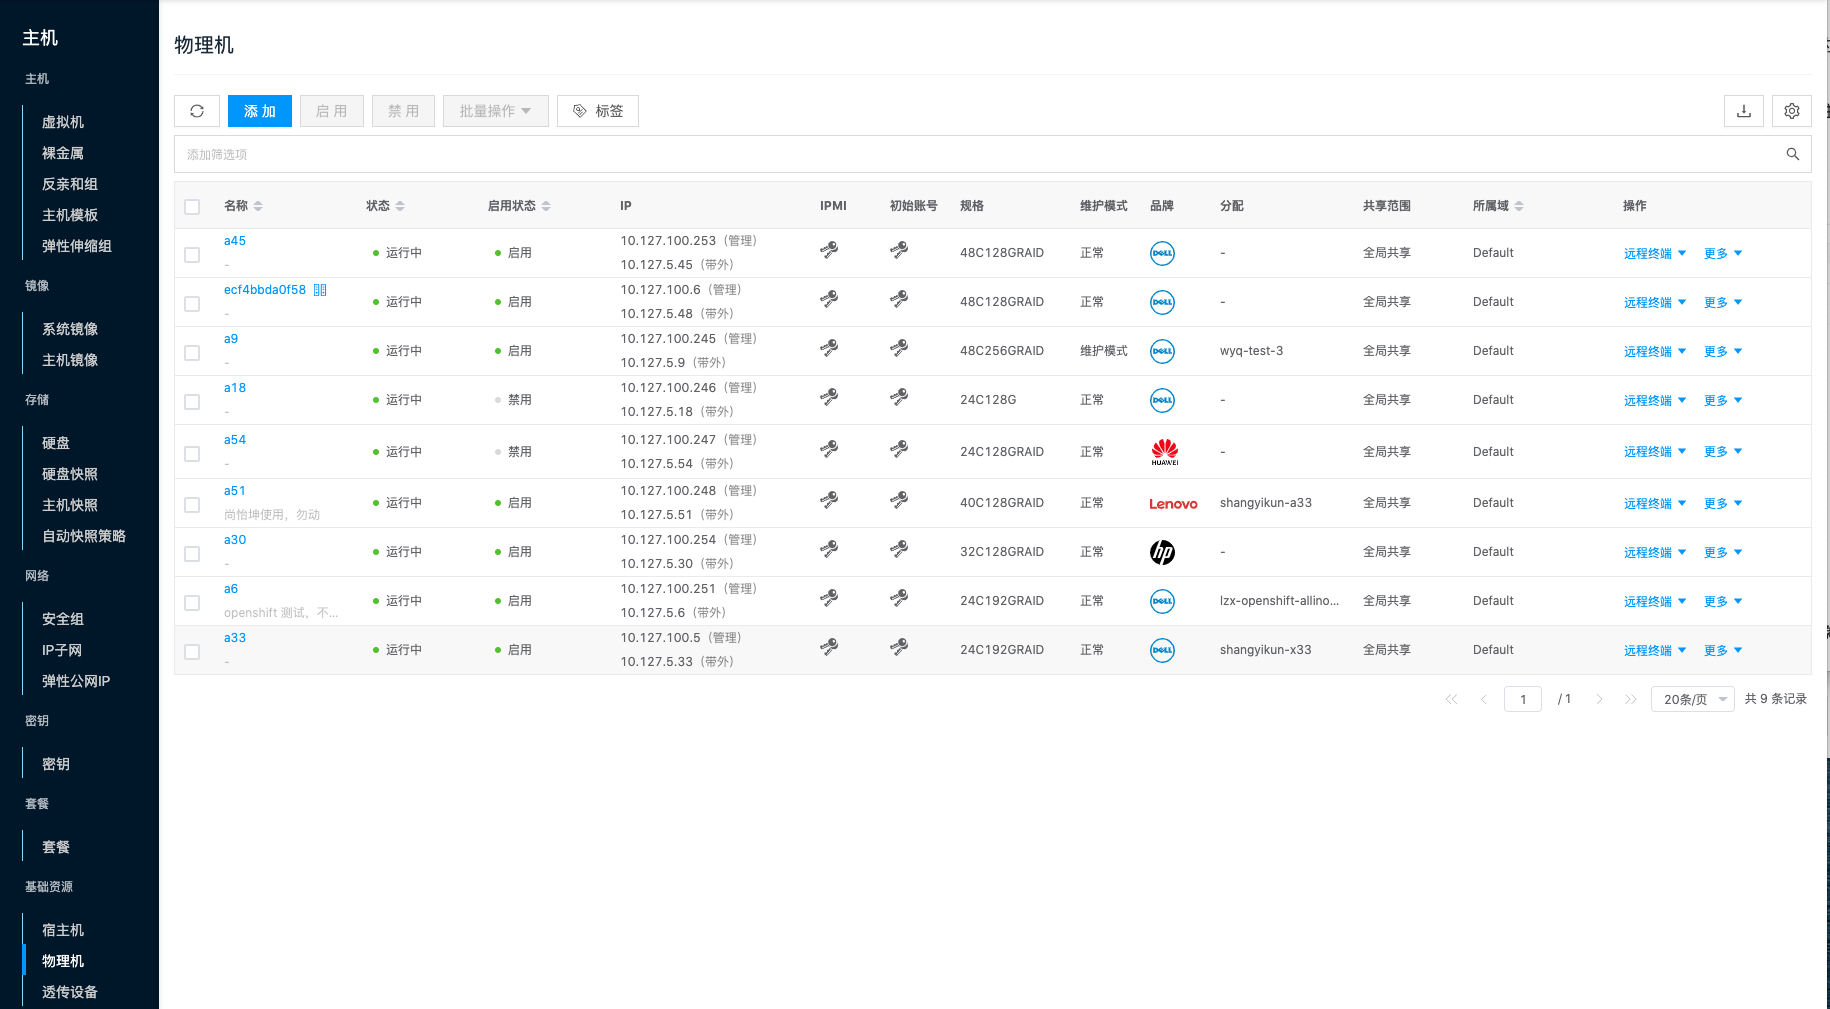
The upper right of the list shows the total number of physical machines and counts for running, stopped, operation failed, and unknown statuses.

View the physical machine list
View information in the physical machine list.
- In the cloud management platform, click the navigation menu in the upper left, then click “Resource Management / Compute / Basic Resources / Physical Machines” in the left menu to open the Physical Machines page.
- View the following parameters:
- Enabled: Whether the physical machine can be used to create bare metal. Only enabled physical machines can create bare metal.
- Status: Running status of the physical machine.
- IP: Management IP and out-of-band IP. The out-of-band IP is the IPMI address.
- SN: Serial number and related information.
- Allocation: Whether the physical machine has been allocated to create bare metal; shows the bare metal name created on this physical machine.
- Initial account: Get the username and password used to connect to the physical machine.
- IPMI: IPMI username, password, and IP.
- Maintenance mode: Whether the physical machine has entered maintenance mode (the yunionos mini system).
Add a physical machine
The OneCloud platform currently supports four ways to add physical machines:
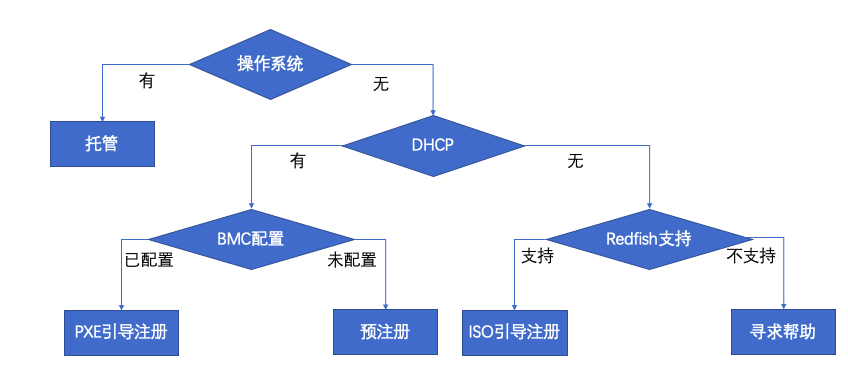
- Hosted: Host an existing physical machine that already has an OS. After hosting succeeds, a bare metal record is also created.
- Pre-register: Pre-rack servers that do not yet have BMC configured. Provide the server MAC address and BMC information to configure. After the server is set to PXE boot and powered on, the OneCloud Baremetal service responds to PXE requests matching the MAC, boots the server into the YunionOS mini system, collects server information, resets BMC information, and completes registration.
- ISO boot registration: Immediately boot servers that already have BMC configured. Does not require a DHCP Relay network, but requires Redfish support. Verifies BMC configuration via the Redfish API, boots YunionOS, and collects more server configuration.
- PXE boot registration: Immediately boot servers that already have BMC configured. Requires a DHCP Relay network and PXE boot. Verifies BMC via IPMI, boots YunionOS, and collects more server configuration.
- Before adding physical machines, ensure the Baremetal service is enabled. If it is not, the Add button on the Physical Machines page is disabled. Follow Enable Baremetal to enable it, then refresh the browser.
- YunionOS is a temporary OS booted via out-of-band control. In this OS you can configure RAID, deploy OS images, and more.
ISO boot registration
Immediately register and boot a server that already has BMC configured. Does not require DHCP Relay, but requires Redfish.
On the Physical Machines page, click “Add” to open the add page.
Select the domain and set the add method to “ISO boot registration”. Two modes are supported.
- Single entry: Configure the following parameters.
- Specify domain: Select the domain the physical machine belongs to.
- Physical machine name: Set the physical server name.
- IPMI address: Enter the configured IPMI address.
- IPMI username: Enter the configured IPMI username.
- IPMI password: Enter the configured IPMI password. Incorrect BMC information prevents successful boot registration.
- Management port IP: Select an IP subnet. To use a static IP, click “Configure IP manually”, set the address, then click “OK”. Because ISO boot registration fits environments without DHCP Relay, you must provide the IP subnet or IP for the management port.
- Register only, do not boot: Do not reboot into YunionOS. When selected, only partial server information is collected; the server cannot create bare metal until you run Detect hardware configuration.
- Template import: Import an XLSX template that contains physical machine registration information.
Follow the preset format; download the template first.
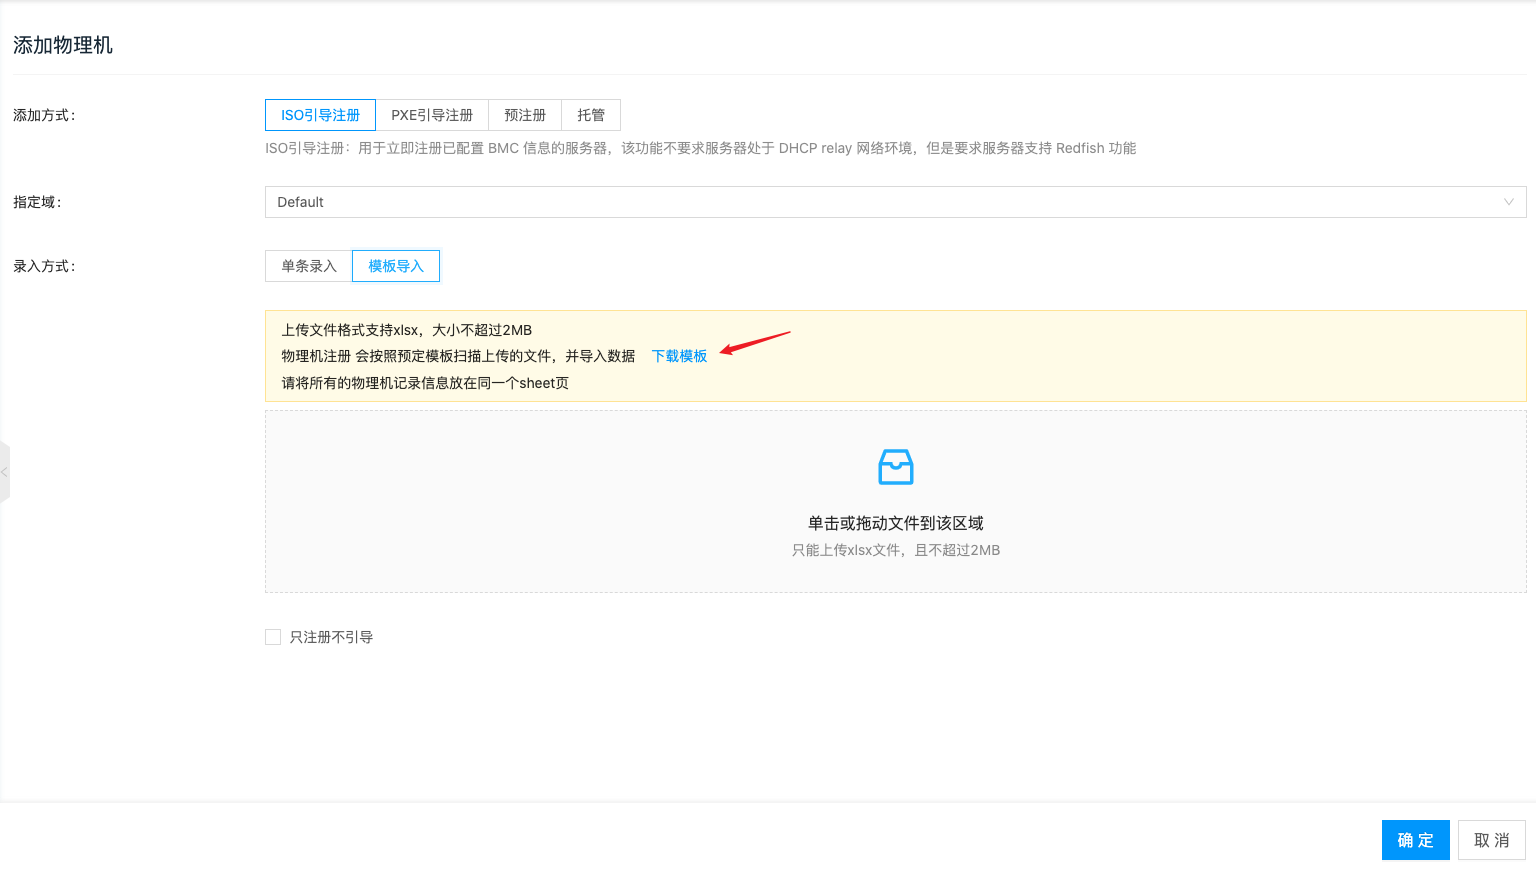
Fill in physical machine information in the downloaded host_template.xlsx. Put all physical machine information on the same sheet.
Click the dashed box or drag the template file into it, then click “OK” to upload.
Register only, do not boot: Do not reboot into YunionOS. When selected, only partial server information is collected; the server cannot create bare metal until you run Detect hardware configuration.
- Single entry: Configure the following parameters.
Click “OK” to complete boot registration.
PXE boot registration
Immediately register and boot a server that already has BMC configured. Requires a DHCP Relay network.
On the Physical Machines page, click “Add” to open the add page.
Select the domain and set the add method to “PXE boot registration”. Two modes are supported.
- Single entry: Configure the following parameters.
- Specify domain: Select the domain the physical machine belongs to.
- Physical machine name: Set the physical server name.
- IPMI address: Enter the configured IPMI address.
- IPMI username: Enter the configured IPMI username.
- IPMI password: Enter the configured IPMI password. Incorrect BMC information prevents successful boot registration.
- Management port MAC: Set the management port MAC. Servers that support Redfish do not need this field.
- Management port IP: Optional. Select an IP subnet; to use a static IP, click “Configure IP manually”, set the address, then click “OK”. Leave empty for DHCP allocation.
- Register only, do not boot: Do not reboot into YunionOS. When selected, only partial server information is collected; the server cannot create bare metal until you run Detect hardware configuration.
- Template import: Import an XLSX template that contains physical machine registration information.
Follow the preset format; download the template first.
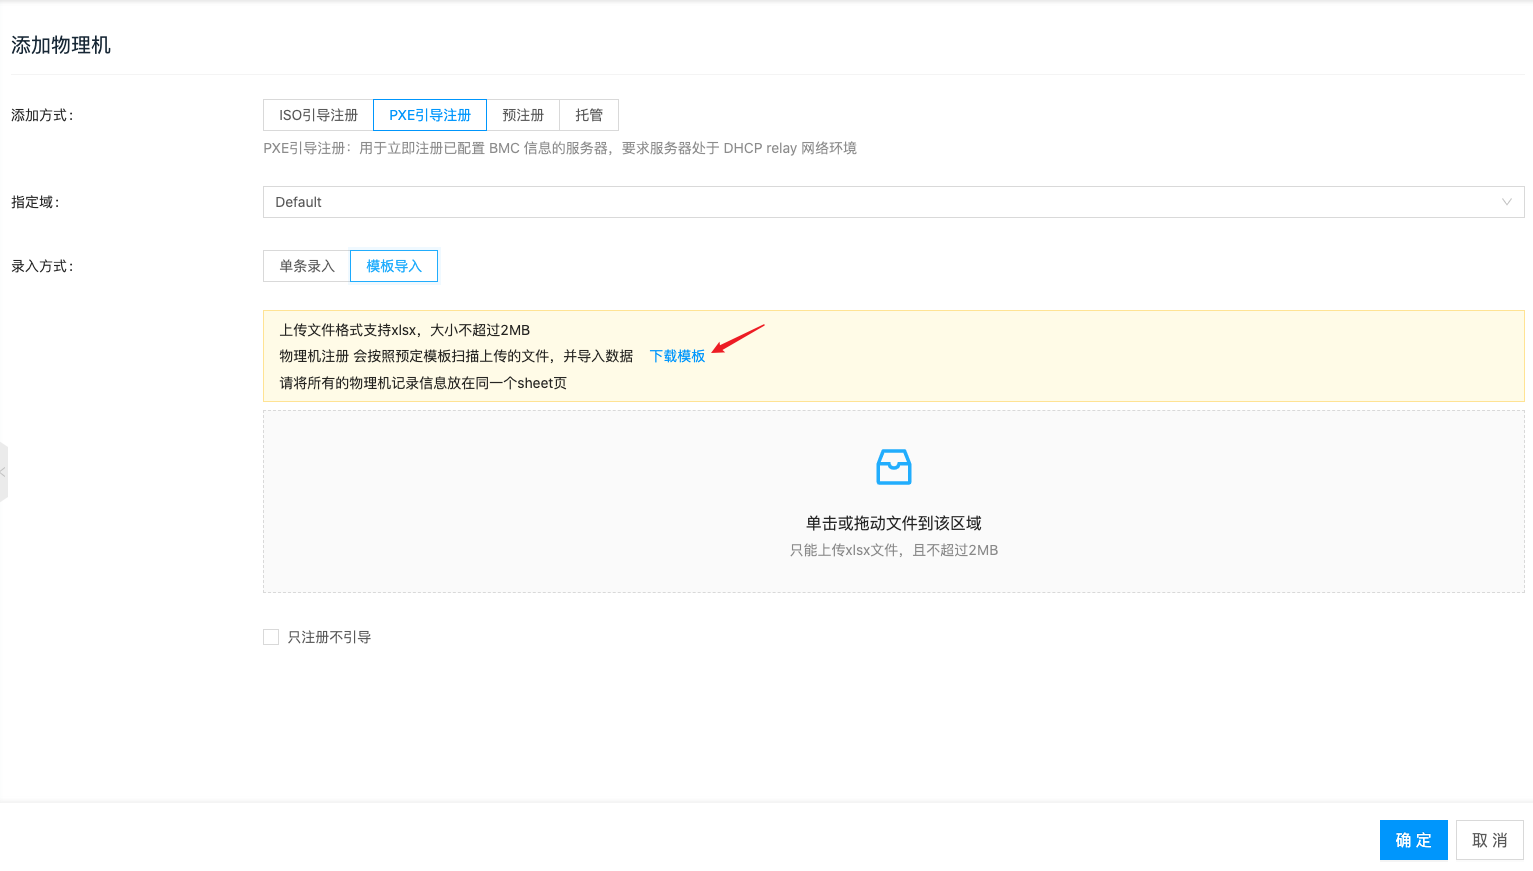
Fill in physical machine information in the downloaded host_template.xlsx. Put all physical machine information on the same sheet.
Click the dashed box or drag the template file into it, then click “OK” to upload.
Register only, do not boot: Do not reboot into YunionOS. When selected, only partial server information is collected; the server cannot create bare metal until you run Detect hardware configuration.
- Single entry: Configure the following parameters.
Click “OK” to complete boot registration.
Pre-register
Pre-rack servers that do not yet have BMC configured. Pre-register only configures related information; actual boot registration happens after the server is set to PXE boot and powered on. Requires a DHCP Relay environment.
If the server already has BMC configured and you choose pre-register, BMC information may be reconfigured during boot to the values set at pre-register time, which may change the server’s BMC settings.
- On the Physical Machines page, click “Add” to open the add page.
- Select the domain and set the add method to “Pre-register”. Three modes are supported.
Single entry: Configure the following parameters.
- Specify domain: Select the domain the physical machine belongs to.
- MAC address: MAC address of the physical machine.
- Physical machine name: Name of the physical machine.
- IPMI address: Set the IPMI address. If omitted and an IPMI IP subnet exists on the platform, the system allocates an IP automatically. For new machines, leave empty; for existing machines, set the previous IP.
- IPMI username: Set the IPMI management username. If omitted, the system defaults to root. For new machines, leave empty; for existing machines, set the previous username.
- IPMI password: Set the IPMI user password. If omitted, the default password is YunionDev@123. For new machines, leave empty; for existing machines, set the previous password.
- When finished, click “OK”.
Batch entry: Note the following.
- One line is one physical machine record; up to 100 records per import.
- Format: “MAC address,name,IPMI address,IPMI username,IPMI password”, separated by English commas “,”. If the password contains a Chinese comma “,”, use single entry instead.
- MAC address and name are required; other parameters can be omitted.
- Example: ee:b3:f4:48:1c:f5,gpuhost01,192.168.1.1,root,admin123
- Example: ee:b3:f4:48:1c:f5,gpuhost01,,, — omits IPMI address, username, and password
- When finished, click “OK”.
Template import: Import an XLSX template that contains physical machine registration information.
Follow the preset format; download the template first.
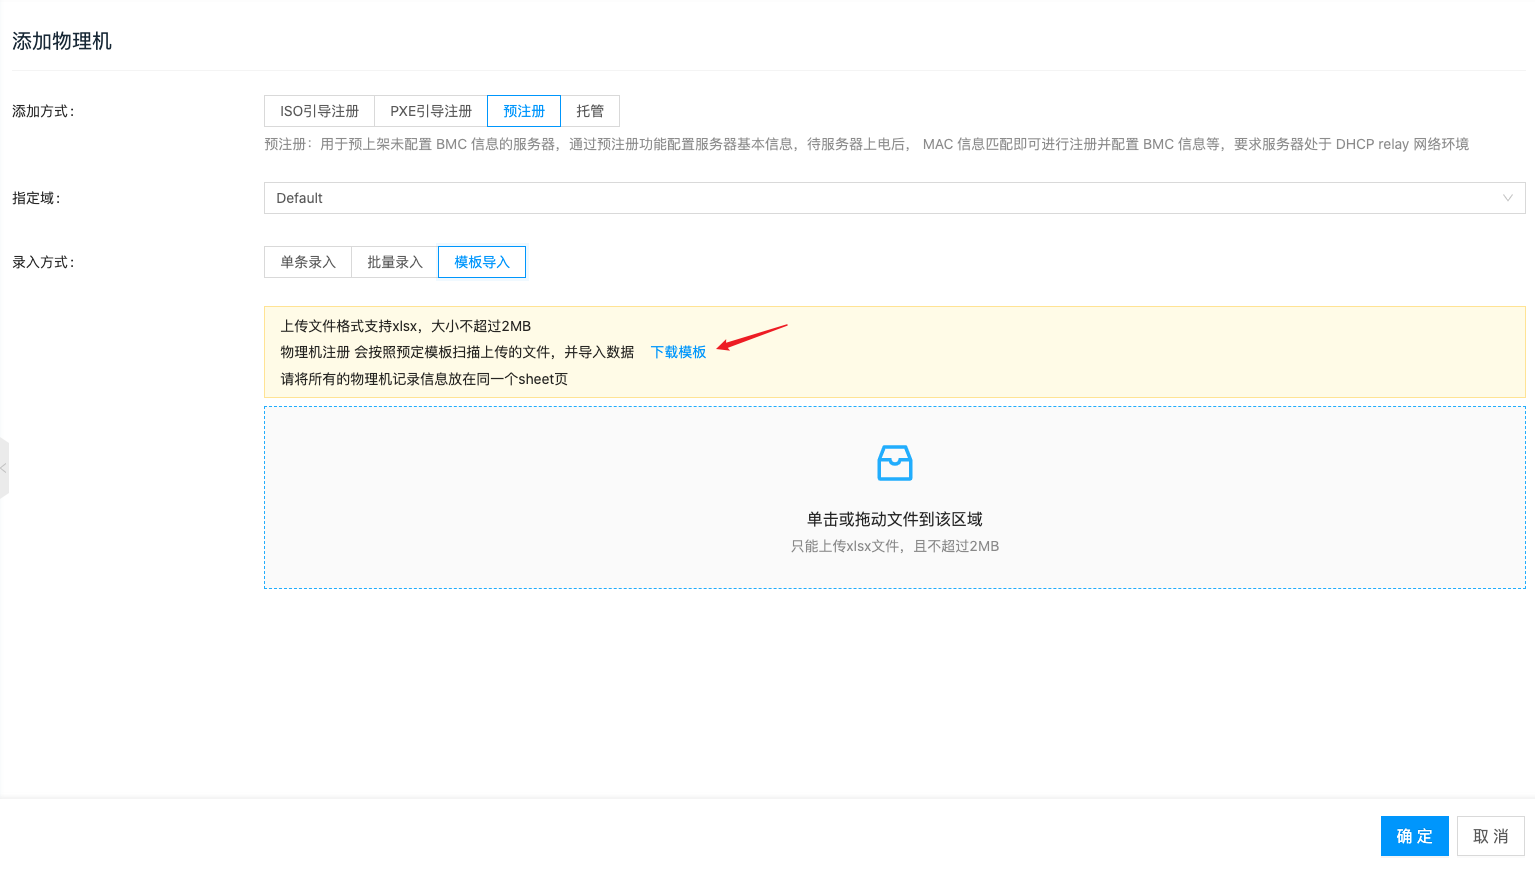
Fill in physical machine information in the downloaded host_template.xlsx. Put all physical machine information on the same sheet.
Click the dashed box or drag the template file into it, then click “OK” to upload.
- After pre-register configuration, an administrator must manually set the server to PXE boot and power it on; the server then completes registration automatically.
Hosted
Manage a server that already has an OS installed. Run the following command on the server so the cloud management platform can manage it; a bare metal server with the same OS configuration is also created in the bare metal list.
Before hosting a server, ensure:
- IP subnets of IPMI type and physical machine type that cover the physical server have been created on the platform;
- The physical server has BMC configured (IPMI address, username, password);
- Port 2222 or a later port is open on the physical server; if 2222 is occupied, open a later port.
The domain of a hosted physical machine depends on the operating user.
On the Physical Machines page, click “Add” to open the add page.
Set the add method to “Hosted”, click “Click to copy”, and run the copied command on the physical machine to be managed.
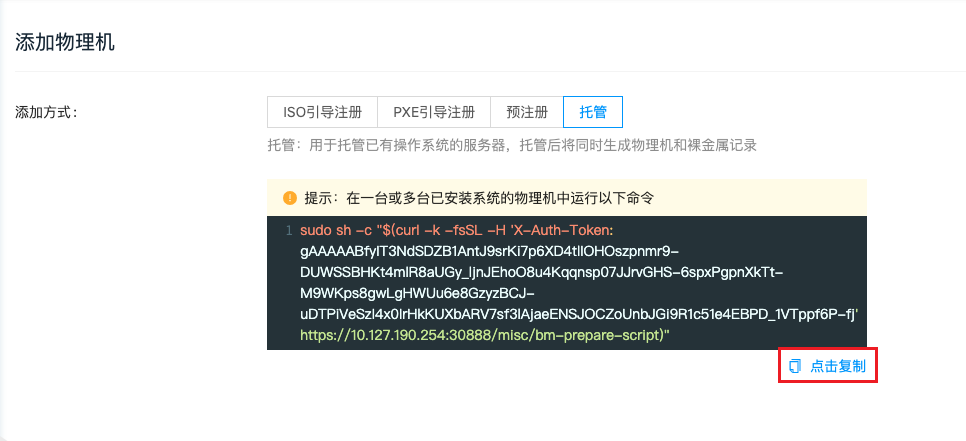
During execution, enter the server IPMI username, password, IPMI IP address, and related information.
After completion, the managed physical machine appears in the list.
Remote control
Connect to a physical machine via SOL (Serial over LAN) or SSH. SOL is remote connection over a serial port. After connecting, log in with the username and password from the Initial account column.
- On the Physical Machines page, click “Remote control” in the Actions column, then select “SOL remote control” to connect via SOL.
- Click “Remote control” in the Actions column, then select “SSH IP address” to open a web SSH connection.
- If port 22 is occupied and SSH uses another port, select “SSH IP address: custom port”, set the port in the dialog, then click “OK”.
- Click “Remote control” in the Actions column, then select “Java console” to download and open the JNLP file and connect.
Enable
Enable a physical machine that is disabled. Enabled physical machines are used to create bare metal servers.
Enable one
- On the physical machine page, click “More” in the row actions for the target physical machine, then choose “Enable”.
- Confirm the action.
Enable in batch
- In the physical machine list, select one or more physical machine (disabled), then click “Enable” above the list.
- Confirm the action.
Disable
Disable a physical machine that is enabled. Disabled physical machines cannot create bare metal servers.
Disable one
- On the physical machine page, click “More” in the row actions for the target physical machine, then choose “Disable”.
- Confirm the action.
Disable in batch
- In the physical machine list, select one or more physical machine (enabled), then click “Disable” above the list.
- Confirm the action.
Adjust scheduling tags
Bind scheduling tags to a physical machine. Physical machines with scheduling tags are scheduled to create bare metal servers according to scheduling policies.
Adjust scheduling tags one
- On the physical machine page, click “More” in the row actions for the target physical machine, then choose “Adjust scheduling tags”.
- Confirm the action.
Adjust scheduling tags in batch
- In the physical machine list, select one or more physical machine, then click “Adjust scheduling tags” above the list.
- Confirm the action.
Sync status
Sync the running status of the physical machine OS. Stopped physical machines do not support sync status.
Sync status one
- On the physical machine page, click “More” in the row actions for the target physical machine, then choose “Sync status”.
- Confirm the action.
Sync status in batch
- In the physical machine list, select one or more physical machine, then click “Sync status” above the list.
- Confirm the action.
Install OS
Create a bare metal device.
- Click “More” in the Actions column, then select “Install OS” to open the create bare metal page.
- Set the following parameters:
Name: Bare metal device name.
Quantity and specification: Because bare metal exclusively uses the physical machine, quantity and specification cannot be changed.
Operating system:
- Public image: Linux public images in the system image list, maintained by administrators.
- Custom image: Linux custom images in the system image list, usually uploaded by users.
- Boot from ISO: Linux OS images in ISO format in the system image list. When selecting an ISO, the user must install the OS for the bare metal server.
Disk configuration: Click “Add disk” to open the create disk configuration dialog.
Select the disk type on the physical machine (HDD:3.6TiB means a 3.6 TiB HDD), set RAID (No RAID, RAID0, RAID1, RAID5, RAID10)
Set the disk count, that is, how many disks of the same configuration are used for RAID. RAID0 uses 100% of disk capacity; RAID1 with 2 disks uses 50%; RAID5 with 3 or more disks uses (n-1)/n; RAID10 with 4 or more disks uses 50%.
- RAID0 and No RAID have no disk count requirement;
- RAID1 requires at least 2 identical disks;
- RAID5 requires at least 3 identical disks;
- RAID10 requires at least 4 identical disks;
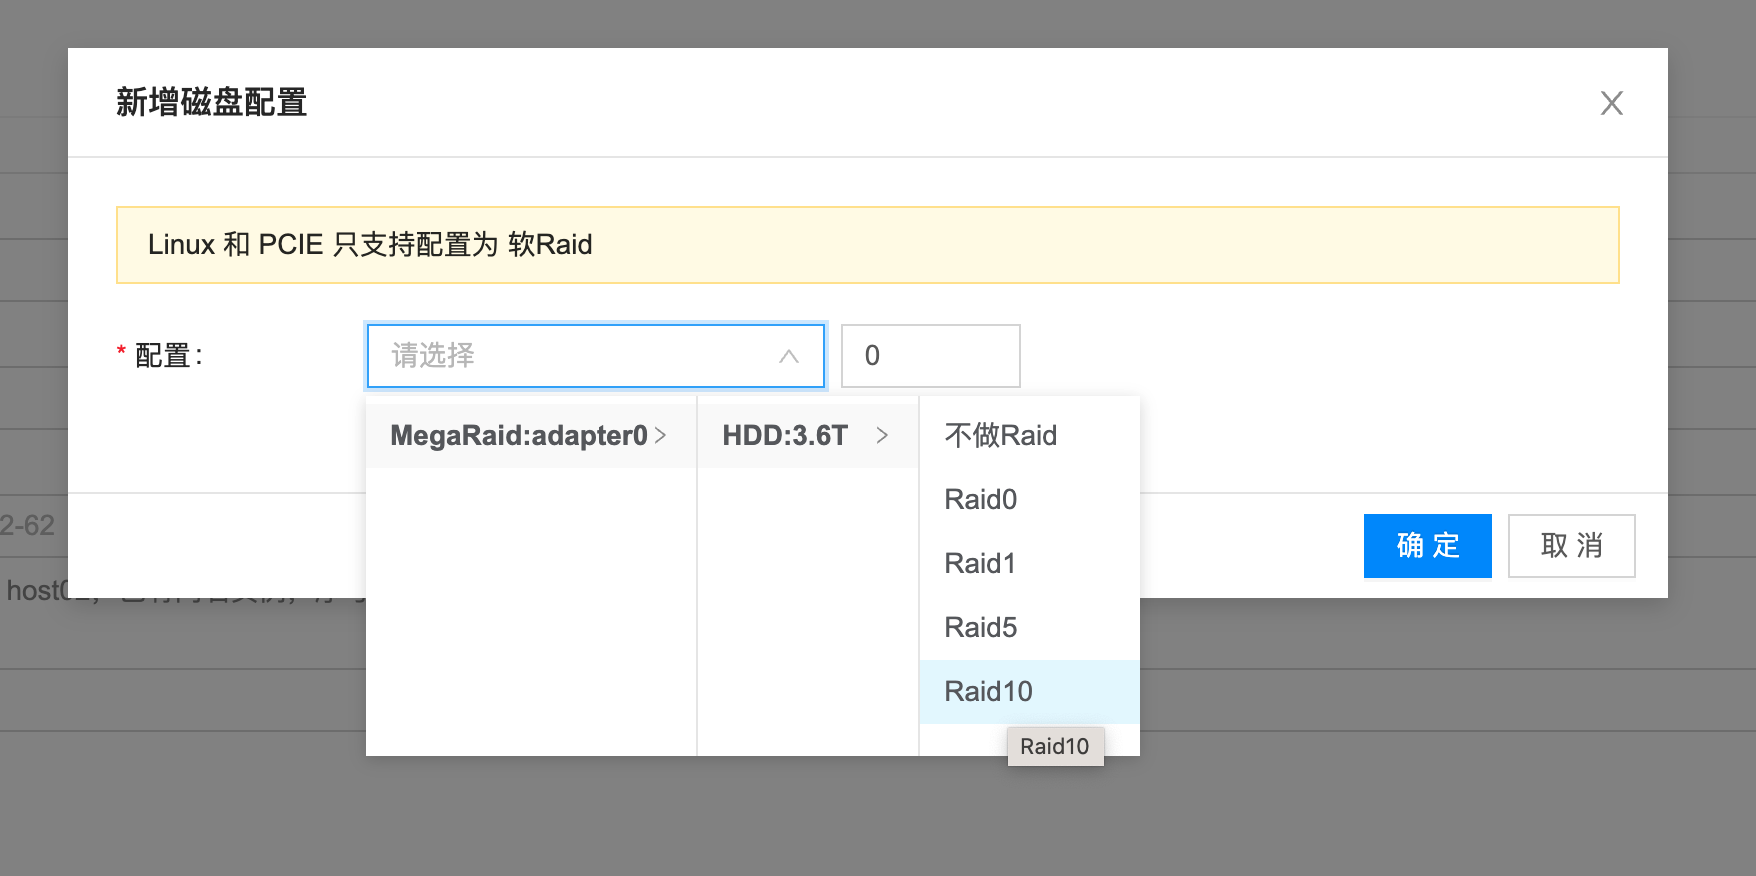
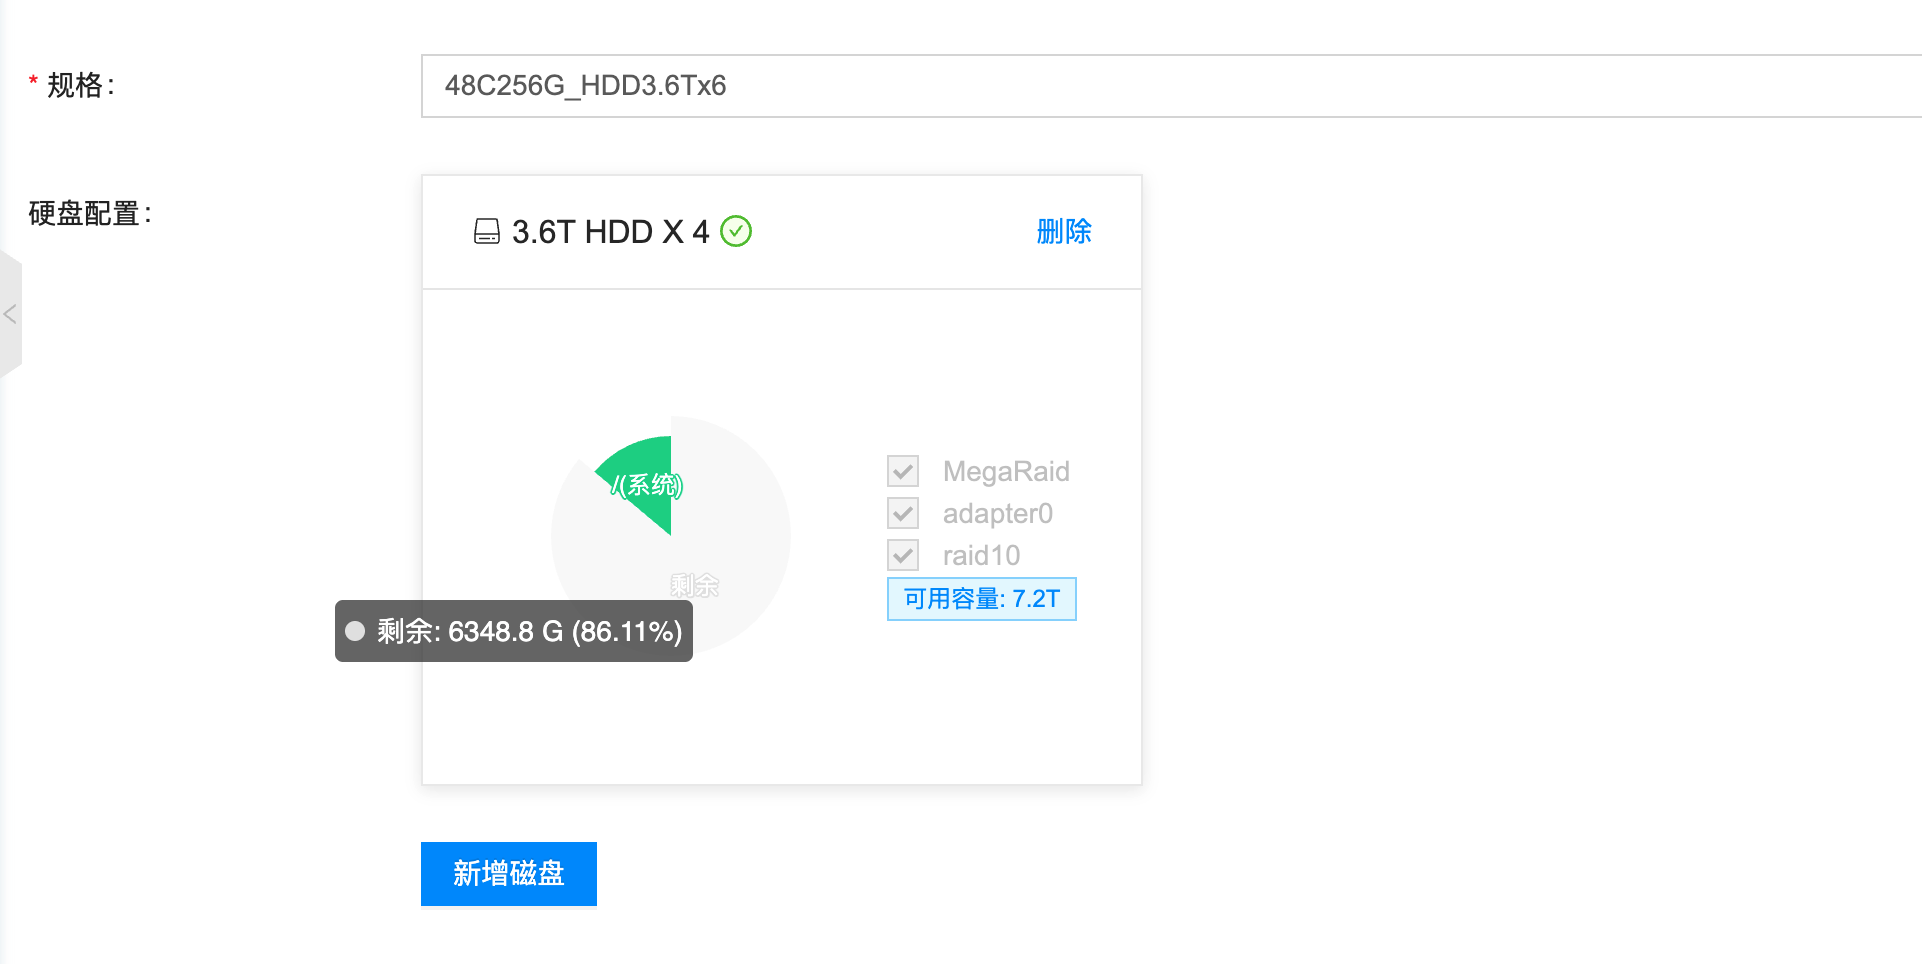
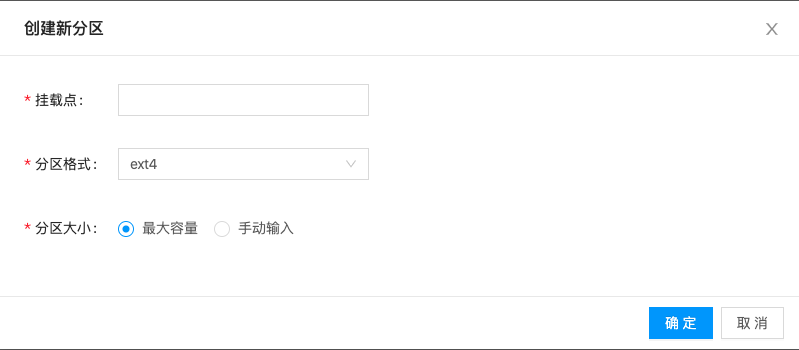
After RAID configuration, partition names and sizes are shown. You can modify partitions on the UI: click the yellow “System partition” area or the “Pending partition” area. Partition parameters:
- Mount point: Partition mount point; the system partition defaults to “/”.
- Partition format: ext4, xfs, ntfs, or swap.
- Partition size: Maximum capacity or manual input. Maximum capacity uses all disk space; manual input sets size in GB.
Network: Set the bare metal IP address. When two NICs connected by cable need bonding, select “Enable bonding”.
When a physical machine has exactly two cabled NICs, they are bonded automatically. When there are more than two cabled NICs, bonding results are unpredictable; proceed with caution.
    - **Specify IP subnet**: Select an IP subnet. To use a static IP, click “Configure IP manually”, set the address, then click “OK”.
    - **Specify scheduling tags**: Set scheduling tags and preferences. Preferences override the default strategy on the tag. The optimal IP subnet is chosen by tags and preferences.

- **Administrator password**: Set the administrator password (root on Linux, administrator on Windows).
    - **Random generate**: Generate a random password; users can view and copy it in the password column of the physical machine list.
    - **Associate key**: Linux only. Create an SSH key under “Network - Keys” first. After association, log in with the SSH key pair.
    - **Keep image settings**: Use the administrator password already in the image.
    - **Manual input**: Set the administrator password manually.
- **Description**: Set remarks for the bare metal.
- Click “Create” to create the bare metal device.
Convert to host
Convert a physical machine to a host. Physical machines create bare metal servers; hosts create VMs.
Preparation
- A host is a compute node with the host service installed. When converting a physical machine to a host on the cloud management platform, use the dedicated host image provided by our company.
- Upload that image to the management platform and record its image ID.
- On the control node, use climc to set the default image for converting physical machines to hosts.
# Set the default image ID
$ climc service-config --config convert_hypervisor_default_template=a9b67435-8c08-4063-8ea6-d885ea26aa79 region2
- When converting, you can select disk RAID settings directly, or use custom settings to choose the host image.
Steps
- On the Physical Machines page, click “More” in the Actions column, then select “Convert to host”. The convert to host dialog appears.
- Configure the following parameters:
- Host name: Defaults to the physical machine name; can be changed.
- Host type: Currently only KVM hosts are supported.
- Disk RAID configuration: Default (highest redundancy), RAID-1/RAID-10 (2× redundancy), RAID-5 (1.x× redundancy), RAID-0 (no redundancy), or custom.
- When the physical machine has only one RAID controller and that controller has 4 or more identical disks, all options above are supported;
- When disk RAID configuration is not “Custom”, the image used for conversion is the one set in region.conf on the control node, and NIC bonding is not supported.
- When disks of different sizes exist on the physical machine, only custom configuration is supported;
- When selecting Default (highest redundancy), RAID-1/RAID-10 (2× redundancy), RAID-5 (1.x× redundancy), or RAID-0 (no redundancy), configure network information and whether to enable bonding.
   - **Network**: Set the host IP address. When two cabled NICs need bonding, select “Enable bonding”.
When a physical machine has exactly two cabled NICs, they are bonded automatically. When there are more than two cabled NICs, bonding results are unpredictable; proceed with caution.
      - **Specify IP subnet**: Select an IP subnet. To use a static IP, click “Configure IP manually”, set the address, then click “OK”.
      - **Specify scheduling tags**: Set scheduling tags and preferences. Preferences override the default strategy on the tag. The optimal IP subnet is chosen by tags and preferences.
- When selecting custom configuration, choose a disk image, add disks in custom disk configuration, select disks and RAID, set network information, and choose whether to bond.
- **Image**: For custom settings, set the image to the dedicated host image.
- **Custom disk configuration**: Click “Add disk” to open the create disk configuration dialog.
- Select the disk type on the physical machine (HDD:3.6TiB means a 3.6 TiB HDD), set RAID (No RAID, RAID0, RAID1, RAID5, RAID10)
- Set the disk count for RAID. RAID0 uses 100% of disk capacity; RAID1 with 2 disks uses 50%; RAID5 with 3 or more disks uses (n-1)/n; RAID10 with 4 or more disks uses 50%.
- RAID0 and No RAID have no disk count requirement;
- RAID1 requires at least 2 identical disks;
- RAID5 requires at least 3 identical disks;
- RAID10 requires at least 4 identical disks;


- Click “OK” to show partition names and sizes. You can modify partitions on the UI: click the yellow “System partition” area or the “Pending partition” area. Partition parameters:
- **Mount point**: Partition mount point; the storage pool default is “/opt/cloud/workspace”.
- **Partition format**: ext4, xfs, ntfs, or swap.
- **Partition size**: Maximum capacity or manual input. Maximum capacity uses all disk space; manual input sets size in GB.

- **Network**: Set the host IP address. When two cabled NICs need bonding, select “Enable bonding”.
When a physical machine has exactly two cabled NICs, they are bonded automatically. When there are more than two cabled NICs, bonding results are unpredictable; proceed with caution.
- **Specify IP subnet**: Select an IP subnet. To use a static IP, click “Configure IP manually”, set the address, then click “OK”.
- **Specify scheduling tags**: Set scheduling tags and preferences. Preferences override the default strategy on the tag. The optimal IP subnet is chosen by tags and preferences.
- Click “OK” to convert the physical machine to a host.
Verify IPMI information
Verify whether IPMI information is configured correctly and whether IPMI over LAN is enabled. When management fails due to IPMI configuration issues, after you fix IPMI settings you can use Verify IPMI to check them; if correct, the physical machine is managed again.
Verify IPMI information one
- On the physical machine page, click “More” in the row actions for the target physical machine, then choose “Verify IPMI information”.
- Confirm the action.
Verify IPMI information in batch
- In the physical machine list, select one or more physical machine, then click “Verify IPMI information” above the list.
- Confirm the action.
Detect hardware configuration
Sync and obtain hardware configuration of the physical machine. When you selected “Register only, do not boot” while adding, use Detect hardware configuration so the physical machine can be used normally.
Detect hardware configuration one
- On the physical machine page, click “More” in the row actions for the target physical machine, then choose “Detect hardware configuration”.
- Confirm the action.
Detect hardware configuration in batch
- In the physical machine list, select one or more physical machine, then click “Detect hardware configuration” above the list.
- Confirm the action.
Power on
Power on a physical machine that is stopped.
Power on one
- On the physical machine page, click “More” in the row actions for the target physical machine, then choose “Power on”.
- Confirm the action.
Power on in batch
- In the physical machine list, select one or more physical machine (stopped), then click “Power on” above the list.
- Confirm the action.
Power off
Power off a physical machine that is running. Not supported when the physical machine is already allocated to bare metal.
Power off one
- On the physical machine page, click “More” in the row actions for the target physical machine, then choose “Power off”.
- Confirm the action.
Power off in batch
- In the physical machine list, select one or more physical machine (running), then click “Power off” above the list.
- Confirm the action.
Enter maintenance mode
Put a physical machine that has been allocated to bare metal into the offline system (yunionos network-boot mini system). In the offline system, administrators can change partitions, rebuild RAID, change passwords, and more. Unallocated physical machines are already in the offline system by default.
Enter maintenance mode one
- On the physical machine page, click “More” in the row actions for the target physical machine, then choose “Enter maintenance mode”.
- Confirm the action.
Enter maintenance mode in batch
- In the physical machine list, select one or more physical machine, then click “Enter maintenance mode” above the list.
- Confirm the action.
Exit maintenance mode
Exit maintenance mode.
Exit maintenance mode one
- On the physical machine page, click “More” in the row actions for the target physical machine, then choose “Exit maintenance mode”.
- Confirm the action.
Exit maintenance mode in batch
- In the physical machine list, select one or more physical machine, then click “Exit maintenance mode” above the list.
- Confirm the action.
Delete
Delete a physical machine. Only unallocated and disabled physical machines can be deleted.
Delete one
- On the physical machine page, click “More” in the row actions for the target physical machine, then choose “Delete”.
- Confirm the action.
Delete in batch
- In the physical machine list, select one or more physical machine, then click “Delete” above the list.
- Confirm the action.
Tag management
See Multi-cloud Management - Tag Management.
View physical machine details
View detailed information about a physical machine.
- On the Physical Machines page, click a physical machine name to open details.
- The top menu supports remote control, enable, disable, adjust tags, sync status, install OS, convert to host, detect hardware configuration, power on, power off, enter maintenance mode, exit maintenance mode, delete, and more.
- View physical machine details.
- Basic info: Cloud ID, ID, name, status, domain, project, share scope, enabled status, maintenance mode, IP, allocation, MAC address, scheduling tags, host version, hardware virtualization, ISO boot, region, availability zone, cloud account, created at, updated at, and description.
- Brand info: Brand name, model, and serial number.
- CPU: CPU cores, sockets, overcommit ratio, current overcommit ratio, and description.
- Memory: Memory capacity, system reserved, overcommit ratio, and current overcommit ratio.
- Storage: Storage capacity, type, current overcommit ratio, invalid storage, and adapter information.
- Network interfaces: All NIC information: IP address, MAC address, subnet mask, type, and speed.
View bare metal server information on the physical machine
View bare metal servers on the physical machine and manage them.
- On the physical machine details page, click the “Bare metal servers” tab.
- View bare metal server information and manage them. For details, see Bare metal.
View physical machine network information
View network information of the physical machine.
- On the physical machine details page, click the “Network” tab.
- View network information: index, MAC address, NIC type, IP address, IP subnet, and Layer 2 network. A green MAC indicates the cable is plugged in.
- When a NIC has no allocated IP, you can set a Layer 2 network. Click “Set Layer 2 network” in the Actions column, select a Layer 2 network in the dialog, then click “OK”.
View physical machine storage information
View storage information on the physical machine.
- On the physical machine details page, click the “Storage” tab.
- View storage information: name, capacity, allocated, wasted, storage type, enabled, and mount point.
View physical machine GPUs
View GPU devices on the physical machine.
- On the physical machine details page, click the “GPU” tab.
- View GPU information: device type, device model, and physical machine.
View physical machine monitoring
View monitoring information for the physical machine.
- On the physical machine details page, click the “Monitoring” tab.
- View the following monitoring information.
- Line charts for the last 1 hour, 3 hours, and 6 hours: CPU usage, system load, memory usage, memory usage details, disk usage, disk usage details, disk IO usage, disk IOPS, network inbound traffic, and network outbound traffic.
- CPU usage: CPU usage, CPU idle, user-space CPU, kernel-space CPU, and I/O wait share.
- System load: 1/5/15-minute average load, and average load per CPU core for 1/5/15 minutes.
- Memory usage: Memory used, free, and total.
- Disk usage: Disk used, free, and total.
- Disk IOPS: Average read IOPS and write IOPS per second.
- Line charts for the last 1 hour, 3 hours, and 6 hours: CPU usage, system load, memory usage, memory usage details, disk usage, disk usage details, disk IO usage, disk IOPS, network inbound traffic, and network outbound traffic.
- You can set monitoring alerts for the metrics above.
- Click “Set monitoring alert” to the right of a metric. The create monitoring alert dialog appears.
- The metric is fixed. Set query period, comparison operator, threshold, alert level, alert method, and recipients, then click “OK” to create the alert.
View physical machine hardware logs
View hardware logs of the physical machine.
- On the physical machine details page, click the “Hardware logs” tab.
- Set an end time to query hardware logs before that time.
- When there are many logs, click “Load more” below the list.
View physical machine operation logs
- On the physical machine page, click the physical machine name to open details.
- Click the “Operation logs” tab.
- Load more: 20 logs by default; click “Load more” for more
- View details: click “View” in the row actions
- Time filter: set start/end dates to query a time range
- Export logs: click the download icon to export logs on this page