DaemonSets
A DaemonSet ensures that a copy of a Pod runs on all (or some) nodes. When nodes join the cluster, a Pod is also added for them. When nodes are removed from the cluster, those Pods are reclaimed. Deleting a DaemonSet deletes all Pods it created.
Typical uses of a DaemonSet include:
- Running a cluster storage daemon on every node
- Running a log collection daemon on every node
- Running a monitoring daemon on every node
Entry: On the cloud management platform, click the  navigation menu in the upper left corner, then click “Resource Management/Kubernetes/Applications/DaemonSets” in the left sidebar to open the DaemonSets page.
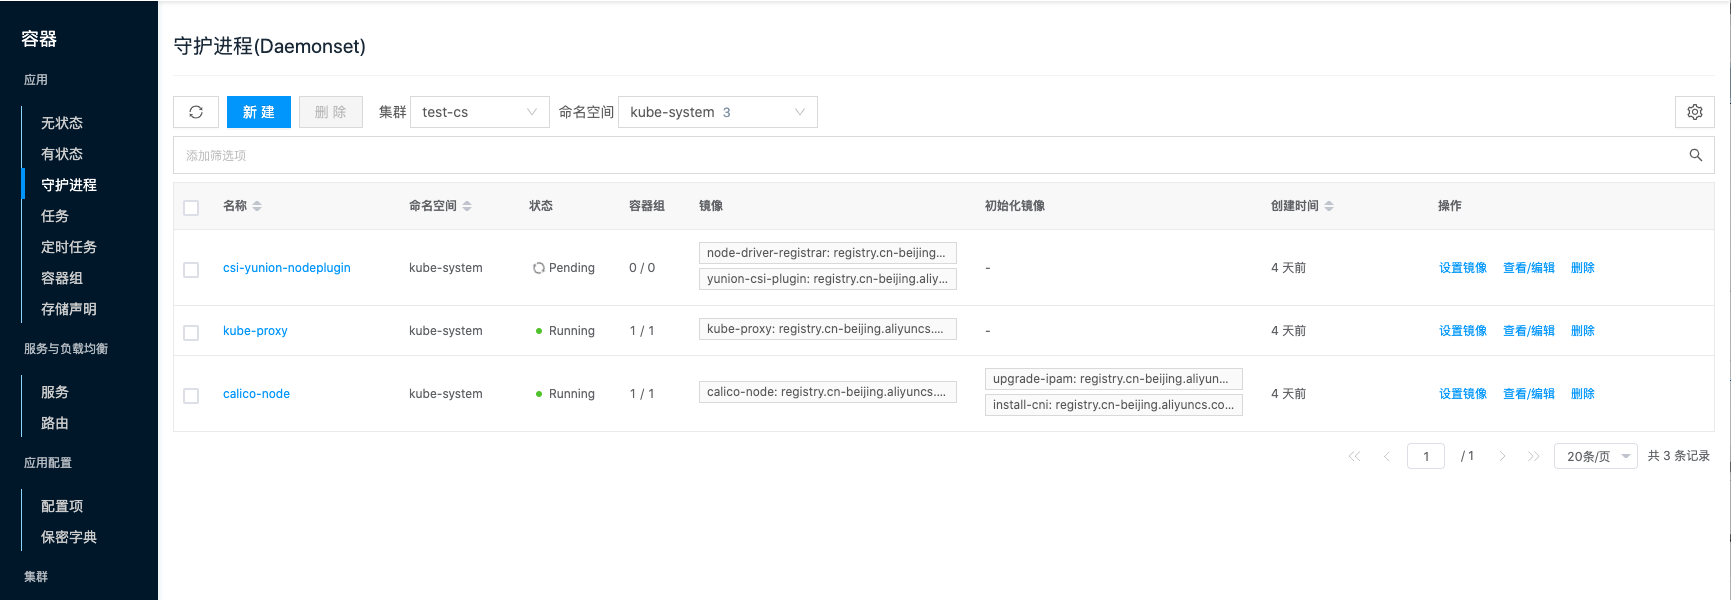
View daemon sets
This feature filters daemon set information by cluster and namespace.
On the DaemonSets page, daemon sets under all namespaces of one cluster are shown by default.
When multiple clusters exist in the environment, click the input box to the right of Cluster above the list, select another cluster, and view daemon sets under all namespaces of that cluster.
When multiple namespaces exist under a cluster, click the input box to the right of Namespace above the list, select a namespace, and view daemon sets under the specified namespace.

Create a daemon set
This feature creates a DaemonSet from an image. A pod created by the daemon set runs on every node.
On the DaemonSets page, click “Create” above the list to open the create daemon set page.
Set the following parameters:
- Name: The name of the Deployment.
- Cluster: Select the cluster that the daemon set belongs to.
- Namespace: Select the namespace that the daemon set belongs to. Namespaces logically isolate a cluster. Deployments, pods, services, and other resources belong to a namespace. On the cloud management platform, a namespace corresponds to a project. After a Kubernetes cluster is created, the default, kube-system, kube-public, and other namespaces are created by default.
- Number of pods: Set the number of Pods, corresponding to the spec.replicas value in the YAML file.
- Image secret: Required when accessing a private registry. You can create a new secret or select an existing one.
- Service: Set how the daemon set and pods are accessed, including access within the cluster and from outside the cluster.
- Internal: Automatically generates a ClusterIP for access within the cluster and between pods.
- Target port: The port on the pod.
- Service port: The port used by users to access the service.
- Protocol: Select the protocol used by the application, including TCP and UDP.
- External: Used with the load balancer feature for access from outside the cluster. Before using an external service, create a load balancer cluster and nodes under Load Balancer. Creating an external service also creates a load balancer instance under Load Balancer.
- Load balancer network: Select an IP subnet. The system automatically allocates an IP address from the subnet as the access IP.
- Target port: The port on the pod.
- Service port: The port used by external users to access the service.
- Protocol: Select the protocol used by the application, including TCP and UDP.
- Internal: Automatically generates a ClusterIP for access within the cluster and between pods.
- Restart policy: Only Always is supported, meaning containers are always restarted when they exit.
- Advanced settings: Configure labels and notes as needed.
- Labels: Custom labels for the daemon set.
- Notes: Custom notes for the daemon set.
- Containers: You can create one or more containers for the daemon set as needed. Click
to add multiple different containers. Name: Custom container name.
Container image: If you enter only an image name, the image from Docker Hub is used by default. To use a private registry image, set registry/image. In this example, enter nginx directly.
CPU/Memory: Set the CPU and memory allocated to the container.
Container command and command arguments: Set the container command and arguments. The container command corresponds to spec.containers.command, and arguments correspond to spec.containers.args. For example, if the YAML file has command: [“perl”, “-Mbignum=bpi”, “-wle”, “print bpi(2000)”], enter the following in the container command field on the form.
$ perl -Mbignum=bpi -wle print bpi(2000)Volumes: Set persistent volume claims and mount points for containers in the Pod as key-value pairs. You must create the persistent volume claim in the namespace under the cluster in advance.
Environment variables: Configure environment variables for the Pod as key-value pairs. Used to add environment flags or pass configuration to the Pod.
Privileged mode: Processes inside a privileged container have the same privileges as processes outside the container.
Click “Deploy” to deploy the nginx application.
Set image
This feature modifies the container image of a daemon set.
- On the DaemonSets page, click “Set image” in the Actions column for the daemon set to open the set image dialog.
- Set the image, then click “OK” to update the application container image.
View/Edit
This feature views or edits the YAML file of a daemon set.
- On the DaemonSets page, click “View/Edit” in the Actions column for the daemon set to open the view/update dialog.
- You can view and edit the YAML file information of the daemon set.
- After editing the YAML file, click “OK” for the changes to take effect.
Delete a daemon set
This feature deletes a daemon set and the pods created by the daemon set.
Delete one
- On the DaemonSets page, click “Delete” in the Actions column for the daemon set to open the confirmation dialog.
- Click “OK” to delete the daemon set and related resources.
Delete multiple
- In the daemon set list, select one or more daemon sets, then click “Delete” above the list to open the confirmation dialog.
- Click “OK” to delete the daemon sets and related resources.
View daemon set details
This feature views detailed information about a daemon set.
- On the DaemonSets page, click the daemon set name to open the daemon set details page.
- View the following information: external ID, ID, name, status, cluster, namespace, pods, image, init image, labels, creation time, and more.
View pods
This feature views pods created by a daemon set and supports managing pods.
View/Edit
This feature views the YAML file of a pod.
- On the DaemonSets page, click the daemon set name to open the daemon set details page.
- Click the “Pods” tab to open the pods page.
- Click “View/Edit” in the Actions column for the pod to open the view/update dialog.
- You can view and edit the YAML file information of the daemon set.
- After editing the YAML file, click “OK” for the changes to take effect.
Delete
This feature deletes a pod. After a pod is deleted, a new pod is redeployed according to the YAML settings.
- On the DaemonSets page, click the daemon set name to open the daemon set details page.
- Click the “Pods” tab to open the pods page.
- Click “Delete” in the Actions column for the pod to open the confirmation dialog.
- Click “OK” to complete the operation.
View events
This feature records events that occur on a resource object, including content, source, reason, and creation time, for troubleshooting.
- On the DaemonSets page, click the daemon set name to open the daemon set details page.
- Click the “Events” tab to open the events page.
- View the event content, source, reason, creation time, and more.
View source
This feature views and edits the YAML information of a daemon set.
- On the DaemonSets page, click the daemon set name to open the daemon set details page.
- Click the “Source” tab to open the source page.
- Click “Copy content” to copy the YAML file information of the node.
- After updating the YAML file, click “Update”.
View operation logs
This feature views operation logs related to a daemon set.
- On the DaemonSets page, click the daemon set name to open the daemon set details page.
- Click the “Operation Logs” tab to open the operation logs page.
- Load more logs: The list displays 20 operation log entries by default. To view more, click “Load more”.
- View log details: Click “View” in the Actions column to view log details. You can copy the detail content.
- View logs for a specific time range: To view operation logs for a time range, set the start and end dates in the upper right of the list and query.
- Export logs: Currently only logs displayed on the current page can be exported. Click the
 icon in the upper right corner, set the columns to export in the Export data dialog, and click “OK”.