Elastic IP
An Elastic IP is a NAT IP that, when bound to a virtual machine, maps the elastic IP to the VM’s private address so the VM can communicate with the public network. One Elastic IP can be bound to only one virtual machine.
Elastic IPs are of two types:
- Elastic IP (elastic_ip): Supports bind/unbind and can be dynamically allocated to different resources
- Public IP (public_ip): Created when binding to a resource; unbind is not supported
Entry: On the cloud management platform, click the  navigation menu in the upper-left corner, then in the left menu that appears click “Resource Management / Network / Network Services / Elastic IP” to open the Elastic IP page.
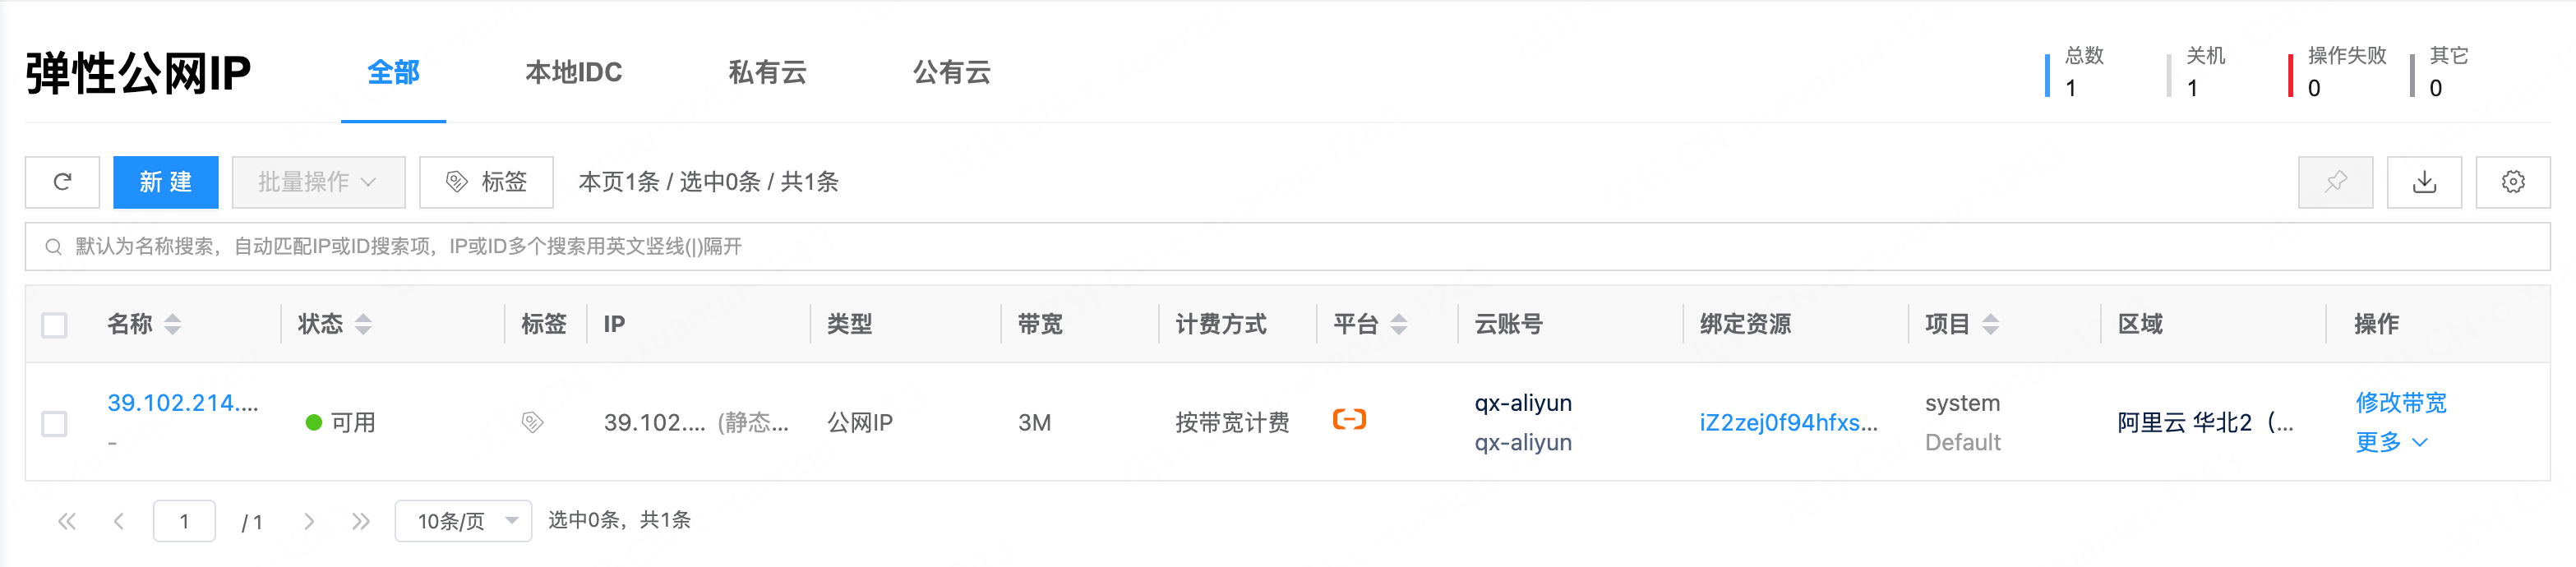
List Field Descriptions
| Field | Description |
|---|---|
| Name | Elastic IP name; click to open the details page |
| Status | Current EIP status, including ready, binding, and more |
| Tags | User-defined tags |
| IP | Elastic IP address and line type |
| Type | Elastic IP (elastic_ip) or public IP (public_ip) |
| Bandwidth | Bandwidth size in Mbps |
| Billing Method | Billed by traffic or by bandwidth |
| Platform | Cloud platform brand |
| Cloud Account | Cloud account name and Owner |
| Bound Resource | Name of the resource bound to the EIP |
| Project | Owning project |
| Region | Owning region |
| Creation Time | Creation time |
Create Elastic IP
This feature is used to create an Elastic IP. At the top of the page, switch among the Local IDC, Private Cloud, and Public Cloud tabs to create Elastic IPs on different platforms.
Create Local IDC Elastic IP
Prerequisites: An IP subnet of the Elastic IP type has already been created.
- On the Elastic IP page, click “Create” to open the create page.
- Configure the following information:
| Field | Description |
|---|---|
| Domain/Project | Administrators and domain administrators must specify the domain and project for the EIP |
| Name | Set the Elastic IP name |
| Description | Optional. Enter EIP description |
| Region | Select the region for the EIP |
| Line Type | Optional. Filter IP subnets by line type |
| Specify IP Subnet | Select VPC and IP subnet. Manual static IP configuration is supported |
| Billing Method | Only billed by bandwidth is supported |
| Peak Bandwidth | Valid range: 1–10000 Mbps |
| Tags | Optional. Set user tags |
- Click “OK” to complete the operation.
Create Private Cloud Elastic IP
Prerequisites: A cloud account for the corresponding platform already exists.
- On the Elastic IP page, switch to the Private Cloud tab, then click “Create”.
- Configure the following information:
| Field | Description |
|---|---|
| Domain/Project | Administrators and domain administrators must specify the domain and project for the EIP |
| Name | Set the Elastic IP name |
| Description | Optional. Enter EIP description |
| Region | Select the region for the EIP |
| Specify IP Subnet | Select VPC and IP subnet. Manual static IP configuration is supported |
| Cloud Account | Specify the cloud account used to create the EIP (available only on some platforms) |
| Tags | Optional. Set user tags |
- Click “OK” to complete the operation.
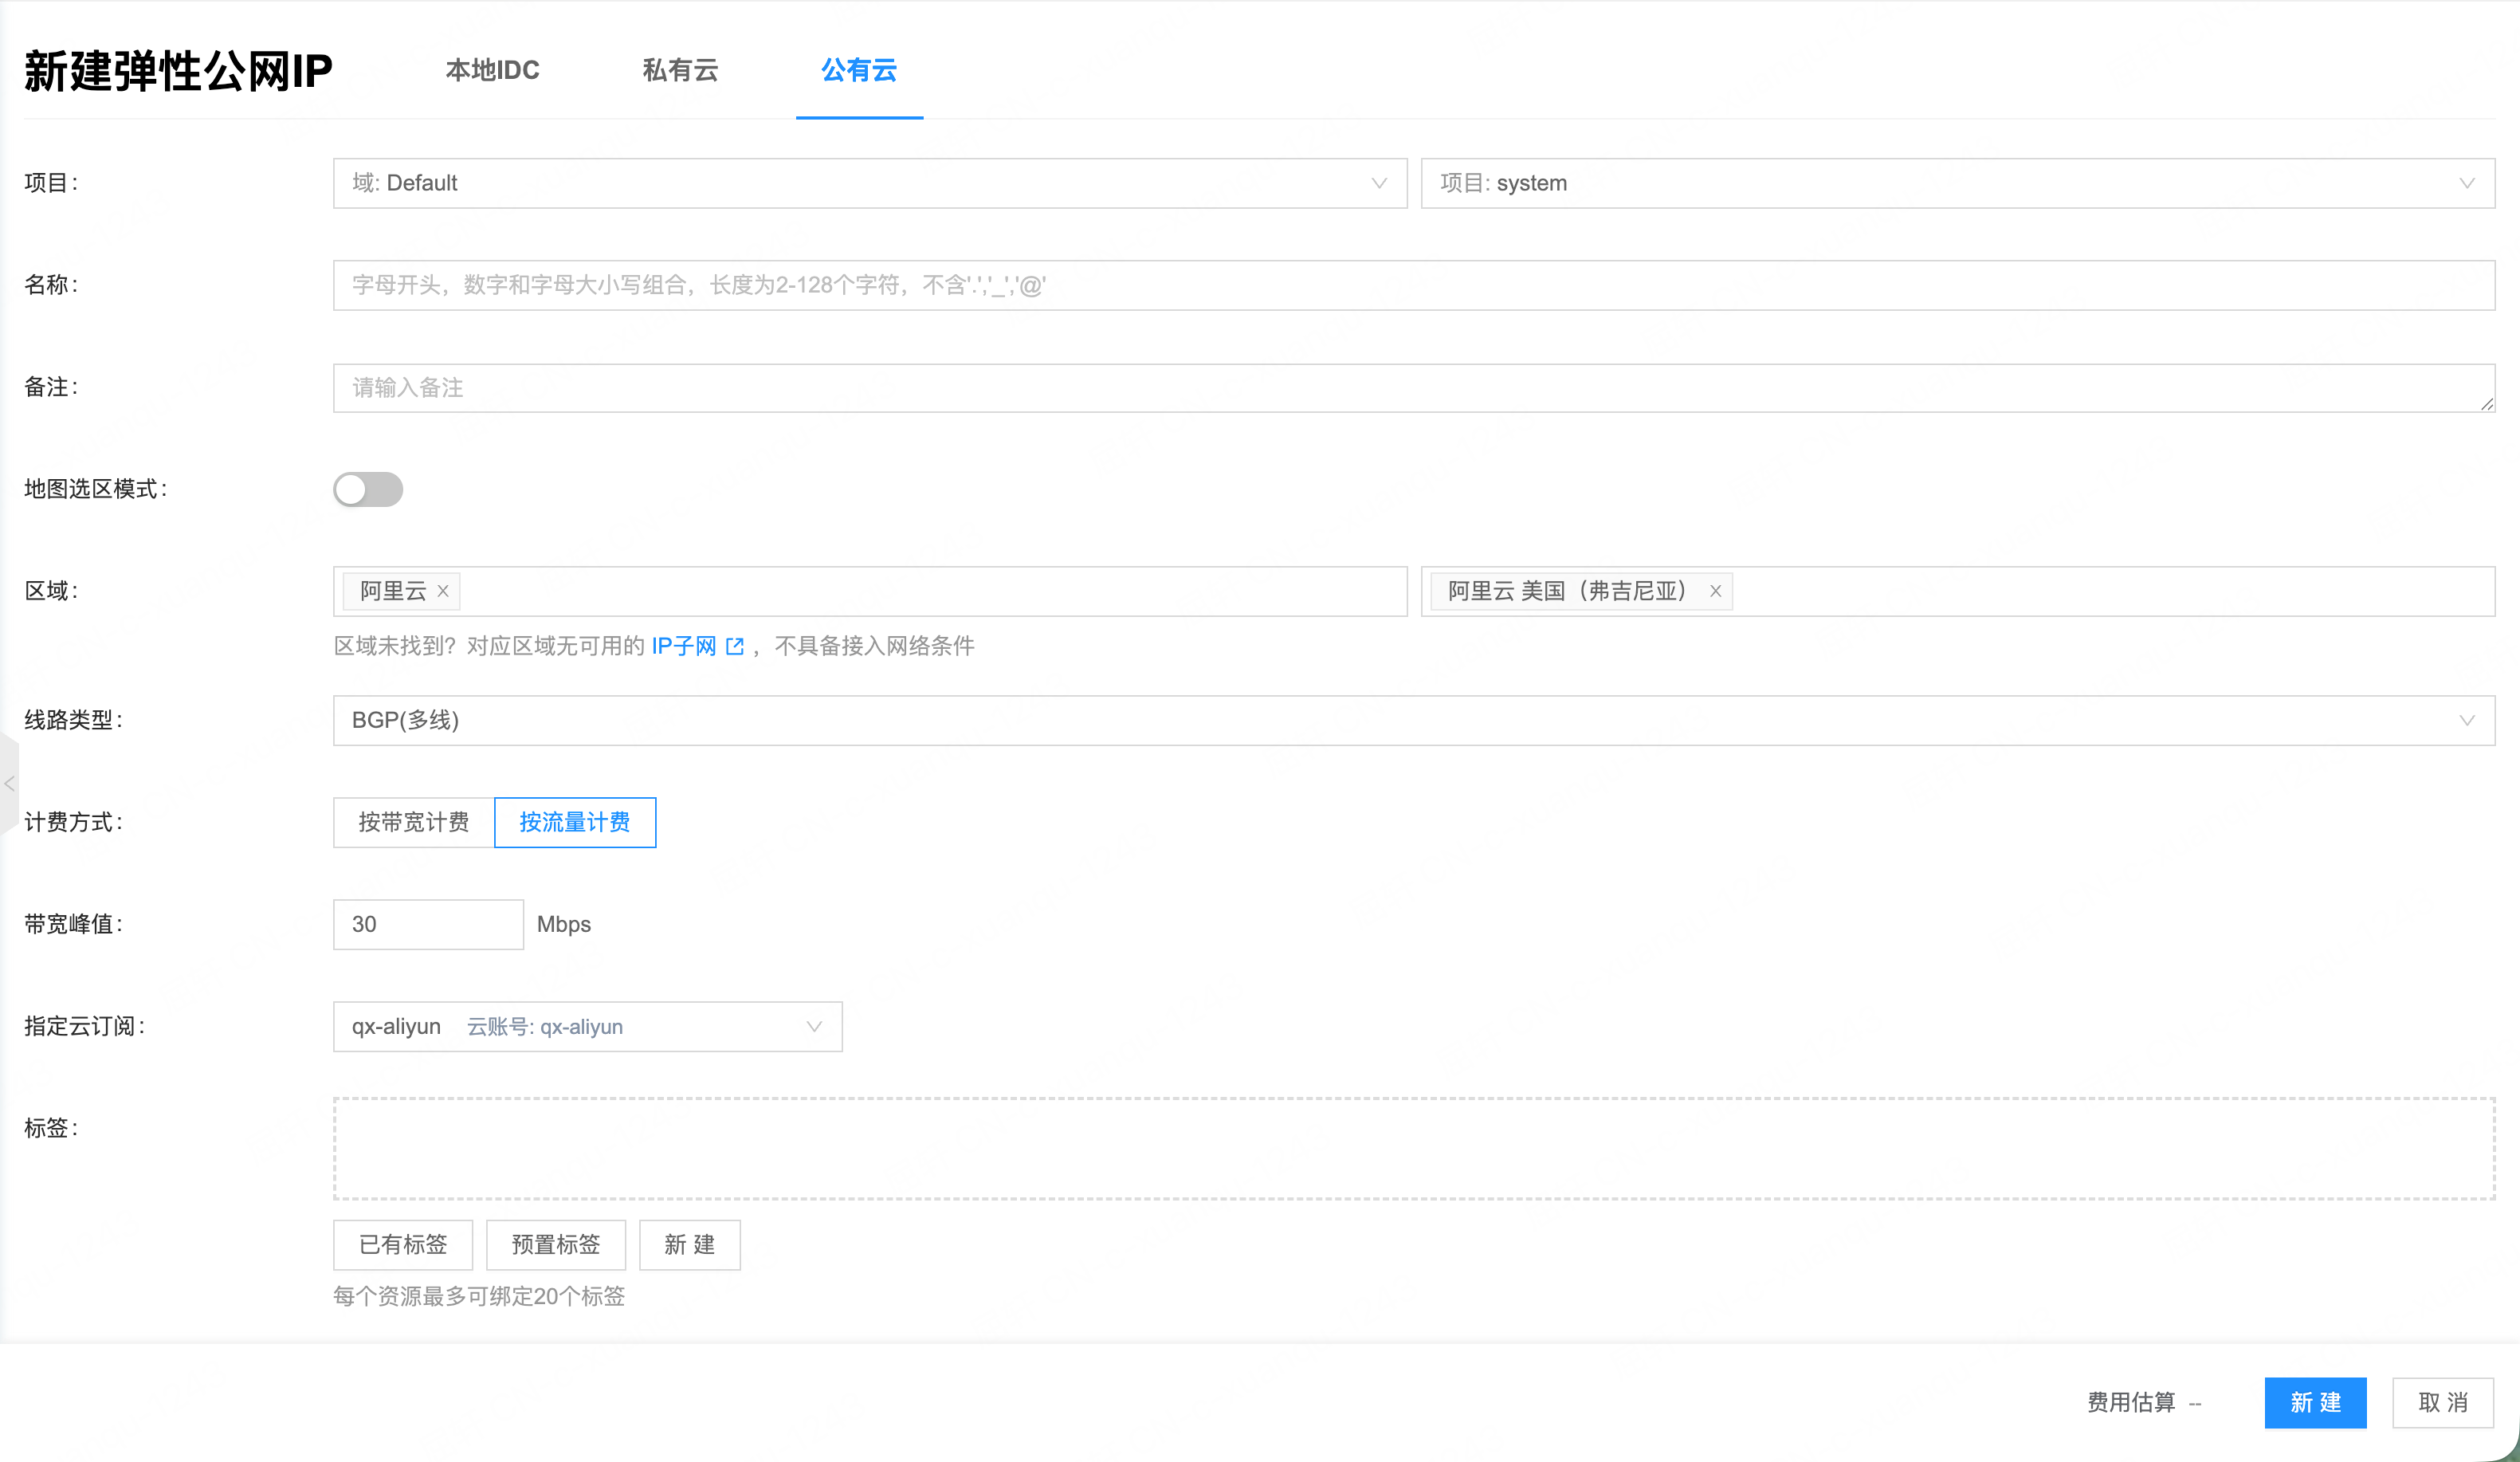
Create Public Cloud Elastic IP
Prerequisites: A cloud account for the corresponding platform already exists.
- On the Elastic IP page, switch to the Public Cloud tab, then click “Create”.
- Configure the following information:
| Field | Description |
|---|---|
| Domain/Project | Administrators and domain administrators must specify the domain and project for the EIP |
| Name | Set the Elastic IP name |
| Description | Optional. Enter EIP description |
| Enable Global Map | Optional. When enabled, you can select a region on the map |
| Region | Select the region for the EIP. You can quickly filter by platform |
| Billing Method | Billed by bandwidth or by traffic |
| Peak Bandwidth | Maximum value depends on billing method and platform |
| Cloud Subscription | Specify the cloud subscription used to create the EIP |
| Tags | Optional. Set user tags |
Note:
- AWS, Azure, and Google platforms only support billing by traffic
- On public cloud platforms, unbound EIPs are charged hourly after creation. After binding to a virtual machine, only bandwidth and traffic fees are charged
- Click “OK” to complete the operation.
Modify Bandwidth
This feature is used to modify the bandwidth of an Elastic IP that is already bound to a resource.
Prerequisites: The Elastic IP must first be bound to a virtual machine.
Platforms that support modifying bandwidth: Huawei Cloud, Baidu Cloud, Alibaba Cloud, UCloud, RockBase, Tencent Cloud, and China Telecom Cloud. Other platforms do not support modifying bandwidth.
- On the Elastic IP page, click “Modify Bandwidth” in the Actions column on the right of the EIP to open the modify bandwidth dialog.
- Modify the bandwidth value, then click “OK”.
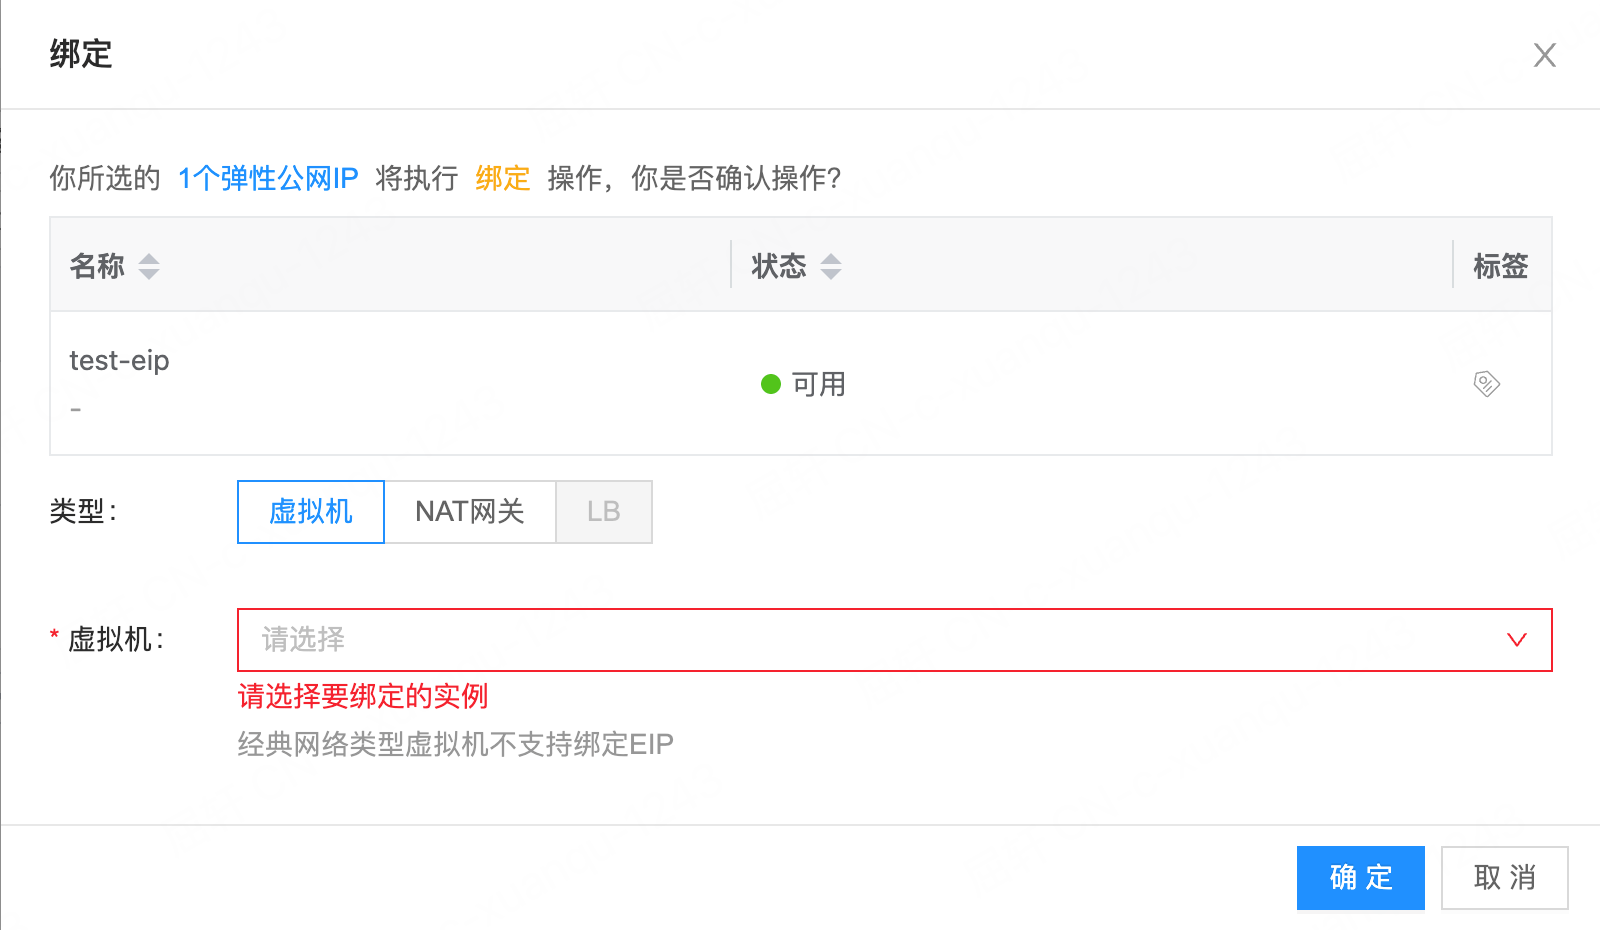
Bind
Bind an Elastic IP to a resource so the resource can communicate with the public network. The Elastic IP and the resource must belong to the same project in the same region.
Supported Resource Types
| Type | Description | Available Platforms |
|---|---|---|
| Virtual Machine | Bind to a virtual machine | All platforms |
| NAT Gateway | Bind to a NAT gateway | Alibaba Cloud only |
| Load Balancer | Bind to an LB | OneCloud and Huawei Cloud only |
Note:
- Classic network virtual machines do not support binding EIPs
- Only virtual machines in ready or running status can be bound
- Only NAT gateways in available status can be bound
- On the Elastic IP page, click “More” on the right of the EIP, then select “Bind”.
- Select the bind type (virtual machine / NAT gateway / load balancer) and the specific instance.
- Click “OK” to complete the operation.
Unbind
This feature is used to unbind an Elastic IP from a resource. After unbinding, the EIP can be bound to other resources.
Note:
- Public IPs (public_ip) do not support unbinding
- On AWS, EIPs bound to NAT gateways currently do not support unbinding
- On the Elastic IP page, click “More” on the right of the EIP, then select “Unbind”.
- Confirm the unbind operation, then click “OK”.
Sync Status
This feature is used to obtain the current status of an Elastic IP.
Sync a single status
- On the Elastic IP page, click “More” on the right of the EIP, then select “Sync Status”.
Sync status in bulk
- In the Elastic IP list, select one or more EIPs, click “Bulk Actions” above the list, then select “Sync Status”.
Change Project
A project is the owner of a resource. Users can change the project of an Elastic IP as needed.
- On the Elastic IP page, click “More” on the right of the EIP, then select “Change Project”.
- Set the new project information, then click “OK”.
Delete Elastic IP
This feature is used to delete an Elastic IP. EIPs bound to resources cannot be deleted. Unbind them first.
Delete a single EIP
- On the Elastic IP page, click “More” on the right of the EIP, then select “Delete”.
- Confirm the deletion, then click “OK”.
Delete in bulk
- In the Elastic IP list, select one or more EIPs, click “Bulk Actions” above the list, then select “Delete”.
- Confirm the deletion, then click “OK”.
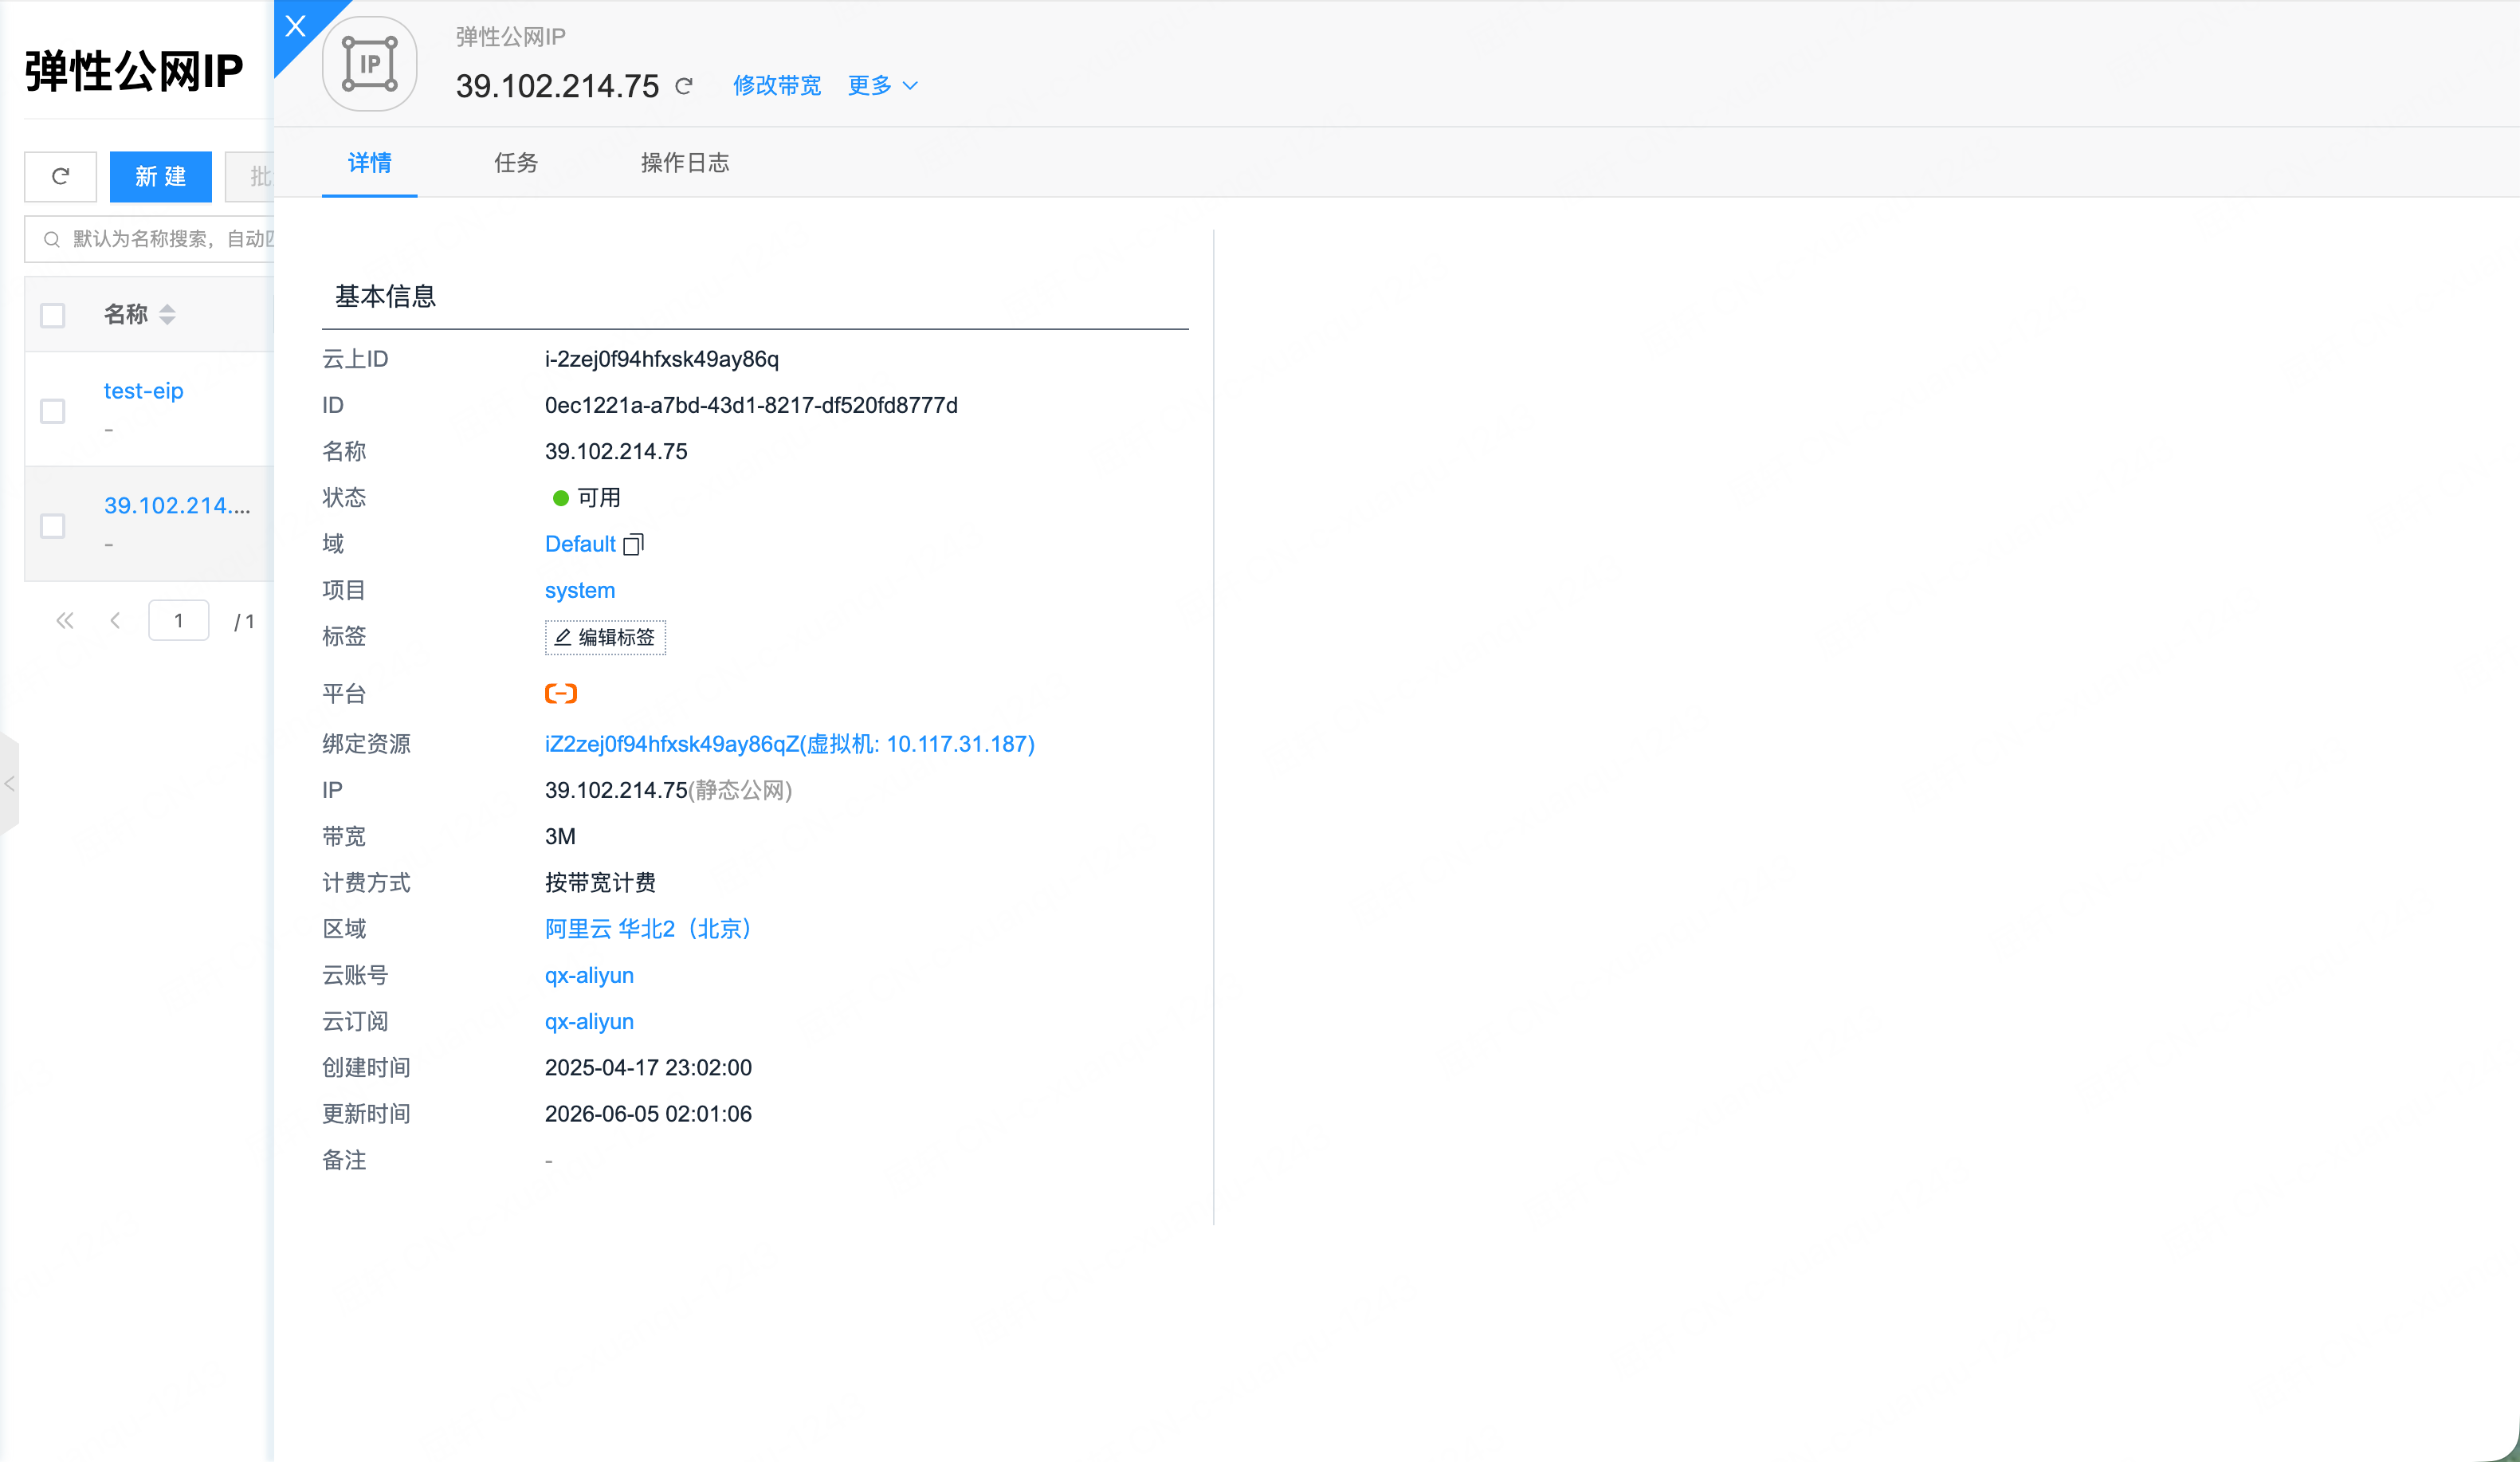
View Elastic IP Details
This feature is used to view detailed information about an Elastic IP.
- On the Elastic IP page, click the EIP name to open the details page.
- The top of the details page supports bind, unbind, modify bandwidth, change project, delete, and other operations on the EIP.
- The details page shows the following information:
| Item | Description |
|---|---|
| Cloud ID | Resource ID of the EIP on the cloud platform |
| System ID | Internal platform resource ID |
| Name | EIP name |
| Status | Current EIP status |
| Domain | Owning domain |
| Project | Owning project |
| Type | Elastic IP / Public IP |
| Platform | Cloud platform brand |
| Bound Resource | Name and type of the bound resource |
| IP Address | EIP IP address |
| Bandwidth | Bandwidth size |
| Billing Method | Billed by traffic / by bandwidth |
| Line Type | BGP line type |
| Region | Owning region |
| Cloud Account | Owning cloud account |
| Cloud Subscription | Owning cloud subscription |
| Creation Time | Creation time |
| Update Time | Update time |
| Notes | User notes |
View Operation Logs
This feature is used to view log information for operations related to the Elastic IP.
- On the Elastic IP details page, click the “Operation Logs” tab.
- Operation logs support the following:
- Load More: 20 log entries are displayed by default; more can be loaded
- View Details: Click “View” on the right of a log; detail content can be copied
- Time Filter: Set start and end dates to query logs for a specific period
- Export Logs: Click the export icon in the upper-right corner, select columns, then export the logs on the current page