OneCloud Private Cloud
OneCloud provides built-in private cloud functionality, this section is used to help users quickly create servers for the OneCloud platform.
Concepts Introduction
- Region: Region is a physical concept, typically the geographic area of the data center, typically a city, such as Beijing, etc. OneCloud private cloud has only one region and only supports name change.
- zone: Availability zone is a physical area under the region where power and network are independent of each other, generally the name of the server room, such as Wangjing, Jiuxianqiao, etc.
- VPC: Proprietary network VPC (Virtual Private Cloud) is a logically isolated piece of network space.
- L2 Network: L2 Network used for network isolation, generally the host and the server need to be in the same L2 Network.
- IP Su’b’net: IP subnet is created based on L2 Network and is used to assign IP addresses to resources such as hosts, baremetal, servers, containers, etc. generally private networks.
- Host: The server on which the host service is installed. Hosts in the enabled state can be used to create servers.
- Storage: used to save disk files of servers, etc. OneCloud supports local storage, Ceph, NFS and other storage.
- images: Images are used to create Servers, administrators can import images from the image market, and also support user-defined uploads of images, etc.
Deployment process
OneCloud supports creating servers for classic network and VPC network.
- Classic network: I.e. a pool of network resources shared with hosts and physical machines, and the same intranet IP cannot be assigned for use by different servers.
- VPC network: VPC is a logically isolated network space where users can customize the network, IP address, etc. within the VPC. Servers in the VPC network can communicate with Servers in the classic network via EIP, etc. The same intranet IP can be used on different VPCs.
Classic network server
When users finish installing the OneCloud product and log in to the OneCloud platform for the first time to select the OneCloud private cloud feature, they will enter the boot process to quickly configure regions, zones, L2 Network, IP subnets, enable hosts, configure storage, import images, etc. For details, please see Installation- Initialization guide.
If the boot process is skipped during boot or the configured resources cannot fully meet the user’s needs, the user can deploy the server for classic network by following the steps below.
- Create Zone.
- Create L2 Network.
- Create IP subnets for classic network.
- Enable host.
- store configuration.
- Importing Images.
- Create Servers for classic network.
- Create Servers for VPC network
VPC network server
VPC network servers cannot be deployed quickly through the bootstrap process. You can deploy servers for VPC networks by following the steps below.
- Create Zone.
- Create VPC.
- Create IP subnet for VPC network and Create IP subnet of the EIP type.
- Enable host.
- store configuration.
- Importing Images.
- Create Servers for VPC network
- Bind EIP for Servers on VPC network.
Deployment process
Administrator login
Take cloudadmin administrator account as an example.
- The admin user logs in to the OneCloud platform and goes to the system project by default.
- Access the system project via the top right corner of
 to switch to the administrative backend view.
 - The following operations are based on the administrative backend view.
Create Zone
Please ask the administrator to add a zone according to the actual situation, if there is already a zone, skip this step.
-
In the cloud management platform, click on the top left corner of
 navigation menu, and click “Network/Locations/Zones” menu item in the pop-up left menu bar to enter the zone page.
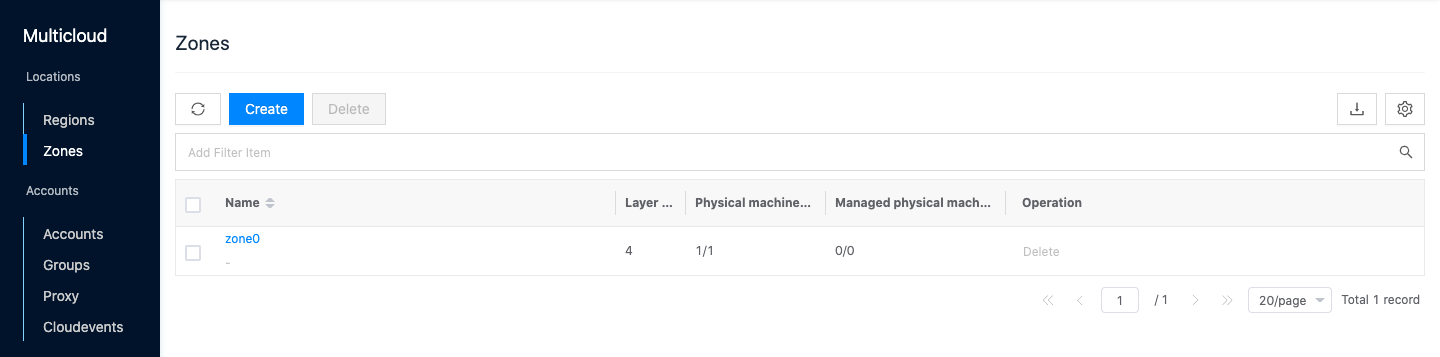
-
Click the “Create” button at the top of the list to bring up the Create Zone dialog box.
-
Set the name, select the zone and location, and click the “OK” button to create the zone.
Create VPC
You need to create a VPC network only when creating servers for VPC network. Ask the administrator to add the configured VPC network under the zone as appropriate.
-
In the cloud management platform, click on the top left corner of
navigation menu, and click “Network/Infrastructure/VPC” menu item in the left menu bar that pops up to enter the VPC page.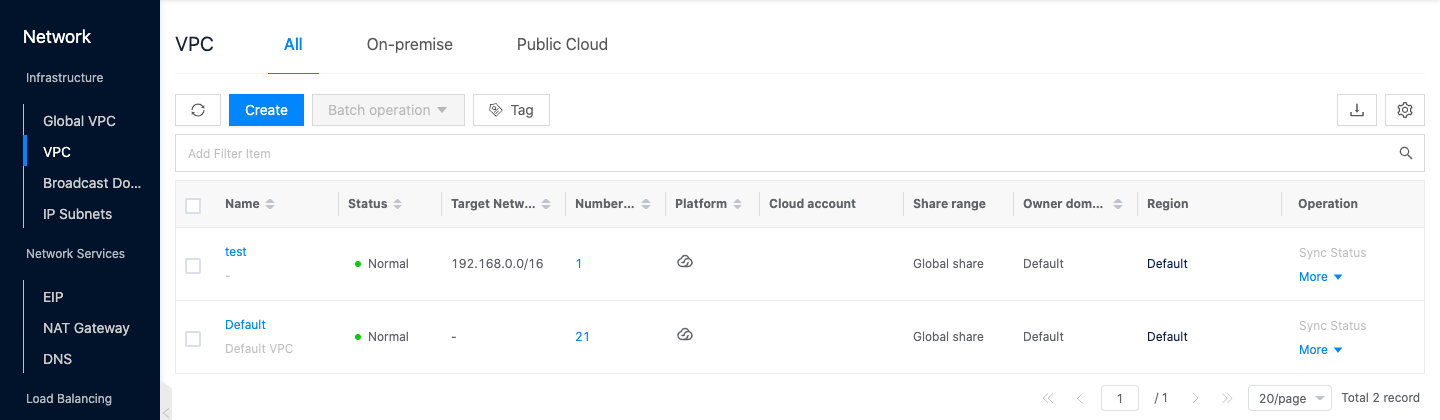
-
Click the “Create” button at the top of the list to bring up the Create VPC dialog box.
-
Configure the following parameters.
- Specify Domains: Select the domain to which the VPC belongs.
- Name: Set the name of the VPC.
- Platform: Select “On-premise”.
- Region: Select the default region.
- Destination segment: The dedicated segment of the VPC network, which will be used by all IP subnets under the VPC.

-
Click the “OK” button to complete the operation.
Create L2 Network
You need to create a L2 Network only when creating servers and hosts for classic networks, and ask administrators to add and configure Broadcast Domainss in the zone according to the actual situation.
-
In the cloud management platform, click on the top left corner of
navigation menu, and click “Network/Infrastructure/L2 Network” menu item in the pop-up menu bar on the left to enter the L2 Network page.
-
Click the “Create” button at the top of the list to bring up the Create L2 Network dialog box.
-
Set the following parameters.
- Specify Domains: Select the domain to which the L2 Network belongs.
- Proprietary Network: Select the local area as well as the local VDC.
- Available Zone: Select the zone to which the L2 Network belongs.
- Name: Set the name of the L2 Network.
- Bandwidth: Set the network bandwidth supported by the L2 Network, including 100Gigabit (100M), Gigabit (1G), Dual Gigabit (2x1G), 10Gigabit (10G), Dual 10Gigabit (2x10G), 25G, 40G, 100G. The L2 Network bandwidth is mainly for the purpose of network utilization statistics to determine the network load of servers.

-
Click the “OK” button to complete the operation.
Create IP Subnets
Create IP subnets for classic network
Ask the administrator to create the IP subnet for the classic network for the server according to the requirement.
-
In the cloud management platform, click on the top left corner of
navigation menu, and click “Network/Infrastructure/IP Subnets” menu item in the left menu bar that pops up to enter the IP subnet page.
-
Click the “Create” button at the top of the list to enter the Create IP Subpage page.
-
Set the following parameters.
-
Specify Project: Select the Project to which the IP subnet belongs.
-
Name: Set the name of the IP subnet.
-
Region: Select the region to which the IP subnet belongs.
-
VPC: Select Default VPC.
-
L2 Network: Select Region, Proprietary Network, and L2 Network.
-
Server Type: Set what type of server the IP subnet is used to assign IP addresses to, including server (Server and baremetal), baremetal hosts (baremetal hosts and host), PXE, IPMI, and EIP.
-
Subnet segment: Set the starting IP address, ending IP address, subnet mask, default gateway (optional), VLAN ID (optional), etc. Support adding 6 IP subnet segments at one time. When creating multiple IP subnets at one time, the subnet names are automatically assigned by the system, such as creating 3 IP subnets and setting the IP subnet name to network in the page, the names will be network0, network1, network2 in order.
-
Auto scheduling: Auto scheduling is supported only when the server type is server. When auto scheduling is enabled, users will assign IP addresses for servers from the IP subnets with auto scheduling enabled when they create server networks with auto scheduling specified.
-
Advanced Configuration: Click the Advanced Configuration hyperlink to expand the advanced configuration options.
- Address Assignment Policy: Includes the default policy (physical machines are assigned from the high IP subnet address and servers are assigned from the low IP subnet address), assign from high address, assign from low address, and random assignment.
- Domain name server: Set the domain name server.
- Host domain suffix: When setting the host domain suffix, when the system assigns an IP to the host, it also creates a domain record pointing to that IP, and the domain name format consists of host name + host domain suffix. E.g. the host name is VM01, the assigned IP address is 192.168.1.1, and the host domain suffix is test.com. i.e. a domain record corresponding to 192.168.1.1 and VM01.test.com is created, and when using the ping command, ping VM01.test.com, it will return the 192.168.1.1 IP address.

-
-
Click the “OK” button to create the IP subnet used by the classic network.
Create IP subnet for VPC network
Ask the administrator to create the IP subnet for the VPC network for the server according to the actual situation.
-
In the cloud management platform, click the top left corner of
navigation menu, and click “Network/Infrastructure/IP Subnets” menu item in the left menu bar that pops up to enter the IP subnet page. -
Click the “Create” button at the top of the list to enter the Create IP Subpage page.
-
Set the following parameters.
- Specify project: Select the project to which the IP subnet belongs.
- Subnet name: The name of the IP subnet.
- Platform: Select the On-premise.
- VPC: Select the VPC created in the above step. non-Default VPC.
- Zone: Select the zone to which the IP subnet belongs. There can be multiple IP subnets in the zone under one VPC, and the subnets in different zones under the same VPC interoperate by default.
- Subnet segment: Set the IP address range of the subnet, the IP subnet needs to be within the network segment range of the VPC. Support adding up to 5 subnets.
- Auto scheduling: When auto scheduling is enabled, users will assign IP addresses to Servers from the IP subnets with auto scheduling enabled when they create Server networks to specify auto scheduling.

-
Click the “OK” button to create the IP subnet for the VPC network.
Create IP subnet of the EIP type
-
In the cloud management platform click on the top left corner of
navigation menu, and click “Network/Infrastructure/IP Subnet” menu item in the left menu bar that pops up to enter the IP subnet page. -
Click the “Create” button at the top of the list to enter the Create IP Subpage page.
-
Set the following parameters.
-
Specify project: Select the project to which the IP subnet belongs.
-
Subnet name: The name of the IP subnet.
-
Platform: Select the On-premise.
-
VPC: Select “Default (classic network)”.
-
L2 Network: Select Region, Proprietary Network, and L2 Network.
-
Server Type: Select the resilient public IP.
-
IP Subnet: Set the starting IP address, ending IP address, subnet mask, default gateway, VLAN ID, etc. When multiple IP subnets are created at one time, the subnet names are automatically assigned by the system, e.g. if three IP subnets are created and the IP subnet name is set to network in the page, the names will be network0, network1 and network2 in order.
-
Advanced Configuration: Click the “Advanced Configuration” hyperlink to expand the advanced configuration options.
- Address assignment policy: Including default policy (physical machines are assigned from IP subnet high address, and servers are assigned from IP subnet low address), assign from high address, assign from low address, and random assignment.
- Domain name server: Set the domain name server.
- Host domain suffix: When setting the host domain suffix, when the system assigns an IP to the host, it also creates a domain record pointing to that IP, and the domain name format consists of host name + host domain suffix. E.g. the host name is VM01, the assigned IP address is 192.168.1.1, and the host domain suffix is test.com. i.e. a domain record corresponding to 192.168.1.1 and VM01.test.com is created, and when using the ping command, ping VM01.test.com, it will return the 192.168.1.1 IP address.
-
-
Click the “OK” button to create the IP subnet of the EIP type, and all subsequent new EIPs of the OneCloud platform will be assigned from the EIP type.
Enable host
The host is the server where the host service is installed. Virtual machines can be created only when the host is enabled and the host service is online.
Description
- For host service installation method, please see Installation Deployment - Installation and just check the Host service when installing the node.
- After the host installation is completed, an IP subnet of the baremetal hosts type containing the IP address of the host will be created automatically.
-
In the cloud management platform, click on the top left corner of
navigation menu, and click “Compute/Physical Resources/Hosts” menu item in the left menu bar that pops up to enter the Hosts page. -
In general, the hosts registered to the OneCloud platform after installing the host service are disabled by default and need to be enabled by the administrator. If there are multiple disabled hosts, you can enable the hosts in batch.
- Individual Enable: Click the “More” button on the right side of the specified “disabled” hosts, and select the “Enable” menu item to enable the hosts.
- Batch Enable: Select one or more “disabled” hosts in the list of hosts, click the “More” button above the list, and select the “Enable” menu item to enable the hosts.

Storage configuration
OneCloud supports host local storage, Ceph, NFS, and GPFS storage, etc. The following describes how the OneCloud platform mounts NFS storage, Ceph storage, and GPFS storage, etc. respectively.
Host Local Storage
When the host is registered to the OneCloud platform, the host local storage information will be displayed in the storage list.
-
In the cloud management platform, click the top left corner of
navigation menu, and click “Storage/Block Storage/Block Storage” menu item in the left menu bar that pops up to enter the storage page and view the host local storage status.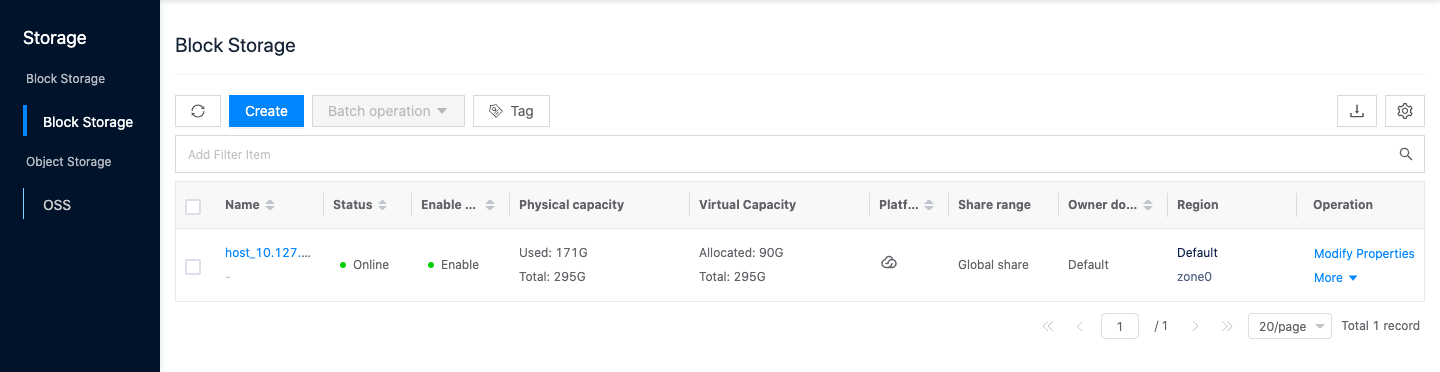
-
When the storage status is online and enabled, users can select local disk for system disk and data disk when creating OneCloud servers.
Ceph Storage
When Ceph storage is present in the environment, you can use Ceph storage on the OneCloud platform by following these steps.
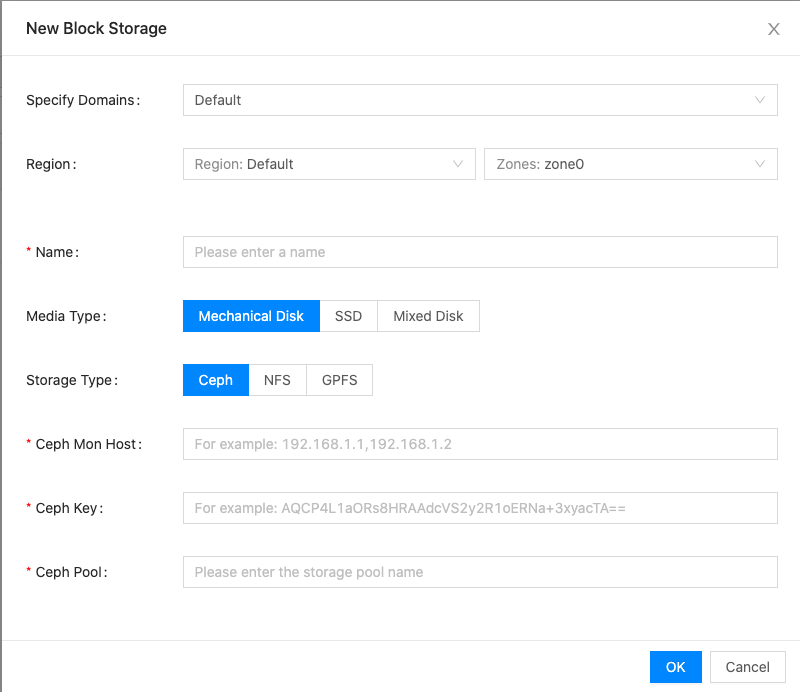
Create Ceph Storage
-
In the cloud management platform click on the top left corner of
navigation menu, and click “Storage/Block Storage/Block Storage” menu item in the left menu bar that pops up to enter the storage page. -
Click the “Create” button at the top of the list to bring up the Create Storage dialog box.
-
Set the name, region and zone, media type, select the storage type as “Ceph”, and configure Ceph Mon Host, Ceph Key and Ceph Pool.
Associating the host
After associating the ceph storage to the host, you can select the ceph storage when creating a server in the OneCloud platform.
-
Click the “More” button on the right action bar of the specified Ceph storage, and select the drop-down menu “Associate Host” menu item to bring up the Associate Host dialog box.
-
Select the hosts to be associated with the ceph storage (batch selection is supported), and click the “OK” button to associate the hosts.
-
When the actual capacity of ceph storage and the capacity of the server have values and are enabled and online, the user can choose the system disk or data disk type as rbd (i.e. GPFS storage) when creating the server.
NFS storage
When NFS storage exists in the environment, the storage can be created and mounted by following these steps
Create NFS Storage
-
In the cloud management platform click on the top left corner of
navigation menu, and click “Storage/Block Storage/Block Storage” menu item in the left menu bar that pops up to enter the storage page. -
Click the “Create” button at the top of the list to bring up the Create Storage dialog box.
-
Set the name, zone and available area, media type, where the storage type is “NFS”, and set the NFS Host (NFS server IP address), NFS Shared Dir (shared directory), and click “OK” button.

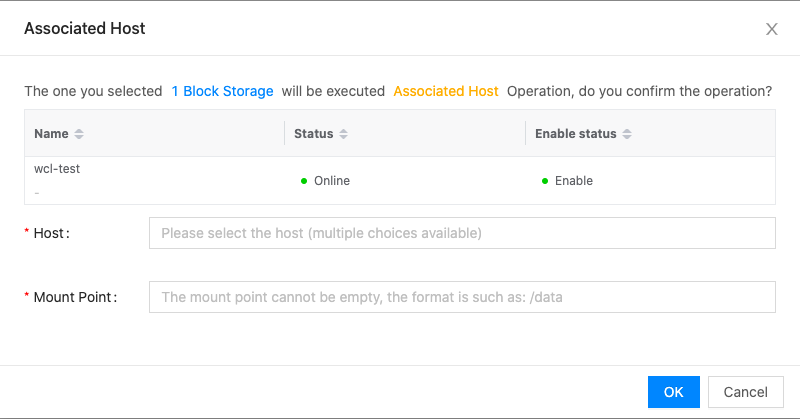
Associated Hosts
After the NFS storage is added, it needs to be associated with the host host for use.
-
Click the “More” button on the right action bar of the specified NFS store, and select the “Associate Host” menu item to bring up the Associate Host dialog box.
-
Select the hosts you want to associate with the NFS storage (you can associate hosts in batch when the host mount points are the same), set the mount points, and click the “OK” button.
-
When the actual capacity of NFS storage and the capacity of the server have values and are enabled and online, the user can choose the system disk or data disk type as nfs storage when creating a server.
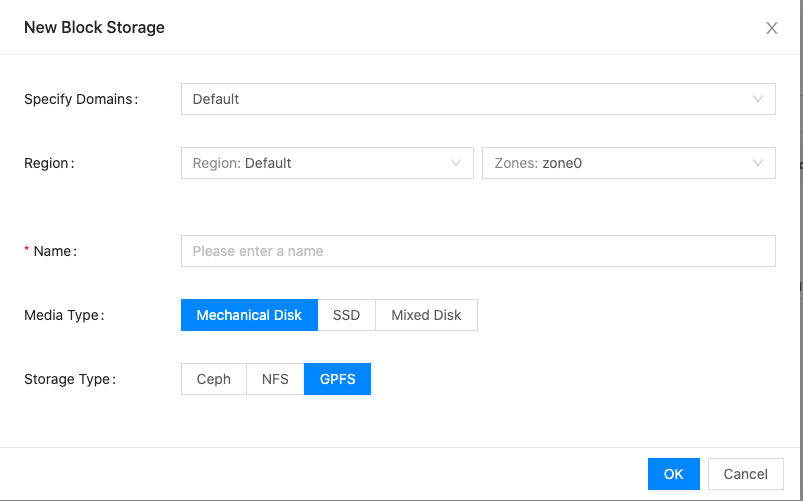
GPFS storage
When GPFS storage exists in the environment, GPFS storage can be used on the OneCloud platform by following the steps below.
Create GPFS Storage
-
In the cloud management platform click on the top left corner of
navigation menu, and click “Storage/Block Storage/Block Storage” menu item in the left menu bar that pops up to enter the storage page. -
Click the “Create” button at the top of the list to bring up the Create Storage dialog box.
-
Set the name, region and available area, media type, select the storage type as “GPFS”, and click “OK” button.
Associating hosts
If you want to create a server with optional GPFS on OneCloud platform, you need to associate the host.
-
Click the “More” button on the right column of the specified GPFS storage, and select the “Associate Host” menu item to bring up the Associate Host dialog box.
-
Select the hosts you want to associate GPFS storage with (you can associate hosts in batch when the hosts have the same mount points), set the mount point (the mount point is the mount point where the actual host has already mounted GPFS), and click the “OK” button.
-
When the actual capacity of GPFS storage and the capacity of the server have values and are enabled and online, users can select the system disk or data disk type as GPFS storage when creating a server.
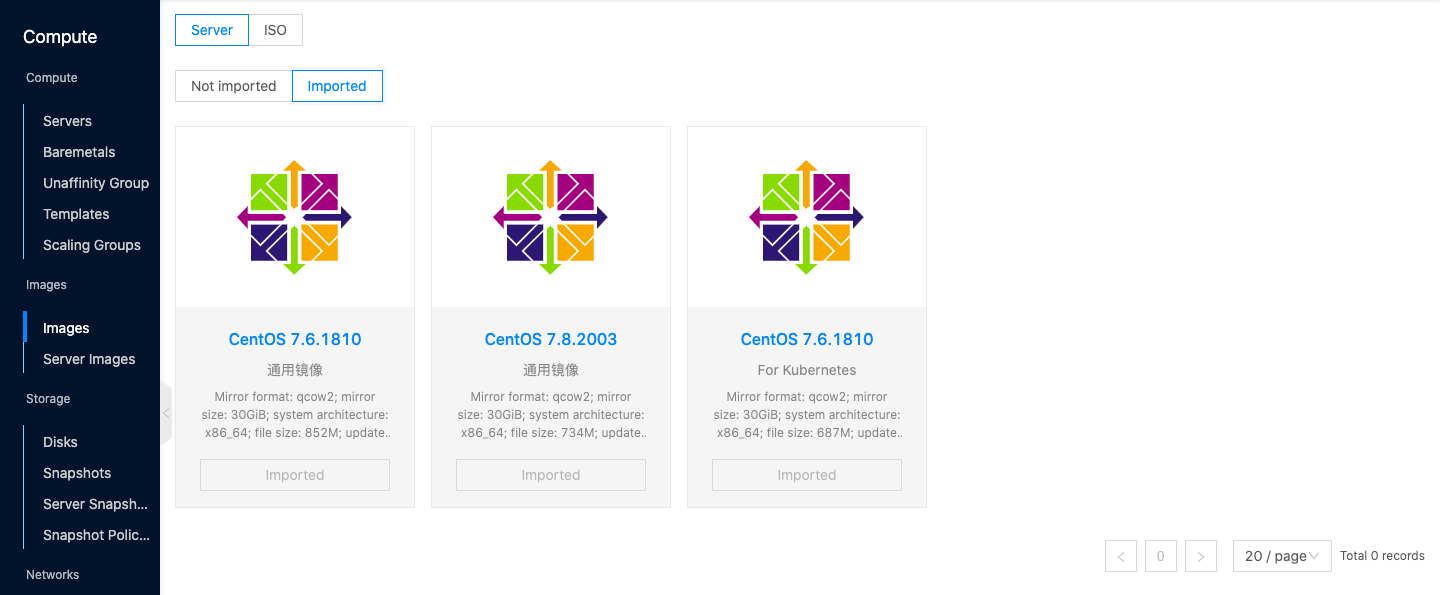
Importing images
The OneCloud platform supports the image Marketplace feature, which contains common Windows and Linux images for users, and administrators can import the required images in the image Marketplace for creating servers. The image Marketplace feature requires nodes to have access to Alibaba Cloud OSS (Object Storage Service) Beijing.
System images are divided into two main categories in terms of format, including server images and ISO images, as shown in the following table.
| image format | Format | Features | Usage |
|---|---|---|---|
| Virtual machine images | QCOW2, VMDK, RAW, VHD | Used to create servers and baremetal, etc. A single image has multiple formats to ensure that the image can be adapted to multiple platforms, is ready to use on boot, does not require an operating system to be installed, etc. | When the image is a public image, you need to select it in the public image when creating a server, and when the image is a custom image, you need to select it in the custom image when creating a server. |
| ISO image | ISO | is only used to create servers for the OneCloud platform. After the server is installed, you need to log in remotely to the server to install the operating system, etc. | Regardless of the image type of the ISO image, select the ISO image from the ISO boot when creating the server. |
System images can be divided into public images and custom images by type, as shown in the following table.
| image Type | Description | Source |
|---|---|---|
| Public image | The share range defaults to the system share and does not allow changes to the share range. | The administrator or domain administrator imports the image from the image Marketplace; the administrator sets the custom image of the project as the public image. |
| Custom images | The sharing scope is private by default, and you can set the sharing scope. | image uploaded by any user; image generated by saving system image; administrator set the public image of the project as custom image. |
-
In the cloud management platform, click the top left corner of
navigation menu, and click “Compute/Images/images” menu item in the left menu bar that pops up to enter the mirroring page.
-
Click the “image Marketplace” button to enter the image Marketplace page.
Description
The following images are used to create GPU servers.
- CentOS 7.6.1810 For Nvidia GPU
- Ubuntu 18.04.2 For Nvidia GPU
-
Import the required images in the unimported page of the Server or ISO tab respectively, and the images will be displayed in the image list when the import is complete. Administrators can view the imported images in the Imported page of the Server or ISO tab.
-
Images imported from the image marketplace are public by default and can be used by any user on the system.
Create Servers for classic network
Once the necessary conditions for creating servers, such as zones, L2 Network, IP subnets, storage, hosts, and images, are set, administrators as well as project users can create servers for the OneCloud platform classic network. This section takes cloudadmin administrator to create a server in the system backend as an example.
-
In the cloudadmin platform, click the top left corner of
navigation menu, and click “Compute/Compute/Servers” menu item in the left menu bar that pops up to enter the server page.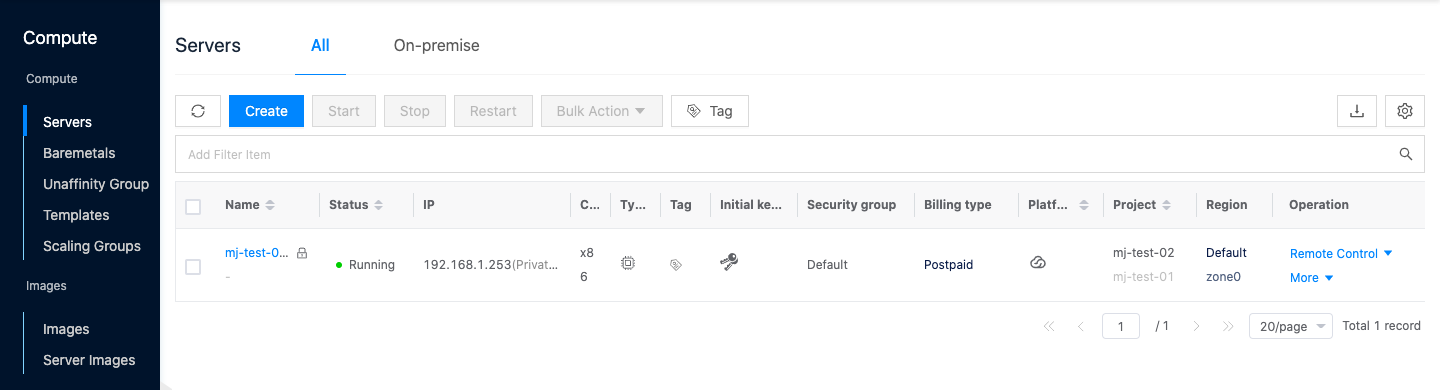
-
Click the “Create” button at the top of the list to enter the On-premise Create Server page.
-
Set the following parameters.
- Specify project: The administrator user supports specifying the project where the server is located. When the project user creates a server, the default is the project where the user is currently located.
- Region: Select the region and available area. The above resources are created and configured based on the region and zone, etc.
- Name: The name of the server.
- Release by expiration: To avoid wasting resources, it is recommended that users check this item and set the time.
- Number: Support to create multiple servers at one time, the name is followed by - number.
- Platform: Select OneCloud platform.
- Configure GPU: It can be selected only when GPU card exists on the host, at this time the OS image selects the image with for Nvidia GPU information.
- OS: According to the actual situation, you can select the required image from the public image list, custom image list, and from ISO boot respectively, and it is recommended to select from the public image.
- CPU, Memory, packages: common packages are automatically generated after the control node is installed, users can select the corresponding packages according to CPU and memory configurations, if there are no available packages, administrators can add the required package information in the “host/package/package” page.
- System Disk: Select the type of system disk and set the size.
- Local disk: Create disk files on the local storage of the host.
- Ceph RBD: I.e. create disk files on ceph storage.
- GPFS: I.e. create disk files on GPFS shared storage.
- NFS: I.e. create disk files on NFS network storage.
- Data disk: Select the data disk type and set the size.
- Administrator Password: You can keep the default and generate a random password.
- Network: Keep the default by the system to automatically schedule the network or specify the IP subnet under the classic network VPC.
- Tag: Bind tags for resources, support new or bind existing tags.
- Security Group: Keep the default or specify the security group. If there is no available security group, the administrator or user needs to create a security group in the “Compute/Networks/Security Group” page and set the corresponding rules, etc.
- Scheduler Policy: It is recommended to keep the default, users in the project do not need to configure this item.
- Bootstrap method: It is recommended to keep the default.
- High Availability: If you need to set the high availability of servers, you can check this item, where the administrator user supports to select the host where the backup machine is located, and the project user does not support to set it.
-
Click the “Create” button at the top of the list to create a server for the OneCloud platform.
Create Servers for VPC network
Once the prerequisites for creating servers, such as Zone, VPC, IP Subnet, Storage, Host, image, etc. are set, administrators as well as project users can create servers for the OneCloud platform Classic Network. This section takes cloudadmin administrator to create a server in the system backend as an example.
-
In the cloudadmin platform, click the top left corner of
navigation menu, and click “Compute/Compute/Servers” menu item in the left menu bar that pops up to enter the server page. -
Click the “Create” button at the top of the list to enter the On-premise Create Server page.
-
Set the following parameters.
- Specify project: The administrator user supports specifying the project where the server is located. When the project user creates a server, the default is the project where the user is currently located.
- Region: Select the region and available area. The above resources are created and configured based on the region and zone, etc.
- Name: The name of the server.
- Release by expiration: To avoid wasting resources, it is recommended that users check this item and set the time.
- Number: Support to create multiple servers at one time, the name is followed by - number.
- Platform: Select OneCloud platform.
- Configure GPU: It can be selected only when GPU card exists on the host, at this time the OS image selects the image with for Nvidia GPU information.
- OS: According to the actual situation, you can select the required image from the public image list, custom image list, and from ISO boot respectively, and it is recommended to select from the public image.
- CPU, Memory, packages: common packages are automatically generated after the control node is installed, users can select the corresponding packages according to CPU and memory configurations, if there are no available packages, administrators can add the required package information in the “host/package/package” page.
- System Disk: Select the type of system disk and set the size.
- Local disk: Create disk files on the local storage of the host.
- Ceph RBD: I.e. create disk files on ceph storage.
- GPFS: I.e. create disk files on GPFS shared storage.
- NFS: I.e. create disk files on NFS network storage.
- Data disk: Select the data disk type and set the size.
- Administrator Password: You can keep the default and generate a random password.
- Network: Specify the IP subnet under VPC network, VPC network does not support default scheduling.
- Tag: Bind tags for resources, support new or bind existing tags.
- Security group: Keep the default or specify a security group. If there is no available security group, the administrator or user needs to create a security group in the “Compute/Networks/Security Group” page and set the corresponding rules, etc.
- Scheduler Policy: It is recommended to keep the default, users in the project do not need to configure this item.
- Bootstrap method: It is recommended to keep the default.
- High Availability: If you need to set the high availability of servers, you can check this item, where the administrator user supports to select the host where the backup machine is located, and the project user does not support to set it.
-
Click the “Create” button to create a server for the OneCloud platform.
Bind EIP for Servers on VPC network
The server of VPC network can only communicate with the server of VPC network, if you need to communicate with external, you also need to bind EIP.
-
In the cloud management platform, click on the top left corner of
navigation menu, and click “Compute/Compute/Servers” menu item in the left menu bar that pops up to enter the server page.
-
Click the “More” button on the right column of the server, select the drop-down menu “Bind EIP” menu item, and the Bind EIP dialog box will pop up.
-
Select the binding method as Create, set the bandwidth, and click the “OK” button.