Installation
The 3.x version is different from the previous version which used traditional deployment method to run on CentOS system.x version uses Kubernetes Operator technology to deploy and run on Kubernetes. The platform services will support containerized deployments in Kubernetes clusters, which are inherently highly available and resiliently scalable.
Prepare for installation
Get the installation package
Please obtain the DVD installer for OneCloud from the download center on the product website or by contacting your salesperson.
Description
After downloading the installation package, it is recommended to check the MD5 value with an md5 tool to ensure the integrity of the installation package.
Configuration requirements
The following table shows the nodes and configuration requirements to be deployed for different scenarios, etc. Please plan the deployment according to the specific usage scenarios.
| Deployment scenarios | Deployment components | Configuration requirements | Resource footprint | Remarks |
|---|---|---|---|---|
| Multi-cloud scenario | Control Nodes |
|
All resources | Access Key ID and Access Key Secret of the cloud account to be managed by Nana with read and write access |
| Private Cloud Scenario | Control Node |
|
All resources | |
| Compute Nodes |
|
Product services need to occupy 2C2G200G system resources |
|
|
| Ceph Storage | Server: Universal X86 physical server;
|
No resource consumption | ||
| Baremetal Hosts nano-management |
|
|
All resources | |
| Baremetal |
|
No resource consumption |
|
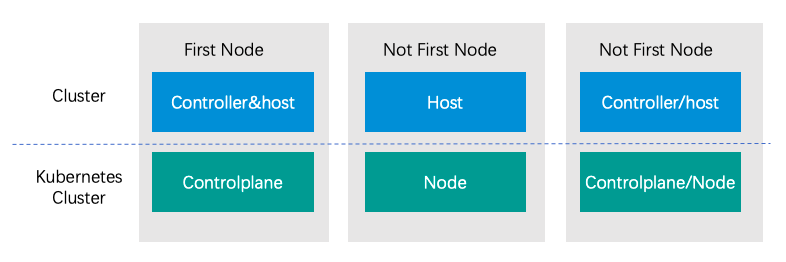
Introduction to installed components
- A Kubernetes cluster consists of Master (Controlplane) nodes and Node nodes. The number of Controlplane nodes on a set of Kubernetes clusters must be 1, 3, or 5, otherwise there may be problems; the number of Node nodes is arbitrary.
- The product mainly consists of Controller (control node) and Host (compute node).
The relationship between the two is shown in the figure below. A server belongs to one of the Controlplane nodes or Node nodes in a Kubernetes cluster, and can act as either a Controller or a Host node on the OneCloud cluster. Servers can have any combination of roles on the Kubernetes cluster and the OneCloud cluster.
Minimalist networking example
Based on the component introduction above, the simplest OneCloud environment can be built using two servers.
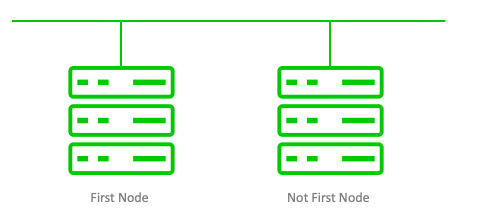
- Server description.
- Where the First Node server serves as the Controlplane node of the Kubernetes cluster, the Controller node and Host node of the OneCloud cluster.
- Not First Node server as the Node node of the Kubernetes cluster, OneCloud the Host node of the cluster.
- Version 3.0 supports offline installation, and the installation process can be done without accessing the Internet. However, the later deployment process of importing images from the image market requires access to the Internet.
Installation process
Installation method introduction
There are two ways to install OneCloud using the DVD installer, depending on whether the user’s server has CentOS 7.x OS installed or not, and the first one is recommended. The two ways of executing scripts only are different, and the installation configuration contents are the same.
- DVD installation: When users use a server without an operating system installed, they can directly mount the downloaded DVD installation package to install CentOS as well as OneCloud .
- script install: When users are using a server with CentOS 7.x OS installed, they can mount the installation package and use the install script inside to install OneCloud .
DVD Installation
The DVD installation method will first install CentOS OS on the server, and the OneCloud installation script will be executed automatically after the installation is completed.
-
Mount the DVD installation package on the server and start the server.
- If you need to install on a baremetal hosts, you need to burn the ISO installation package downloaded from the official website in DVD format to a DVD disc or a USB boot image.
- If you burn it as a DVD disc, please set the boot method in BIOS to CD-ROM corresponding media on the physical server.
- If you create a USB boot image, please set the boot method in BIOS to the media corresponding to the USB device on the physical server.
- If you install on a server, you can directly mount the ISO installation package in DVD format onto the virtual CD-ROM drive of the server and set the boot method of the server to CD-ROM drive.
- If you need to install on a baremetal hosts, you need to burn the ISO installation package downloaded from the official website in DVD format to a DVD disc or a USB boot image.
-
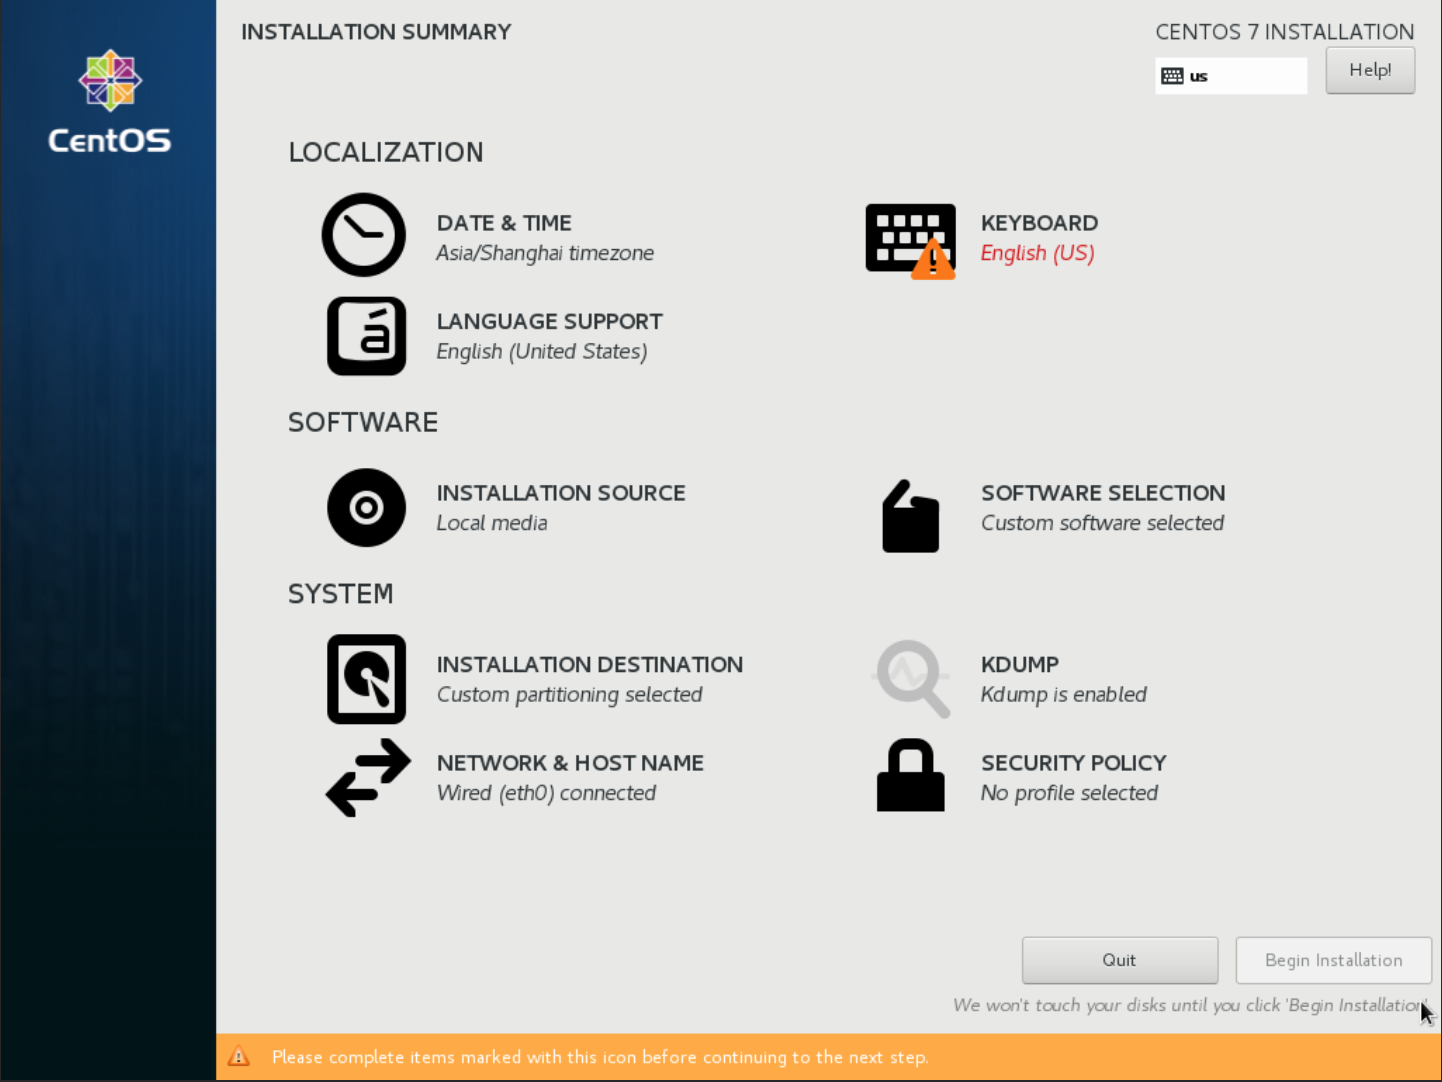
The following parameters are supported to be configured during CentOS system installation, or you can keep the default values and start installing CentOS system directly.
-
LANGUAGE (mandatory): Select the CentOS 7 operating system language, English is the default, click the \ “Continue” button.

-
KEYBOARD (mandatory): Select the keyboard layout. After the setup is finished, if there are no special requirements for disk, network, etc. it is recommended to keep the default and directly click the \ “Begin Installation” button to start the CentOS system installation.
-
INSTALLATION DESTIONATION (optional): Set the disk partition, if there is no special need, it is recommended to keep the default. You can also divide the disk partition according to your needs, etc.

-
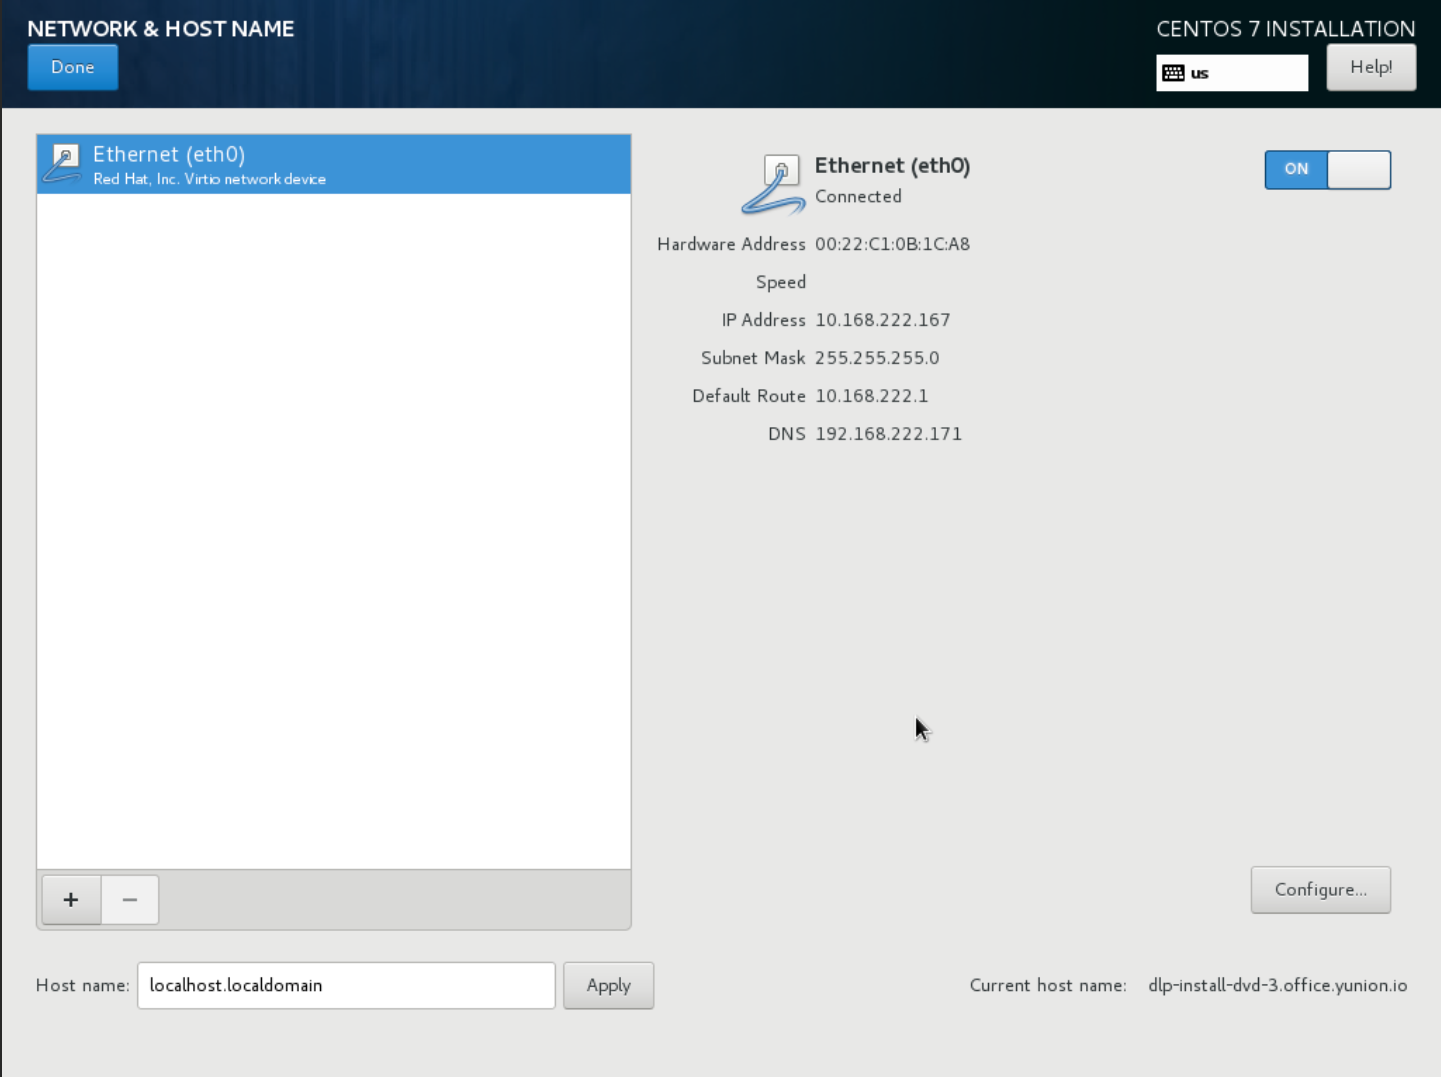
NETWORK&HOST NAME (optional): set the network and host name, if there is no special need, you can leave it as default.
-
-
During the installation of CentOS system, you need to set the root user password or create a new user. It is recommended to set the root user password.
-
Wait for the OS installation to complete, then run the installation script automatically and enter the installation configuration page. Please follow the [installation configuration](#installation configuration) content to configure.
Script Installation
When installing the product on a server with CentOS installed, you need to make sure that the server has disabled selinux and that the server has been restarted. If selinux is not disabled, please follow the steps below to disable selinux and restart the server.
# disable selinux
$ setenforce 0
$ sed -i 's/SELINUX=enforcing/SELINUX=disabled/' /etc/selinux/config
Execute the script on CentOS 7.x server in the following way.
-
Connect to the CentOS server remotely as root user and upload the DVD installer to the server.
Description
Support downloading the DVD installer on the server using the wget command. The name of the installer obtained by using the wget command through the download link on the official website may not be the same as the name of the installer obtained by direct download. However, the contents of the unpacked file are the same. If you use the wget command to download the DVD installer, please use the actual name of the downloaded installer when you mount the installer.
-
After uploading, mount the installer as a disk partition on the mnt directory, enter the mnt/yunion directory, and execute the install.sh script file to enter the installation configuration page. Please follow the contents of installation configuration to configure.
# Please see the installation package name downloaded from the official website
$ mount -o loop Yunion-x86_64-DVD-3.0.0-20200108.0.iso /mnt
$ cd /mnt/yunion
$ ./install.sh
Installation Configuration
The configuration content varies slightly depending on whether the server is First Node and the components installed.
Description of common operations on the configuration page.
- enter key: enter key is used to confirm the selection button.
- Space bar: After selecting a sub-menu, you can also press the space bar to enter the sub-menu configuration page; the space bar can also select or deselect specific configuration items.
- Up and down arrow keys: used to switch up and down menus and configuration items.
- Tab key or left and right arrow keys: used to switch the bottom side of the “Select”, “OK” and “Help” button, press enter to confirm the selection.
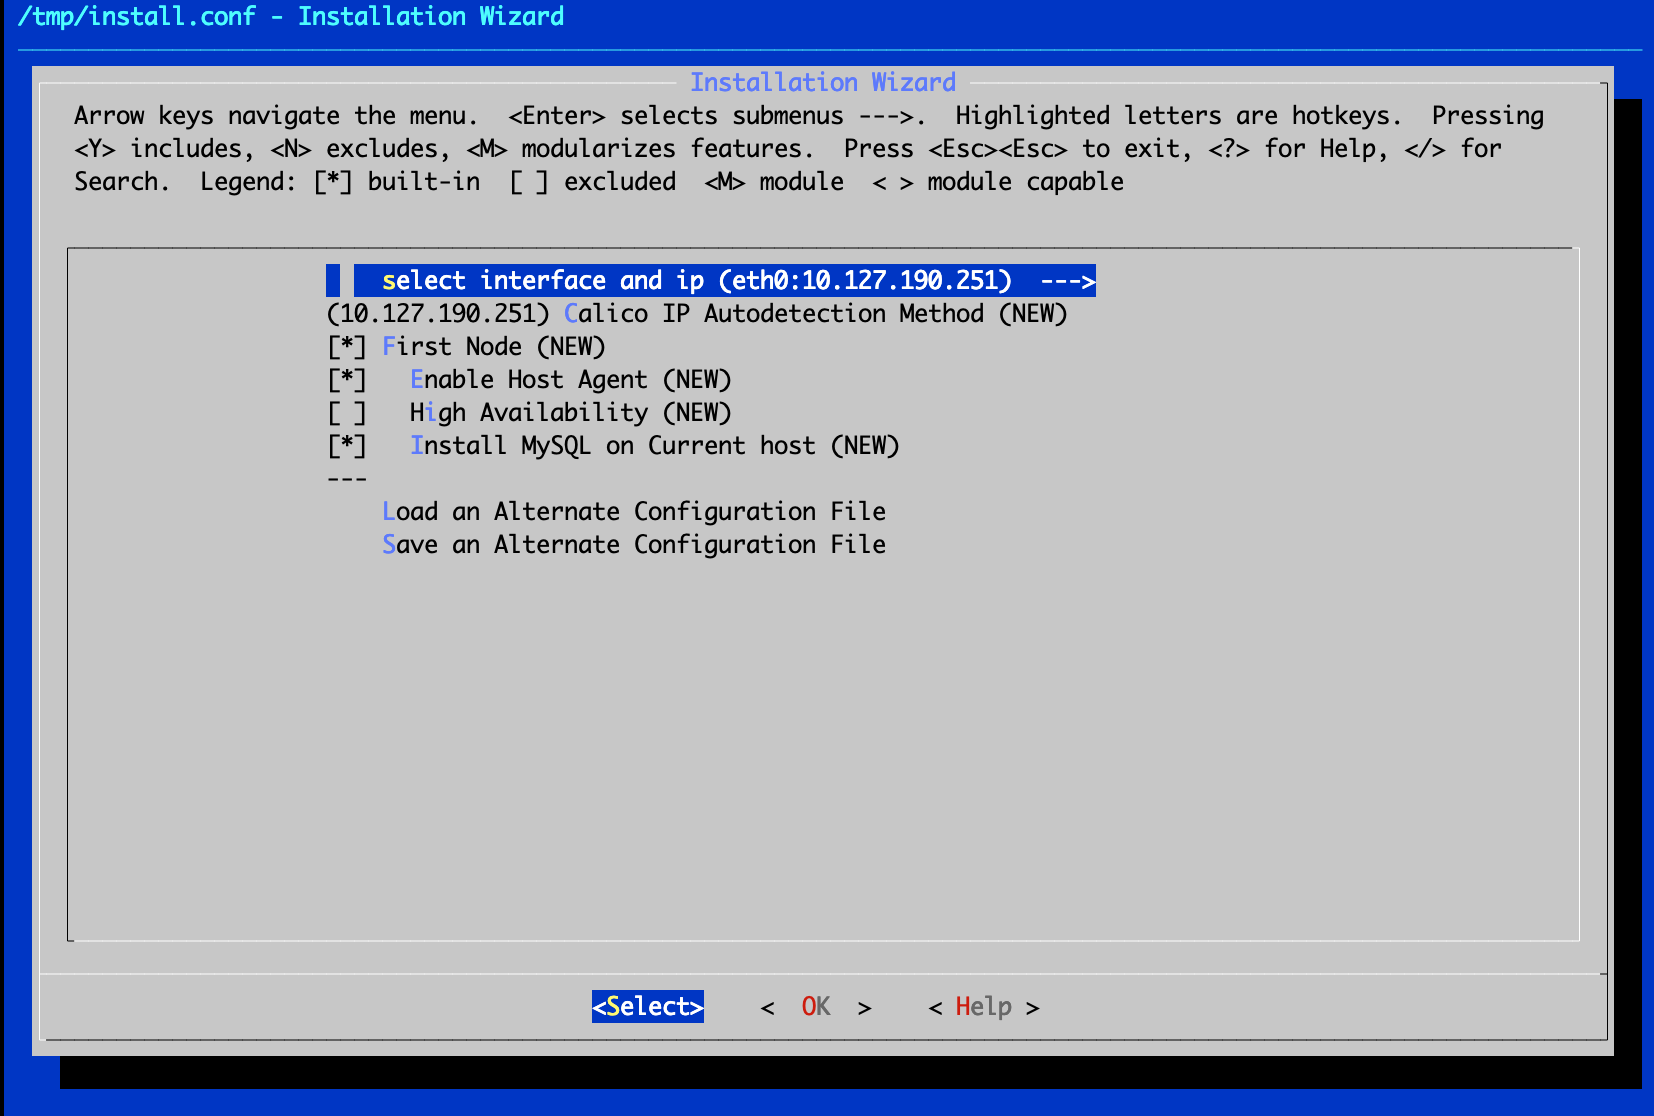
First Node Server
-
In the installation configuration page, if the server has multiple NICs, you need to select the NIC as the management network.

-
Keep the default checkboxes “First Node” and “Enable Host Agent” unchanged, or keep the default checkbox if the database does not require anything else.
-
If you are using an existing database, you need to move the cursor to “Install MySQL on Current host” by using the up and down arrow keys, press the spacebar to uncheck the item and configure the information of Connect MySql.
Description
Connecting to a MySQL database with a non-root user is not supported until after version 3.4.12.
- MySQL Host IP: the IP address of the MySQL server.
- MySQL Port Number: the port number of the MySQL server.
- MySQL Username: the user name to connect to MySQL server, root user is recommended, if you use other user, you also need to authorize the user.
GRANT ALL PRIVILEGES ON * . * TO ‘

-
In this example, you can choose to install the database on the current host, select the “OK” button on the installation configuration page, press enter, select “Yes” in the pop-up save configuration dialog box, and press enter to confirm the selection and start the installation.

-
The installation process is long, please be patient until the installation is complete.
Description
- When the server’s current kernel (
uname -rto check the kernel version) does not match the product requirements “3.10.0-1062.4.3.el7.yn20191203.x86_64”, the product will automatically reboot after installation. - If the server’s current kernel (
uname -rto check the kernel version) is the same as the product’s requirement “3.10.0-1062.4.3.el7.yn20191203.x86_64”, the product will not restart automatically after installation.
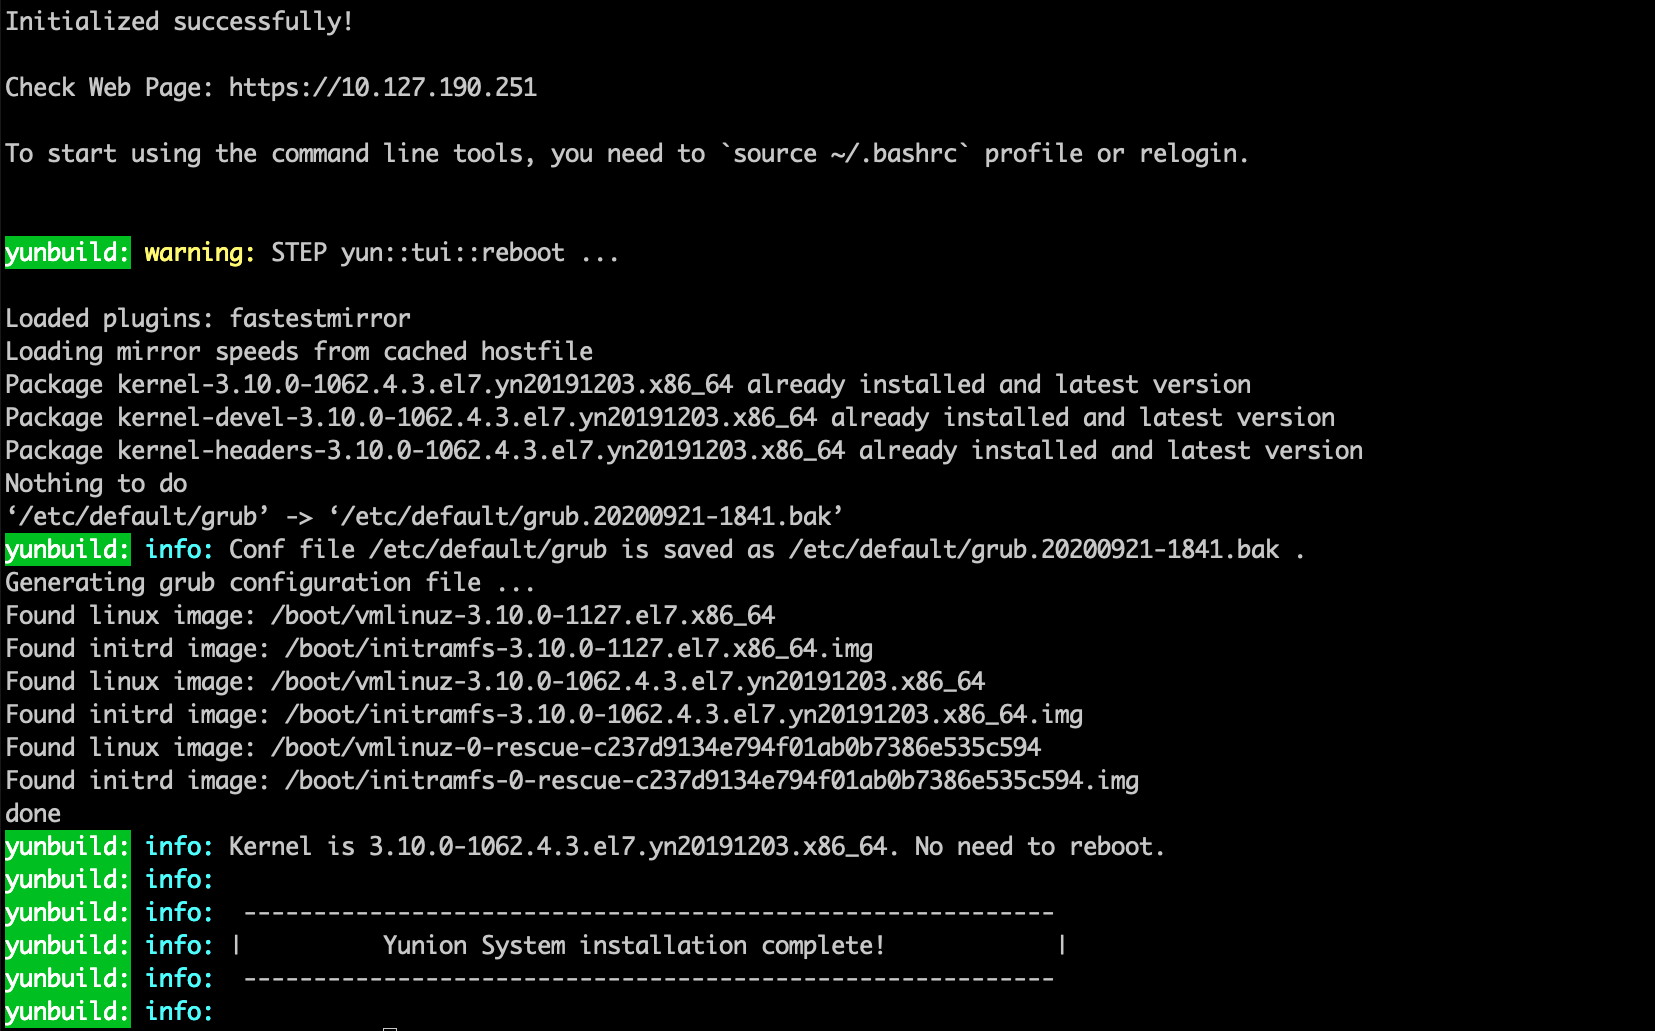
- When the server’s current kernel (
-
Execute the
source ~/.bashrccommand in the server to load the kubernetes environment variables. After loading, users can manage the OneCloud system components, etc. via kubectl-related commands.
# View K8s nodes
$ kubectl get node
# Check the running status of the component pod, running means running normally
$ kubectl get pod --namespace onecloud
- Type https://服务器IP地址 in your browser to open the OneCloud platform and perform Initialization guide.
Not First Node server
This deployment deploys the K8s node and host node on the Not First Node server.
-
In the installation configuration page, press the spacebar to uncheck “First Node”, and the default for Role of K8S is “K8s Node”; the default for roles is “Enable Host Agent”. Enable Host Agent". You can change the role according to your needs, but in this case, you don’t change it, just keep the default.
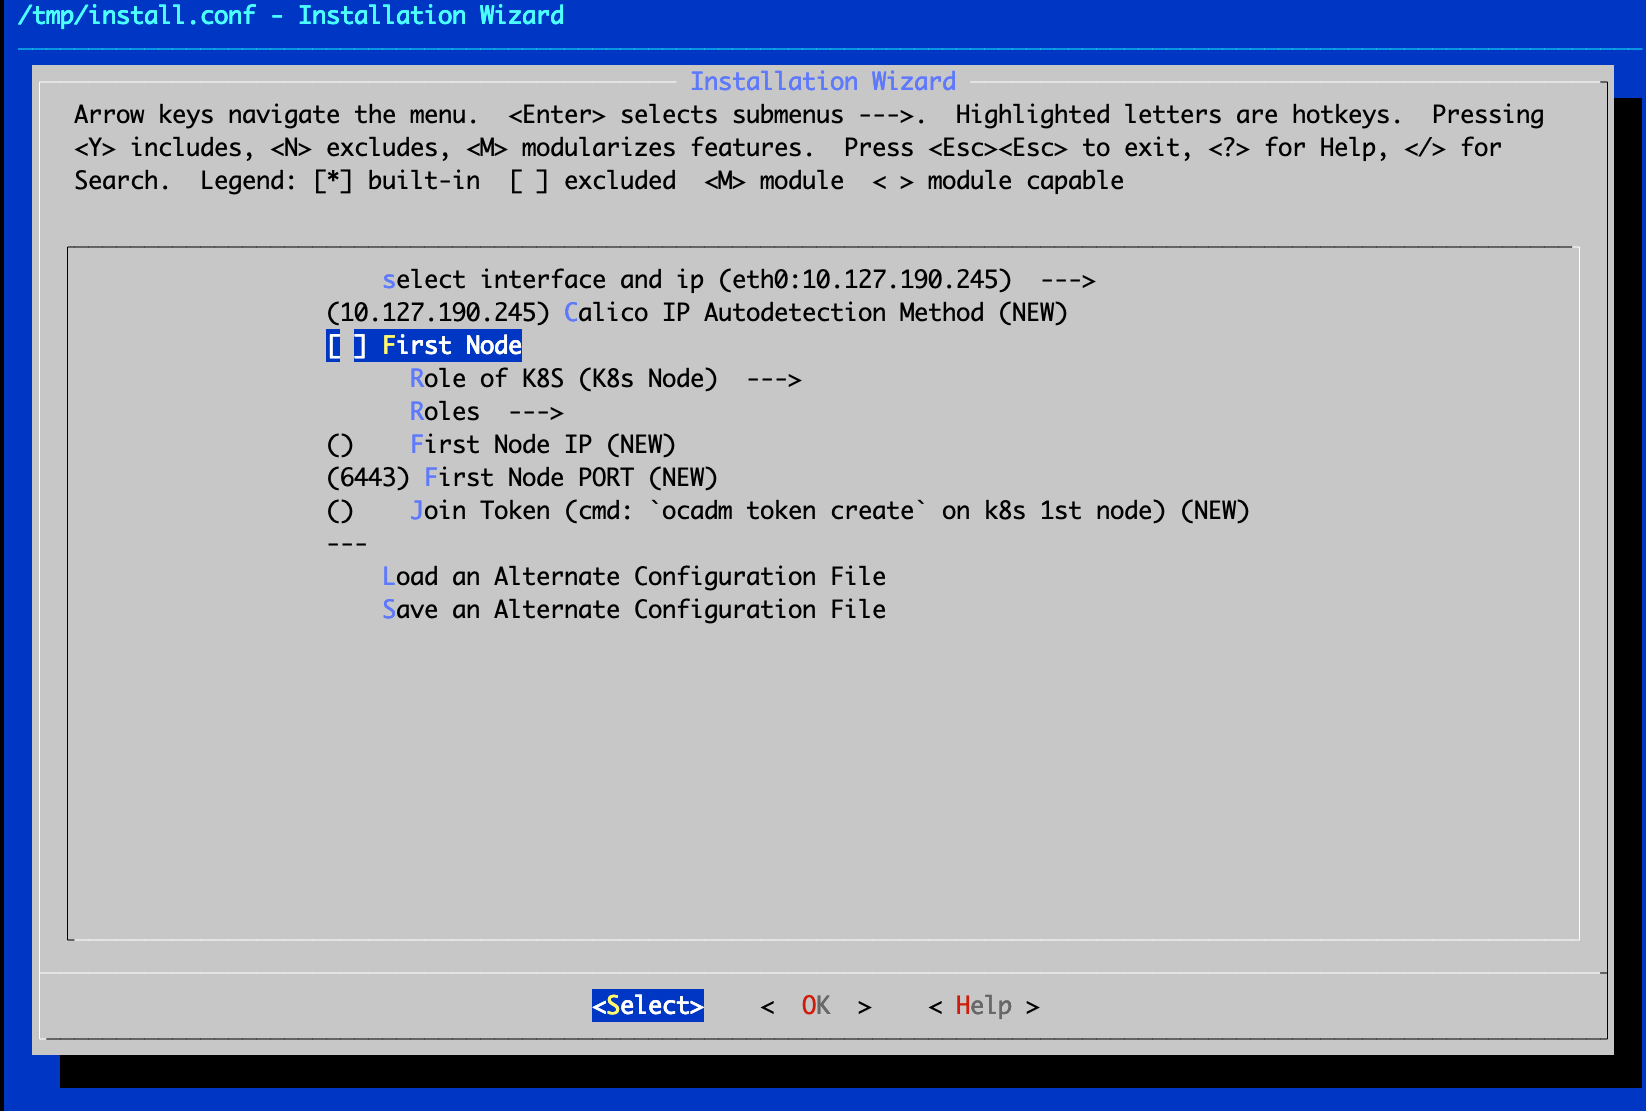
-
Configure First Node IP to be the server IP address of First Node configured in the previous section.

-
Configure Join Token to be the Token value obtained on the First Node server.

Description
Join Token is obtained as follows:
Enter the
ocadm token createcommand on the First Node server to get the Token. Note You cannot use the ocadm command directly on the First Node server that has just been successfully deployed. You need to log in to the server again or execute thesource ~/.bashrccommand directly to load the kubernetes environment variables without disconnecting.As shown in the figure below, after First Node server is successfully deployed, disconnect and reconnect the server first. The content in the red circle is the Token value

-
When the configuration is finished, select the “OK” button with the cursor, press enter, select “Yes” with the cursor in the Save Configuration dialog box, and press enter to confirm the selection and start the installation.
-
The installation process is long, please be patient until the installation is complete.
Description
- When the server’s current kernel (
uname -rto check the kernel version) does not match the product requirements “3.10.0-1062.4.3.el7.yn20191203.x86_64”, the product will automatically reboot after installation. - If the server’s current kernel (
uname -rto check the kernel version) is the same as the product’s requirement “3.10.0-1062.4.3.el7.yn20191203.x86_64”, the product will not restart automatically after installation.

- When the server’s current kernel (
-
ssh remote login to the server as root user, and the host node deployment is complete.
-
After user deployment, you can see the host node in the OneCloud platform host page. The host is disabled by default after it is registered to the cloud management platform, you need to enable the host on the interface, and the enabled host can be used to create servers.
Enable Baremetal service
The Baremetal service is disabled by default after the OneCloud platform is installed. Baremetal service provides PXE Server, DHCP, TFTP, http and other functions to complete nano-managed baremetal hosts operations and manage physical machines.
Users can enable Baremetal service on any node in the OneCloud environment by following the commands below.
-
Log in to the First Node as root user via SSH, etc.
-
Execute the following command. Where $node_name is the name of the node; $listen-interface is the name of the NIC on which the baremetal-agent is listening.
Note
If the node that needs to enable Baremetal service has host service installed, please set the listening NIC to br0, otherwise the listening NIC is the actual NIC name of the node.
# Enable Baremetal service on the specified node and listen to the NIC $ ocadm baremetal enable --node $node_name --listen-interface $listen_interface # Disable Baremetal service $ ocadm baremetal disable --node $node_name # If baremetal service is enabled on node1 host and listening to br0 NIC. $ ocadm baremetal enable --node node1 --listen-interface br0 -
After the baremetal service is enabled, you can check whether the baremetal-agent is registered to the control node with the following command.
$ kubectl get pods --namespace onecloud | grep baremetal default-baremetal-agent-fb5d4b5f7-2ld8v 1/1 Running 0 15m -
The pre-registration and pxe bootstrap registration methods of the baremetal hosts of the NAC need to be used with DHCP Relay, i.e. Baremetal-agent will only process requests from the DHCP Relay server, so it is also necessary for the user to configure DHCP Relay on the switch in advance or use the DHCP Relay function of the Host service.
# Log in to all servers that have compute nodes deployed and modify /etc/yunion/host.conf to add the dhcp_relay configuration item.
dhcp_relay:
- 10.168.222.198 # baremetal agent dhcp service listener address
- 67 # baremetal agent dhcp service listening port

# Check the pods for the host service
$ kubectl get pods -n onecloud -o wide | grep host
default-host-p6d8h 2/2 Running 0 78m 10.168.222.189 k8s-dev1 <none> <none>
default-host-xdc7x 2/2 Running 0 78m 10.168.222.150 k8s-dev2 <none> <none>
# Delete the host service pods and restart the host service
$ kubectl delete pods -n onecloud default-host-p6d8h default-host-xdc7x
Workorder component management
The OneCloud system enables the process ticket (itsm) component by default, and the administrator can manage the ticket component on the First Node.
The ticket component management command is as follows.
# Enable the ticket component
$ ocadm component enable itsm
# Disable the ticket component.
$ ocadm component disable itsm