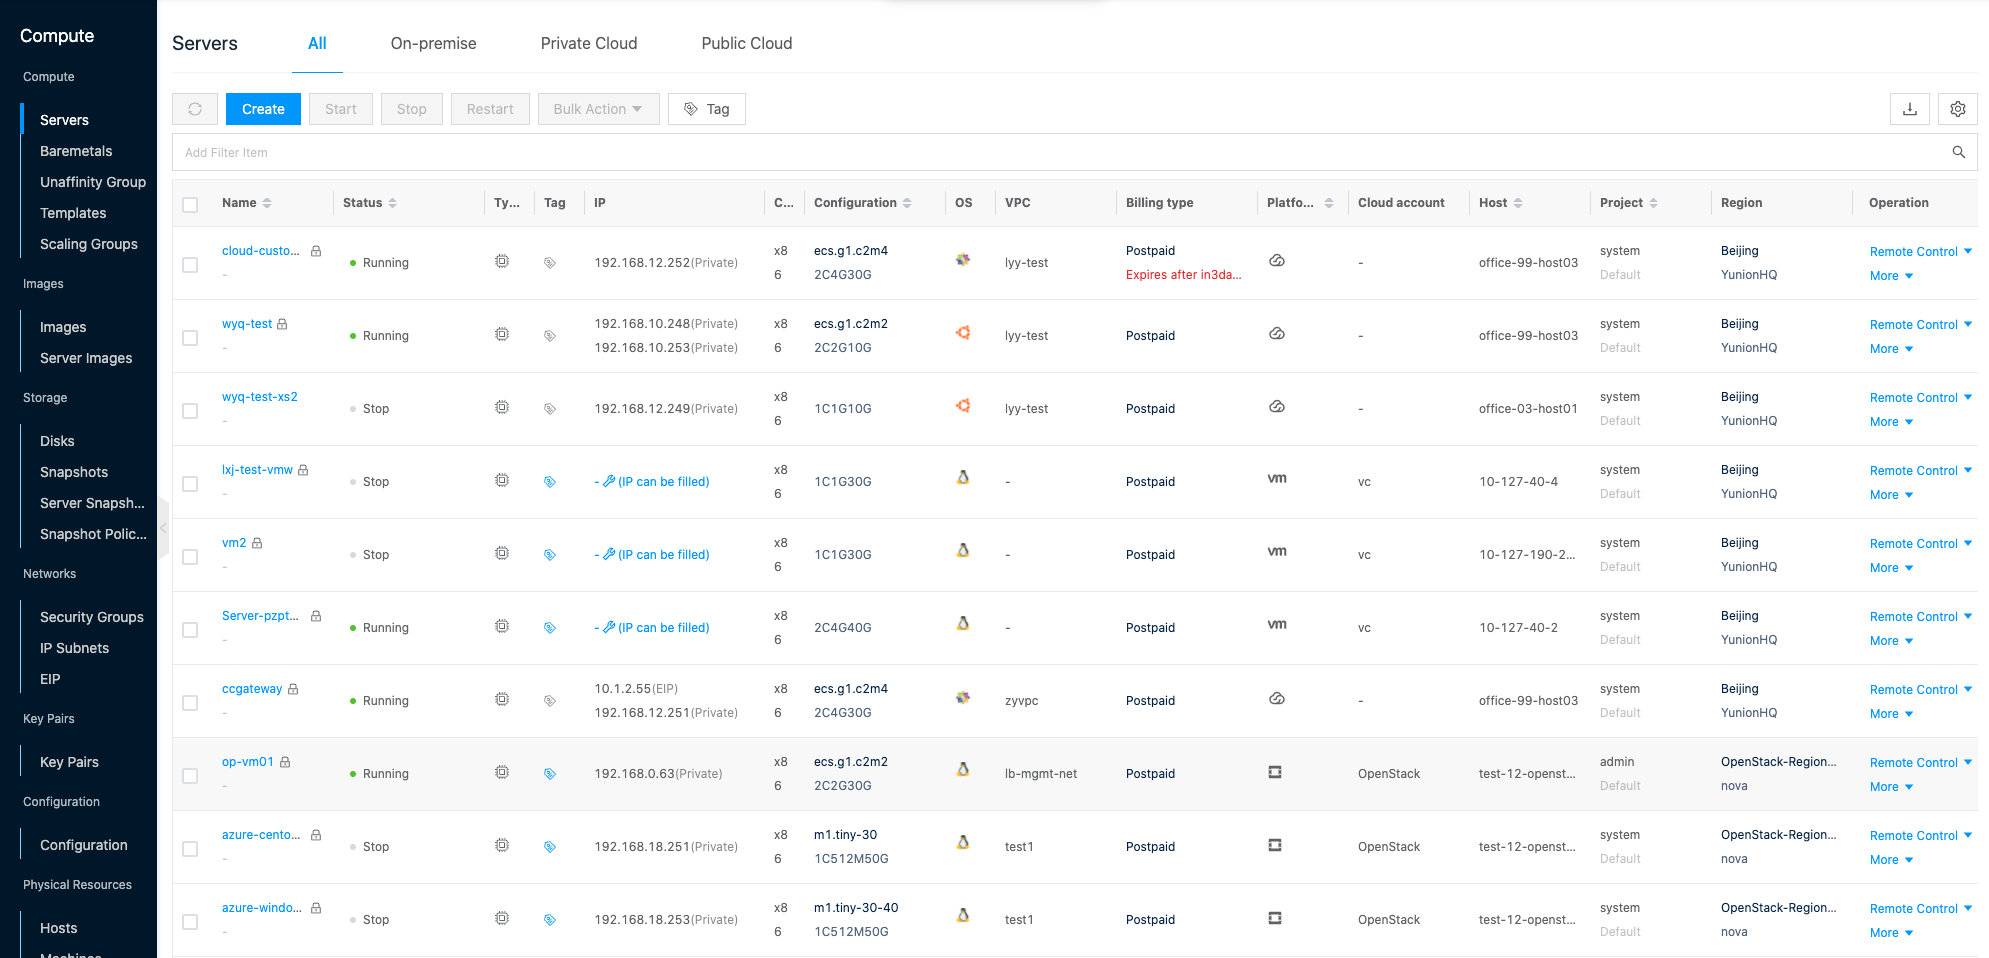
Servers
A server is a server instance running on a host machine built using virtualization technology, including CPU, memory, operating system, disk, network card, and other complete virtual hardware infrastructure environment.
Servers Source.
- When the cloud management platform is docked to other platform cloud accounts, it will automatically synchronize servers on other platforms to the cloud management platform for management.
- Create server creation.
Entry: In the Cloud Management Platform, click the top left corner of  navigation menu, and click “Compute/Compute/Servers” menu item in the left menu bar that pops up to enter the Servers page.
-
The top right of the list will show the total number of servers and the number of servers that are running, shutdown, operation failed, and unknown.

-
In project view, the user cannot see the list parameters belonging to the domain resources, e.g. the user cannot see the host to which the server belongs or the cloud account used in project view.
Create Servers
This feature supports the creation of one or more servers on On-premise, private cloud or public cloud platform. If the host request process is enabled in the platform, the user will initiate a ticket request for host request after configuring the new server parameters, and wait for the ticket review to complete before the automatic deployment of the server begins. If the host request process is not enabled in the platform, you can directly create a new server.
Prerequisites
- On-premise: Requires the presence of OneCloud platform hosts with enabled status in the base resources, or the cloud management platform has been docked to the VMware platform, and the VMware platform hosts with enabled status exist in the base resources.
- Private cloud: The cloud management platform is required to have imported the resources of OpenStack, ZStack or DStack cloud accounts, and the hosts belonging to the above platforms exist in the base resources in the enabled state, and the corresponding platforms have available IP subnets.
- Public cloud: The cloud management platform is required to have imported the resources of Alibaba Cloud, AWS, Azure, Huawei Cloud, Tencent Cloud or UCloud cloud account, the cloud account is enabled and the status is normal, and the corresponding platform has an available IP subnet.
Operation Entrance
- Create On-premise server: In the server page, click the “Create” button at the top of the list to enter the Create On-premise Servers page.
- Create Private Cloud server: In the Servers page, click the “Private Cloud” tab at the top, click the “Create” button at the top of the list, and enter the Create Private Cloud Servers page.
- Create Public Cloud Server: On the Server page, click the “Public Cloud” tab at the top, click the “Create” button at the top of the list to enter the Create Public Cloud Server page.
Description
On the Create Servers for any platform page, you can click the “On-premise”, “Private Cloud”, and “Public Cloud” tabs at the top to create servers on different platforms.
Parameters configuration
Description
- When creating Servers on On-premise, you can directly select the platform the Server belongs to ( OneCloud or VMware).
- When creating Servers on a private cloud platform, you need to determine the platform the Server belongs to by region (OpenStack, ZStack, DStack,or HCSO).
- When creating a Server on a public cloud platform, you need to determine the platform the Server belongs to by the parameters of the platform and region (Alibaba Cloud, AWS, Azure, Huawei Cloud, Tencent Cloud, UCloud).
- Specify Project: Specify the project to which the server belongs when creating a new server.
- Region (On-premise, Private Cloud): Select the region and zone. You need to determine the platform to which the server belongs by region when creating a private cloud platform server.
- Name: Set the name of the server.
- When setting the number of servers greater than 1, except for the first server name, all other server names are indicated by the name -1~N.
- Servers and baremetal share the name space. Names are unique in the system. Creating a server in a project reports a duplicate name error because a server or baremetal with that name already exists in another project.
- The name supports an ordered suffix placeholder #, where a # takes up a place, e.g. if the name is set to host## and the number of Servers is 2, the Servers created will be named host00 and host01. If the name is still set to host##, the names will follow the previous order, numbered in descending order.
- The name supports expressions in the format of ${variable}, such as ${host}, then the server name is displayed as the name of the host where the server is created. For detailed description, please see Server Name Expression Example Description.
- Billing type (Public Cloud): Including postpaid, prepaid packages.
- This model is suitable for scenarios where the demand for equipment will increase dramatically in an instant, and the price is more expensive than prepaid packages.
- This model is suitable for scenarios where the demand for the device is relatively stable and the price is cheaper than postpaid. support checkbox auto-renewal.
Note
- Only Alibaba Cloud annual subscriptions support purchase by the week, and the platform will automatically select Alibaba Cloud when a week is selected.
- The renewal period for Servers purchased on a weekly basis is one week for the Alibaba Cloud platform, one month for Servers purchased on a monthly basis, and one year for Servers purchased on an annual basis; all other platforms have a one-month renewal period. Subsequent Servers are automatically renewed before each expiration.
- Auto delete after: Set the length of time to use the new server before it expires, after the set time, the server will be deleted and put into the trash. By default, no expiration is set, user can set “1 hour”, “6 hours”, “1 day”, “3 days “, “1 week”, “1 month” or customize the length of use.
Note
- The public cloud only supports expiration release for pay-per-use Servers.
- Public cloud Servers are still charged after they are placed in the trash, so if the Server is no longer in use, please clear it in the trash.
- Quantity: Set the number of servers to be created.
- Platform (On-premise): Select the platform that the server belongs to, including OneCloud and VMware.
- Region (Public Cloud): You can determine the user selectable packages by city, platform, region, and zone, and it is recommended to select the closest city, which can reduce access latency and improve access speed.
Description
When creating a server for a public cloud platform and selecting a city, the optional platform and region need to meet both the following conditions.
- Have a cloud account that corresponds to the platform and the cloud account is not disabled and has a sufficient balance.
- Have a VPC and IP subnet for the corresponding platform region.
- Cloud subscription (public cloud): Servers will be created on the public cloud platform using the specified cloud subscription. Images, VPCs, IP subnets, etc. will be filtered based on cloud subscriptions.
- CPU architecture: x86 and ARM architectures are currently supported. Only OneCloud platforms support ARM architecture, other platforms only support x86 architecture by default.
- Configure GPU: Configure GPU card for the server, after enabling this item, you also need to select the specific GPU card.
- CPU, Memory: set the specifications of the server. And you can choose the available packages according to the server specifications, etc.
Note
The OS image is currently filtered by the CPU architecture in the configuration.
- Configuration: Server packages are combinations of CPU and memory specifications of servers with different package prices. Among them, On-premise and private cloud packages can be maintained through the cloud management platform, and users can choose the packages of On-premise or private cloud platform when creating servers of private cloud platform. The public cloud package information is synchronized with the information on the corresponding public cloud platform.
- OS: Select the image of the server, and support to get the image from the following ways. The image drop-down list includes the image name, size, CPU architecture, partition method, boot method, and supports the selected image boot method to automatically select the following boot method.
- Public Cloud Image: Display the public image on the corresponding public cloud platform, which is only supported by the public cloud platform and is not displayed in the image list.
- Public Cloud Custom Image: support for selecting custom images on the specified cloud account of the corresponding public cloud platform, supported only by the public cloud platform, not displayed in the image list.
- Private Cloud Image: Show the image on the corresponding private cloud platform, only supported by the private cloud platform. Not shown in the image list.
- VMware Platform Image: support to select the images of specified VMware accounts on VMware platform, only supported by VMware platform. Not shown in the image list.
- Public Image: corresponds to the public image in the list of images, which is generally the common image of the system and maintained by the administrator.
- Custom Image: Corresponds to the custom image in the system image list, generally uploaded by the user.
- Boot from ISO: corresponds to the ISO format image in the system image list. When selecting an ISO image file, the user is required to install the operating system for the server. supported only for OneCloud and VMware platforms.
- Server Image: Corresponds to the server image in the server image list, supported by OneCloud platform only.
- Server Snapshot: Corresponds to the server snapshot in the server snapshot list, supported only for
OneCloud
and VMware platforms.
Description
- When using Public Image and Custom Image on the cloud management platform when creating servers on the public cloud platform, it is recommended to use cached images since they need to be cached to the public cloud platform and may take longer to create. Cached images have a cached flag to the right of the image name.
- For servers that install Windows OS by mounting ISO, after the installation is completed, you also need to install Virtio driver, which can be obtained from the image marketplace-ISO.
- System disk: Display and set different disk types, media, and the capacity size of the disk according to the selected package. The public cloud platform does not support setting the scheduling tab
Note
- Only the system disk of OneCloud platform supports viewing the media corresponding to the disk.
- System disk size is not support for resizing when creating a server in VMware platform selecting a VMware platform image or server snapshot.
- When creating servers in OpenStack platform, image as system disk and image storage as system disk storage are supported.
- The public cloud platform does not support setting scheduler tags.
- When creating servers in Tencent Cloud Platform, the system disk size must be a multiple of 10. Otherwise, the creation will fail.
- When the operating system selects “Boot from ISO”, the disk type on the server is displayed as data disk. The disk type display does not affect the normal use of the server.
- When setting the system disk, the system will automatically check whether the storage capacity of the selected disk type meets the demand.
- When the remaining capacity of the corresponding storage is less than 100GB, a yellow box will remind the user. At this point, you can still create the disk successfully, but we suggest you to go to Storage - Block Storage page to add new storage or adjust storage capacity.
- When the remaining capacity of the corresponding storage cannot meet the set system disk size, a red box will be displayed and the user will be prompted to go to Storage - Block Storage page to add new storage or adjust the storage capacity.
- When the scheduler tag and scheduling preferences are not set and block storage is specified, the system will automatically select the optimal storage for the server according to the scheduler policy and the default preferences of the scheduler tag.
- When there is a scheduler policy that matches the scheduler policy, the corresponding storage will be selected according to the scheduler tag and scheduler tag preference set in the scheduler policy. The scheduler tag preferences in the scheduler policy will override the default policy in the scheduler tag.
- When there is no conforming scheduler policy, the optimal storage will be selected based on the default policy of the scheduler tag bound in the storage device.
- When scheduler tag and scheduler tag preference are set, the set scheduler tag preference will override the default policy on the scheduler tag. The storage that provides the system disk is selected based on the scheduling preference as well as the scheduler tag.
- Prefer: Scheduling prefers storage with this tag.
- Avoid: Scheduling avoids storage with this tag.
- Exclude: Exclude storage with this tag from scheduling.
- Require: stores with this tag must be used when scheduling.
- E.g. Take local storage as an example, local storage A is bound to scheduler tag A. The default policy for scheduler tag A is to use as much as possible. Local storage B is bound to scheduler tag B. The default policy for scheduler tag B is to prohibit its use. Scheduler Policy A is when creating a server in project A, select scheduler tag B, and scheduler policy preference is must use.
- When the scheduler tag is not set, there are two cases as follows.
- If the server belongs to project A, the system will prefer local storage B to provide storage for the server system disk.
- When the server does not belong to project A, the system will prefer local storage A to provide storage for the server system disk.
- When the scheduler tag is set to A and the policy is forbidden, the system will exclude local storage A and select local storage B to provide storage for the Server system disk.
- When the scheduler tag is not set, there are two cases as follows.
- Selete Block Storage: Users support selecting block storage for disks under the System View, and support to view the usage of storage, etc. which is currently only supported by VMware platform.
- Data disk: optional, you can add multiple data disks according to your needs, set the type, media, and capacity size of the disk. The optional type of disk is the same as the system disk. Only the first data disk supports selecting the disk type, the subsequent added data disks are of the same type as the first data disk.
Note
- Only the data disk of OneCloud platform supports viewing the media corresponding to the disk.
- When creating an OpenStack server when the system disk is stored as an image, the data disk type can be set.
- The data disk type for the VMware platform is the same as the system disk type.
- The added data disk is only mounted to the server and will not automatically perform partitioning operations, but will need to be manually partitioned by the user after remotely connecting to the server.
- Only
OneCloud
platform supports support for setting mount points, snapshotting build disks, and setting scheduler tags. Private clouds that use local storage also support the set scheduler tag feature.
- Set scheduler tag: same as system disk.
- Set mount point: Set the file type (ext4, xfs, swap) of the data disk, and the non-system directory where the data disk is mounted. Only one of them can be set: set mount point and snapshot build disk.
- Snapshot build disk: Create data disk based on snapshot. You can view the existing snapshots in the On-premise. Only one of the two can be set: set mount point and snapshot build disk.
- Username: Show the administrator account of the server.
- Password: Set the administrator password, which is the password of root user in Linux system and administrator user in Windows OS.
- Random Password: randomly generated administrator password, users can view the copied administrator password in the password column of the server list
- Key Pair: You need to create a new key before associating the key. After associating the key, the user needs to use the private key to log in the server remotely.
- Keep image settings: The administrator password is the existing administrator password in the image.
- Custom Password: You can set the administrator password manually.
Description
- When you choose to boot from ISO, setting the administrator password is not support. The administrator password needs to be set when the user installs the OS.
- Depending on the platform where the server is located, the administrator password may be set in one of the above ways, please see the interface.
- Networks: Set the IP address of the server.
Note
- VMware servers do not support VPC networks, only default classic networks can be selected.
- Only OneCloud servers can select default classic and VPC networks.
- Only OneCloud platform Servers support adding up to 8 networks, other platforms only support one network.
- Auto scheduling: When Auto scheduling is selected, IP addresses are assigned to servers from the IP subnets where Auto scheduling is enabled.
- Specify IP subnet: Select VPC and IP subnet. If you want to specify static IP, click “Manually configure IP” button to set IP address and click “OK” button.
- Specify scheduler tag: Set the scheduler tag and the scheduler tag preference. The set scheduler tag preference will override the default policy on the scheduler tag. Select the optimal IP subnet based on the scheduler tag and scheduling preferences.
- Prefer: Scheduling preference is given to IP subnets that have this tag.
- Avoid: Try to avoid IP subnets with this tag when scheduling.
- Exclude: Exclude IP subnets with this tag from scheduling.
- Require: IP subnets with this tag must be used in scheduling.
- E.g. if IP subnet A is bound to scheduler tag A, the default policy is prohibit, and IP subnet B is bound to scheduler tag B, the default policy is try to use. Scheduler Policy A is when the server belongs to project A. Select scheduler tag A and scheduler tag preference is must use.
- When the network is selected as default when the server is created, there are two cases as follows.
- When the server belongs to project A, the system will select IP subnet A to assign an IP address to the server.
- When the server does not belong to project A, the system will select IP subnet B to assign an IP address to the server.
- When the network selection specifies IP subnet A when creating a server, the system will select IP subnet A to assign an IP address to the server.
- When the network selects scheduler tag A when creating a server and the tag preference is must use, the system will assign an unused IP address from IP subnet A to the server.
- When the network is selected as default when the server is created, there are two cases as follows.
- Tag: Supports binding tags for newly created servers. Selecting existing tags and new tags is supported.
- Create tag: Click the Create button at the top of the list, set the tag key and tag value, and click the “Add” button to create a new tag and bind it to the resource.
- Select existing tags: Click “Existing Tags” button to select tag keys and values.
Advanced Configuration: Hidden by default, can be configured according to requirements.
- EIP: EIP is a kind of NAT IP that enables communication between servers and public network by binding with servers. The default is no binding, when you select “Create”, you need to configure the following parameters.
- Line type: You can create the EIP of the corresponding line type according to your requirements.
- Network billing method: Set the billing method of the EIP, including billing by traffic and billing by bandwidth.
- Billed by flow: charge by actual transmission flow, which can limit the peak bandwidth to avoid the cost of unexpected traffic, and will drop packets when the instantaneous bandwidth exceeds the value, which is applicable to the occasion of large network fluctuation.
- Billed by Bandwidth: Billed by transmission rate, choose fixed bandwidth, packets will be dropped when the bandwidth exceeds the value, suitable for scenarios with less network fluctuation.
- Bandwidth: Set the bandwidth size.
- Public IP (Tencent Cloud and Alibaba Cloud): Public IP enables communication between servers and the public network by binding with servers. It includes EIP and Static Public IP. EIP can be flexibly bound or unbound with servers. Static public IP does not support unbinding with servers. The default is no binding. When you select “Create EIP” or “Create Static Public IP”, you need to configure the following parameters.
- Network billing method: Set the billing method of the EIP, including billing by traffic and billing by bandwidth.
- Billed by traffic: Billed by actual transmission traffic, which can limit the peak bandwidth to avoid the cost of unexpected traffic, and will drop packets when the instant bandwidth exceeds the value, which is suitable for the occasion of network fluctuation.
- Billed by Bandwidth: Billed by transmission rate, choose fixed bandwidth, packets will be dropped when the bandwidth exceeds the value, suitable for scenarios with less network fluctuation.
- Bandwidth: Set the bandwidth size.
Note
- On-premise platforms support binding elastic public IPs when creating servers for VPC networks, and only support per-bandwidth billing.
- Public cloud platforms other than Tencent Cloud and AliCloud only support new EIP when creating new servers, Tencent Cloud and AliCloud platforms support new EIP and Static Public IP when creating new servers.
- When creating an AWS server, if the selected VPC does not allow external network access, the new EIP is not allowed.
- AWS, Azure, Google only support billed by traffic.
- Network billing method: Set the billing method of the EIP, including billing by traffic and billing by bandwidth.
- Security Group: Set up security group rules for servers. Security group is a virtual packet filtering firewall that controls whether associated servers can be accessed and the external resources that servers can access by setting up security group rules, etc. A server supports binding up to 5 security groups.
- Scheduler Policy: The scheduler policy allows you to select the host or cloud account to which the server belongs.
- Default: The system will select the optimal host for the server based on the scheduler policy and the scheduler tag.
- Priority check the scheduler policy in the system, if there is a matching scheduler policy, the best host will be selected based on the scheduler tag and scheduler tag preference in the scheduler policy. The scheduler tag preferences in the scheduler policy will override the default policy in the scheduler tag.
- When there is no matching scheduler policy, the system will select the optimal host based on the default policy of the scheduler tag bound to the host.
- Host: The server will be created on the specified host.
- Scheduler tag: Set the scheduler tag and the scheduler tag preference. The set scheduler tag preference will override the default policy of the scheduler tag. Select the corresponding host according to the scheduler tag and scheduler tag preference.
- Use (prefer): Scheduling preference is given to hosts with this tag.
- Avoid: Avoid hosts with this tag when scheduling.
- Exclude: Exclude hosts with this tag from scheduling.
- Require: Hosts with this tag must be used when scheduling.
- E.g. If host A binds to scheduler tag A, the policy for scheduler tag A is disable. Host B is bound to scheduler tag B. The policy for scheduler tag B is try to use. Scheduler Policy A is when a server is created in project A, scheduler tag A is selected and scheduler policy preference is must use.
- When the scheduler policy is selected as default when a server is created, there are two cases as follows.
- When the server belongs to project A, the system will choose to create the server on host A.
- When the server does not belong to project A, the system will choose to create the server on host B.
- When scheduler tag A is selected and the scheduler tag preference is set to must use, the system will select to create the server on host A.
- When the scheduler policy is selected as default when a server is created, there are two cases as follows.
- Cloud Subscription: The specified cloud subscription will be used to create servers on the private cloud platform, or VMware platform. If IP subnet is specified when configuring the network, only the cloud subscription where the IP subnet is located can be selected.
- Default: The system will select the optimal host for the server based on the scheduler policy and the scheduler tag.
- Boot Firmware: Includes BIOS and UEFI modes, supported only by OneCloud platforms, and only UEFI mode is supported by the ARM architecture.
- High Availability: Only supported by OneCloud platform and requires no less than 2 hosts for the domain where the Servers are located or shared to the domain where the Servers are located to achieve high availability by creating a backup machine for the Servers, synchronizing data between the Servers and the backup machine on a regular basis, and when the Servers fail, the business will switch to the backup machine for normal use. It can quickly recover the business and reduce the business downtime caused by the failure of Servers. When enabling the high availability feature, you need to specify the host of the backup machine.
- Anti-affinity group: Select whether to check the unaffinity group. If checked, the unaffinity group needs to be selected, and the newly created Servers need to select the hosts, etc. according to the scheduling rules within the unaffinity group. If the scheduling rules are not satisfied, the creation may fail, which is only supported by OneCloud platform.
After the setup is complete, users can click the Create button to create a server.
If tickets are enabled, you need to fill in the reason for the application and click the “Submit Ticket” button to submit a ticket to create a server, and wait for approval before starting to create a server.
Example of host name expression
The host (including server and baremetal) name supports expressions in the format of ${variable name}, and the variable name needs to be lowercase. E.g. ${host}, the server name is displayed as the name of the host where the server is created; ${region}-${zone}, the name of the region - zone name, etc.
The supported variable names are as follows.
| Variable Name | Example | Description |
|---|---|---|
| brand | aliyun | brand |
| charge_type | postpaid | billing method |
| cloud_env | onpremise/public/private | Used to distinguish between local IDCs, private clouds and public cloud platforms |
| cloudregion_id | default | region id |
| cpu | 1 | Number of CPUs |
| host | gobuild | host name |
| host_id | 16f49f8a-88cc-4715-8870-f78130196fa9 | host_id |
| ip_addr | 192.168.1.1 | IP address |
| mem | 1024 | memory |
| os_distribution | operating_system | CentOS |
| os_type | Linux | operating system type |
| os_version | 6.9 | OS version |
| owner_tenant | system | project |
| owner_tenant_id | d56f5c37e36a42b782d7f32b19497c4c | project id |
| provider | OpenStack | provider |
| region | Default | region |
| region_id | kvm | virtualization method |
| res_name | server | resource_category |
| template_id | 5199f56b-01c2-425c-8e29-0179d283e4a3 | template_id |
| zone | zone1 | zones |
| zone_id | 00f3f3c6-1d16-4053-81f1-4cb092f418f5 | zone_id |
Servers Operation
Servers support multiple operations, and different platforms have different restrictions on server operation requirements.
| operation\platform | OneCloud | VMware | OpenStack | ZStack | DStack | HCSO | Alibaba Cloud | AWS | Azure | Huawei Cloud | Tencent Cloud | UCloud | Ctyun | ||
|---|---|---|---|---|---|---|---|---|---|---|---|---|---|---|---|
| VNC Login | Run | Run | Run | Run | Run | Run | Run | N | N | Run | Run | Run | N | N | |
| Web SSH login | All IPs, run | All IPs, run | EIP, run | EIP, run | EIP, run | EIP, run | EIP, run | EIP, run | EIP, run | EIP, run | EIP, run | EIP, run | EIP, run | EIP, run | |
| Rebuild system | Running, Stop | Running, Stop | Stop | Stop | Stop | Stop, Failure | Running, Stop | Running, Stop | Running, Stop | Stop, Failure | Running, Stop | Stop | Stop | Stop | |
| Adjust Configuration | Run, Stop | Stop | Stop | Run, Stop | Run, Stop | Stop | Stop | Stop | Run, Stop | Stop | Stop | Stop | Stop | Stop | |
| Create Snapshot | Y | Server Snapshot | Y | Y | Y | Y | Y | Y | Y | Y | Y | Y | N | Y | |
| create same configuration | Y | N | N | N | N | Y | Y | Y | Y | Y | Y | Y | Y | Y | |
| Bind GPU card | Y | N | N | N | N | N | N | N | N | N | N | N | N | N | |
| Set Disk Speed | Y | N | N | N | N | N | N | N | N | N | N | N | N | N | |
| Auto delete after | Y | Y | Y | Y | Y | Y | Y | Y | Y | Y | Y | Y | Y | Y | |
| server clone | Y | N | N | N | N | N | N | N | N | N | N | N | N | N | |
| Renewal | N | N | N | N | N | N | Y | N | N | Y | Y | Y | N | N | |
| Automatic renewal settings | N | N | N | N | N | N | Y | N | N | Y | Y | Y | N | N | |
| Reset Password | Stop | Stop | Run | Run | Run | Stop | Stop | N | Run | Stop | Run | Stop | Run | Stop | |
| Bind/Unbind Key | Stop | Stop | Create servers | Run | Run | Create servers | Stop | N | Run | Create servers | Stop | - | Stop | N | |
| Save Image | Y | Y | N | N | N | Y | Y | Y | Y | Y | Y | N | Y | N | |
| Mount/Unmount ISO | Y | N | N | N | N | N | N | N | N | N | N | N | N | N | |
| #Security groups | 5 | N | 5 | 1 | 1 | 5 | 5 | 5 | 1 | 5 | 5 | 1 | 5 | 5 | |
| Bind/unbind EIP | Y (vpc) | N | Y | Y | Y | Y | Y | Y | Y | Y | Y | Y | Y | Y | |
| Public IP to EIP | N | N | N | N | N | N | Y | Y | Y | Y | Y | Y | Y | Y | |
| Set source/target check | Y | N | N | N | N | N | N | N | N | N | N | N | N | N | |
| Backup Machine | Y | N | N | N | N | N | N | N | N | N | N | N | N | N | |
| Migration | Y | N | N | N | N | N | N | N | N | N | N | N | N | N |
Tag Management
Please see Setting - Tag Management content.
Remote control
Connect to the server remotely via VNC remote terminal or Web SSH.
Note
- VNC remote terminal remote connection is not support by AWS, Azure, Google, Sky Cloud.
- Windows OS servers only support remote connection via VNC remote terminal.
- ZStack, DStack, HCSO, Alibaba Cloud, AWS, Azure, Huawei Cloud, Tencent Cloud, and UCloud require the presence of an EIP on the server to connect remotely via Web SSH.
- Servers on OneCloud platform Classic network can use Web SSH and VNC remote terminal directly; Servers on OneCloud platform VPC network can use Web SSH and VNC remote terminal directly, or they can bind EIP and use Web SSH with EIP. please note that Servers on unbound EIP VPC network servers can only connect through the platform’s Web SSH, and cannot use SSH tools to connect. If you need to use SSH tools to connect servers, please bind EIP for servers.
- When the EXSI where the VMware server is located is lower than version 6.5, the VNC remote terminal cannot be opened directly, and users need to download the vmrc (VMware Remote Console) client locally.
- After VNC has been connected to a black page for a long time, pressing the spacebar will restore the display.
-
On the server page, click the “Remote Terminal” button on the right action bar of the server, select the “VNC Remote Terminal” menu item, and create a new browser tab with the Web Console name.

- Send Remote Commands: Click the “Send Remote Commands” button and select the drop-down menu “Ctrl-Alt-F1~F12” menu item to send specific commands to the server console.
- Ctrl-Alt-Delete: Click Ctrl-Alt-Delete button to send Ctrl-Alt-Delete command to the server console if the server is Windows system, and if the server is Linux system, a restart server prompt will pop up, click “OK” button will restart the server.
- Send Text: Click the Send Text button, enter the content to be sent in the Send Text dialog box that pops up, click the “OK” button to send the text to the server console, if the content sent is the login password, you need to type the Enter key to confirm the login after sending the text.
-
Click the “Remote Terminal” button and select the “SSH IP Address” menu item to establish a web SSH connection with the server.
-
Click the Remote Terminal button, select the “SSH IP:Custom Port” menu item, set the port number in the pop-up dialog box, and click the “OK” button to establish a web SSH connection with the server.

Instance status
Start
This function is used to power on a server that is in a shutdown state. The batch boot operation supports selecting servers in the “shutdown” state on different platforms.
Start
- On the Servers page, click the “More” button on the right action bar of the server in the “Stop” state, and select the drop-down menu “Instance Status-Start” menu item to start the server.
Batch Start.
- Check one or more servers in the “Stop” state in the server list, and click the “Start” button at the top of the list to start multiple servers in a batch.
Stop
This function is used to shut down a running server. The batch shutdown operation supports selecting servers in “running” state on different platforms.
注意
At present, only Alibaba Cloud and Tencent Cloud postpaid servers support shutdown without charge.
- After shutting down, the CPU and memory will be released, and the billing of the CPU and memory will be stopped. The associated hard disk, mirroring, and public network bandwidth (if billing is required) will still be billed
- After shutting down, the CPU and memory of the instance will no longer be reserved, so it may fail when the instance is started again. At this point, you can try to start again, or start again at a different time
- After the shutdown, the common public IP will be released and cannot be retrieved. It is recommended that you first convert to a flexible public IP before performing the shutdown operation
- After shutdown, the elastic public IP will be reserved and will not be released, and no fee will be charged during shutdown
- During shutdown, many instances of operations (such as adjusting the configuration, reinstalling the system, etc.) may not be supported. If you need to operate, please perform it after booting.
- Some instances that do not support shutdown without charging will continue to be charged normally after shutdown
Servers Stop
- On the server page, click the “More” button in the action bar to the right of the server in the “Running” state, and select the “Instance Status-Stop” menu item to bring up the action confirmation dialog.
- When the server is a postpaid server on Alibaba Cloud or Tencent Cloud platform, you can choose to check the “No charge for shutdown” box.
- Click the “OK” button to complete the operation.
Batch Stop.
- Check one or more servers with “Running” status in the server list, and click the “Stop” button at the top of the list to bring up the operation confirmation dialog box.
- When the selected server is a postpaid server on Alibaba Cloud or Tencent Cloud platform, you can choose to check the “No charge for shutdown” box.
- Click the “OK” button to complete the operation.
Restart
This function is used to restart a running server, and the VNC connection will be interrupted during the restart. Batch restart operation supports selecting “running” servers on different platforms.
Restart
- On the server page, click the “More” button on the right action bar of the “running” server, and select the “Instance Status-Restart” menu item to bring up the action confirmation dialog.
- Select whether to check the Force Restart, and click the “OK” button.
Batch Restart
- Select one or more servers with “Running” status in the server list, and click the “Restart” button at the top of the list to bring up the operation confirmation dialog box.
- Select whether or not to check Force Restart, and click the “OK” button.
Note
If Force Restart is checked, unsaved data in the server will be lost.
Reset
This function is used to restart a running server, and the VNC connection will not be interrupted during the restart. Only servers on OneCloud platform are supported.
- On the Servers page, click the “More” button on the right action bar of the running server, and select the “Instance Status-Reset” menu item to bring up the action confirmation dialog.
- Click the “OK” button to complete the operation.
Pending
This function is used to put the running server into the hibernation state. When the server is hung, it will save the current state and the service will be suspended without ending.
Currently, only VMware servers support suspend/resume operations.
Servers Mount
- On the Servers page, click the “More” button in the action bar to the right of the server in the “Running” state, and select the “Instance Status-Pending” menu item to bring up the action confirmation dialog.
- Click the “OK” button to complete the operation.
Batch Mount
- Select one or more servers in the “Running” state in the server list, click the**_“Batch Operation”_** button at the top of the list, and select the drop-down menu **_“Instance Status-Pending”_** menu item to bring up the operation confirmation dialog box.
- Click the “OK” button to complete the operation.
Restore
This function is used to restore a suspended server to a running state.
Only VMware servers currently support the suspend/resume operation.
Servers Restore
- On the Servers page, click the “More” button in the action bar to the right of the hung server, and select the “Instance Status-Restore” menu item to bring up the action confirmation dialog.
- Click the “OK” button to complete the operation.
Batch Restore
- Select one or more servers in the “Running” state in the server list, click the**_“Batch Operation”_** button at the top of the list, and select the drop-down menu **_“Restore”_** menu item to bring up the operation confirmation dialog box.
- Click the “OK” button to complete the operation.Batch Action
Sync Status
When the server is maliciously damaged or operated by illegal brute force, resulting in abnormal service status (such as system crash), it needs to be repaired by the administrator in the background to synchronize the server environment status and provide system-level service repair measures. Or synchronize the running state in case of resource over-allocation. Batch synchronization state operation supports selecting servers on different platforms.
Sync State.
- On the server page, click the “More” button in the action bar on the right side of the server, and select the drop-down menu “Instance Status-Sync Status” menu item to synchronize the server status.
Batch Sync Status
- Check one or more servers in the server list, click the**_“Batch Operation”_** button at the top of the list, and select the drop-down menu **_“Sync Status”_** menu item to synchronize the server status.
Instance Settings
Modify PropertiesBatch Action
This function is used to modify the boot media, boot method, etc. of the server. Batch modify attribute operation supports selecting servers on different platforms.
server modify properties
- On the server page, click the “More” button on the right action bar of the server, and select the drop-down menu “Instance Settings-Modify Properties” menu item to bring up the Modify Properties dialog box.
- Modify whether the server is enabled for deletion protection. When the deletion protection is disabled, the server can be deleted. When the deletion protection is enabled, the server cannot be deleted.
- Modify the boot media of the server, and choose to boot the server from disk, optical drive, or network.
- If the ISO is mounted, you can choose to boot the server from the optical drive and perform the operation of installing the operating system.
- If the system disk already has an operating system, you can choose to boot the server through the disk, etc.
- If the device needs to download the image to boot from a remote server through the network, you need to choose to boot the server through the network.
- Modify the boot method of the server. Currently, only the server on OneCloud platform supports modification, and the ARM architecture only supports the UEFI boot method.
- Click the “OK” button to complete the operation.Batch Action
Batch modify attributes.
- Check one or more servers in the server list, click the**_“Batch Operation”_** button, and select the drop-down menu **_“Modify Properties”_** menu item to bring up the Modify Properties dialog box.
- Modify the boot media of the server, and choose to boot the server from disk, optical drive, or network.
- If the ISO is mounted, you can choose to boot the server from the optical drive and perform the operation of installing the operating system.
- If the system disk already has an operating system, you can choose to boot the server through the disk, etc.
- If the device needs to download the image to boot from a remote server through the network, you need to choose to boot the server through the network.
- Modify the boot method of the server. Currently, only the server on OneCloud platform supports modification, and the ARM architecture only supports the UEFI boot method.
- Click the “OK” button to complete the operation.
Rebuild System
This function is used to change the system for the server.
-
On the server page, click the “More” button on the right column of the server, and select the drop-down menu “Instance Settings - Rebuild System” menu item to bring up the Rebuild System dialog box.
-
Select the system image, you can select the image of the same OS from the public image or custom image respectively.
-
Set the administrator password, which is the password of the root user in Linux system and the password of the administrator user in Windows OS.
- Random Password: Random Password administrator password, users can view the copied administrator password in the password column of the server list.
- Key Pair: You need to create a new key before associatinBatch Actionr associating the key, users need to use the private key to log in to the server remotely.
- Keep image settings: The administrator password is the existing administrator password in the image.
- Custom Password: You can set the administrator password manually.
Description
Depending on the platform where the server is located, the administrator password may be set in one of the above ways, please see the interface.
- Check the “Automatically start after reinstallation” box by default, you can uncheck it if you want, and click the “OK” button to finish the operation.
Adjust Configuration
This function is used to modify the hardware configuration of the server, including CPU, memory and disk size, etc. It supports batch operation.
Note
- CPU and memory sizes are only allowed to be adjusted upwards in the OneCloud platform Server running state.
- ZStack does not allow CPU and memory size adjustment in the Server boot state, and only supports increasing the data disk.
- Alibaba Cloud Servers are not allowed to adjust Server configuration after binding EIP.
- Servers on platforms other than Alibaba Cloud, Tencent Cloud and Huawei Cloud with prepaid do not support adjusting the configuration.
- When adjusting the configuration in batch, only Servers on the same platform are allowed to be selected.
Servers Adjustment Configuration
- On the Servers page, click the “More” button on the right action bar of the server, and select the drop-down menu “Instance Settings - Adjust Configuration” menu item to bring up the Adjust Configuration dialog box.
- Adjust the number of CPU, Memory and data disks of the server, or add new disks as required. If ticket is enabled, you need to fill in the reason of application and click “Submit Ticket” button to submit the adjustment configuration ticket, and wait for the approval before the configuration is successfully adjusted.
Batch Adjustment Configuration
- Check one or more servers of the same platform in the server list, click the**_“Batch Operation”_** button at the top of the list, and select the drop-down menu **_“Adjust Configuration”_** menu item to bring up the Adjust Configuration dialog box.
- Adjust the CPU cores and memory of the server. If the server is in the “shutdown” state, you can check the “Automatically start after adjusting configuration”, and click the “OK” button.
- If ticket is enabled, you need to fill in the reason of application and click “Submit Ticket” button to submit the ticket to adjust the configuration, and wait for approval before the configuration is successfully adjusted.
Change Project
A project is the owner of a resource. When a server belongs to a project, all members of the project have permission to use the server. The project to which a Server belongs can be changed according to specific usage requirements.
To change a project for a single server
- On the Servers page, click the “More” button in the action bar on the right side of the server, and select the drop-down menu “Instance Settings - Change Project” menu item to bring up the Change Project dialog box.
- After selecting the domain and the items under the domain, click “OK” button to finish the operation.
Batch Change Projects
Batch change projects require that the servers belong to the same domain.
- Check one or more servers in the server list, click the “Batch Operation” Batch Actionop of the list, and select the drop-down menu “Change Projects” menu item to bring up the Change Projects dialog box.
- After selecting the domain and the items under the domain, click “OK” button to finish the operation.
Create Snapshot
A snapshot is a data backup method that creates a fully usable copy of a server’s system disk, data disk, or the server as a whole at a specified point in time, making it easy to quickly roll back to the state of the server at the time the snapshot was created after a server failure.
Note
- The UCloud and SkyCloud platforms do not support snapshot creation at this time; VMware platform servers only support server snapshot creation. The private cloud platform only supports local disk to create disk snapshots. The OneCloud platform supports creating both disk snapshots and server snapshots.
- Exceptional state drives are not support for creating disk snapshots.
- The number of snapshot quotas for server snapshots is equal to the number of disks on the host, i.e. if there are 2 disks on the host, the snapshot quota for creating a server snapshot for that host is 2.
- On the Servers page, click the “More” button on the right action bar of the server, and select the drop-down menu “Instance Settings - Create Snapshot” menu item to bring up the Create Snapshot dialog box.
- Select the snapshot category.
- When the Snapshot category is “Create disk snapshot”, select the disk to be backed up, set the snapshot name, and click the “OK” button to create a disk snapshot.
- When you select the Snapshot category as “Create server sBatch Actionhe snapshot name and click the “OK” button to create the server snapshot.
Create the same configuration
This function is used to create identically configured servers.
Note
- This operation is not support for servers on VMware, OpenStack, ZStack, and DStack platforms.
- On the server page, click the “More” button on the right action bar of the server, and select the drop-down menu “Instance Settings - Create the same configuration” menu item to bring up the Create the same configuration dialog box.
- Enter the name, set the number, and click the “OK” button. If you create multiple servers, the name of the 1st created server is the set name, and the names of the 2nd~Nth created servers are Name - 1~N-1.
Set GPU card
This function is used to set the GPU card to be bound or unbound for the server. Before binding the GPU card, please make sure the GPU pass-through device exists on the host where the server is located. It is recommended to bind the GPU card when the server is used for high performance computing, graphics display, etc.
Note
- Only OneCloud platforms support the ability to bind and unbind GPU cards.
- A server on the host machine can only bind GPU cards when there is an idle GPU device on the host machine.
- The GPU card can be bound and unbound only when the server is powered off.
- Batch binding GPU card operation only supports associating GPU cards of the same model, and batch unbinding will cancel all the associated GPU cards.
- Currently, only the administrator supports setting GPU function.
server setup GPU card
- On the Servers page, click the “More” button on the right action bar of the server, and select the drop-down menu “Instance Settings - Set GPU Card” menu item to bring up the Set GPU Card dialog box.
- The Set GPU Card page supports binding and unbinding GPU cards.
- Bind GPU card: Check whether to bind and select GPU card, support to choose to bind multiple GPU cards for the server, default check the box to start automatically after successful setup, that is, the server will start automatically after binding GPU card, click “OK” button.
- Unbind GPU cards: Uncheck whether to bind or not, after unchecking, then unbind all GPU cards on the server, the default check box is Auto-start after successful setup, that is, the server will be automatically started after unbinding GPU cards, click the “OK” button.
Batch setup GPU cards for servers
- Check one or more OneCloud servers with shutdown status on the platform in the server list, click the “Batch operation” button at the top of the list, and select the drop-down menu “Set GPU card” menu item to bring up the Set GPU card dialog box.
- The Set GPU Card page supports batch binding and unbinding GPU cards.
- Bind GPU card: Select “Associated GPU card” to set GPU card, select GPU card model, set the number of GPU cards bound on each server, and check the box of “Auto start after batch binding GPU” by default, that is, the server will be started automatically after binding GPU card, click “OK” button.
- Unbind GPU card: Select “Unbind GPU card” to set GPU card, default check “Automatically start after batch unbind successfully”, that is, automatically start the server after unbinding GPU card, click “OK” button to batch unbind GPU card.
Set Disk Speed
This function is used to limit the IOPS of the disk, where IOPS is the number of I/O requests that the system can handle per unit time, and I/O requests are usually read or write data operation requests. This operation is supported only for servers in the running state on the OneCloud platform.
- On the server page, click the “More” button in the action bar on the right side of the server, and select the drop-down menu “Instance Settings - Set Disk Speed” menu item to bring up the Set Disk Speed dialog box.
- Check whether to limit the speed, if checked, set the maximum disk IOPS, and click the “OK” button.
Auto delete after
Release at expiration means set the length of time the server will be used. When the set period is exceeded, the server will be automatically deleted and stored to the trash.
Note
- Only pay-per-use Servers in the public cloud support the release on expiration feature.
- Public cloud Servers are still charged after being placed in the trash, so if the Server is no longer in use, please purge it in the trash.
- On the server page, click the “More” button on the right action bar of the server, and select the drop-down menu “Instance Settings - Auto delete after” menu item to bring up the Auto delete after dialog box.
- Select whether to check Release by expiration, and then set the release time of the server after checking, and click the “OK” button.
- Click the Release Time input box to display the calendar and other contents. support entering the date and time directly in the Release Time input box in the format of yyyy-mm-dd hh:mm:ss, and click the “OK” button.
- Select the date in the calendar box, click the Select Time button, it will jump to the Set Time page, select the time and click the “OK” button.
- support quick selection of “1 hour”, “2 hours”, “3 hours”, “6 hours “1 day”, “2 days”, “1 week” button, the release time will be set to the corresponding time range, click “OK” button.
- When the settings are completed, the billing method column will display information such as how much time is left for the server to be released.
- If you no longer need the expiration release function, you can uncheck the expiration release in the expiration release dialog box that pops up before the Server is released, and click the “OK” button.
Server Clone
This function is used to clone a server with the same system and configuration as the current server based on the specification information of the server. Only running and shutdown servers on the OneCloud platform support the host cloning feature.
The current host cloning implementation principle is to create a new server based on the server snapshot, the host cloning process will generate a server snapshot and occupy the snapshot quota, which requires users to delete the useless snapshot in time, if the snapshot quota does not exist in the current user project, you will not be able to use the host cloning function.
single server clone
- On the server page, click the “More” button on the right operation bar of the server, select the drop-down menu “Instance Settings-Host Clone” menu item to bring up the Host Clone dialog box.
- Set the name, number, and cloning method.
- Create Server Snapshot Clone: When you select “Create Server Snapshot Clone”, it is recommended to check “Delete the server snapshots generated by this clone after the clone is completed” to reduce the number of useless server snapshots and release the snapshot quota, etc. Click “OK” button The server will create a server snapshot and create a server with the exact same configuration as the current server.
- Existing Server Snapshot Clone: When you select “Existing Server Snapshot Clone”, you need to check the server snapshot already created by the server and click the “OK” button. The server cloned using an existing server snapshot has the same configuration and state as the server at the time the snapshot was created, and may not have the same state as the current server. If users do not need to use the existing server snapshot, they can also delete the server snapshot and increase the snapshot quota on this page.
Batch server clone
- Select two or more servers in the server list, click the**_“Batch Operation”_** button at the top of the list, and select the drop-down menu **_“Instance Settings - Host Clone”_** menu item to bring up the Host Clone dialog box.
- Click the “OK” button to clone the servers in batch.
Join Anti-affinity Group
This function is used to add a server to an unaffinity group. Only servers on OneCloud platform support the join unaffinity group feature.
- On the server page, click the “More” button on the right action bar of the server, and select the drop-down menu “Instance Settings - Join Anti-affinity Group” menu item to bring up the Join Anti-affinity Group dialog box.
- Select the unaffinity group (only the unaffinity group with the same project as the server is displayed), and click the “OK” button.
Renewal
If you need to continue using the server resources after the expiration of the prepaid server packages applied on Alibaba Cloud, Huawei Cloud, Tencent Cloud, and UCloud platforms, you need to perform the renewal operation before the server resources are released.
- On the server page, click the “More” button on the right column of the server, and select the drop-down menu “Instance Settings-Renewal” menu item to bring up the renewal dialog box.
- Select the renewal length and click “OK” button.
Automatic renewal settings
Batch Action In order to avoid the Servers on Alibaba Cloud, Huawei Cloud, Tencent Cloud, and UCloud platforms from being released after the prepaid servers expire due to forgetting to renew, we recommend users to set up auto-renewal for important prepaid servers.
Description
The renewal period is one week for Servers purchased on a weekly basis, one month for Servers purchased on a monthly basis, and one year for Servers purchased on an annual basis for the Alibaba Cloud platform; all other platforms have a one-month renewal period. Subsequent Servers are automatically renewed before each expiration.
- On the Servers page, click the “More” button on the right action bar of the server, and select the drop-down menu “Instance Settings - Automatic renewal settings” menu item to bring up the Set Expired release dialog box.
- Expired release: Check Expired release and click “OK” button to set Expired release.
- Cancel Expired release: Uncheck Expired release, click “OK” button to cancel Expired release.
Password Key
Reset Password
This function is used to update the password of the administrator user on the server. The administrator password is the password of the root user on Linux systems and the password of the administrator user on Windows operating systems.
Note
- Password resets are not support for servers on the AWS platform.
- Servers on the OpenStack, ZStack, DStack, Azure, and UCloud platforms support password reset operations in a running state.
- Servers on OneCloud , VMware, HCSO,Alibaba Cloud, Huawei Cloud, Tencent Cloud, Google, and Ctyun Cloud platforms support password reset operations in the shutdown state.
- The reset password operation is not available for servers with bound keys.
- The OneCloud platform servers created by ISO boot method do N the reset password operation.
server password reset
- On the Servers page, click the “More” button on the right action bar of the server, and select the “Password Key - Reset Password” menu item to bring up the Reset Password dialog box.
- Set the administrator password.
- Random Password: Generate administrator password randomly, and users can view and copy the administrator password in the password column of the server list.
- Custom Password: You can set the administrator password manually. The default check box is “Start automatically after password reset”, you can uncheck it if you want, click “OK” button to finish the operation.
Batch Reset Password
The servers selected for batch password reset need to belong to the same platform.
- Check one or more servers of the same platform in the server list, click the**_“Batch Operation”_** button at the top of the list, and select the drop-down menu **_“Reset Password”_** menu item to bring up the Reset Password dialog box.
- Set the administrator password.
- Generate randomly: Generate administrator password randomly, and users can view the copied administrator password in the password column of the server list.
- Custom Password: You can set the administrator password manually. The default check box is “Start automatically after password reset”, you can uncheck it if you want, click “OK” button to finish the operation.
Note
If the password reset for the server of Huawei Cloud Platform does not take effect, the reason is that the one-click password reset plug-in is not installed on the server, please follow the installation method to install the plug-in. If users need to use a custom image in Huawei Cloud Platform, they need to install the one-click reset password plug-in in the custom image.
Bind key
This function is used to bind a key for a server. After the key is bound, users need to use the private key to log in to the server or get the password of the server on the cloud management platform with the private key. Please create the key before binding it. A server only supports binding one key. When the key is bound, the user cannot see the password information directly in the password column of the server list, and needs to enter the private key content to get the password.
Note
- Binding keys are not support for servers on AWS and Ctyun Cloud platforms.
- Servers on ZStack, DStack, and Azure platforms support binding keys in the running status.
- The OpenStack, HCSO, Huawei cloud platform supports key binding only for new servers, not for servers that have already been created.
- The OneCloud platform servers created by ISO boot do not support the bind key operation.
-
- Servers of other platforms need to bind keys in shutdown state.
- On the server page, click the “More” button on the right action bar of the server, and select the “Cryptographic Keys - Bind Keys” menu item to bring up the Bind Keys dialog box.
- Select the key pair, check the “Automatically start after binding key” by default, uncheck it as needed, and click the “OK” button, the server with the bound key needs to use SSH key pair to log in.
Unbind Keys
This function is used to unbind the server from the key.
Note
Resetting the password after unbinding the key for OpenStack Platform Servers may report an error, please reset the password manually.
- On the server page, click the “More” button on the right action bar of the server, and select the “Password Key - Unbind Key” menu item to bring up the Bind Key dialog box.
- Check the “Automatically start after binding key” box by default, you can uncheck it if you want, and click the “OK” button to finish the operation.
Setup SSH Authentication
This function is used to set the server to be able to be logged in unencrypted by the platform. To be able to be logged in by the platform, the server must be connected to the platform network (i.e., connected to the platform network through EIP, NAT gateway or SSH proxy) and the platform’s public key file must be present in the server. Please make sure the server is connected to the platform network first.
Setup SSH Authentication
- On the server page, click the “More” button on the right column of the server, and select the “Password Key - Setup SSH Authentication” menu item to bring up the Setup SSH Authentication dialog box.
- Configure the following parameters.
- SSH port: Modify the SSH port of the server, which will be used to log in to the server without password.
- Method: The public key of the platform can be uploaded to the server by keypair, password or script.
- When the setting method is “Key”, please use the root user or the user with sudo password-free privilege to connect to the corresponding server via ssh with the user name and private key, and click “OK” button to enter the page of waiting for ssh authentication to to start setting and detecting if the server’s ssh authentication status becomes available.
- When the setting method is “Password”, please use the root user or a user with sudo password-free privilege to connect to the corresponding server via ssh with the user name and password. Click the “OK” button to enter the page of waiting for ssh authentication to start setting and detecting if the server’s ssh authentication status becomes available.
- When the setting method is “Script”, please execute the following script in the server with root or sudo privileges, and then click “OK” button to enter the page of waiting for ssh authentication to to start setting and detecting if the server’s ssh authentication status becomes available.
- If the ssh authentication status of the server is available, click the “Close” button directly.
- If the ssh authentication status of the server is unavailable, please check the reason in the action list.
- If “Failed to connect to the host via ssh” is prompted in the error report, you need to bind the server to EIP, NAT gateway or SSH proxy to make it communicate with the platform network first.
- If “Permission denied” is prompted in the error message, it means that the information entered is wrong, you can click “Previous” button to modify the configuration, continue to setup and detect ssh authentication status.
Batch Setup SSH Authentication
Only batch setting of unclassified login for servers under the same project is supported.
- Select one or more servers in the server list, click the “Batch Operation” button at the top of the list, and select the “Password Key - Setup SSH Authentication” menu item to bring up the Setup SSH Authentication dialog box.
- Configure the following parameters.
- SSH port: Modify the SSH port of the server, which will be used to log in to the server without password.
- Method: The public key of the platform can be uploaded to the server by keypair, password or script.
- When the setting method is “Key”, please use the root user or the user with sudo password-free privilege to connect to the corresponding server via ssh with the user name and private key, and click “OK” button to enter the page of waiting for ssh authentication to to start setting and detecting if the server’s ssh authentication status becomes available.
- When the setting method is “Password”, please use the root user or a user with sudo password-free privilege to connect to the corresponding server via ssh with the user name and password. Click the “OK” button to enter the page of waiting for ssh authentication to start setting and detecting if the server’s ssh authentication status becomes available.
- When the setting method is “Script”, please execute the following script in the server with root or sudo privileges, and then click “OK” button to enter the page of waiting for ssh authentication to to start setting and detecting if the server’s ssh authentication status becomes available.
- If the ssh authentication status of the server is available, click the “Close” button directly.
- If the ssh authentication status of the server is unavailable, please check the reason in the action list.
- If “Failed to connect to the host via ssh” is prompted in the error report, you need to bind the server to EIP, NAT gateway and SSH proxy to make it communicate with the platform network first.
- If “Permission denied” is prompted in the error message, it means that the information entered is wrong, you can click “Previous” button to modify the configuration, continue to setup and detect ssh authentication status.
Detect SSH Authentication
This function is used to detect whether the server can be logged in unencrypted by the platform.
Detect SSH Authentication
- On the server page, click the “More” button on the righBatch Actionerver, and select the “Password Key - Detect SSH Authentication” menu item to bring up the Detect SSH Authentication dialog box.
- Start to detect the ssh authentication of the server, and support to reason for ssh authentication status being unavailable in the operation list.
- If “none publickey” is prompted in the error message, you can set the server to unencrypted login by setting up ssh authentication function.
- If “network error” is indicated in the error report, you need to bind the server to EIP or NAT gateway or SSH proxy to make it communicate with the platform network first.
Detect SSH Authentication
- Select one or more servers in the server list, click the “Batch Operation” button at the top of the list, and select the drop-down menu “Password Key - Detect SSH Authentication” menu item to bring up the Detect SSH Authentication dialog box.
- Start to detect the ssh authentication of the server, and support to reason for ssh authentication status being unavailable in the operation list.
- If “none publickey” is prompted in the error message, you can set the server to unencrypted login by setting up ssh authentication function.
- If “network error” is indicated in the error report, you need to bind the server to EIP or NAT gateway or SSH proxy to make it communicate with the platform network first.
Images
Save image
Save On-premise Server Image
Save the shutdown server as an image file in qcow2 format in the image list, the saved image is a custom image by default. Currently only the OneCloud platform and the VMware platform are supported.
- Click the “More” button on the right side of the server, select the drop-down menu “Image - Save Image” menu item, and the Save Image dialog box will pop up.
- Select the image category, enter the image name, select whether to check “Auto-start after saving image”, and click the “OK” button. If you check “Auto-start after saving image”, the server will be started after the server saves the image file.
- Create System Image: Only the system disk of the server will be saved as a system image, and the image will occupy only one image quota.
- Create server image: After selecting this item, the system and data disks of the server will be saved as a server image, and the server image will occupy a image quota equal to the number of disks of the server.
Save Private Cloud Server Image
Saves the image of the private cloud platform to a custom image list corresponding to the private cloud platform. Not visible in the image list of the platform, users can use the image to create servers with the same configuration in the custom image list when creating a server. Currently, HCSO is supported.
- Click the “More” button on the right action bar of the server in the “shutdown” state of the private cloud platform, and select the “Image - Save Image” menu item to bring up the Save Image dialog box.
- Enter the name of the image, select whether to check “Auto-start after saving image”, and click the “OK” button. If you check “Auto-start after saving image”, the server will be started after the server saves the image file.
Save Public Cloud Server Image
Saves the image of the public cloud platform to a custom image list corresponding to the public cloud platform. Not visible in the image list of the platform, users can use the image to create servers with the same configuration in the custom image list when creating a server. Currently, AliCloud, Tencent Cloud, Huawei Cloud, AWS, Azure, and Google are supported.
- Click the “More” button on the right action bar of the server in the “shutdown” state of the public cloud platform, and select the “Image - Save Image” menu item to bring up the Save Image dialog box.
- Enter the name of the image, select whether to check “Auto-start after saving image”, and click the “OK” button. If you check “Auto-start after saving image”, the server will be started after the server saves the image file.
Mount ISO
This function is used to mount an ISO image for a server’s virtual CD-ROM drive. Only servers on the OneCloud platform support mounting ISO operations. To install the operating system using the ISO file, please set the boot medium to optical drive in the modified properties after mounting the ISO image.
Note
For servers that install Windows OS by mounting ISO, after the installation is complete, you also need to install Virtio drivers, which are available in the image marketplace - ISO.
- On the Servers page, click the “More” button on the right action bar of the server, and select the drop-down menu “Image-Mount ISO” menu item to bring up the Mount ISO dialog box.
- Select the ISO image, if there is no ISO image in the list, please upload the ISO image in the system image list or import the ISO image in the image market first.
- Click “OK” button to complete the mount ISO operation.
Unmount ISO
This function is used to unmount the ISO image mounted on the virtual optical drive of the server. Only servers on OneCloud platform support the unmount ISO operation.
- On the server page, click the “More” button in the action bar on the right side of the server, and select the “Image - Uninstall ISO” menu item to bring up the action confirmation dialog.
- Click the “OK” button to complete the detach ISO operation.
Network Security
Associated Security Groups
A security group is a virtual packet filtering firewall that controls whether the associated server can be accessed by setting security group rules, and the external resources that the server can access, etc. Please create security group rules on the Network - Security Groups page before binding security groups for servers. Batch associated security group operation supports selecting servers on different platforms.
To associate a security group to a single server
- On the Servers page, click the “More” button in the action bar on the right side of the server, and select the drop-down menu “Network Security - Associate Security Group” menu item to bring up the Associate Security Group dialog box.
- You can associate or unassociate security groups in the Associated Security Groups dialog box.
- Associated Security Groups: Select the security groups you want to bind, and support up to 5 security groups. If there is no security group that meets the requirements, you can click the “Create Security Group” hyperlink, configure the relevant parameters in the Create Security Group pop-up page, and click the “OK” button to create a security group.
- Unassociate security groups: Deselect security groups and keep at least one security group.
- Click the “OK” button to complete the operation.
Batch Associated Security Groups
- Check one or more servers in the server list, click the**_“Batch Operation”_** button, and select the drop-down menu **_“Network Security - Associate Security Groups”_** menu item to bring up the Associate Security Groups dialog box.
- You can associate or unassociate security groups in the Associated Security Groups dialog box.
- Associated Security Groups: Select the security groups you want to bind, and support up to 5 security groups. If there is no security group that meets the requirements, you can click the “Create Security Group” hyperlink, configure the relevant parameters in the Create Security Group pop-up page, and click the “OK” button to create a security group.
- Unassociate security groups: Deselect security groups and keep at least one security group. Click the “OK” button to complete the operation.
Bind EIP
The EIP is a NAT IP that enables communication between a server and the public network by binding to the server.
Note
- Currently, servers on the ZStack and OpenStack platforms do not support creating elastic public IPs when binding elastic public IPs, and do not support binding elastic public IPs that belong to the same IP subnet.
- Servers on the VMware platform do not support binding elastic public IPs.
- Binding elastic public IPs is supported only for servers on OneCloud platform VPC networks.
- On the server page, click the “More” button on the right action bar of the server, and select the drop-down menu “Network Security - Bind EIP” menu item to bring up the Bind EIP dialog box.
- Configure the following parameters
- If you select “Create” EIP as the binding method
- When you select
OneCloud
platform, configure the following parameters.
- Line type: You can create the EIP of the corresponding line type according to the requirements.
- Network billing method: Set the billing method of the EIP, including per-traffic billing and per-bandwidth billing.
- Billed by flow: charge by actual transmission flow, which can limit the peak bandwidth to avoid the cost of unexpected traffic, and will drop packets when the instantaneous bandwidth exceeds the value, which is applicable to the occasion of large network fluctuation.
- Billed by Bandwidth: Billed by transmission rate, choose fixed bandwidth, packets will be dropped when the bandwidth exceeds the value, suitable for scenarios with less network fluctuation.
- Bandwidth: Set the bandwidth size.
- Configure the following parameters when choosing a public cloud platform.
- Network billing method: Set the billing method of EIP, including billing by traffic and billing by bandwidth.
- Per-flow billing: Charges according to the actual transmission traffic, which can limit the peak bandwidth to avoid the cost of unexpected traffic, and will drop packets when the instantaneous bandwidth exceeds the value, which is applicable to the occasion of large network fluctuation.
- Billed by Bandwidth: Billed by transmission rate, choose fixed bandwidth, packets will be dropped when the bandwidth exceeds the value, suitable for scenarios with less network fluctuation.
- Bandwidth: Set the bandwidth size.
Note
Tencent Cloud and Azure do not support per-fixed-bandwidth billing.
- Network billing method: Set the billing method of EIP, including billing by traffic and billing by bandwidth.
- When you select
OneCloud
platform, configure the following parameters.
- If you choose “Bind to Existing” as the binding method, please make sure that the EIP of the corresponding platform already exists on the EIP page, and select EIP.
- If you select “Create” EIP as the binding method
- Click the “OK” button.
Unbind EIP
This function is used to unbind the server from the EIP and release the EIP resource, and the released EIP can be used by other servers.
In the Servers page, click the “More” button on the right side of the server, and select the “Network Security - Unbind EIP” menu item to bring up the Unbind EIP dialog box. 2. Click the “OK” button to complete the operation.
Public IP to EIP
This function is used to convert the public IP bound by the server to the EIP.
Description
- Converting a public IP to an EIP is supported only when the public cloud server with a bound public IP is running or shut down.
- Servers bound to a public IP are not bound to an EIP.
- On the Servers page, click the “More” button on the right action bar of the server, and select the drop-down menu “Network Security - Public IP to EIP” menu item to bring up the Public IP to EIP dialog box.
- Click the “OK” button to complete the operation.
Set source/target check
Source/Destination checking means checking whether the source/destination address of the traffic received or sent by the server is the server. When checking is enabled, when the source/destination address is not a server, it is discarded without processing; source/destination checking must be disabled when the server is used as a NAT, router, firewall, etc.
Only servers on the OneCloud platform support setting source/target checking and have it enabled by default.
- On the server page, click the “More” button on the right action bar of the server, and select the drop-down menu “Network Security - Set source/target check” menu item to bring up the Set source/target check dialog box.
- Choose to turn on or off source/target checking, and click “OK” button to complete the operation.
Supplementary IP
When a VMware server is not synchronized to an IP address for some reasons (such as shutdown state synchronization, agent not installed, etc.), the IP address field of the server list shows “-”, and the supplemental IP address for the VMware server is supported at this time. the supplemental IP address must be the same as the actual IP of the server.
- In the server list, when the IP address column of the VMware platform server is empty, click the “Supplementary IP” button in the IP address column to bring up the Supplementary IP dialog box.
- Set the IP address and click the “OK” button.
High Availability
Only servers created on OneCloud platform based on local storage support high availability, by creating a backup machine for the server to achieve high availability, the server and the backup machine are the main backup and the data is synchronized in real time, when the main server fails, it will automatically switch to the backup machine to quickly recover the business, reducing the business downtime caused by the failure of the server, and at the same time will create an available backup machine for the server again to keep it in a highly available state.
Note
support manual retries when creating a backup machine fails or when switching backup machines fails.
Add backup machine
This function is used to create a backup machine on other hosts for a server using local storage. The created backup machine has the same configuration as the server, and it is the primary backup for each other, keeping data synchronization in real time, etc. Only the information of the primary server is displayed in the server list, not the information of the backup machine.
Note
- Servers and backup machines cannot be located on the same host.
- Servers that have been added to a backup machine do not support the ability to adjust configuration, create snapshots, or migrate.
- After adding a backup machine to a server that has already created a snapshot and switching to the backup machine, the original snapshot is not available.
- On the Servers page, click the “More” button on the right action bar of the server, and select the drop-down menu “High Availability - Add Backup Machine” menu item to bring up the Add Backup Machine dialog box.
- Select the host of the backup machine and click the “OK” button.
- To the right of the server name will appear
 icon will appear.
Delete backup machine
This function is used to delete the backup machine of a server.
- Click on the name side with icon on the server, select the “More” button, and select the drop-down menu “High Availability - Delete Backup Machine” menu item to bring up the Add Backup Machine dialog box.
- If the host where the backup machine is located is offline, you can check “Force clear backup machine record”. Click “OK” button to delete the backup machine.
Migration
This function is used to migrate servers to other hosts. When no host is specified, the system will automatically select the host.
Note
- Migration requires the presence of at least two
OneCloud
hosts in the environment that are on the same wire, and requires both hosts to have the same CPU model and microcode. If the host CPU model is not the same and you still want to continue the migration, you can turn on Skip CPU Check and the platform will do its best to mess with the migration, but after the migration is completed, there may be a situation that the server does not run properly on the target host.
# Check the CPU model
$ lscpu | grep "Model name"
# Check microcode
$ cat /proc/cpuinfo | grep microcode
- Migration is not support for highly available servers.
- Migration is not support for servers with mounted GPU devices or optical drive devices.
Servers Migration
- On the Servers page, click the “More” button in the action bar on the right side of the server, and select the drop-down menu “High Availability-Migration” menu item to bring up the migration dialog.
- Configure the following parameters.
- Forced migration: If the host is down and the server uses shared storage, you can check “Forced migration”.
- Skip CPU check: When migrating servers, the CPU model and microcode of the destination host and the host where the servers are located are required to be the same. If the CPU model of the host is not the same and you still want to continue the migration, you can turn on Skip CPU check and the system will try its best to mess with the migration, but after the migration is completed, there may be a situation that the servers cannot run normally on the target host.
- Hosts: Select the target host, or leave it blank, the system will automatically select the host. The platform will pre-dispatch and filter out the hosts that meet the migration conditions. If there is no host that meets the conditions, please check whether there are available CPU, memory and storage on the hosts in the same wire, and whether the CPU model and microcode are the same, if they are not, you can skip the CPU check first and then try to migrate, etc. 3。 Click the “OK” button to migrate the server to another host.
Batch Migration
You can select servers in different hosts to migrate to the same host.
- Select one or more servers in the server list, click the “Batch Operation” button at the top of the list, and select the drop-down menu “Migration” menu item to bring up the migration dialog box.
- Configure the following parameters.
- Forced migration: If the host is down and the server uses shared storage, you can check “Forced migration”.
- Skip CPU check: When migrating servers, the CPU model and microcode of the destination host and the host where the servers are located are required to be the same. If the CPU model of the host is not the same and you still want to continue the migration, you can turn on Skip CPU check and the system will try its best to mess with the migration, but after the migration is completed, there may be a situation that the servers cannot run normally on the target host.
- Hosts: Select the target host, or leave it blank, the system will automatically select the host. The platform will pre-dispatch and filter out the hosts that meet the migration conditions. If there is no host that meets the conditions, please check whether there are available CPU, memory and storage on the hosts in the same wire, and whether the CPU model and microcode are the same, if they are not, you can skip the CPU check first and then try to migrate, etc. 3。 Click the “OK” button to migrate the server to another host.
Delete
Set deletion protection
This function is used to set the deletion protection for the server. A server cannot be deleted when deletion protection is enabled on the server; a server can only be deleted when deletion protection is disabled on the server.
server set deletion protection
- Disable delete protection.
- Click on the server name with
 icon, click the “More” button in the action bar on the right side of the server, and select the drop-down menu “Delete - Delete-Lock Setting” menu item to bring up the Delete-Lock Setting dialog box.
 - Select “Disable” deletion protection and click “OK” Batch Action
- Click on the server name with
- Enable delete protection.
- When the server name is not marked with icon, click the “More” button in the action bar on the right side of the server, and select the drop-down menu “Delete - Delete-Lock Setting” menu item to bring up the Delete-Lock Setting dialog box.
- Select “Enable” delete protection, and click “OK” button.
- When the server name is not marked with
Batch Delete-Lock Setting
The Bulk Delete-Lock Setting operation supports selecting servers of different platforms.
- Disable delete protection.
- Check one or more servers in the server list, click the “Batch Operation” button at the top of the list, and select the drop-down menu “Delete-Lock Setting” menu item to bring up the Delete-Lock Setting dialog box.
- Select “Disable” delete protection and click the “OK” button to disable delete protection for the server in batch.
- Enable Delete Protection.
- Check one or more servers in the server list, click the “Batch Operation” button at the top of the list, and select the drop-down menu “Delete-Lock Setting” menu item to bring up the Delete-Lock Setting dialog box.
- Select “Enable” delete protection and click the “OK” button to enable delete protection for the server in batch.
Delete
This function is used to delete a server when the server name item has a icon to the right of the server name item, it means that the server has deletion protection enabled and the server cannot be deleted. If you need to delete the server, you need to disable the deletion protection before deleting the server. If
Batch delete server operation supports selecting servers of different platforms.
Note
- Alibaba Cloud, Tencent Cloud, Huawei Cloud, AWS, Azure, Google, HCSO, Zstack, Dstack, OpenStack, OneCloud and other platforms support deleting snapshots, post-mounted data disks, and EIPs when deleting servers.
- Huawei Cloud, HCSO must check Delete Snapshot when deleting a server.
- When deleting a server on OneCloud platform, if the disk is a ceph disk, the snapshot must be deleted at the same time. If the disk is a local disk, then you must check Delete post-mounted data disk as well.
Delete the server
Batch Action
Note
- Alibaba Cloud, Tencent Cloud, Huawei Cloud, AWS, Azure, Google, HCSO, Zstack, Dstack, OpenStack, OneCloud and other platforms support deleting snapshots, post-mounted data disks, and EIPs when deleting servers.
- Huawei Cloud, HCSO must check Delete Snapshot when deleting a server.
- When deleting a server on OneCloud platform, if the disk is a ceph disk, the snapshot must be deleted at the same time. If the disk is a local disk, then you must check Delete post-mounted data disk as well.
- On the server page, click the “More” button in the action bar on the right side of the server, and select the drop-down menu “Delete - Delete” menu item to bring up the action confirmation dialog.
- Support checking “Delete snapshot at the same time”, “Delete mounted data disk at the same time”, “Delete EIP at the same time”, etc.
- Click the “OK” button to complete the operation.
- If ticket is enabled, you also need to fill in the reason for the application and click “Submit Ticket” button to submit the ticket for deleting the host and wait for approval before successfully deleting the server.
Delete multiple servers
Note
Only OneCloud platforms support simultaneous deletion of snapshots when deleting servers.
- Select one or more servers in the server list, click the “Bulk Action” button at the top of the list, and select the drop-down menu “Delete” menu item to bring up the action confirmation dialog.
- Support checking “Delete snapshot at the same time”, “Delete mounted data disk at the same time”, “Delete EIP at the same time”, etc.
- Click the “OK” button to complete the operation.
- If ticket is enabled, you also need to fill in the application reason and click “Submit Ticket” button to submit a ticket to delete the host and wait for approval before successfully deleting the server.
View Servers Details
This function is used to view server details and information such as security group, network, disk, monitoring, alert and operation logs.
- On the server page, click the server name item to enter the server details page.
- The menu item at the top of the details page supports administrative operations on servers, etc.
- View the following information.
- Basic Information: Including ID, name, status, domain, project, CPU Architecture, User Tag, Agent install status, Keypair, platform, billing method, region, zone, cloud account, created at, updated at, and description.
- Configuration information: Including operating system, IP address, MAC address, system image, host, security group, VPC, CPU, memory, system disk, data disk, ISO, GPU, host of backup machine, etc..
- Other settings: Support to turn on or off the deletion protection.
View security group information
This function is used to view the security group information bound by the server.
In the Servers page, click the server name item to enter the server details page. Click the Security Groups tab to enter the Security Groups page. 3. Display the list of security groups bound to the server and support security group management operations, please see Security Groups.
Networks
This function is used to view the network card information of the server and support the management operation for the network card.
Add network card
This function is used to add network cards to servers, up to 8 network cards can be added, currently only servers on OneCloud platform support the add network card function.
- On the server page, click the server name item to enter the server details page. Click the “Network” tab to enter the network page. Click the “Add network card” button above the network card list to bring up the Add network card dialog box.
- Set the VPC and IP subnet, if you want to specify a static IP, click “Configure IP manually” button, set the IP address, and click “OK” button.
Modify Bandwidth
This function is used to modify the bandwidth limit of the network card. Currently, it only supports OneCloud platform, VMware platform, ZStack platform, and OpenStack platform.
- On the server page, click the server name item to enter the server details page. Click the Network tab to enter the Network page. Click the “Modify Bandwidth” button on the right side of the network card to bring up the Modify Bandwidth dialog box.
- Set the bandwidth, 0 means no limit, the value range is 0~10000 integers. Click the “OK” button.
- If the ticket for adjusting configuration is enabled, you also need to fill in the reason of application, click “Submit Ticket” button to submit the ticket for modifying bandwidth, and wait for approval before the bandwidth is successfully modified.
Change IP
This function is used to modify the IP address of the server, and supports dynamically assigning IP addresses in IP subnets or manually specifying IP addresses within IP subnets. Currently, it only supports OneCloud platform, VMware platform.
- On the Servers page, click the server name item to enter the server details page.
- Click the “Network” tab to enter the Network page. Click the “Change IP”_** button on the right side of the network card to bring up the Change IP dialog box.
- Select IP subnet, if you want to specify static IP, click “Configure IP manually” button to set IP address, and click “OK” button.
Detach NIC
This function is used to detach NICs on servers. When detaching, you need to detach them in order, only the last NIC is allowed to be detached, that is, the NIC with the largest serial number is supported to be detached, and all NICs can be detached. Currently, only the OneCloud platform is supported.
- On the Servers page, click the server name item to enter the server details page.
- Click the “Network” tab to enter the network page.
- Click the “Detach” button on the right side of the last NIC to bring up the Detach NIC dialog box.
- Click the “OK” button to complete the operation.
View Disk Information
This function is used to view the disk information on the server.
- On the Servers page, click the Servers Name item to enter the Servers Details page. Click the Disk tab to enter the Disk page. View the serial number, disk name, size, drive, cache mode, status, storage type, disk type, etc. of the server disk. support custom data column function.
View snapshot information
This function is used to view the disk snapshot and server snapshot information created by the server, and supports the management of snapshots.
- On the Servers page, click the server name item to enter the server details page.
- Click the Snapshot tab to enter the Snapshot page. By default, you can view the snapshot of the disk and support operations such as rolling back the disk and deleting it. Click the “Server Snapshot” tab to view the server snapshot and support delete operations.
View Servers Metric Information
This function is used to view the Metric information of the server and supports setting alerts based on the monitoring information.
- On the Servers page, click the server name item to enter the server details page. Click the Monitoring tab to enter the Monitoring page.
- The following monitoring information is viewed by default.
- Basic monitor: the monitoring information obtained by default.
- Support to view the performance monitoring information of the last 1 hour, the last 1 day, the last 1 week, the last 1 month, the last 3 months, the last 6 months, support to set the time granularity, the size of the time granularity is related to the length of the view.
- Monitoring indicators include CPU Usage, Memory Usage, Network Inbound Traffic, Network Outbound Traffic, Disk Usage, Disk Read Rate, Disk Write Rate, among which Memory Usage and Disk Usage need to be viewed after the Agent is installed.
- Agent monitor: The monitoring information obtained after the Agent is installed on the server, which has more disk utilization indicators than the basic monitoring. Compared with the basic monitoring, the monitoring data obtained by Agent monitoring are more accurate.
- Basic monitor: the monitoring information obtained by default.
Install Agent
Server memory usage and disk usage and other monitoring information, you need to install the Agent to collect and obtain.
Prerequisites for agent installation.
- The server is a linux OS.
- The server is running.
- Servers within the OneCloud platform VPC can install the agent directly. Servers on non- OneCloud platforms require the presence of an SSH Proxy Endpoint in the VPC or IP subnet where they are located.
- The server can be logged in password-free by the platform.
- On the Virtual Machine page, click the server name item to enter the server details page.
- Click the Monitoring tab to enter the Monitoring page.
- Click the “Install Agent” button to bring up the Install Agent button.
- Start detecting the ssh authentication status of the server.
- If the ssh authentication status of the server is available, click the “OK” button to install the Agent.
- If the ssh authentication status of the server is unavailable, please setup ssh authentication of the server first.please click the “View” button in the list of actions to see the specific reason for ssh authentication status being unavailable.
- If “none publickey” is reported as the reason, you can setup ssh authentication of the server to make the server ssh authentication status available. The configuration parameters for setup ssh authentication mode are as follows.
- Setting method: The public key of the platform can be uploaded to the server by key, password or script.
- When the setting method is “Keypairs”, please use the root user or the user with sudo password-free privilege to connect to the corresponding server via ssh with the user name and private key, and click “OK” button to start setting and detecting if the server’s ssh authentication status becomes available.
- When the setting method is “Password”, please use the root user or a user with sudo password-free privilege to connect to the corresponding server via ssh with the user name and password. Click the “OK” button to start setting and detecting if the server’s ssh authentication status becomes available.
- When the setting method is “scripts”, please execute the following script in the server with root or sudo privileges, and then click “OK” button to start setting and detecting if the server’s ssh authentication status becomes available.
- If the error message indicates “network error”, you need to go back to the previous step and select another server, or bind EIP or NAT gateway for this server so that it can communicate with the platform network.
- If “none publickey” is reported as the reason, you can setup ssh authentication of the server to make the server ssh authentication status available. The configuration parameters for setup ssh authentication mode are as follows.
Description
When the Agent installation fails, you can hover over “Agent installation is failed, try reinstall” and it will show you the exact reason why the Agent installation failed.
Servers Alert Settings
This function is used to set alerts for the monitoring indicators of the server, and the alert recipient will be notified by email when the alert conditions are exceeded.
- In the Servers page, click the server name item to enter the server details page.
Click the “Alert” tab to enter the alert page.
You can manage alerts.
- Create alert: You can create multiple alerts according to the actual situation.
- Click the “Create” button at the top of the list to bring up the Create Alert dialog box.
- Indicators: support setting alert conditions for parameters such as CPU usage, memory usage, network inbound traffic, network outbound traffic, disk read rate, disk write rate, etc.
- Query period: Set the period time for querying the alert conditions.
- Comparison operator and threshold value: Set the threshold value of the alert condition. When the monitoring index data of the server exceeds or is lower than the threshold value of the index in the alert condition, the alert will be triggered.
- Level: Including normal, important and fatal.
- Alert mode: Currently, only email alert is supported.
- Alert Receiver: You can select the user in the same project or the user in the role of domain administrator or system administrator.
- After setting, click “OK” button.
- Modify alerts: All parameters except indicators can be modified.
- Delete Alerts: support deleting individual alert conditions or deleting alert conditions in batch.
- Delete: Click the operation column Delete button, and click the “OK” button when the operation confirmation dialog box pops up.
- Batch delete: Select one or more alert conditions in the list, click the Delete button in the upper left corner, and click the “OK” button in the pop-up operation confirmation dialog to delete the alert conditions in batch.
- Create alert: You can create multiple alerts according to the actual situation.
View Servers Operation Log
This function is used to view the log information of server related operations.
- On the Servers page, click the server name item to enter the server details page.
Click the Operation Log tab to enter the Operation Log page.
- Load More Logs: In the Operation Logs page, the list shows 20 operation logs by default. To view more operation logs, click the “Load More” button to get more logs.
- View Log Details: Click the “View” button on the right column of the operation log to view the log details. Copy details are supported.
- View logs of specified time period: If you want to view the operation logs of a certain time period, set the specific date in the start date and end date at the top right of the list to query the log information of the specified time period.
- Export logs: Currently, only the logs displayed on this page are supported to be exported. Click the upper-right corner of
 icon, set the export data column in the pop-up export data dialog, and click the “OK” button to export the logs.
macos/deepLFree.translatedWithDeepL.text
icon, set the export data column in the pop-up export data dialog, and click the “OK” button to export the logs.
macos/deepLFree.translatedWithDeepL.text