Policies
Policies define policies to operate resources on the platform. Common policies are preconfigured after the system is deployed and are called system policies. The user itself does not have any policies. You need to assign roles to the user when he joins the project and associate policies to the roles in order to make the user have the corresponding operation policies.
Description
System policies combine user view and operation policies to generate 9 types of policies for resources.
- User view is divided into system backend, domain System View, and project view.
- operation policies are divided into administrative policies, edit policies, read-only policies.
- So resource policies are specifically admin, edit, read-only policies for resources under the global; admin, edit, read-only policies for resources under this domain; admin, edit, read-only policies for resources under this project.
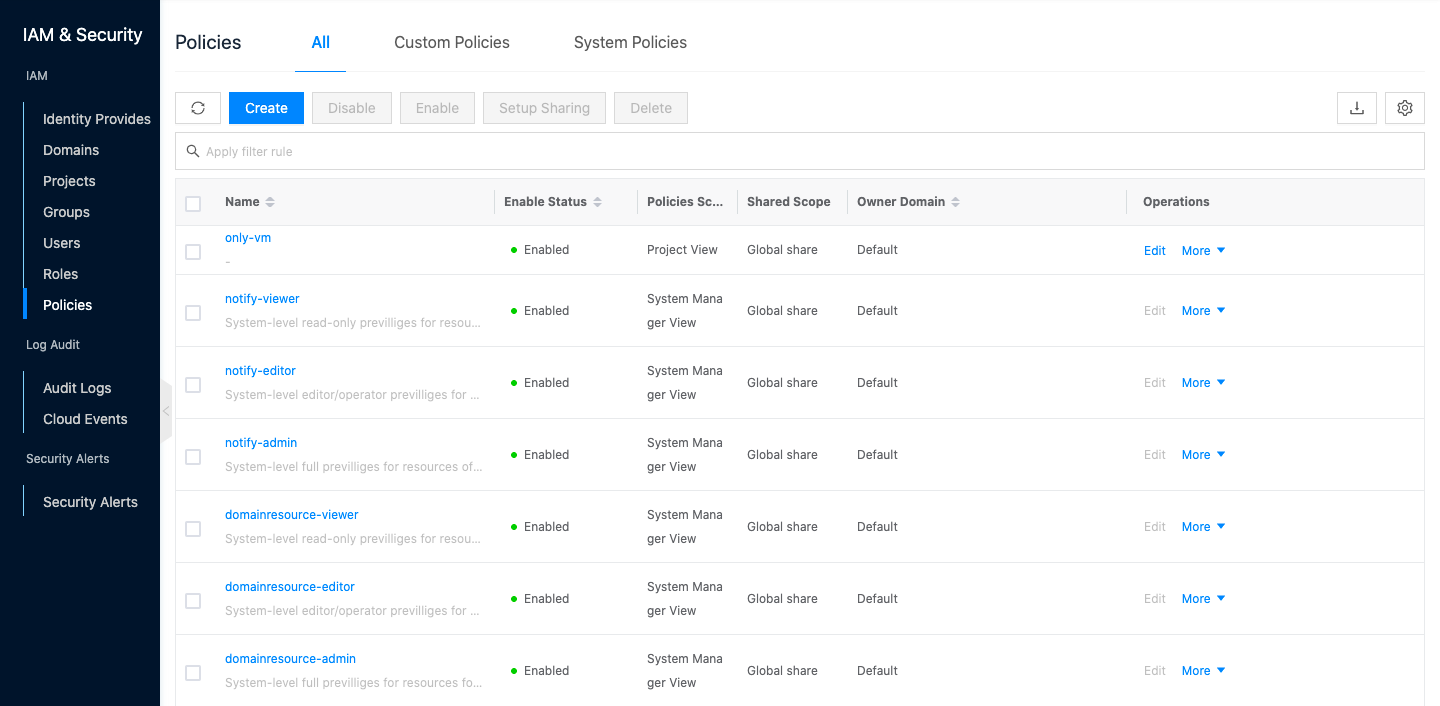
Entry: In the cloud management platform click on the top left corner of  navigation menu, and click “IAM & Security/IAM/Policies” menu item in the left menu bar that pops up to enter the policies page.
Create Policy
Users can create custom policies when the system policies do not meet their needs.
Note
After creating or modifying a custom permission, it takes about 5 minutes for it to take effect.
- Click the “Create” button at the top of the list to enter the Create Policy page.
- Set the following parameters.
- Domain: Select the domain to which the permission belongs.
- Name: The name of the custom permission.
- Remarks: Remarks on the custom permission.
- Permission configuration mode: Support visual view and YAML edit view.
-
Visual view: Configure the following parameters.
- Administrative policies: administrative policies include administrative backend, domain administrative backend, and no administrative backend. Administrative policies correspond to the list of policies range system, domain, project. And support customizing the node policies under different views.
- System View: that is, after users join the project with the role of System View privileges, they can switch to the System View, and set custom System View under the user has the privileges, including calculation, image, container, authentication, notification, log, other, billing measurement, alert, process and other module privileges, and support the expansion of set specific functional privileges including list, details, update, create, delete, execute operations and other specific operational privileges.
- Domain View: that is, after the user joins the project with the role of having Domain View privileges, you can switch to the Domain View, and support customizing the domain calendar background view system user-owned privileges. Including computing, mirroring, container, authentication, notification, logging, billing measurement, alert and other module policies, and support the expansion of set specific functional policies including list, details, update, create, delete, execute operations and other specific operational policies.
- Project View: that is, the user who binds this permission only has the project view, and set the user-owned policies under the custom project view. It includes module policies for calculation, mirroring, container, notification, log, billing measurement, alert, etc. and supports expanding and setting specific functional policies including list, details, update, create, delete, execute operation and other specific operation policies. Since users joining the project in any role will have member policies, when they join the project in a role with custom project view policies, the user’s policies will be a concatenation of custom and member policies.
- Administrative policies: administrative policies include administrative backend, domain administrative backend, and no administrative backend. Administrative policies correspond to the list of policies range system, domain, project. And support customizing the node policies under different views.
-
YAML edit view:the policy format is as follows.
 auth: true
 policy:
     compute:
         servers:
             create:
                 '*': allow
             delete:
                  '*': deny
             get:
                  '*': allow
             vnc: allow
             list:
                 '*': allow
             perform:
                 '*': allow
             update:
                 '*': allow
 scope: project
-
- Click the “OK” button to complete the operation.
Modify Policies
This function is used to modify the settings of custom policies. System policies are not supported to be modified.
Note
- You need to wait for about 5 minutes after creating or modifying custom policies before they take effect.
- When logging in as a user with a bound permission role, you need to click the refresh button on your browser to refresh the page after modifying policies before the modified policies take effect.
- Click the “modify” button on the right operation column of the permission to enter the modify permission page.
- Modify the parameters, same as adding policies.
- Click the “OK” button when the modification is finished.
Enable
This function is used to enable the “disabled” state of the permission. It supports individual and batch enablement.
Enable
- On the permission page, click the “More” button in the action column to the right of the “Disabled” permission, and select the “Enable” menu item to bring up the action confirmation dialog.
- Click the “OK” button to complete the operation.
Batch Enable
- Select one or more “Disabled” policies in the permission list, click the “Enable” button at the top of the list, and the operation confirmation dialog box will pop up.
- Click the “OK” button to complete the operation.
Disable
This function is used to disable the permission in the “enabled” state. When the non-member permission is disabled, the role matching the permission will not have the permission, such as the role only binds one kind of permission, after disabling the permission, the role will be member permission by default. If member permission is disabled, the user only has the view permission for mirroring and network on the cloud management platform. Support single and batch disable.
Disable
- On the permission page, click the “More” button in the operation column to the right of the “Enable” permission, and select the “Disable” menu item to bring up the operation confirmation dialog.
- Click “OK” button to complete the operation.
Batch Disable
- Select one or more “enabled” policies in the permission list, and click the “Disable” button at the top of the list to bring up the operation confirmation dialog box.
- Click the “OK” button to complete the operation.
Clone
This function is used to create custom policies based on cloning of existing policies. Currently, only identical policies can be cloned. Please modify the policies through the modify function after the cloning is completed.
- On the permission page, click the “Clone” button on the right column of the permission to bring up the Clone dialog box.
- Enter the name and click the “OK” button to complete the operation.
Set up sharing
This function is used to set the sharing status of the authority.
There are three types of sharing scope for domain resources.
- No sharing (private): I.e. domain resources can only be used by users in this domain.
- Domain sharing-part (Multiple Domains sharing): that is, domain resources can be shared to the specified domain (one or more), and only users under the domain where the domain resources are located and the shared domain can use the domain resources.
- Domain Share-All (Global share): I.e. domain resources can be shared to all domains, i.e. all users in the system can use the domain resources.
Description
Conditions for setting up sharing: need to satisfy both
- The current user is in the system backend.
- Three-level Resource Hierarchy have been enabled in OneCloud
set sharing
- On the permission page, click the “More” button on the right column of the permission in the “Private” status, and select the “Set up sharing” menu item to bring up the Set up sharing dialog box.
- Configure the following parameters.
- When the sharing range is selected as “No Sharing”, the sharing range of domain resources is private and only users of this domain can use it.
- When Shared Range is selected as “Domain Shared”, you need to select the domain to be shared.
- When the domain is selected as one or more domains, the shared scope of the domain resource is Domain Shared-Partial, and only users in the domain where the domain resource is located and under the shared domain can use the domain resource.
- When the domain selects All, i.e. the sharing scope of the domain resource is Domain Share-All, all users in the system can use the domain resource.
- Click the “OK” button to complete the operation.
Batch set up sharing.
- Select one or more policies in the permission list and click the “Set up sharing” button at the top of the list to bring up the Set up sharing dialog box.
- Configure the following parameters.
- When the sharing scope is selected as “No Sharing”, the sharing scope of domain resources is private and only users of this domain can use it.
- When Shared Range is selected as “Domain Shared”, you need to select the domain to be shared.
- When the domain is selected as one or more domains, the shared scope of the domain resource is Domain Shared-Partial, and only users in the domain where the domain resource is located and under the shared domain can use the domain resource.
- When the domain selects All, i.e. the sharing scope of the domain resource is Domain Share-All, all users in the system can use the domain resource.
- Click the “OK” button to complete the operation.
Delete
This function is used to delete custom policies. Custom policies can be deleted when they are in the disabled state. System policies are not supported to be deleted.
Delete
- In the permission page, click the “Delete” button on the right column of the permission in the “Disabled” state to bring up the operation confirmation dialog box.
- Click the “OK” button to complete the operation.
Batch delete
- Select one or more “disabled” policies in the permission list, and click the “Delete” button at the top of the list to bring up the operation confirmation dialog box.
- Click the “OK” button to complete the operation.
View Permission Details
This function is used to view the details of policies.
- In the permission page, click the permission name item to enter the permission details page.
- The menu item at the top of the details page supports managing operations for policies.
- View the following information.
- Basic Information: Including Cloud ID, ID, name, status, domain, project, enable status, permission scope, whether to share, role, IP whitelist, created at, updated at, and description.
- Policies: Including administrative privileges and node privileges.
View operation log
This function is used to view the log information of permission-related operations.
- On the permission details page, click the Operation Log tab to enter the Operation Log page.
- Load more logs: In the Operation Log page, the list shows 20 operation logs by default. If you want to view more operation logs, please click “Load more” button to get more log information.
- View Log Details: Click the “View” button on the right column of the operation log to view the log details. Copy details are supported.
- View logs of specified time period: If you want to view the operation logs of a certain time period, set the specific date in the start date and end date at the top right of the list to query the log information of the specified time period.
- Export logs: Currently, only the logs displayed on this page are supported to be exported. Click the upper-right corner of
 icon, set the export data column in the pop-up export data dialog, and click the “OK” button to export the logs.