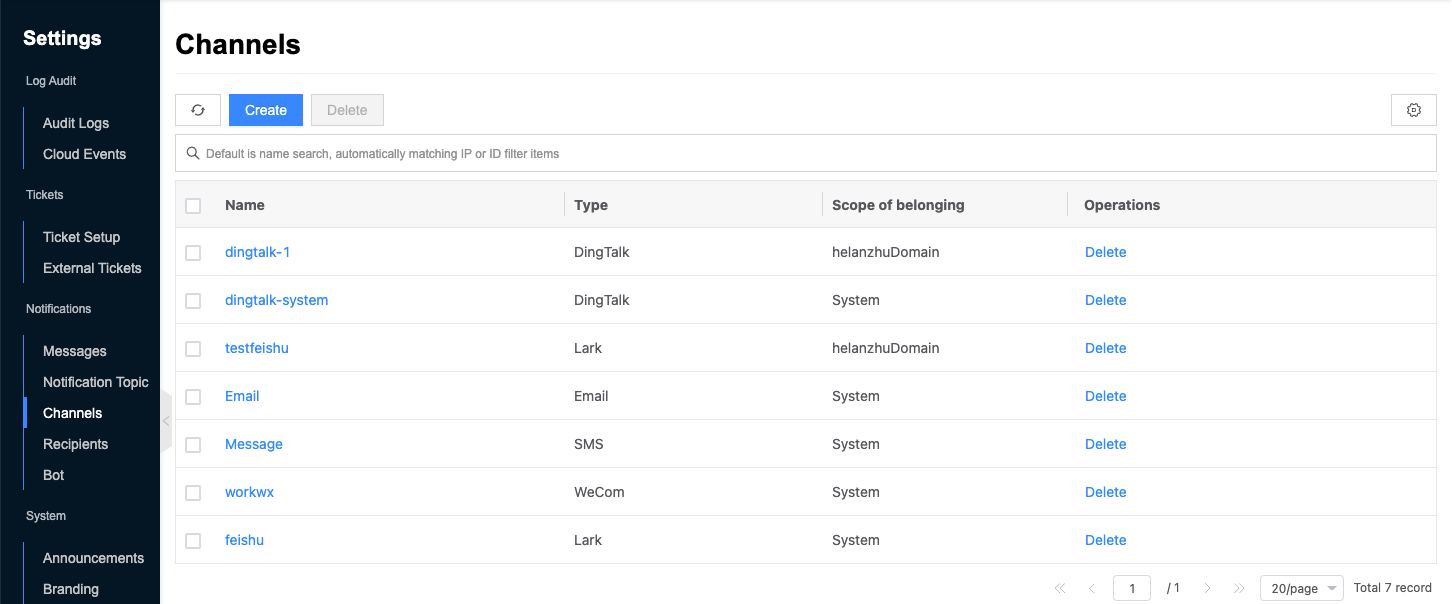
Channels
Channel is used to configure the way to receive OneCloud message notifications, currently supports email, SMS, Dingtalk, Lark, WeCom and other channels.
The process for users to receive OneCloud messages is as follows.
- Configure email, SMS, Dingtalk, Lark, WeCom and other channels in Channels.
- Create recipient in Recipient Management and enable channels such as email, SMS, Dingtalk, Lark, and WeCom for the user.
- OneCloud message notifications in the platform, such as alert messages, when the recipient is selected to receive the alert message, the message will be pushed to the user via email, SMS, Dingtalk, Lark, WeCom and other channels.
Entry: In the cloud management platform, click the top left corner navigation menu, and click “Settings/Notifications/Channels” menu item in the left menu bar that pops up to enter the Channnels page.
Create Channel
This function is used to set up channels for the platform.
- In the channels page, click the “Create” button at the top of the list to enter the create channel page.
- Configure the following parameters.
- Owner: Set the owner of the channel. When the channel belongs to the system, it is available globally; when the channel belongs to the domain, it is available under the domain; among them, mailbox and SMS are only allowed to belong to the system, and Dingtalk, Lark and WeCom can belong to the system or the domain, when Dingtalk, Lark and WeCom are configured in the system and the domain at the same time, the one configured under the domain shall prevail.
- Name: The name of the channel.
- Type: including Mailbox, SMS, Dingtalk, FeiShu, and WeCom. When you select different types, configure the corresponding parameters.
- When the type is “mailbox”, configure the following parameters.
- SMTP server: Set the server address for sending emails.
- SSL: Whether to connect SMTP server through SSL encryption.
- Port: Configure the port number, the default is 465.
- Username: Set the user name for sending emails.
- Password: the password of the user to send emails.
- When the type is “SMS”, configure the following parameters.
- Access key ID/Secret: the key information of docking Aliyun SMS platform, please refer to How to configure Alibaba Cloud SMS to get relevant parameters? for the way to get it.
- Signature: generally for the company abbreviation, you need to get the corresponding information in the corresponding AliCloud platform - “Products and Services - “SMS Service - “Signature Management.
- China message template: When sending messages to domestic, you need to configure the corresponding message template, currently support verification code, alarm template and template for abnormal login.
- Global message template: When sending messages to international or Hong Kong, Macao and Taiwan, you need to configure the corresponding message template, which currently supports verification code, alarm template and abnormal login template.
- When the type is “Dingtalk”, the following parameters are configured.
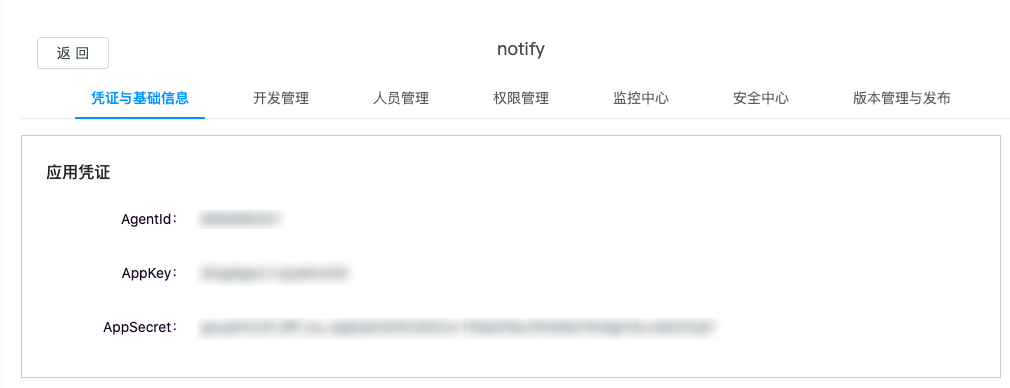
- AgentId: When creating the application, the system will automatically generate an AgentId, which can be used to send enterprise session messages and other scenarios. Please refer to How to configure Dingtalk to get relevant parameters?.
- AppKey: When creating an application, the system will automatically assign a pair of AppKey and AppSecret, which is a unique identifier in the application development process.
- AppSecret: AppSecret is generated together with the above AppKey, use AppKey and AppSecret to exchange for access_token.
- When the type is “Lark”, the following parameters are configured.
- AppId: the id of the application. Please refer to How to configure Lark to get relevant parameters?.
- AppSecret: the secret key of the application, generated by Lark open platform when creating the app, can be used to get app_access_token. app_secret can be viewed in the application details page > credentials and basic information > application credentials module.
- When the type is “WeCom”, configure the following parameters.
- CorpId: Used to identify the enterprise. Please refer to How to configure WeCom to get relevant parameters?.
- AgentId: The id of the application.
- Secret: The secret key of the application.
- When the type is “mailbox”, configure the following parameters.
- After the configuration is completed, click “Connection Test” button to test the connectivity of the cloud management platform and the channel.
- After the connection test is successful, click “OK” button.
How to configure Alibaba Cloud SMS to get relevant parameters?
- Get Access Key ID/Access Key Secret.
- Login to Alibaba Cloud console, click the “user avatar” icon on the top right corner of the page, select the drop-down menu “accessskeys” menu item, enter the security information management page. If they do not exist, you can click “Create Accesskey” button to create AccessKey.
- Configure the signature.
- Login to Alibaba Cloud console, click “Products and Services/SMS Service” menu item on the left menu bar to enter the SMS service console.
- Configure the signature in the signature management page in domestic SMS or international/HK/Macau/Taiwan messages, the signature is usually the company abbreviation.
- Configure SMS template.
- Login to Alibaba Cloud console, click “Products and Services/SMS Service” menu item on the left menu bar to enter the SMS service console.
- Configure the SMS template in the template management page in Domestic SMS or International/Hong Kong/Macau/Taiwan messages, the following four template formats are recommended. Get the template CODE after creation, such as SMS_126462297.
| name | format | h description |
|---|---|---|
| Captcha | Template type: Verification Code Template content: Your verification code is ${code}. |
|
| Alerts | Template Type: SMS Notification Template Content: The ${type} named ${alert_name} triggers an alert, please login to the platform to check it in time. |
SMS Alert Template |
| Abnormal | Template Type: SMS Notification Template Content: |
SMS Alert Template |
How to configure Dingtalk to get relevant parameters?
As an example, let’s introduce how to create a new app on the Dingtalk open platform to receive message notifications from the OneCloud platform.
Description
For more, please see the Dingtalk official website documentation
-
Login to Dingtalk Open Platform as administrator.
-
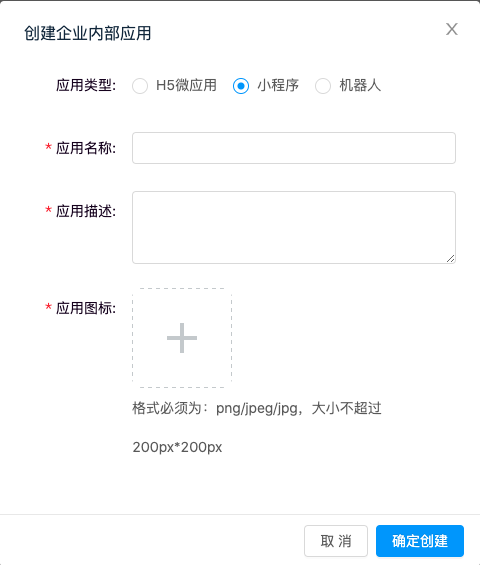
Create an app in the “App Development” page on the “Organization Internal App / Mini App” page.
-
Set the application type as “Applet”, set the application name, description, icon, etc. according to your requirements, and click “OK “ button to create.
-
Get the application credentials in the “Credentials and Basic Information” page of the new application.
-
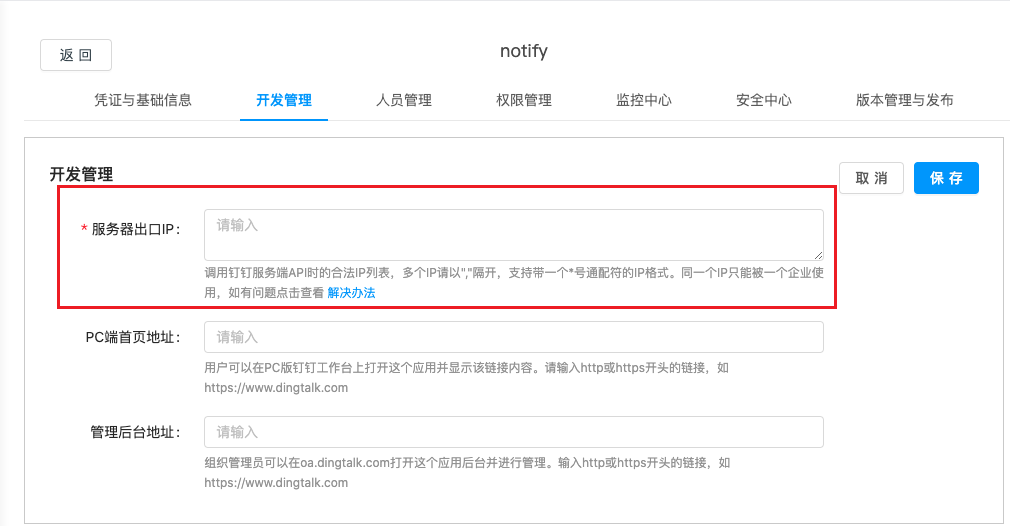
In the development management page, add the external access IP of OneCloud platform to the server exit IP.
-
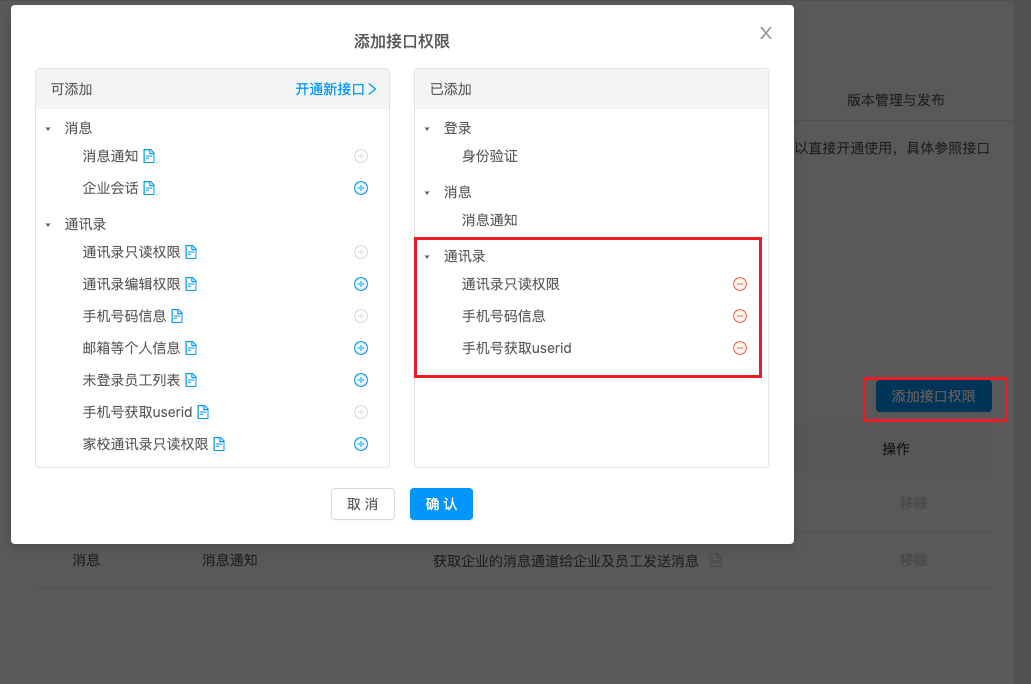
In the permission management page, it is recommended that the permission range applies to “All employees”, or you can set it according to your needs. Add at least “Address book read-only permission”, “Mobile phone number information”, “Mobile phone number get useid”, and other permissions as needed. Add other permissions as needed.
How to configure Lark to get relevant parameters?
Take the new app as an example to introduce how to create a new app on the Lark open platform to receive message notifications from the OneCloud platform.
Description
For more, please see the Lark Developer Documentation
-
Enterprise users (no admin user required) login to Lark Developer Platform .
-
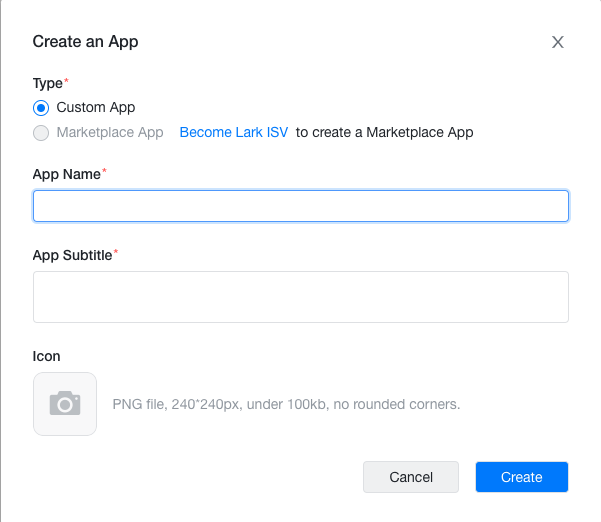
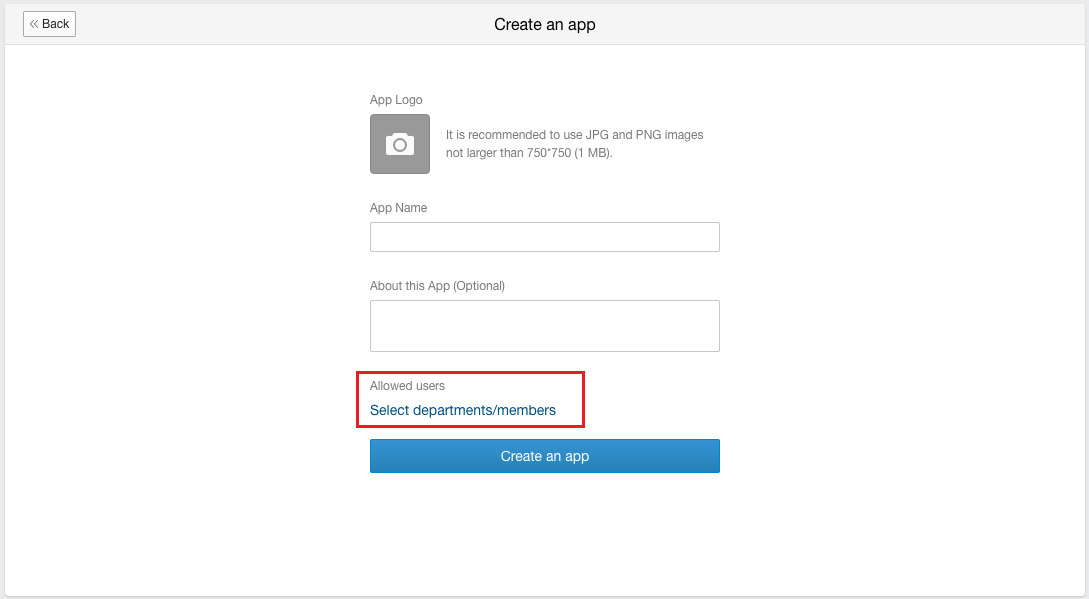
On Console - Developer Console page, create a Custom app.
-
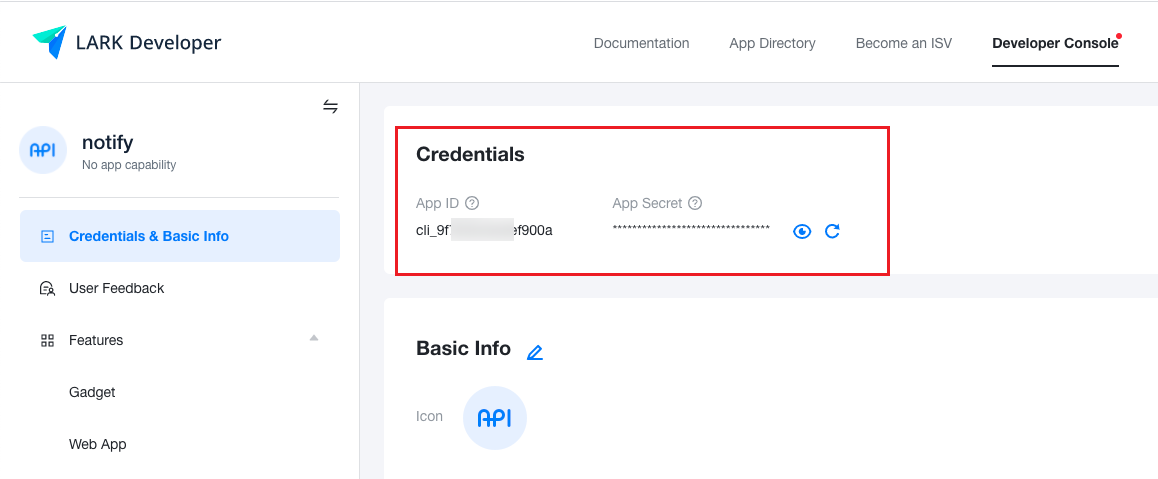
Get the application credentials in the “Credentials & Basic Info” page of the new application.
-
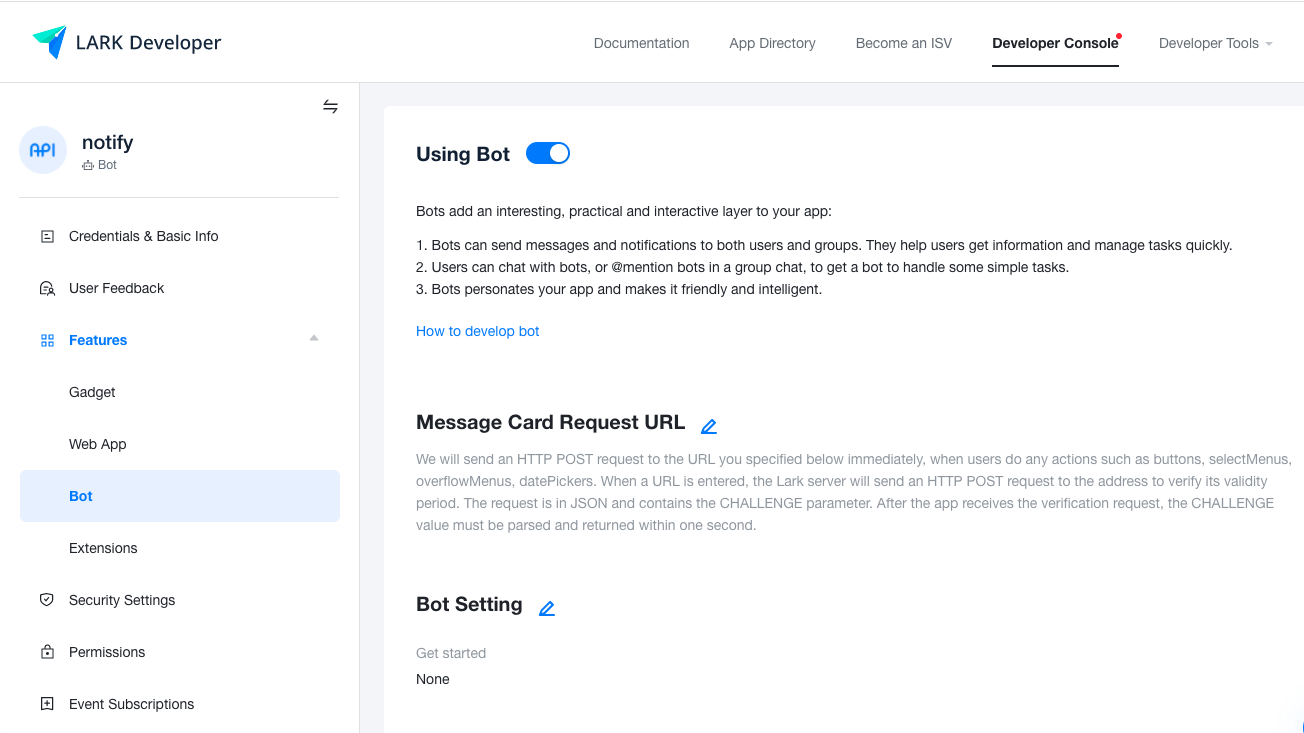
Enable the bot in the Features - Bot.
-
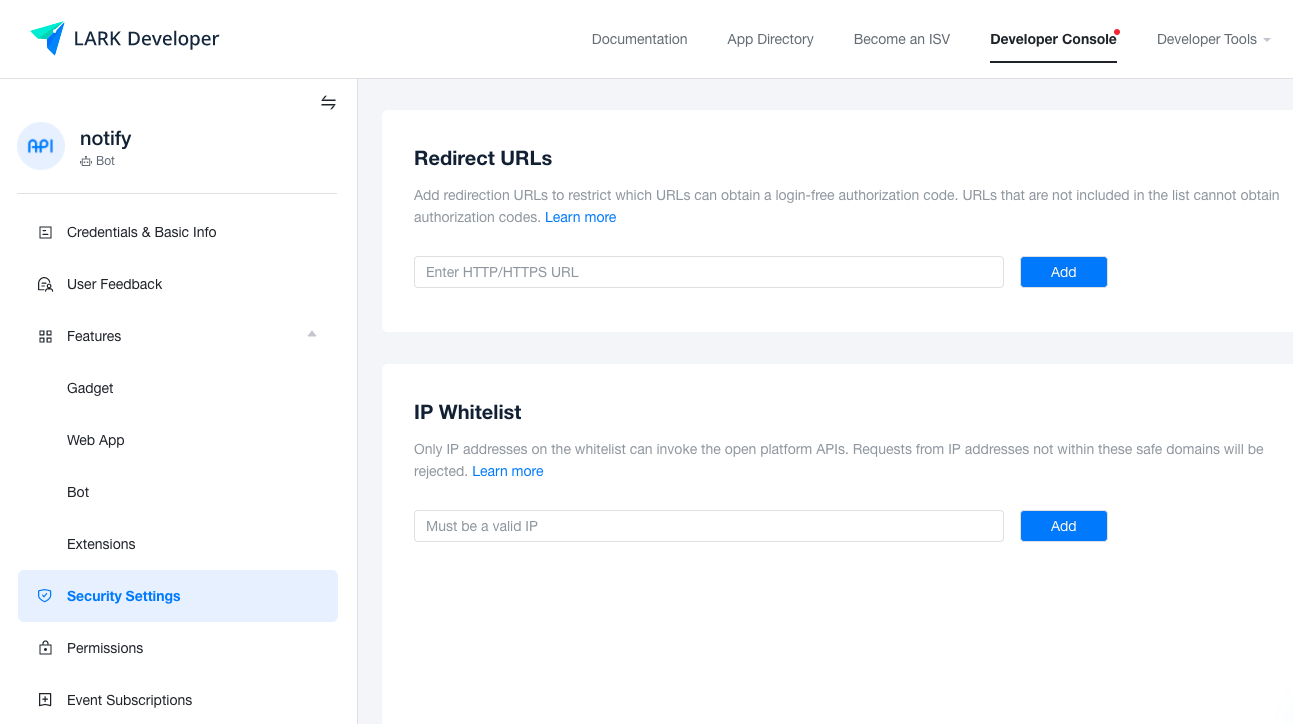
Add IP whitelist to the external access IP of OneCloud platform in the Security Settings.
-
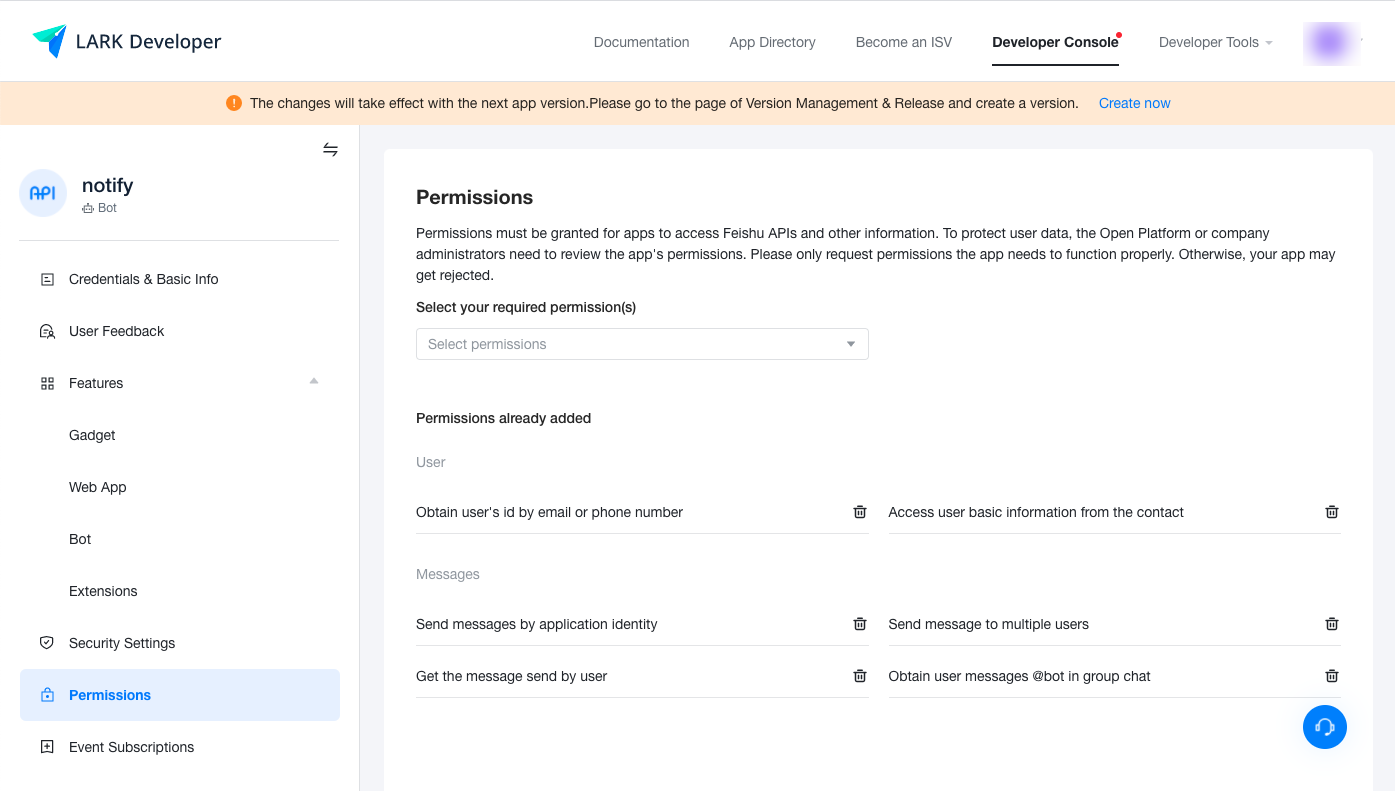
Add permissions to the application as needed in Permissions Management, at least “Access user basic information from the contact”, “Obtain user’s id by email or phone number”, “Send messages to multiple users “, “Send messages by application identity”, and other permissions as needed.
-
On the Version Management & Release page, Click “Create a version”, configure the relevant information, note that the availability status is set to “All” or the organization to which the application applies, and click the “Save” button to wait for the administrator to review and publish the application.

How to configure WeCom to get relevant parameters?
As an example, let’s introduce how to create a new app on the WeCom platform to receive message notifications from the OneCloud platform.
Description
For more information, please see WeCom official website documentation
-
Login to WeCom Admin Backend as admin user
-
Under the Application Management tab, select Application - Create Self-Built Application, and configure the logo, name, application description and visibility range of the application, and it is recommended to set the visibility range to “All Employees” or the organization to which the application applies.
-
Get the AgentId and Secret information in the application details.

-
Get the company ID in the My Company page.

Delete Channel
This function is used to delete a channel.
Delete
- On the channels page, click the “Delete” button on the right operation column of the channel to bring up the operation confirmation dialog.
- Click the “OK” button to complete the operation.
Batch Delete
- Select one or more channels in the channel list, and click the “Delete” button at the top of the list to bring up the operation confirmation dialog box.
- Click the “OK” button to complete the operation.
View channel details
This function is used to view the details of channels.
- On the Notification channels page, click the Notification channel name item to enter the Notification channel details page.
- View the following information.
- Details: including ID, name, type, belonging range, create at, and update at.
- Configuration information: The configuration information of different types of channels is different.
- Mailbox: including SMTP server, port, user name, SSL.
- SMS: including Access Key ID, signature, domestic message template, international/HK/Macau template, etc.
- Dingtalk: including AgentID, Appkey.
- FeiShu: including AppID.
- WeCom: including Enterprise ID, AgentID.
View operation log
This function is used to view the operation logs related to channels.
- On the channels page, click the channel name item to enter the channel details page.
- Click the Operation Log tab to enter the Operation Log page.
- Load More Logs: In the Operation Logs page, the list shows 20 operation logs by default. To view more operation logs, please click “Load More” button to get more logs.
- View Log Details: Click the “View” button on the right column of the operation log to view the log details. Copy details are supported.
- View logs of specified time period: If you want to view the operation logs of a certain time period, set the specific date in the start date and end date at the top right of the list to query the log information of the specified time period.
- Export logs: Currently, only the logs displayed on this page are supported to be exported. Click the upper-right corner of
 icon, set the export data column in the pop-up export data dialog, and click the “OK” button to export the logs.