Introduction
Product description
Cloud Management Platform (hereinafter referred to as Cloud Management Platform) is a multi-cloud operation and maintenance management solution for enterprises with complex IT infrastructure construction, operation and maintenance, and management in multi-cloud environment, which aims to help users manage and use IT infrastructure resources distributed in multi-cloud (multiple private clouds, multiple public clouds) scenarios more efficiently.
The cloud management platform has the following main features.
- Uniform resource management: Cloud management platform supports resource management operations through the cloud platform API interface. After passing the platform account such as AK\SK authentication, you can quickly perform resource creation, configuration, remote, deletion and other full lifecycle operations on the cloud management platform to achieve uniform resource management.
- Unified image: Cloud management platform provides a standardized operating system operating environment, that is, a image on the cloud management platform can be used for both private and public cloud platforms.
- Unified resource scheduling: The cloud management platform provides scheduler tags and scheduler policies to dynamically schedule resources to achieve optimal scheduling of computing, network, and storage resources.
- Multi-tenant isolation: The cloud management platform supports project-based multi-tenant isolation, where the resources within a project are isolated and users only have permission to use the project’s resources after joining the project.
The current OneCloud platforms that support nano-management are as follows.
- Public cloud: Alibaba Cloud (public and financial clouds), Azure, Tencent cloud, AWS, Huawei cloud, UCloud, Google cloud, Ctyun cloud, Ecloud, etc. More cloud platforms will be supported one after another to meet users' needs.
- Private clouds: VMware, ZStack, DStack, OpenStack, Apsara, HCSO, etc..
Introduction to common concepts
- Cloud management platform user view: Including system backend view, Domain View, project view. The operation menu is different for different views.
- After the system deployment is completed, the user will be guided to create an administrator user, which is a user who joins the system project with the role of admin and has all system privileges. Login to the cloud management platform as administrator user, the user has system project view and management backend view by default.
- When the user joins the project with the system built-in domainadmin role in any domain, the user has the domain System View privileges, and logs into the cloud management platform with this user, the user has the project view and the domain System View.
- When a user joins a project with any role and logs into the cloud management platform, the user has the project view by default.
- Domain: A domain is a logical concept of the cloud management platform that is divided based on multi-tenant management. A domain contains a complete set of logical autonomy system, such as user authentication, permission management, project management, etc. thus allowing domain administrators to manage users, groups, projects, roles, and permissions within the domain based on the domain with full autonomy.
- Project: Project is the owner of the resources, virtual resources (servers, baremetal, etc.) need to belong to the project, users can use all the resources in the project after joining the project.
- User: The user is the user of the resource. The user itself does not have any permission to use the resources, when the user joins the project with the role, he/she will have the permission information bound to the role. If a user joins the system project in the default domain with the role of admin, the user has the system backend privileges. No matter what role the user joins the project with, the user will have member privileges by default.
- On-premise, private cloud, public cloud division description: Cloud management platform supports nano-managed private cloud platform and public cloud platform, where On-premise and private cloud are essentially private clouds, which are divided into On-premise and private cloud according to the different resource management methods of cloud management platform. On-premise can directly manage the resources on the platform through the cloud management platform. Private clouds require the cloud management platform to call the API interface on the private cloud platform for management. At present, the cloud management platform supports the resources on
OneCloud
, VMware, OpenStack, ZStack, DStack, Alibaba Cloud, Azure, Tencent Cloud, AWS, Huawei Cloud, UCloud, Google Cloud, Ctyun Cloud and Ecloud.
- On-premise: Including OneCloud and VMware.
- Private cloud: Including OpenStack, ZStack, DStack.
- Public cloud: Including Alibaba Cloud, Azure, Tencent Cloud, AWS, Huawei Cloud, UCloud, Google Cloud, Ctyun Cloud and Ecloud.
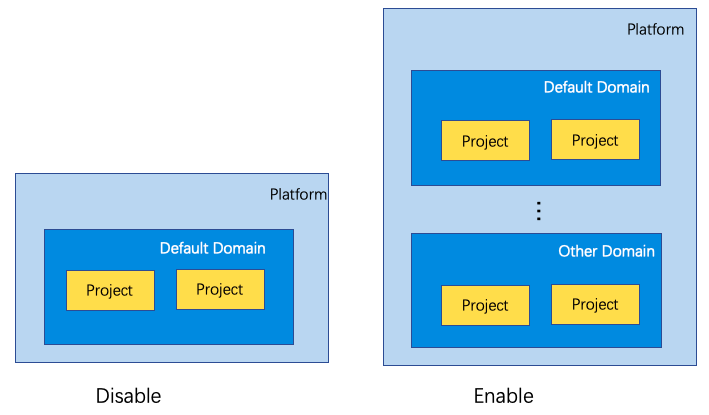
Three-level Resource Hierarchy description
- When the system does not open three levels of permissions, only the default domain exists in the system, and users can create projects in the default domain.
- When the system opens three levels of permissions, the system can create other domains in addition to default domain, and create projects in any domain, etc.
The following figure shows.
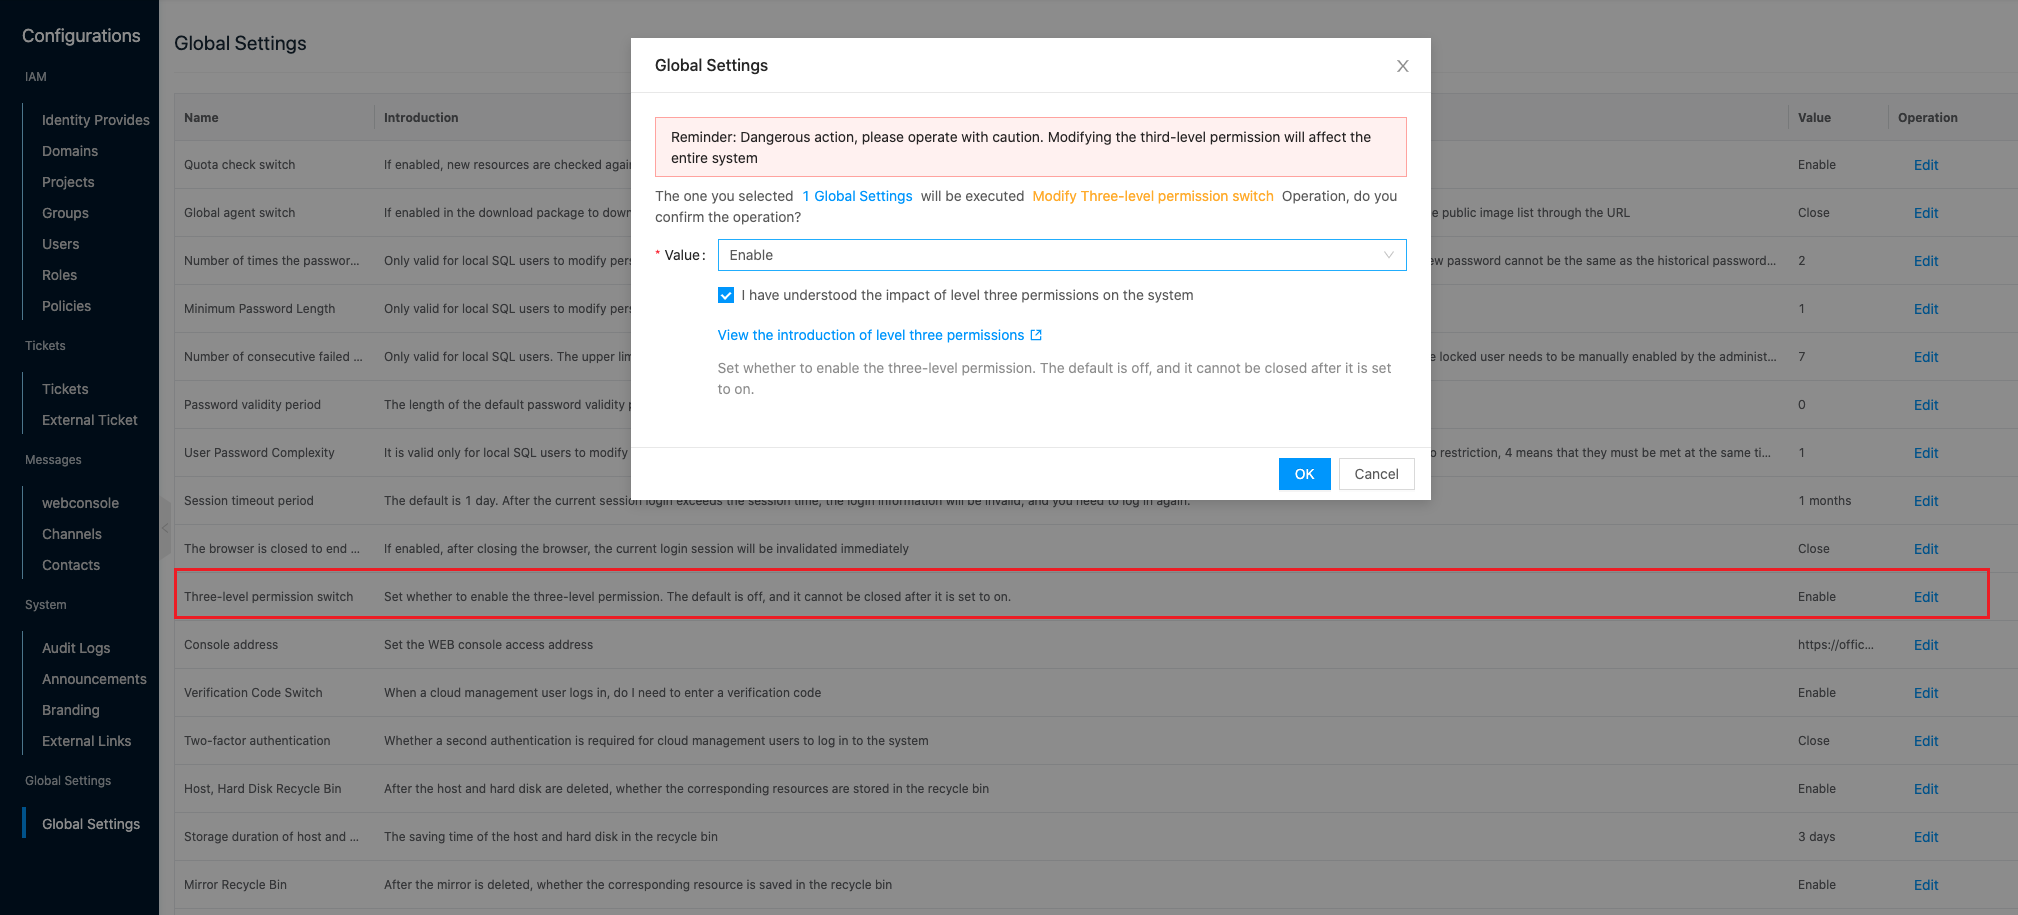
You can turn off the three-level permission by default after the system is installed, and you can turn on the three-level permission by the following command or in the global settings.
You can turn on the three-level permission by the following command or in the global settings. The method to turn on the three-level permission is as follows.
Note
Please be careful as there is no support to turn off third-level privileges after they are turned on.
-
It is recommended to enable third-level permissions in System Configuration - Global Settings on the OneCloud platform.
-
Enable third-level privileges on the First Node node configuration via the climc command.
# Enable third-level privileges
$ climc service-config --config non_default_domain_projects=true common
Interface introduction
Introduction to the top area
Switching views
When the user has (domain) administrator rights or multiple projects, click on the top left corner of 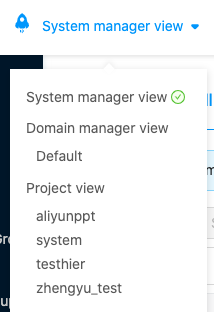 to toggle the view. The displayed view is the view the user is currently in.
Common system
This feature is used to help users quickly jump to the user’s frequently used site pages in the OneCloud platform.
Only when the administrator has configured the frequently used system, the top left corner of the
OneCloud
platform will show  icon and text. At this time, users can click “Cloud Management Platform” in the upper right corner, and select the name of the commonly used system in the pop-up drop-down menu to quickly jump to the corresponding website page.
Big Screen
The monitoring big screen is mainly used to display the overall resource usage and cost related information of the platform. At present, three types of monitoring big screen are supported. When different types are selected, different indicators of monitoring big screen will be displayed.
Default
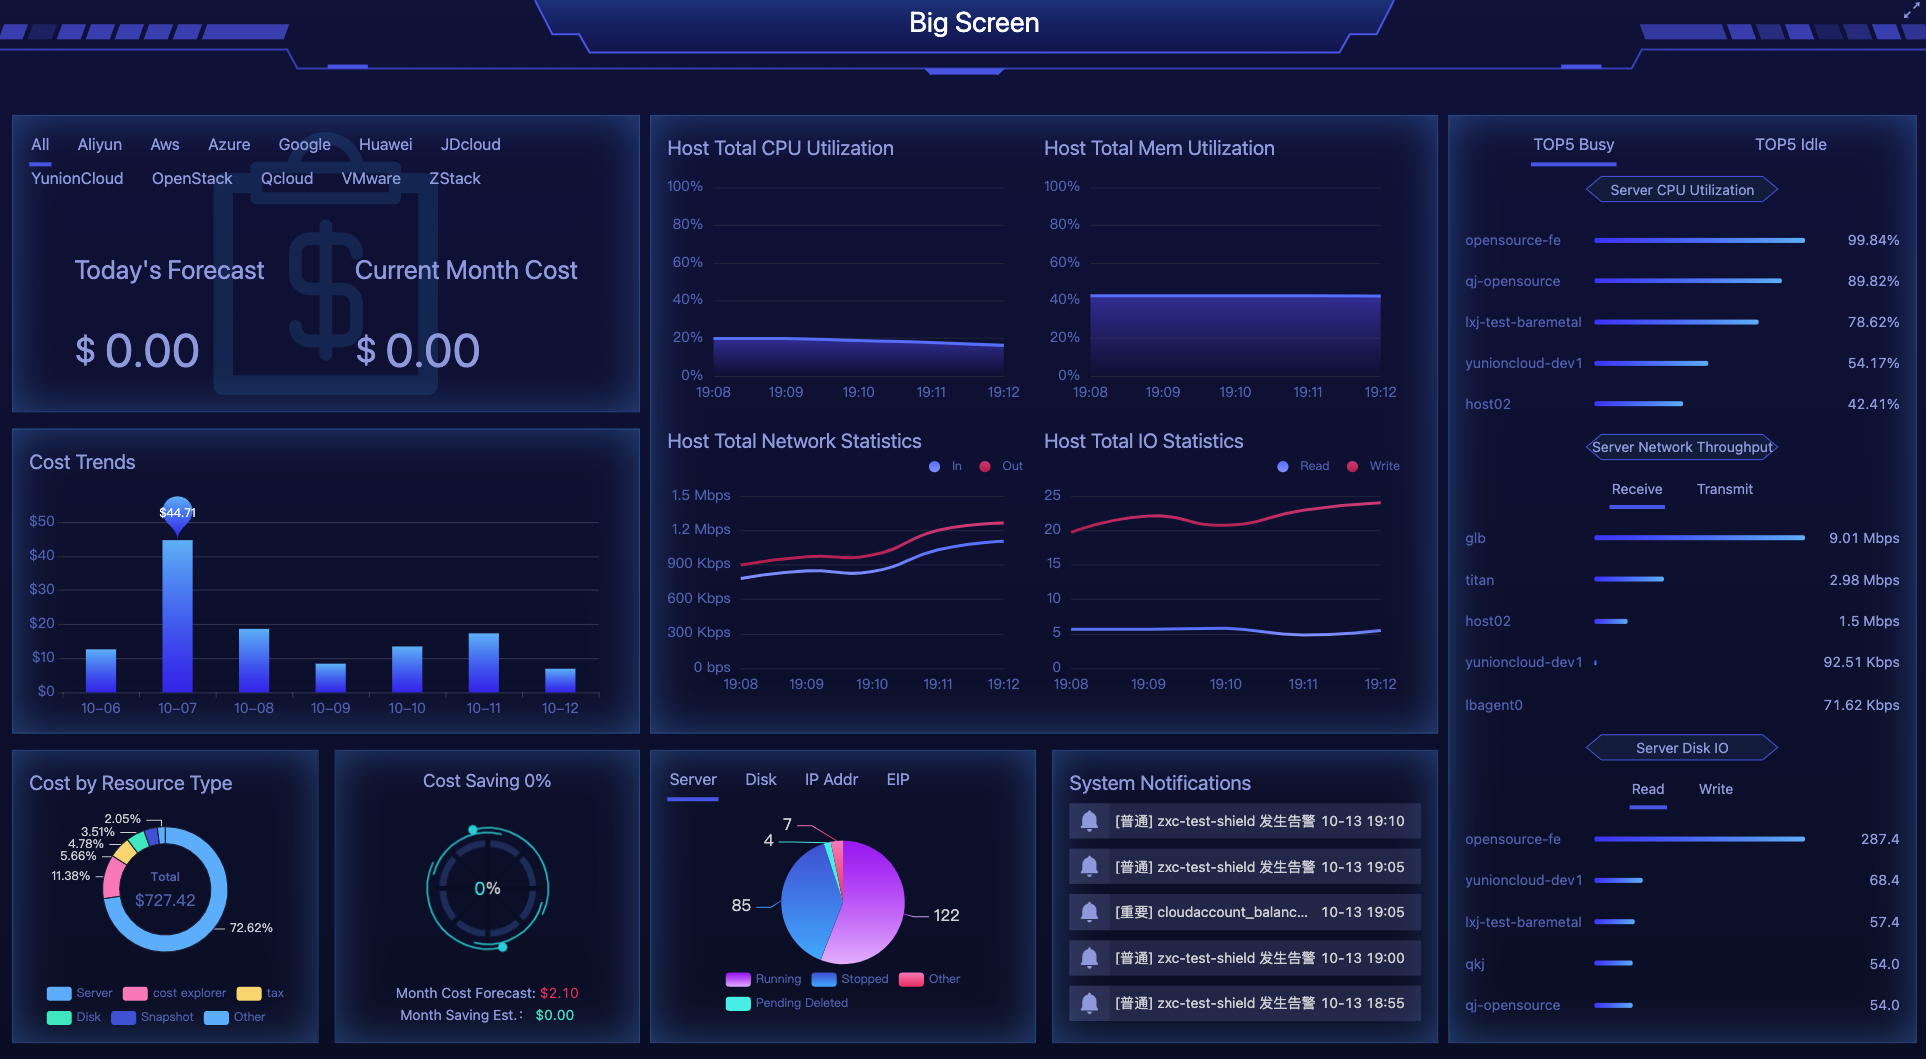
Cost-related
- Today’s forecast, Current Month Cost: Display the cost of today’s forecast consumption and the data of Current Month Cost in the cloud management platform.
- Cost trend: Display the consumption trend of the cloud management platform in the last 7 days, and display the highest consumption data in 7 days.
- Cost by resource Type: Shows the consumption data of the cloud management platform for this month and the ratio of consumption of different resource types to the total cost. It is used to help users rank the highest spending resource types this month.
- Cost Saving: This module is used to display the estimated expenses spent in the platform this month and the expense and proportion that can be saved by expense optimization (handling idle resources, etc.).
Resource-related
- Host Total CPU Utilization: Shows the CPU utilization of the hosts of all the platforms hosted by the cloud management platform in the last 5 minutes.
- Host Total Memory Utilization: Shows the memory utilization of all the hosts of all the platforms hosted by the cloud management platform in the last 5 minutes.
- Host Total Network Throughput: Displays the network inbound and outbound throughput of all hosts of all platforms hosted by the Cloud Management Platform over the last 5 minutes.
- Host Total Disk IO: Displays the disk read and write IO for all hosts of all platforms hosted by the cloud management platform over the last 5 minutes.
- Server CPU Utilization: Shows the top 5 busiest and top 5 idle server CPU utilization in the cloud management platform.
- Server Network Throughput: Shows the top5 busiest and top5 idle server network throughputs out or in the cloud management platform.
- Server disk I/O: Shows the top5 busiest and top5 idle server disk I/O reads or writes in the cloud management platform.
- Resource statistics: Statistics on the usage of servers, hard disks, IP addresses, elastic public IPs, etc. respectively.
- System messages: Display the message notification and time, etc. of messages with serious message level in the message center.
private cloud
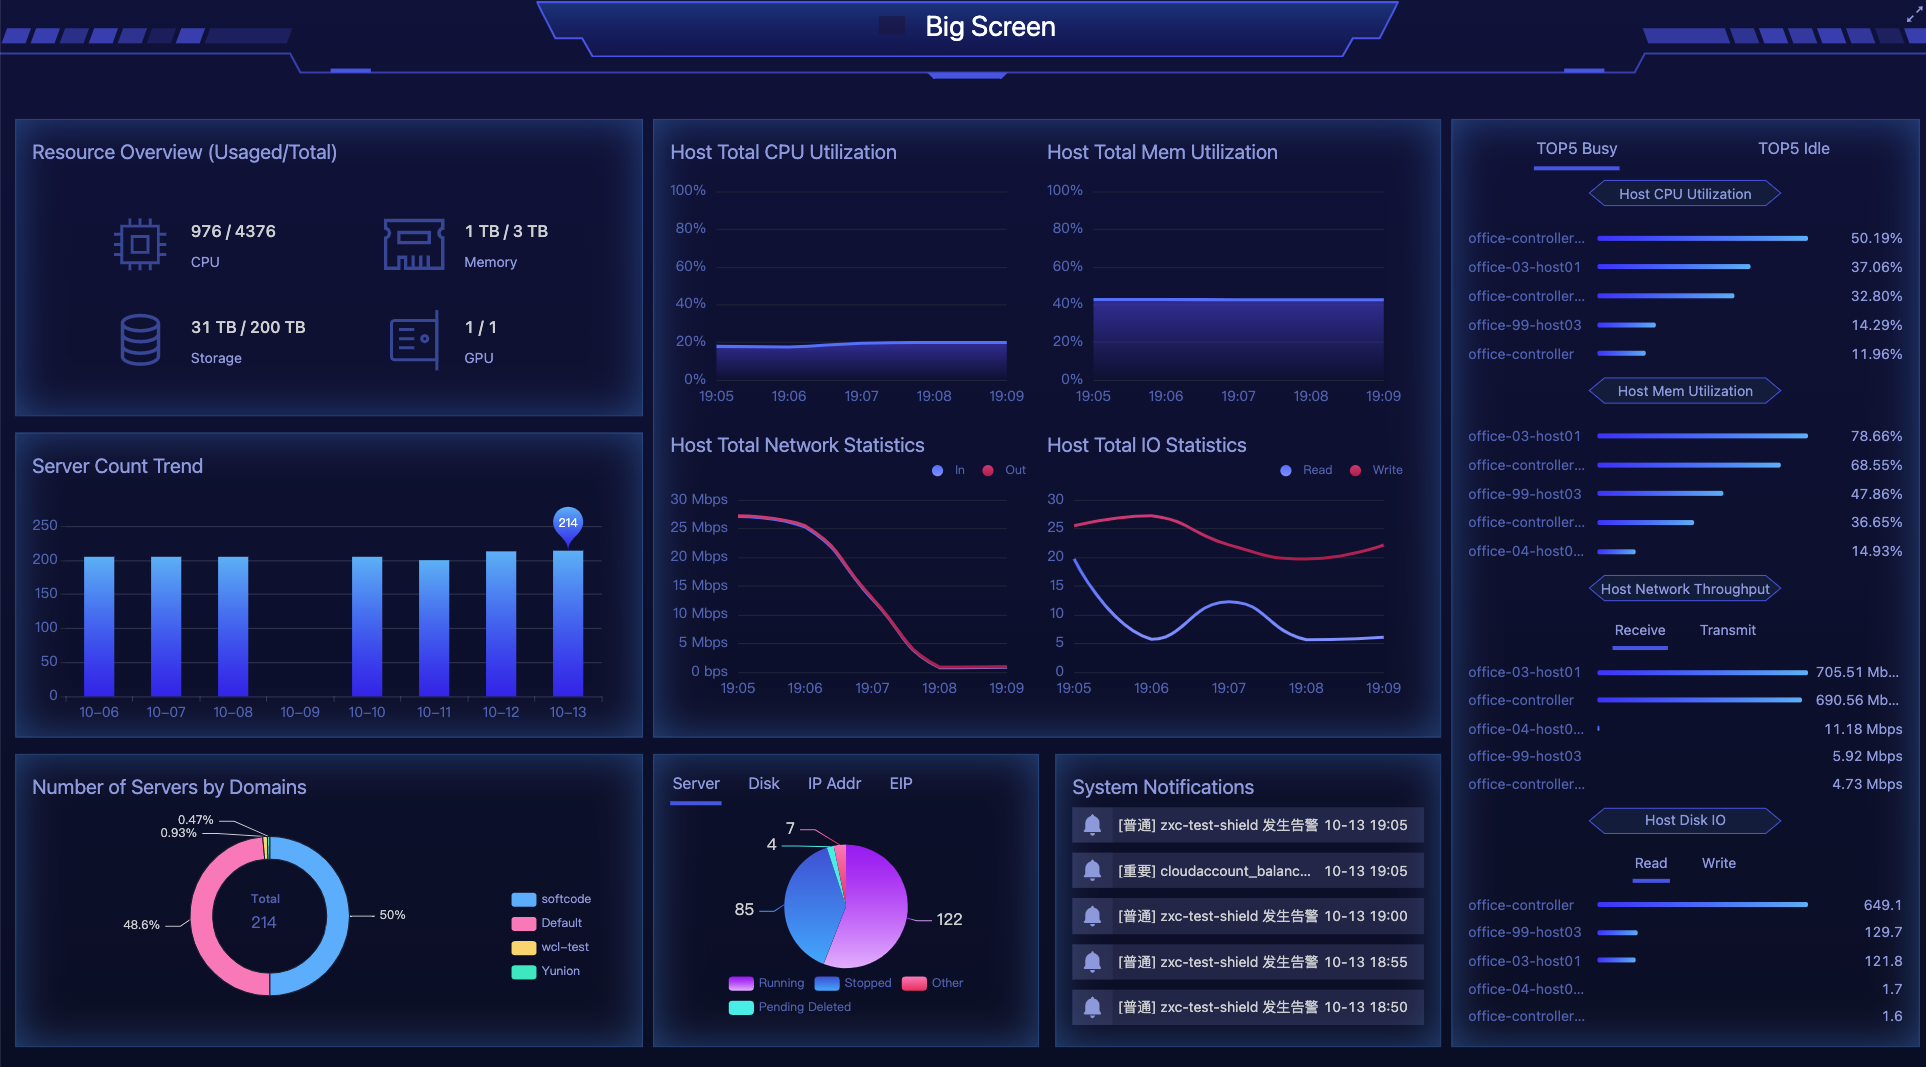
Resource-related
- Resource Overview (Usaged/Total): Shows the used and total amount of virtual CPU, memory, storage, GPU under the system/domain respectively.
- Servers Count Trend: Shows the trend of servers count in the last 7 days under the system/domain.
- Number of Servers by Domains (system view): Show the number and percentage of servers under different domains under the system backend.
- Number of Servers by Project (domain view): show the number and percentage of servers under different projects under the domain.
- Host Total CPU Utilization: Shows the CPU utilization of the hosts of all platforms managed by Cloud Management Platform in the last 5 minutes.
- Host Total Memory Utilization: Shows the memory utilization of all the hosts of all the platforms hosted by the cloud management platform in the last 5 minutes.
- Host Total Network Throughput: Displays the network inbound and outbound throughput of all hosts of all platforms hosted by the Cloud Management Platform over the last 5 minutes.
- Host Total Disk IO: Displays the disk read and write IO of all hosts of all platforms hosted by the Cloud Management Platform over the last 5 minutes.
- Host CPU utilization: Displays the top 5 busiest and top 5 idle host CPU utilization in the cloud management platform.
- Host Memory Utilization: Shows the top5 busiest and top5 idle host memory utilization in the cloud management platform.
- Host Network Throughput: Shows the top5 busiest and top5 idle host network throughputs out or in the cloud management platform.
- Host Disk I/O: Shows the top5 busiest and top5 idle host disk I/O reads or writes in the cloud management platform.
- Resource statistics: Statistics on the usage of servers, hard disks, IP addresses, elastic public IPs, etc. respectively.
- System messages: Display the message notification and time, etc. of messages with serious message level in the message center.
Cloud Management
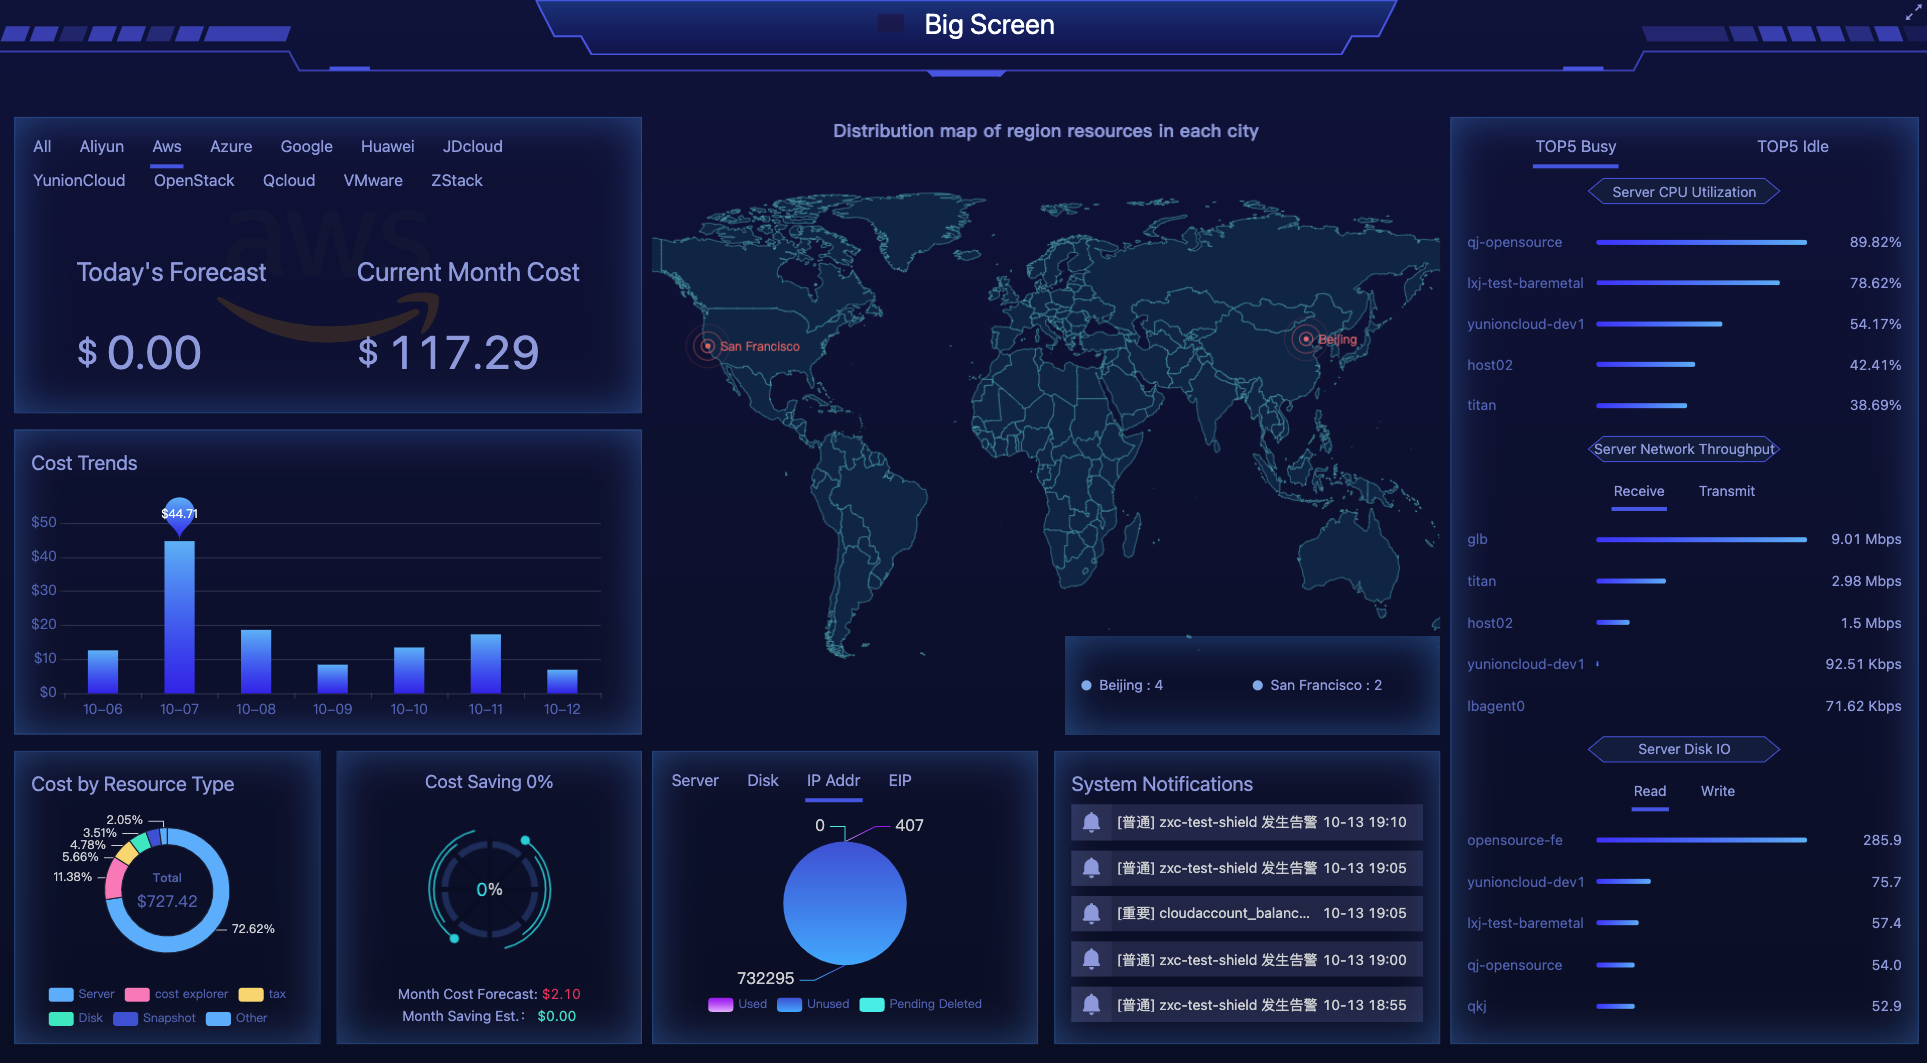
Cost-related
- Today’s forecast, Current Month Cost: Display the cost of today’s forecast consumption and the data of Current Month Cost in the cloud management platform.
- Cost trend: Display the consumption trend of the cloud management platform in the last 7 days, and display the highest consumption data in 7 days.
- Cost by resource Type: Shows the consumption data of the cloud management platform for this month and the ratio of consumption of different resource types to the total cost. It is used to help users rank the highest spending resource types this month.
- Cost Saving: This module is used to display the estimated expenses spent in the platform this month and the expense and proportion that can be saved by expense optimization (handling idle resources, etc.).
Resource-related
- Resource distribution map by region: Shows the number of resources under different regions in the form of a map.
- Server CPU Utilization: Shows the top 5 busiest and top 5 idle server CPU utilization in the cloud management platform.
- Server Network Throughput: Shows the top5 busiest and top5 idle server network throughputs out or in the cloud management platform.
- Server disk I/O: Shows the top5 busiest and top5 idle server disk I/O reads or writes in the cloud management platform.
- Resource statistics: Statistics on the usage of servers, hard disks, IP addresses, elastic public IPs, etc. respectively.
- System messages: Display the message notification and time, etc. of messages with serious message level in the message center.
Messages
This function is used to view the latest message notifications in the platform and support quick jump to the message center page.
- Click the top right corner of
 icon to display the last 8 service messages.
 - Click the “View Most” link to enter the message center page.
Ticket Center
This function is used to initiate ticket requests and process tickets.
Submit Ticket
Description
- The system administrator needs to have the ticket and process configured in the ticket configuration.
- Only domain administrators or project users are supported to initiate tickets.
This function is used to help project users and domain administrators to initiate tickets, only support to initiate join project tickets, technical support tickets, project quota tickets and domain quota tickets.
- domain administrator click the top right corner of
 icon in the drop-down pop-up box to support launching application for domain quota ticket.
 - Project users click the top right corner of icon in the top right corner, and the drop-down pop-up box supports to initiate join project ticket, technical support ticket, apply for project quota ticket, etc.
Handle Tickets
When a user initiates a ticket, the user in the approval process can process the ticket.
- The approving user clicks the upper right corner of icon and select “Pending My Approval” menu item in the drop-down pop-up box to jump to the Pending My Approval ticket page.
- Process the ticket, etc.
- The Ticket Center supports the following pages.
- “My Tickets”: The list is all the ticket applications initiated by users, and supports the operation of withdrawing and viewing details.
- Pending for Approval": The list shows the tickets that need to be approved by the currently logged-in user, and supports the operation of passing, rejecting and viewing ticket details.
- “Approved Tickets”: The list shows the tickets that have been approved by the currently logged-in user.
- “Involved Tickets”: There are two cases.
- The list shows all tickets approved by the currently logged-in user, but approved by other users
- The information of tickets that are withdrawn by the ticket application user.
- “External Tickets”: the list shows the information of tickets approved by external tickets system.
Feature config
This function is used to customize the functions displayed by the product, users can choose the function or platform to use according to the demand, the platform will display the relevant menu according to the demand, and the irrelevant menu will be hidden. Only support the operation under the management platform view, you can enter the selection repeatedly.
- Click the top right corner of
 icon and select the drop-down menu “Function Selection” menu item to enter the function selection.
 - Select the corresponding function and platform according to the requirement. For details, please see [Initialization Guidance - Function Selection](../../quick/deploy/#Function selection).
Documentation
This function is used to view the product companion manual.
- Click on the upper right corner of icon and select the drop-down menu “Product Manuals” menu item to jump to the offline version of the companion product manual page.
About
This function is used to view product license information as well as version information, etc.
Description
Viewing and performing license operations etc. is supported only in the admin backend view.
License Information
- Click on the top right corner of icon and select the drop-down menu “About” menu item to enter the About page.
- View License Information: Support to view the current authorization information of Cloud Management Platform and License authorization operation.More about License.
- Authorized user: The name of the user who applies for the License and carries out the License authorization, and the user who applies for the License needs to have the permission to manage the background.
- Expiration time: The expiration date of the License file. When the expiration date is exceeded, you need to re-apply for the License file and perform the authorization operation.
Description
- The trial version alerts 7 days in advance that the License will expire.
- The commercial version alerts you one month in advance that the License will expire.
- Number of licensed CPUs: The total number of CPUs supported by the cloud management platform.
- Current quota used: The number of CPUs of the hosts that are currently used by the cloud management platform.
- Server identifier: The unique identifier of the server where the cloud management platform is installed, which is used to apply for the License file.
- Issuance time: The issuance time of the License file.
- View License Usage: View the current user’s License usage rate of private cloud license and cloud management license, which is refreshed once an hour by default and supports immediate refresh to get the latest License usage rate.
- Status: Including normal, warning and disabled status.
- Normal: When any License utilization rate is 0 to 100%, the status is normal.
- Warning: When the usage rate of any License is 101% to 110%, the status will be displayed as Warning, and the user will be reminded to apply for a new License at the top.
- Disable: When the usage rate of any License exceeds 110%, most of the features of OneCloud platform will be disabled, and only disable, delete, and renew License operations are supported, so users can make OneCloud platform available by applying for a new License or by disabling the host or deleting the public cloud server.
- Used: Shows the number of private cloud license licenses and cloud management license licenses used on the platform respectively. You can view the usage status of specific Licenses.
Description
The number of cloud management license licenses used for public cloud Servers is taken as the minimum of the average number of Servers running in the last 7 days or less and the number of Servers currently running. If it has been running for less than 7 days, the average number of Servers that have been running for the longest time in the past is used.
- License count: Displays the number of private cloud license licenses and the number of cloud management license licenses available to the user. Overuse is allowed by 10%, and is rounded upwards if less than 1.
- Usage rate: Shows the usage rate of private cloud license and cloud management license, and the authorization status is judged by the usage rate.
- Status: Including normal, warning and disabled status.
View version information
This function is used to view the version information of the product.
- Click the top right corner of icon and select the drop-down menu “About” menu item to enter the About page.
- View version information.
- Current product: Display the product name.
- Software version: Show the software version of the current product.
- Support: When the user has the need to upgrade the enterprise version or upgrade the product version, the user can use the support email address to contact our company, and we will contact you as soon as possible.
- Manufacturer Information: The manufacturer information of the product, which cannot be changed.
User Profile
This function is used to view user information, etc.
-
Click the top right corner of
 icon and select the drop-down menu “User Profile” menu item to enter the user information page.
 -
Contact information: Support modifying cell phone number and email address and setting notification channels, etc.
- Click the “Modify” button on the right of the contact information to bring up the modify contact information dialog box.
- Set the cell phone number, email address and notification channel for receiving system messages, etc. Click the “OK” button to complete the operation.
- When email and SMS are enabled for the notification channel, the default email and SMS icons are gray, indicating that the notification channel is not verified. At this time, users need to click the notification channel icon of email and SMS to bring up the dialog box of cell phone number verification or email verification. Click “Send verification code” link to send verification SMS and verification email to user’s cell phone and email.
- Enter the verification code and click the “OK” button to complete the verification, and the icon of email and SMS at the notification channel will be green after verification.
Description
The enabled status of the contact is “disabled”, which means that the user cannot receive system messages through the notification channel and does not affect the user’s login, etc.
-
User information: Display the user name, display name, user ID, last login IP, last login time, password expiration time, whether MFA is enabled or not, and information about the items the user has joined.
- Password Expiration Time: When the password has 7 days to expire, it will indicate that the password is about to expire and ask the user to change the password as soon as possible. If the password has expired, the user cannot log in the system successfully.
- MFA Authentication: Multi-Factor Authentication, users need to pass two or more authentication methods to log in to the cloud management platform. Multiple authentication ensures the security of the cloud management platform.
- Project information: Including the project ID, name, domain, user’s role in the project, permissions associated with the role and other information.
-
Third-party account association: Used to associate the account with the secondary authentication source (i.e. the authentication source that is not enabled to automatically create users). After association, users can click the icon of the corresponding authentication source on the login page to use the external authentication source to log in to the cloud management platform.
- Association: Click the “Association” button on the right side of the authentication source icon to jump to the external authentication source for login authorization, and the authentication source can be associated after successful login.
- Cancel the association: Click the Associate button on the right side of the associated authentication source icon to bring up the operation confirmation dialog box, click the “OK” button to cancel the association.
-
Preference setting: Select whether to display system resources, which is effective only for the current user. If the servers created by container cluster belong to system resources, they are not displayed in the server list. If you enable this item, you can view the servers that form the container cluster in the server list.
Theme Settings
This feature is used to skin the web interface of the cloud management platform.
- Click the top right corner of icon and select the drop-down menu “Theme Settings” menu item to bring up the dialog box.
- Select the overall style setting, theme color, etc. to change the web interface of Cloud Management Platform.
Language Setting
This function is used to switch the language of the cloud management platform. Currently, only Chinese and English are supported.
- Click the top right corner of icon, select the drop-down menu “Theme Settings” menu item, and select “Simplified Chinese” or “English” in the pop-up dialog box. You can switch the language of the cloud management platform.
Cloud SSO
Account login user
Only after the currently logged-in user is associated with a cloud user will the “Account Login User” page be displayed. The currently logged-in user can easily log in to the corresponding public cloud platform by means of account and password on the Cloud SSO - Account Login User page.
- Click the top right corner of icon and select the drop-down menu “Cloud SSO” menu item to enter the Cloud SSO-Account login user page.
- Users can open the corresponding public cloud platform through the login address, and log in to the public cloud platform with the information such as account, username and password.
- Click the “View Permissions” button in the operation column on the right side of the cloud subscriber to view information about the permissions that the cloud subscriber has.
SSO login user
Only after the current login user is added as a SAML user, the “SSO login user” page will be displayed, and the currently SSO login user can click on the top right corner of icon in the upper right corner, click on the platform icon under “SSO Login”, if you have multiple free login accounts of one platform at the same time, multiple icons of the same platform will appear, you can place your mouse on the icon to check the specific account name, or free login to the public cloud platform in the Cloud SSO- Account Sign-in user page.
- Click the top right corner of icon and select the drop-down menu “Cloud SSO” menu item to enter the Cloud SSO-Account Sign-in User page.
- Click the “SSO login user” tab to enter the SSO login user page.
- Click the “SSO login” button on the right column of the list to sign in to the public cloud platform with SSO.
Description
When logging in to Azure with SSO, an alert dialog box will pop up and the user will click “Copy and Login” button to copy the account name and jump to Azure, enter the account and log in to Azure with SSO.
Access Credentials
Accesskey
The cloud management platform supports Accesskey, and external applications can connect to access the cloud management platform through Accesskey and AccessSecret.
- Click the top right corner of icon and select the drop-down menu “Access Credentials” menu item to enter the access credentials page.
- The default is the AccessKey management tab, which supports the following operations.
- New AccessKey: Click the “New” button at the top of the list to create a new user AccessKey. Please save the user’s AccessKey Secret information properly, which will be displayed only once when it is created.
- Enable AccessKey: Click the “Enable” button on the right column of the AccessKey in the “Disabled” status to enable the AccessKey in the “Disabled” status.
- Disable AccessKey: Click the “Disable” button on the right column of the AccessKey in the “Enable” status to disable the AccessKey in the “Enable” status.
- Deleting AccessKeys.
- Delete: Click the Delete button on the right column of the AccessKey, and click the “OK” button in the pop-up deletion confirmation dialog box to delete the AccessKey information.
- Batch Delete: Select one or more AccessKeys in the list, click the Delete button at the top of the list, and click the “OK” button in the pop-up deletion confirmation dialog box to delete the AccessKey information.
OpenID Connect/OAuth2
The cloud management platform supports as an authentication provider for other systems such as Grafana, Kubernetes, etc.
- Click the top right corner of icon and select the drop-down menu “Access Credentials” menu item to enter the Access Credentials page.
Click the “OpenID Connect/OAuth2” tab to enter the OpenID Connect/OAuth2 page.
The OpenID Connect connection information will be displayed at the top of the list, which supports copying.
- The following operations are supported.
- New OpenID Connect/OAuth2: Click the New button at the top of the list to bring up the New OpenID Connect/OAuth2 dialog box, set the callback address, and click the “OK” button.
- Enable OpenID Connect/OAuth2: Click the “Enable” button on the right action bar of OpenID Connect/OAuth2 in the “Disabled” state to enable OpenID Connect/OAuth2 in the “Disabled” state.
- Disable OpenID Connect/OAuth2: Click the “Disable” button on the right column of OpenID Connect/OAuth2 in the “Enabled” state to disable OpenID Connect/OAuth2 in the “Enabled” state.
- To delete OpenID Connect/OAuth2.
- Delete: Click the Delete button on the right column of OpenID Connect/OAuth2, and click the “OK” button in the pop-up deletion confirmation dialog to delete OpenID Connect/OAuth2 information.
- Batch Delete: Select one or more OpenID Connect/OAuth2 in the list, click the Delete button at the top of the list, and click the “OK” button in the pop-up deletion confirmation dialog to delete the OpenID Connect/OAuth2 information.
Change Password
This function is only available for local users to change their passwords.
- Click on the top right corner of the icon and select the drop-down menu “Change Password” menu item to bring up the Change Password dialog box.
- Enter the old password, new password, confirm password, and click “OK” button.
Exit system
- Click the top right corner of icon and select the drop-down menu “Logout” menu item to log out of the login system.
Left navigation bar
The left navigation bar displays all the function menus of the cloud management platform in the structure of menu-submenu-menu items, and the operation menus are displayed differently when the user has different rights. The following table shows the menu items that users can view in the system backend view, Domain View and project view respectively. When there is a √ item in the Admin Backend, Domain Admin Backend or Project column, it indicates the operation menu that users can view under Admin Backend view, Domain Admin Backend view or Project view.
Note
When a user has admin user rights in the project, that user can also use the Trash feature under the project view.
| Menu | Submenu | Menu items | System View | Domain View | Project View |
| Dashboard | ✔️ | ✔️ | ✔️ | ||
| Compute | Compute | Servers | ✔️ | ✔️ | ✔️ |
| Baremetals | ✔️ | ✔️ | ✔️ | ||
| Anti-affinity Group | ✔️ | ✔️ | ✔️ | ||
| Templates | ✔️ | ✔️ | ✔️ | ||
| Scaling Groups | ✔️ | ✔️ | ✔️ | ||
| Images | Images | ✔️ | ✔️ | ✔️ | |
| Server Images | ✔️ | ✔️ | ✔️ | ||
| Storage | Disks | ✔️ | ✔️ | ✔️ | |
| Snapshots | ✔️ | ✔️ | ✔️ | ||
| Server Snapshots | ✔️ | ✔️ | ✔️ | ||
| Snapshot Policies | ✔️ | ✔️ | ✔️ | ||
| Networks | Security Group | ✔️ | ✔️ | ✔️ | |
| IP Subnets | ✔️ | ✔️ | ✔️ | ||
| EIP | ✔️ | ✔️ | ✔️ | ||
| Key Pairs | Key Pairs | ✔️ | ✔️ | ✔️ | |
| Configuration | Configuration | ✔️ | ✔️ | ✔️ | |
| Physical Resources | Hosts | ✔️ | ✔️ | ||
| Machines | ✔️ | ✔️ | |||
| GPU | ✔️ | ✔️ | |||
| Scheduling | Scheduler Tags | ✔️ | ✔️ | ✔️ | |
| Scheduler Policies | ✔️ | ||||
| Dynamic Tags | ✔️ | ||||
| Trash | Servers | ✔️ | ✔️ | ||
| Disks | ✔️ | ✔️ | |||
| Images | ✔️ | ✔️ | |||
| Containers | Applications | Deployments | ✔️ | ✔️ | ✔️ |
| Statefulsets | ✔️ | ✔️ | ✔️ | ||
| DaemonSets | ✔️ | ✔️ | ✔️ | ||
| Jobs | ✔️ | ✔️ | ✔️ | ||
| Cron Jobs | ✔️ | ✔️ | ✔️ | ||
| Pods | ✔️ | ✔️ | ✔️ | ||
| PVC | ✔️ | ✔️ | ✔️ | ||
| Service & Load Balancing | Service | ✔️ | ✔️ | ✔️ | |
| Ingresses | ✔️ | ✔️ | ✔️ | ||
| Configurations | Configmaps | ✔️ | ✔️ | ✔️ | |
| Secrets | ✔️ | ✔️ | ✔️ | ||
| Clusters | Clusters | ✔️ | ✔️ | ✔️ | |
| Nodes | ✔️ | ✔️ | ✔️ | ||
| Storage Classes | ✔️ | ✔️ | ✔️ | ||
| Namespaces | ✔️ | ✔️ | ✔️ | ||
| Role | ✔️ | ✔️ | ✔️ | ||
| ClusterRole | ✔️ | ✔️ | ✔️ | ||
| Role Binding | ✔️ | ✔️ | ✔️ | ||
| Cluster Role Binding | ✔️ | ✔️ | ✔️ | ||
| Service Account | ✔️ | ✔️ | ✔️ | ||
| Components | ✔️ | ✔️ | ✔️ | ||
| Multi-cluster resources | FederatedNamespace | ✔️ | ✔️ | ✔️ | |
| FederatedRole | ✔️ | ✔️ | ✔️ | ||
| FederatedClusterRole | ✔️ | ✔️ | ✔️ | ||
| FederatedRoleBinding | ✔️ | ✔️ | ✔️ | ||
| FederatedClusterRoleBingding | ✔️ | ✔️ | ✔️ | ||
| Network | Locations | Regions | ✔️ | ||
| Zones | ✔️ | ||||
| Infrastructure | Global VPC | ✔️ | ✔️ | ||
| VPC | ✔️ | ✔️ | |||
| L2 Network | ✔️ | ✔️ | |||
| IP Subnets | ✔️ | ✔️ | ✔️ | ||
| Network Services | EIP | ✔️ | ✔️ | ✔️ | |
| NAT Gateway | ✔️ | ✔️ | |||
| DNS | ✔️ | ||||
| Load Balancing | LB Instances | ✔️ | ✔️ | ✔️ | |
| Access Control | ✔️ | ✔️ | ✔️ | ||
| Certificates | ✔️ | ✔️ | ✔️ | ||
| Load Balancing Clusters | Clusters | ✔️ | |||
| Nodes | ✔️ | ||||
| Storage | Block Storage | Block Storage | ✔️ | ✔️ | |
| Object Storage | OSS | ✔️ | ✔️ | ✔️ | |
| Databases | RDS | RDS Instances | ✔️ | ✔️ | ✔️ |
| Redis | Redis Instances | ✔️ | ✔️ | ✔️ | |
| Monitoring | Overview | ✔️ | ✔️ | ✔️ | |
| Metrics | Query | ✔️ | ✔️ | ✔️ | |
| Alerts | Policies | ✔️ | ✔️ | ✔️ | |
| History | ✔️ | ✔️ | ✔️ | ||
| Resources | ✔️ | ✔️ | |||
| Automation | Tools | Cron Jobs | ✔️ | ||
| Orchestration | Servers | ✔️ | ✔️ | ✔️ | |
| Containers | ✔️ | ✔️ | ✔️ | ||
| App Market | ✔️ | ✔️ | ✔️ | ||
| Helm Repos | ✔️ | ✔️ | ✔️ | ||
| Cost | Overview | ✔️ | ✔️ | ✔️ | |
| Analysis | Account | ✔️ | ✔️ | ||
| Platform | ✔️ | ✔️ | ✔️ | ||
| Multidimention | ✔️ | ✔️ | ✔️ | ||
| Budgets | ✔️ | ✔️ | ✔️ | ||
| Alerts | ✔️ | ✔️ | ✔️ | ||
| Bills | Instance Bills | ✔️ | ✔️ | ✔️ | |
| Resource Bills | ✔️ | ✔️ | ✔️ | ||
| Transactions | ✔️ | ✔️ | ✔️ | ||
| Optimization | Suggestions | ✔️ | ✔️ | ||
| Ignores | ✔️ | ✔️ | |||
| Rules | ✔️ | ||||
| Rates | Rates Settings | ✔️ | |||
| Multicloud | Accounts | Accounts | ✔️ | ✔️ | |
| Groups | ✔️ | ✔️ | |||
| Proxy | ✔️ | ✔️ | |||
| Settings | IAM | Identity Provider | ✔️ | ||
| Domains | ✔️ | ||||
| Projects | ✔️ | ✔️ | |||
| Groups | ✔️ | ✔️ | |||
| Users | ✔️ | ✔️ | |||
| Roles | ✔️ | ✔️ | |||
| Policies | ✔️ | ✔️ | |||
| Log Auidt | Audit Logs | ✔️ | ✔️ | ✔️ | |
| Cloud Logs | ✔️ | ✔️ | |||
| Security Inspection | Suggestions | ✔️ | ✔️ | ||
| Ignores | ✔️ | ✔️ | |||
| Rules | ✔️ | ✔️ | |||
| Security Alerts | Security Alerts | ✔️ | ✔️ | ✔️ | |
| Settings | Tickets | Tickets | ✔️ | ✔️ | |
| External Ticket | ✔️ | ✔️ | |||
| Notifications | Messages | ✔️ | ✔️ | ✔️ | |
| Channels | ✔️ | ||||
| Recipients | ✔️ | ✔️ | |||
| System | Announcements | ✔️ | ✔️ | ✔️ | |
| Branding | ✔️ | ||||
| External Links | ✔️ | ||||
| Tags | Tags | ✔️ | ✔️ | ✔️ | |
| UIPolicy | Assignments | ✔️ | |||
| Definitions | ✔️ | ||||
| Global Settings | Global Settings | ✔️ | |||
Operation area
The action area displays the function view page.
When the user selects the corresponding menu item in the left navigation bar, the corresponding function page will be viewed in the operation area, where the user can manage the resources, etc. E.g. if you click “Compute/Compute/Server” menu item, the operation area will display all the server information, and support the management of servers such as new, power on, and power off.
General Functions
Introduction of general functions in the operation area.
-
Mouse hover over the parameter value, if it appears
 icon appears, it means you can click the icon to modify the parameter value.
 -
If the mouse hovers over the parameter value, and if the
 icon appears, it means that you can click this icon to copy the parameter value.
 -
Hovering over a parameter value or action column button displays a description if one is available.
-
Resource name description.
- When the name is duplicated when creating servers and baremetal on OneCloud platform, -1~N will be automatically added after the name, and the server and baremetal share the name space. There is no such rule when creating other resources, and an error will be reported directly when the name is duplicated.
- When creating other resources, project users may have the problem that there is no duplicate resource in the project, but the duplicate name error is reported when creating the project, which is because the name is unique in the system and all projects share the system namespace. It is recommended to create resources in a project with a prefix identifier related to the project to avoid such name duplication problems.
-
The list supports adjusting column widths, etc.
secondary menu supports collapse and expand
Collapse secondary menu
Expand secondary menu
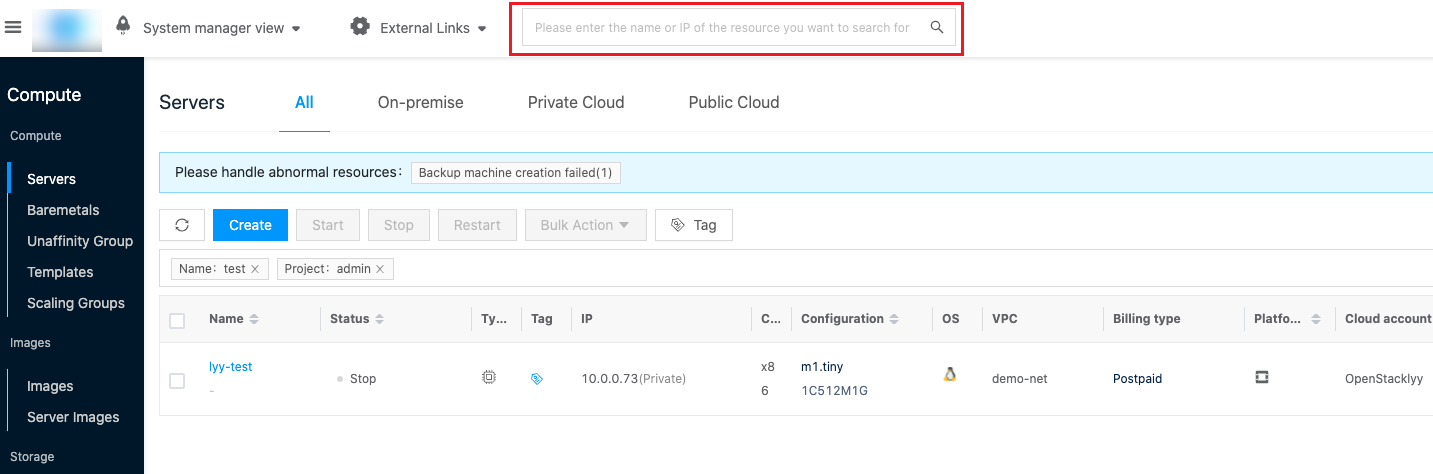
Search
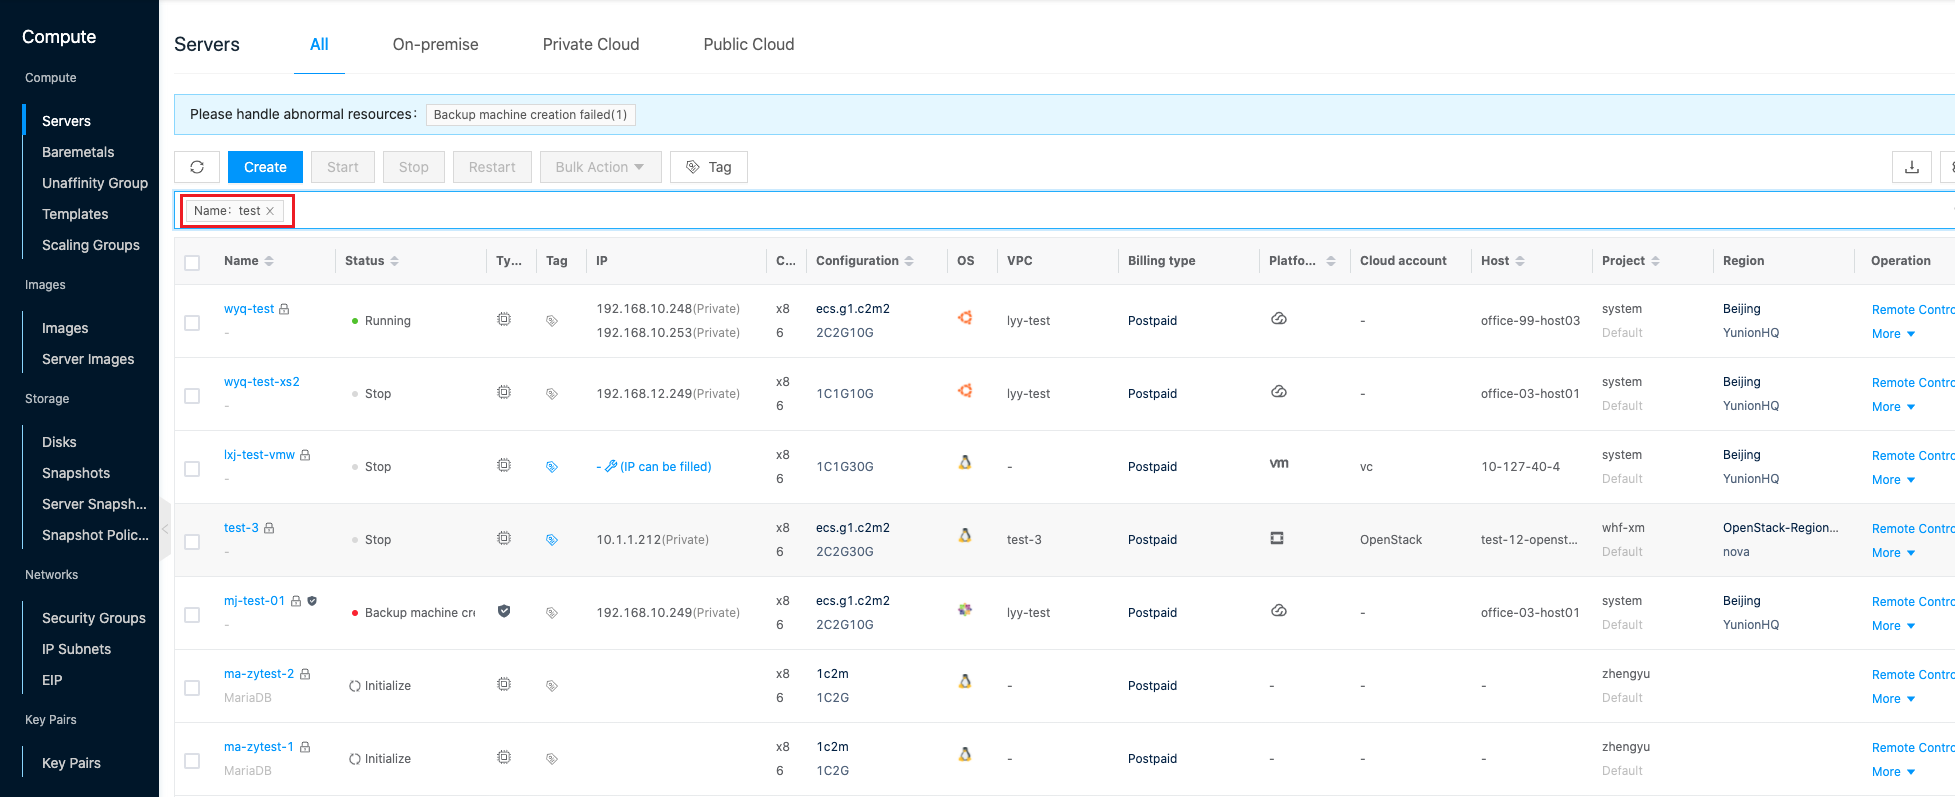
All resource pages in the cloud management platform support the search function, which supports quick search to qualified resources based on platform, region, name and other conditions. Take server as an example to introduce the use of search function.

The search rules are as follows.
-
Enter a keyword in the search box and press Enter to search for resources whose name contains a keyword (letter) or whose IP contains a keyword (number). E.g. search for resources whose name contains test.
-
Search by resource attributes: Click the search box to search by resource attributes (such as platform, project, IP, status, etc.). Support searching multiple resource attributes at the same time. E.g. search for resources with platform OneCloud under the item system.


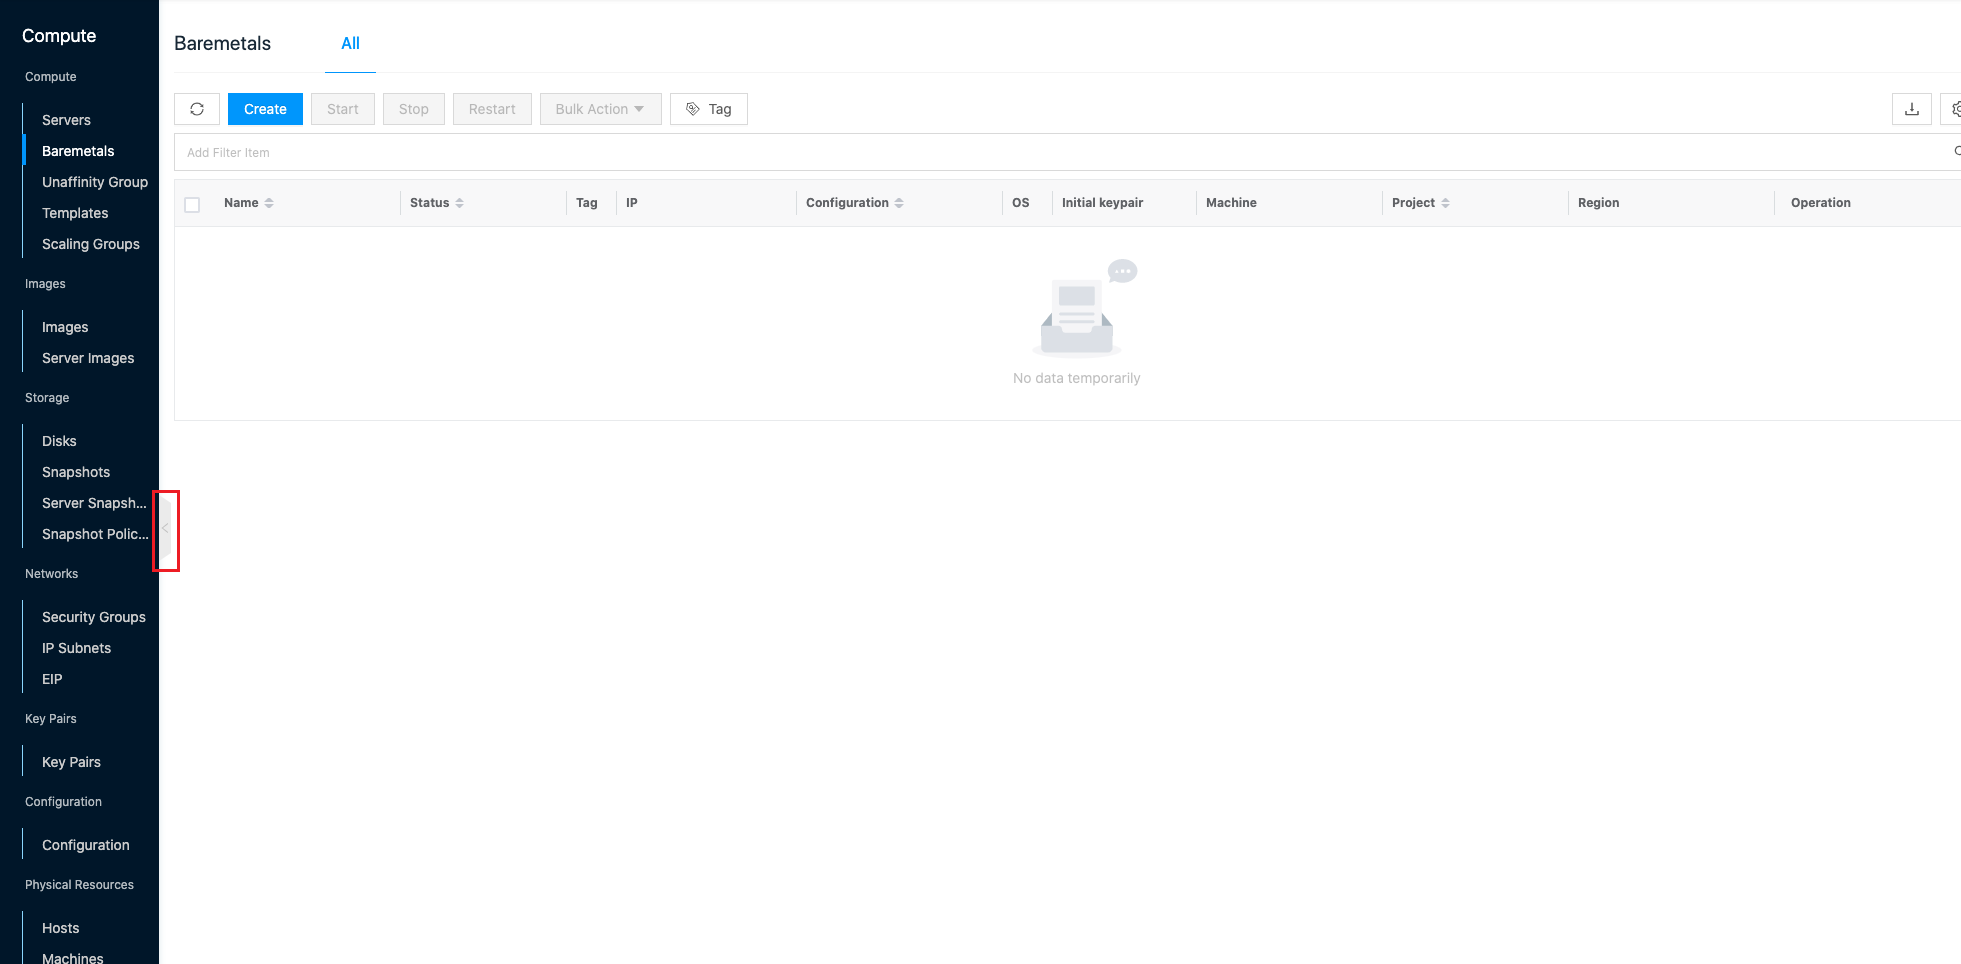
Export Data
The OneCloud platform supports exporting data from lists. The export data function can be used with search function to export the data the user wants. The export function is not supported for container-related lists at the moment.
Export all data
-
Click the top right corner of the list
 icon to bring up the Export Data dialog box.
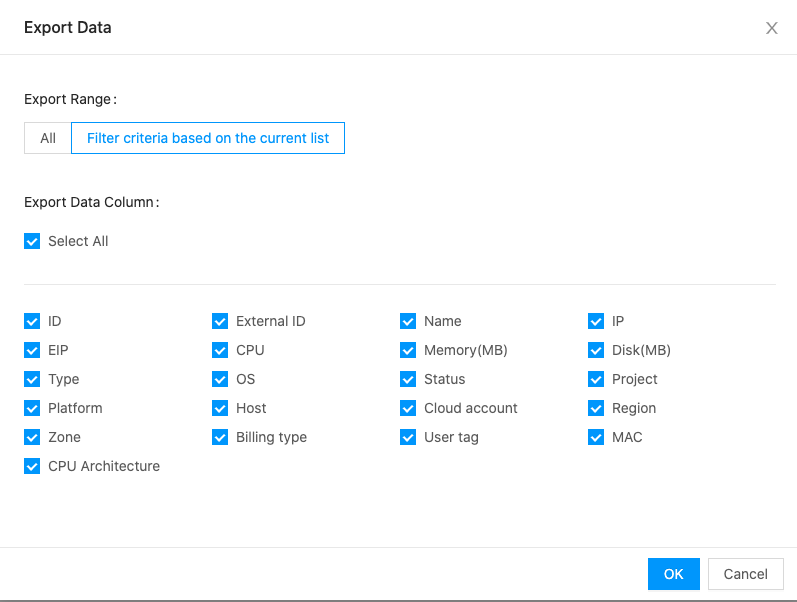
-
Select the export range as “All” and select the desired data columns, and click the “OK” button.
Export the data you need
-
The user searches for the desired data in the search box.
-
Click on the top right corner of the list
icon to bring up the Export Data dialog box. -
Select the export range as “Filter by current list”, and select the desired data columns, click “OK” button.
Custom List Project
The OneCloud platform supports customizing the list data columns, and users can set the content of the list display according to their needs.
-
Click the top right corner of the list
 icon to pop up the custom list dialog.
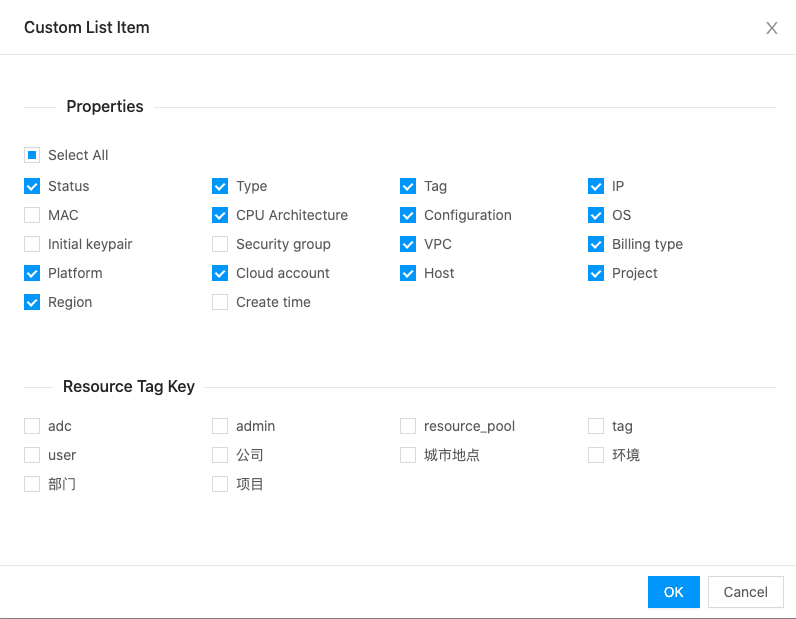
Description
Currently only the server list, baremetal list, and baremetal hosts list support resource tag keys as data columns.
-
Check the properties that need to be displayed in the list, and also check the tag key as a data column if the resource tag key is supported, click the “OK” button.
Description
The tag column is displayed after the name column by default.
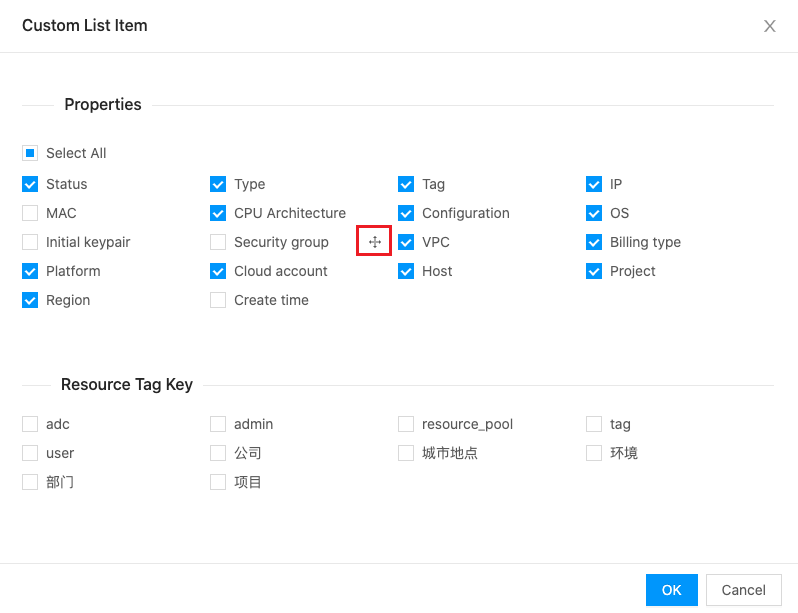
-
Attributes support custom sorting, hovering over an attribute will bring up the
 icon will appear, and users can drag and drop to adjust the display order of the attributes.
Global search
resources that support global search
The OneCloud platform supports global search of system resources, and the list of supported search resources is as follows.
| Resource \ Search Keyword | Name | IP |
|---|---|---|
| Server | ✔️ | ✔️ |
| Baremetal | ✔️ | ✔️ |
| System Image | ✔️ | |
| Host Image | ✔️ | |
| Hard Disk | ✔️ | |
| Disk Snapshot | ✔️ | |
| Security Groups | ✔️ | |
| EIP | ✔️ | ✔️ |
| Resilient NIC | ✔️ | |
| Layer 2 Networking | ✔️ | |
| IP Subnets | ✔️ | ✔️ |
| Host | ✔️ | ✔️ |
| Baremetal Hosts | ✔️ | ✔️ |
| Trash (Host) | ✔️ | ✔️ |
| Recycle Group (Hard Disk) | ✔️ | |
| Recycle Group (Image) | ✔️ | |
| Load Balancing - Instance | ✔️ | ✔️ |
| Block Storage | ✔️ | |
| Storage Buckets | ✔️ | |
| RDS-Index List | ✔️ | ✔️ |
| Redis-instance-list | ✔️ | ✔️ |
Note
The resource items displayed by the user search are related to the user permissions. If the user has the view trash permission, then if there are resources in the trash that match the criteria, the corresponding resources will be displayed on the search page.
Usage
-
Search by name: Enter the resource name directly in the top search box or click the search box and select the resource property as “Name” and enter the resource name, press
and the search page will display all the resources that match the search criteria. The search page will display all the resources that meet the search criteria. The number of resources that meet the search criteria in the resource type and the resource list information will be displayed with the resource type as the tab, and the user can manage the searched resources directly in the search page. 
-
Search by IP: In the top search box, click to select the resource attribute as “IP” and then enter the IP address of the resource, press
, and the search page will display all the resources that meet the search criteria. The search page will display all the resources that meet the search criteria. The number of resources that meet the search criteria in the resource type and the resource list information will be displayed with the resource type as the tab, and the user can manage the searched resources directly in the search page. 
Domain resources and project resources sharing
Domain resource description
The following domain resources are supported to be shared when OneCloud is enabled with level 3 permissions. When OneCloud is turned off for Three-level Resource Hierarchy, domain resources are not supported for sharing.
- Hosts, physical machines, block storage, cloud accounts, proxies, VPCs, NAT gateways, elastic NICs, and Layer 2 networks.
Sharing Principle.
- If the domain resources are synchronized down through the cloud account, the domain resources are shared with the cloud account.
- When the cloud account is not shared, the resources synced down through the cloud account cannot be shared either.
- When the cloud account is enabled for sharing, the resources synced down through the cloud account will also be enabled for sharing with the cloud account.
- When the cloud account is enabled for sharing, the resources synced through the cloud account can change the sharing range. Please make sure the sharing range is within the sharing range of the cloud account.
- When the cloud account modifies the sharing range, the sharing range of the resources synced through the cloud account should always remain within the sharing range of the cloud account. E.g. if the cloud account shares domain A, B, C, D, and domain resources share domain A and C, and the cloud account modifies the sharing range to domain A and B, then the domain resources can only be shared to domain A.
- When the cloud account shares cloud subscription, the domain resources synchronized down through the cloud account cannot be shared.
- The shared range of local storage should always be consistent with the shared range of the host.
Project resource description
When OneCloud is enabled with Three-level Resource Hierarchy, the following project resources are supported not only for project sharing but also for domain sharing. When OneCloud is turned off for Three-level Resource Hierarchy, the following resources support only project sharing.
- System image, host image, security group, IP subnet, load balancing instance, access control, certificate, oss bucket.
Sharing principles
- Some security groups are resources synchronized through cloud accounts, but the sharing scope of security groups is not related to cloud accounts.
- The shared scope of IP subnets and storage buckets synchronized through the cloud account is related to the shared scope of the cloud account. You can see the domain resources for details.