Managing Baremetal Hosts
The OneCloud platform supports managing physical servers and creating baremetal servers based on physical servers.
Introduction to baremetal hosts nano management related concepts
- YunionOS is an out-of-band control that boots the baremetal hosts into a temporary operating system, a streamlined Linux system customized by buildroot with built-in tools and software for baremetal hosts management. baremetal enters this system via ssh to achieve some more complex management operations, such as configuring RAID, deploying OS images etc.
- Redfish is an HTTPservice-based management standard that uses a RESTful interface for device management. Physical servers are managed through the Redfish API. The latest mainstream servers (e.g. Dell iDRAC 9, HPE iLO 9, etc.) are now supported by Redfish.
- BMC stands for Baseboard Management Controller, which is a standalone embedded system within the physical server that does not depend on the server’s CPU, operating system, or BIOS, and provides out-of-band management and control of the physical server, such as obtaining the physical server’s parameters and indicators, and performing simple operations on the physical server such as powering on and off.
Prerequisites
Server requirements
Support for physical servers from Dell, HP, Huawei, Wave, Lenovo, Supermicro and other major x86 server vendors and models, and physical servers with BMC modules or support for Redfish functionality, etc.
Enable Baremetal Agent
Please make sure Baremetal service is enabled in your environment. Baremetal service provides PXE Server, DHCP, TFTP, http, etc. to complete nano-managed baremetal hosts operations and manage physical machines. The Baremetal service is not enabled by default after the installation of OneCloud , users need to enable Baremetal service on any node in the environment by following the commands below.
- Login to the First Node as root user via SSH, etc.
- Use the
kubectl get pods -n onecloud |grep baremetalcommand to see if the Baremetal service is enabled in the environment. If it already exists, ignore steps 3 and 4. - If Baremetal service does not exist, execute the following command to enable Baremetal service. Where $node_name is the name of the node; $listen-interface is the name of the NIC on which the baremetal-agent is listening.
Note
If the node that needs to enable Baremetal service has host service installed, please set the listening NIC to br0, otherwise the listening NIC is the actual NIC name of the node.
# Enable Baremetal service on the specified node and listen to the NIC
$ ocadm baremetal enable --node $node_name --listen-interface $listen_interface
# Disable Baremetal service
$ ocadm baremetal disable --node $node_name
# If you enable baremetal service on node1 host and listen on br0 NIC.
$ ocadm baremetal enable --node node1 --listen-interface br0
- After the baremetal service is enabled, you can check whether the baremetal-agent is registered to the control node with the following command.
# View baremetal pods
$ kubectl get pods -n onecloud | grep baremetal
default-baremetal-agent-fb5d4b5f7-2ld8v 1/1 Running 0 15m
Methods to Add Machine
The platform currently supports 5 types of physical machines and the principle of nano-management, please select the appropriate way according to the specific situation.
| Method | Magnitude | Existing IPMI information | Boot method | DHCP Relay | Network allocation method | Reliance on Redfish API | |
|---|---|---|---|---|---|---|---|
| ISO Boot Registration | Small | Yes | ISO | No | Static Allocation | Yes | |
| PXE Boot Registration | Small | Yes | PXE | Yes | DHCP Distribution | NO | |
| Pre-registration | Small | No | PXE | Yes | DHCP Distribution | NO | |
| auto-registration | large | no | PXE | yes | DHCP allocation | NO |
ISO Boot Registration
This method has no network requirements, but requires that the baremetal hosts has been configured with BMC information and the server supports Redfish, etc.
- Configure the BMC information of the physical server and the IP address of the management port on the OneCloud platform.
- Baremetal will verify the BMC information of the physical server through the Redfish API, and then obtain the configuration information of the physical server, such as server SN, vendor model, and NIC information.
- After the verification, the Redfish API on the physical server will load the ISO of YunionOS provided by Baremetal through the extranet.
- After entering the YunionOS system, set the IP address of the management port according to the configuration, so that the physical server can access Baremetal through the management network and report the SSH login information of the server.
- Baremetal calls the tools in YunionOS via SSH to collect server information and perform management operations, etc.
- At this point, the physical server is successfully registered to the OneCloud platform.
PXE bootstrap registration.
This method requires the existence of DHCP Relay in the user environment and requires that the baremetal hosts has been configured with BMC information, and the BMC information of the baremetal hosts will not be changed during the boot registration process. If the server does not support Redfish, you also need to provide the MAC address of the server.
- Configure the BMC information of the physical server on the OneCloud platform and set up the server for PXE boot, etc.
- Baremetal verifies the BMC information of the physical server via IPMI.
- After verification, a small amount of server information is collected, the physical server is set to boot, the physical server is configured with the management port IP address via DHCP, and
- Boot the physical server into YunionOS through the management network and report SSH login information.
- Baremetal invokes the tools in YunionOS via SSH to collect server information and perform management operations, etc.
- At this point, the physical server is successfully registered to the OneCloud platform.
Auto-registration
This method is suitable for large-scale server auto-registration to the cloud management platform, which only requires the existence of DHCP Relay in the user’s environment and resets the BMC information during the bootstrap registration process.
- After the new physical server on the shelf sets up PXE to start powering up, the DHCP Relay on the L3 gateway that the physical server accesses will forward the PXE request from the physical server to Baremetal.
- Baremetal service will respond to the PXE request, direct the physical server to load the YunionOS system from the network and reboot into the YunionOS system, and report the server’s ssh information.
- Baremetal calls the tools in YunionOS via SSH to collect the server information and reset the server BMC information (if no BMC information is provided, it will be configured according to the default information).
- At this point, the physical server is successfully registered to the OneCloud platform.
Pre-registration
This method is suitable for small-scale server registration to the cloud management platform, which requires the existence of DHCP Relay in the user’s environment and the MAC address of the server to be provided, and the BMC information will be reset during the boot process.
- After the new physical server on the shelf sets up PXE to boot up the power, the DHCP Relay on the L3 gateway that the physical server accesses will forward the PXE request from the physical server to Baremetal.
- Baremetal service will verify whether the MAC address of the physical server matches after receiving the request, and will record the basic information of the physical server and respond to the PXE request after the match is successful, direct the physical server to load the YunionOS system from the network and reboot into the YunionOS system, and report the ssh information of the server.
- Baremetal calls the tools in YunionOS via SSH to collect the server information and reset the server BMC information (if no BMC information is provided, it will be configured according to the default information).
- At this point, the physical server is successfully registered to the OneCloud platform.
Hosting
This method is suitable for servers with existing operating systems, and there is no network requirement for this method. The execution of the hosting script will use container technology to run YunionOS in the physical server to collect server information, without affecting the original operating system of the baremetal hosts.
Introduction to typical networks
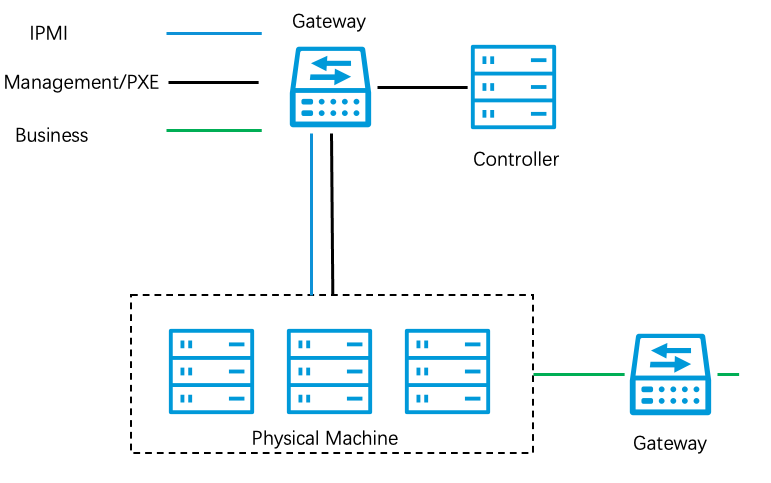
Network description
- IPMI network is used to access BMC (Baseboard Management Controller) remotely. Through IPMI network, you can control the physical server’s power on/off remotely, etc.
- Management network: A network for performing management of physical server operations, such as configuring physical servers, installing software, etc.
- PXE network: Send PXE requests, get IP address, etc. PXE network is generally a network with management network.
- Service network: The network needed to run services on the physical server.
Configure DHCP Relay (optional)
Please ignore this step for ISO boot registration or hosted physical machines.
Since Baremetal Agent service will only handle unicast requests for DHCP Relay, it is required to configure DHCP Relay in the network environment and Relay it to the node where Baremetal is deployed when using PXE bootstrap registration, pre-registration, or auto-registration for nano-hosted physical machines.
- When the baremetal hosts and Baremetal node in the same layer 2 network, then the user can choose to use the DHCP Relay function of Host service or configure DHCP Relay on the physical switch.
- When the baremetal hosts and Baremetal node are in a L3 network environment, at this time the user can only configure DHCP Relay on the physical switch.
Host Service Enable DHCP Relay
# Log in to all servers where compute nodes have been deployed and modify /etc/yunion/host.conf to add the dhcp_relay configuration item.
dhcp_relay:
- 10.168.222.198 # baremetal agent dhcp service listener address
- 67 # baremetal agent dhcp service listening port
# View the pods for the host service
$ kubectl get pods -n onecloud -o wide | grep host
default-host-p6d8h 2/2 Running 0 78m 10.168.222.189 k8s-dev1 <none> <none>
default-host-xdc7x 2/2 Running 0 78m 10.168.222.150 k8s-dev2 <none> <none>
# Delete the pods of the host service and restart the host service
$ kubectl delete pods -n onecloud default-host-p6d8h default-host-xdc7x
Physical Switch Configuration DHCP Relay
You need to configure DHCP Relay for the IPMI segment and management segment of the baremetal hosts respectively.
The commands to configure DHCP Relay for physical switches of different manufacturers are different, the following configurations are for reference only, please configure according to the actual situation.
# Configure DHCP Relay and Relay to the IP of the node where Baremetal is located.
interface Vlanif10
description new_test_host_net
ip address 10.127.100.1 255.255.255.0
dhcp select relay
dhcp relay binding server group baremetal-group
dhcp relay server group baremetal-group
server 10.127.100.2 0
Operation steps
Network configuration
Please create IPMI IP subnet used by baremetal hosts, PXE IP subnet, and IP subnet used by baremetal server, etc. respectively according to the network plan. All three IP subnets need to be on the same L2 Network.
Create IPMI IP subnet
-
In the cloud management platform, click on the top left corner of
 navigation menu, and click “Network/Infrastructure/IP Subnets” menu item in the left menu bar that pops up to enter the IP subnet page.
-
Click the “Create” button at the top of the list to enter the Create IP Subpage page.
-
Set the following parameters.
- Subnet name: Used to identify the IPMI subnet.
- Platform: Select the On-premise.
- L2 Network: Please select the regional and proprietary network as well as the available L2 Network according to the planning. Subsequent users need to choose among the region and available area where the L2 Network is located when applying for baremetal.
- Server type: Select IPMI.
- IP Subnets: Set the IP subnet segment, subnet mask, gateway, and VLAN ID, etc.
-
Click the “OK” button.
Create PXE IP Subnets
-
In the cloud management platform, click on the top left corner of
navigation menu, and click “Network/Infrastructure/IP Subnets” menu item in the left menu bar that pops up to enter the IP subnet page. -
Click the “Create” button at the top of the list to enter the Create IP Subpage page.
-
Set the following parameters.
- Subnet name: Used to identify the IPMI subnet.
- Platform: Select the On-premise.
- L2 Network: Please select the regional and proprietary network as well as the available L2 Network according to the planning. Subsequent users need to select among the region and available area where the L2 Network is located when applying for baremetal.
- Server type: Select PXE.
- IP Subnets: Set the IP subnet segment, subnet mask, gateway, and VLAN ID, etc.
-
Click the “OK” button.
Creating a Physical or Server IP Subnets
The user will give preference to the baremetal hosts IP subnet when creating baremetal devices, if there is no baremetal hosts IP subnet available in the environment the server IP subnet will be used.
-
In the cloud management platform, click on the top left corner of
navigation menu, and click “Network/Infrastructure/IP Subnets” menu item in the left menu bar that pops up to enter the IP subnet page. -
Click the “Create” button at the top of the list to enter the Create IP Subpage page.
-
Set the following parameters.
- Subnet name: Used to identify the IPMI subnet.
- Platform: Select the On-premise.
- L2 Network: Please select the regional and proprietary network as well as the available L2 Network according to the planning. Subsequent users need to choose among the region and available area where the L2 Network is located when applying for baremetal.
- Server type: Select baremetal hosts or server IP subnet, the default preference is to use baremetal hosts IP subnet when new baremetal server is created, and server IP subnet will be used when there is no available baremetal hosts IP subnet.
- IP Subnets: Set the IP subnet segment, subnet mask, gateway and VLAN ID, etc.
-
Click the “OK” button.
Nana-Managed Baremetal Hosts
ISO Boot Registration
Before ISO boot registration, administrators are requested to prepare the following information in advance.
- BMC information of the physical server.
- Physical server management port IP address, IP subnet or L2 Network, etc.
- In the cloud management platform, click the top left corner of navigation menu, and click “Compute/Physical Resources/Machines” menu item in the left menu bar that pops up to enter the Machines page.
- Click the “Add” button to enter the Add Baremetal Hosts page, and select the add method as “ISO Boot Registration”.
- Configure the following information.
- entry: Configure the following parameters.
- Specify Domains: Select the domain to which the baremetal hosts belongs.
- name: Set the name of the physical server.
- IPMI Address: Enter the IPMI address that has been configured on the server.
- IPMI Username: Enter the IPMI user name that has been configured on the server.
- IPMI Password: Enter the IPMI password information that has been configured on the server. If the BMC information entered is incorrect, the bootstrap registration cannot be completed correctly.
- Management Port IP: Select the IP subnet. If you want to specify a static IP, click the “Manually Configure IP” button to set the IP address and click the “OK” button. Since ISO bootstrap registration is applicable to environments without DHCP Relay, users must configure the IP subnet or IP address information that provides access to the server management port.
- Registration only without boot: boot into YunionOS without reboot, after checking this item, only part of the server information is collected, the server cannot be used to create baremetal at this time, it needs to be synchronized with hardware configuration operations to make it officially put into production use.
- Template import: Import of template files in XLSX format with baremetal hosts registration information is supported.
-
To import baremetal hosts information, you need to follow a predefined format, so please download the template first.
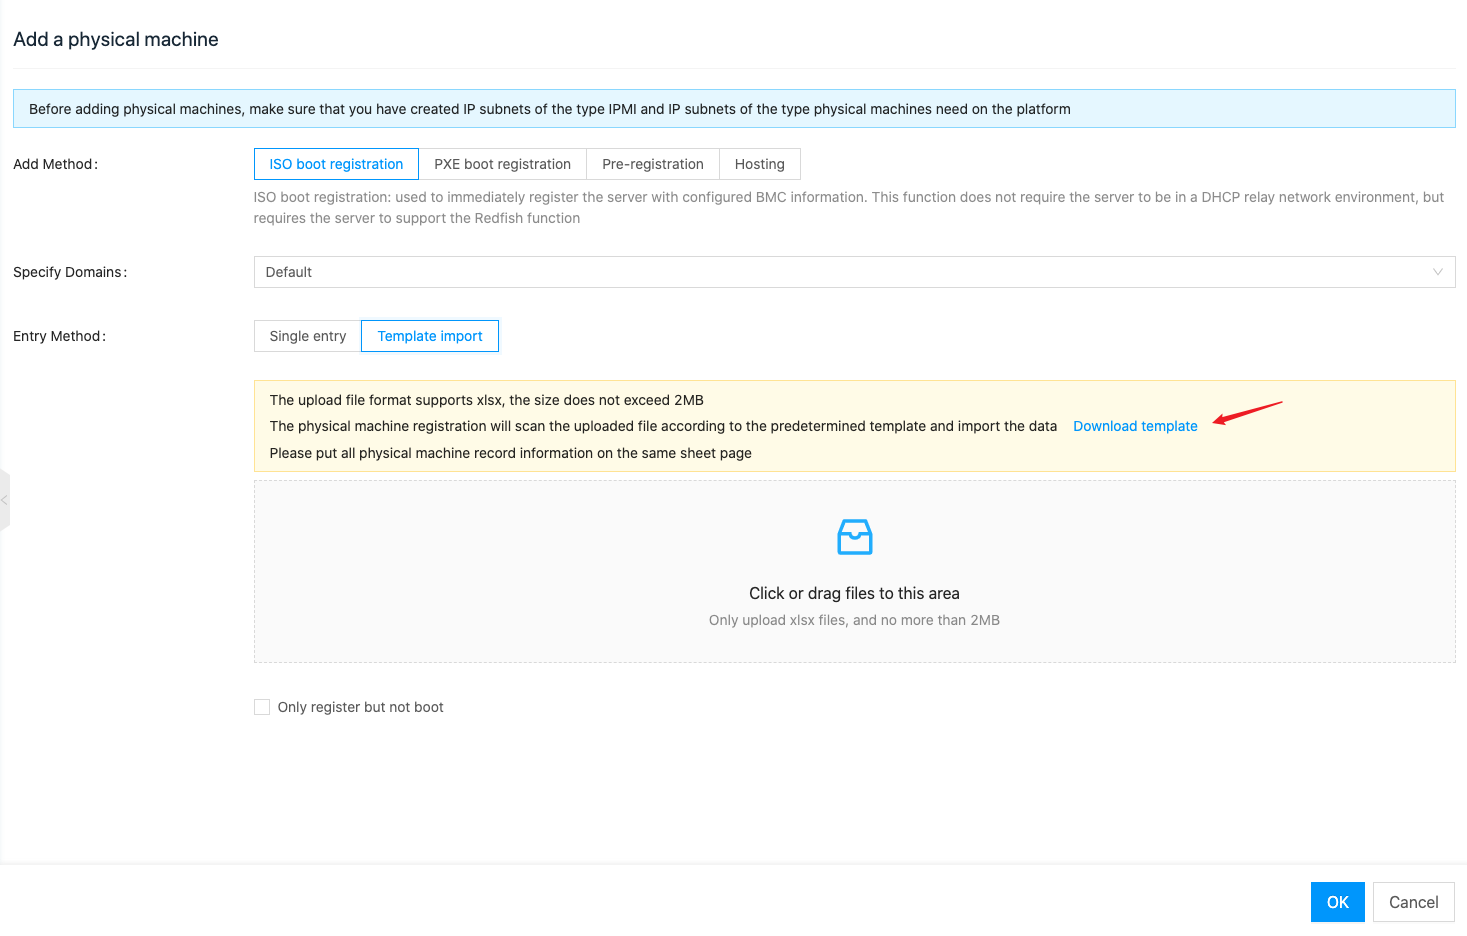
-
Add the baremetal hosts information to the downloaded host_template.xlsx file. Please put all baremetal hosts information in the same sheet page.
-
Click the dotted box or drag the template file to the dotted box, click “OK” button to upload the template file.
-
Register only without boot: Boot into the YunionOS system without rebooting. After checking this item, only some information of the server is collected, the server cannot be used to create baremetal at this time, you need to perform synchronization hardware configuration operation to make it officially put into production use.
-
- entry: Configure the following parameters.
- Click the “OK” button to complete the boot registration.
PXE Boot Registration
Before PXE boot registration, please ask the administrator to prepare the following information in advance.
- BMC information of the physical server.
- In the cloud management platform, click the top left corner of navigation menu, and click “Compute/Physical Resources/Machines” menu item in the left menu bar that pops up to enter the Machines page.
Click the “Add” button to enter the Add Baremetal Hosts page, and select the add method as “PXE Boot Registration”.
- Configure the following information.
- entry: Configure the following parameters.
- Specify Domains: Select the domain to which the baremetal hosts belongs.
- Baremetal Hosts name: Set the name of the physical server.
- IPMI Address: Enter the IPMI address that has been configured on the server.
- IPMI Username: Enter the IPMI user name that has been configured on the server.
- IPMI Password: Enter the IPMI password information that has been configured on the server. If the BMC information entered is not correct, the boot registration cannot be completed correctly.
- Management port MAC address: Set the management port MAC address of the server, Redfish-supported servers do not need to fill in this item.
- Management port IP: optional. If you want to specify a static IP, click “Configure IP manually” button to set the IP address, and click “OK” button. Leave it blank to have the IP automatically assigned by DHCP.
- Register only without boot: boot into YunionOS without reboot, after checking this item, only some information of the server is collected, the server cannot be used to create baremetal at this time, you need to synchronize hardware configuration operation to make it officially put into production use.
- Template import: Import of template files in XLSX format with baremetal hosts registration information is supported.
-
To import baremetal hosts information, you need to follow a predefined format, so please download the template first.
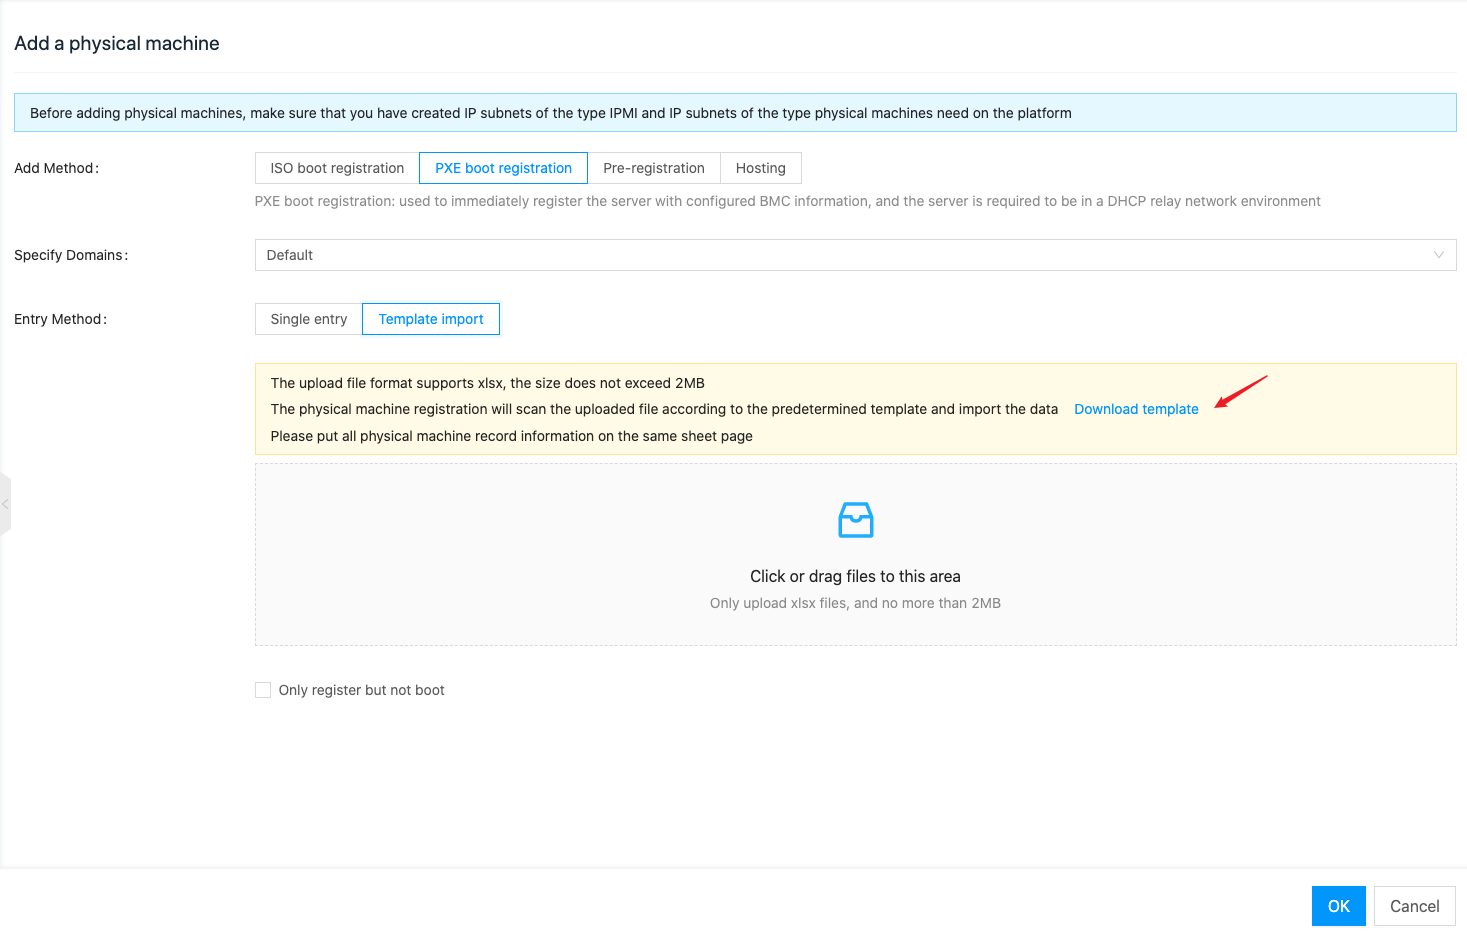
-
Add the baremetal hosts information to the downloaded host_template.xlsx file. Please put all baremetal hosts information in the same sheet page.
-
Click the dotted box or drag the template file to the dotted box, click “OK” button to upload the template file.
-
Register only without boot: Boot into the YunionOS system without rebooting. After checking this item, only some information of the server is collected, the server cannot be used to create baremetal at this time, you need to perform synchronization hardware configuration operation to make it officially put into production use.
-
- entry: Configure the following parameters.
- Click the “OK” button to complete the boot registration.
Pre-registration
The pre-registration operation is only to pre-shelf the server information, it does not mean that the baremetal hosts has been registered to the OneCloud platform, the actual registration needs to wait until the server is powered on and started.
Before pre-registering the baremetal hosts, please ask the administrator to prepare the following information in advance.
- MAC address and name of the physical server, required.
- BMC information (IPMI address, user name, password, and other information) is planned by the administrator. The physical server can be configured without BMC information in advance, and the BMC information of the physical server will be reset to the BMC information set when registering the baremetal hosts when subsequently registering the server for boot.
-
In the cloud management platform, click the top left corner of
navigation menu, and click “Compute/Physical Resources/Machines” menu item in the left menu bar that pops up to enter the Machines page. -
Click “Add” button to enter the Add Baremetal Hosts page, and select “Pre-registered” as the add method.
-
There are three ways to import baremetal hosts information. Among them, single entry is applicable to the scenario of hosting a single server, and batch import and file import are applicable to the scenario of hosting multiple servers at one time.
- entry: Configure the following parameters.
- Specify Domains: Select the domain to which the baremetal hosts belongs.
- MAC address: MAC address of the baremetal hosts device.
- Baremetal Hosts name: The name of the baremetal hosts device.
- IPMI Address: Set the IPMI address of the baremetal hosts. When this parameter is not set, if the IPMI IP subnet exists on the platform, the system will automatically assign an IP address to it, and it is generally recommended that the new machine is left blank and the old machine is set with the previous IP address.
- IPMI user name: Set the IPMI management user name. When this parameter is not set, the system will use the root user to log in by default. It is generally recommended to leave it blank for new machines and set the previous user name for old machines.
- IPMI password: Set the password of IPMI user. When this parameter is not set, the system default password is YunionDev@123. It is generally recommended to leave it blank for new machines and set the previous password for old machines.
- When the setting is finished, click “OK” button.
- Batch entry: Please note the following.
- One row is for one baremetal hosts record, and up to 100 records can be imported at one time.
- The format of entry information is “MAC address, name, IPMI address, IPMI user name, IPMI password”, divided by English comma “,”, if the password contains Chinese comma “,” need to use the single entry function for registration.
- Among them, MAC address and name are required, other parameters can be omitted without filling.
- For example: ee:b3:f4:48:1c:f5,gpuhost01,192.168.1.1,root,admin123
- E.g. ee:b3:f4:48:1c:f5,gpuhost01,,, – omitted IPMI address, IPMI username and IPMI password
- When the entry is complete, click the “OK” button.
- Template import: supports importing template files in XLSX format containing the registration information of physical machines.
-
To import the baremetal hosts information, you need to follow the predefined format, please download the template first.

-
Add the baremetal hosts information to the downloaded host_template.xlsx file. Please put all baremetal hosts information in the same sheet page.
-
Click the dotted box or drag the template file to the dotted box, click “OK” button to upload the template file.
-
- entry: Configure the following parameters.
-
At this point, the server is ready to be pre-shelved.
-
Wait for the administrator to set the server to PXE boot and power up the server before the actual registering baremetal hosts operation and getting the basic information of the server, etc.
-
Once the server has information displayed on the platform, the administrator can perform management operations on the baremetal hosts on the OneCloud platform, etc.
Auto-registration
OneCloud platform does not enable auto-registration by default, if you need to use this feature, you can enable auto-registration through the interface or climc command.
Global settings to enable auto-registration
-
In the cloud management platform, click the top left corner of
navigation menu, and click “Settings/Global Settings/Global Settings” menu item in the left menu bar that pops up to enter the global settings page.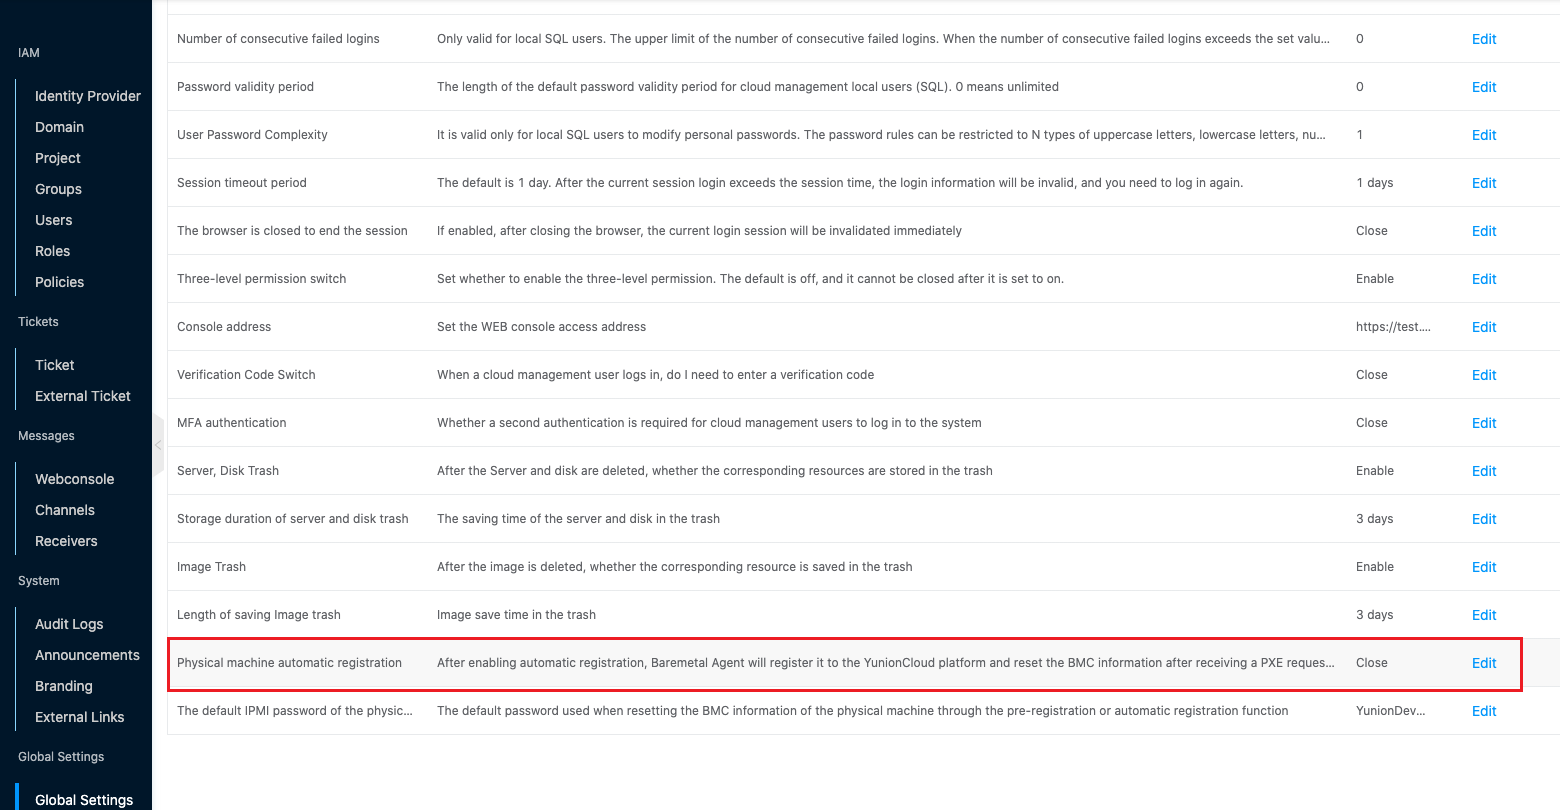
-
Click the “Edit” button to enable the auto-register function.
Climc enable auto-register
# Command line to enable auto-registration
$ climc service-edit-config baremetal
    ...
    # Auto-register option, default is false
    auto_register_baremetal: true
    ...
Hosting Baremetal Hosts
The Hosting Baremetal Hosts operation allows you to host a physical server that has an operating system installed.
Before hosting a server, ensure the following conditions.
- An IP subnet containing the IPMI type of the physical server and the type of the baremetal hosts has been created on the platform.
- the physical server has been configured with BMC information (IPMI address, username, password).
- The physical server has released port 2222 or later; if port 2222 is occupied, you need to release the port after 2222.
Description
The domain of the hosted machines is related to the operating user.
-
In the cloud management platform, click on the top left corner of
navigation menu, and click “Compute/Physical Resources/Machines” menu item in the pop-up left menu bar to enter the baremetal hosts page. -
Click “Add” button to enter the Add Baremetal Hosts page, and select “Managed” as the add method.
Select “Managed” as the add method.
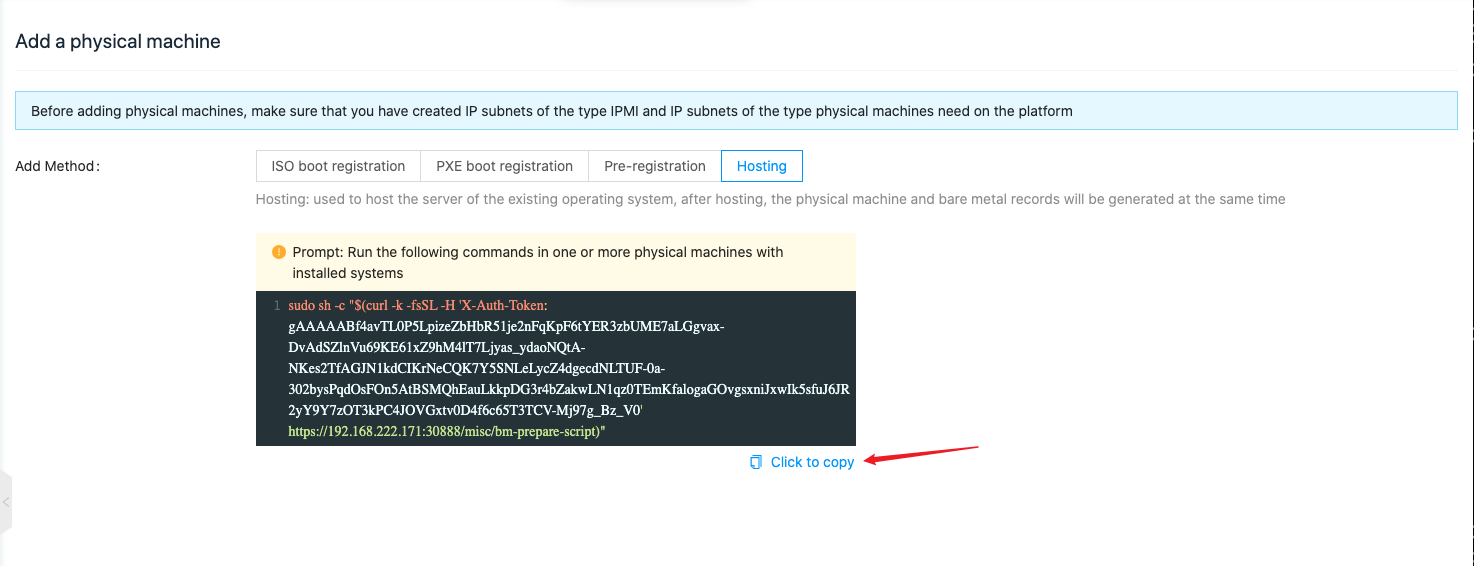
-
Click the “Click to copy” link to copy the command.
-
Connect to the physical server remotely via ssh, etc. and execute the copied command in the server.

-
During the command execution, you need to enter the IPMI user name, password and IPMI IP of the server. After the setup is finished, wait for a while, the baremetal hosts will be registered to the OneCloud platform, and a baremetal server with the same configuration as the previous baremetal hosts will be created.
Create baremetal server
After the administrator nano-manages the physical server, users can see the baremetal menu in the left menu bar when signing in the OneCloud platform and can create a baremetal server.
-
In the cloud management platform click on the top left corner of
navigation menu, and click “Compute/Compute/BareMetals” menu item in the left menu bar that pops up to enter the baremetal page.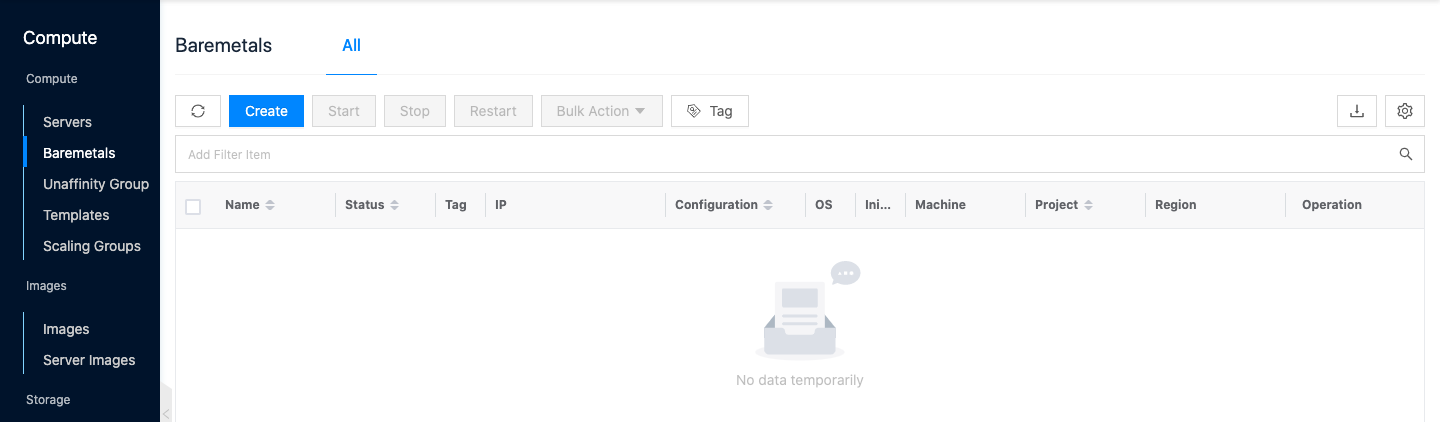
-
Click the “Create” button at the top of the list to enter the Create Baremetal page.
-
Configure the following parameters.
-
Region: Select the region and zone, the administrator needs to inform the user the zone where the physical server of nano management is located.
-
Name: Set the name of the baremetal server.
-
Quantity: Set the number of baremetal servers to be created.
-
OS: You can choose from public image or custom image according to the actual situation, and it is recommended to choose from public image.
-
Specification: Display the specification information of all available physical machines.
-
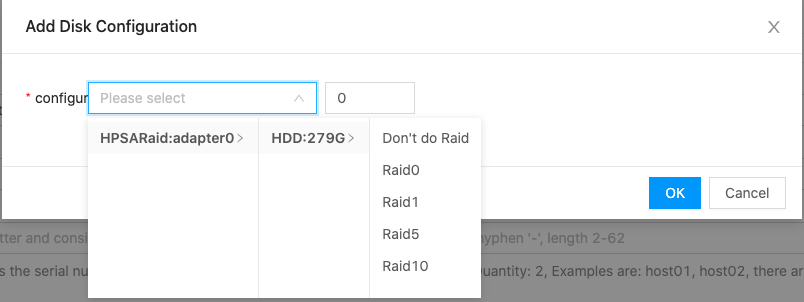
Hard Disk Configuration: Click the Add Disk button, select the disk array controller and set RAID for the disk in the Add Disk Configuration dialog box that pops up, and select the disk format, different number of disks support different RAID settings. When the settings are complete, click the “OK” button.
-
The relationship between RAID and the number of disks is as follows.
- RAID0 and no RAID have no requirement on the number of disks.
- RAID1 requires at least 2 identical disks.
- RAID5 requires at least 3 identical disks.
- RAID10 requires at least 4 identical disks.
-
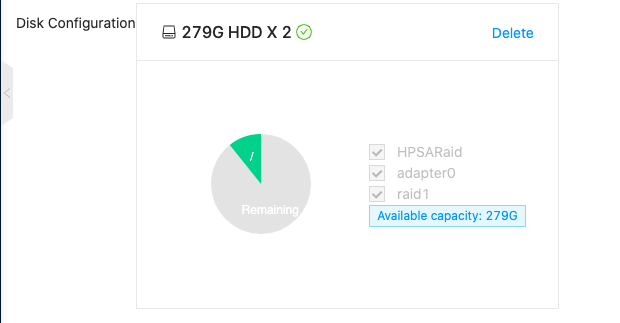
After the disk setup is finished, it also supports interface to set disk partitions, etc. You can click “System” green area to update partition settings or “Remaining” gray area to create new partitions respectively. Partition parameters are as follows.
- Mount point: set the partition mount point, the default system partition mount point is “/”.
- Partition format: Including ext4, xfs, ntfs, swap partition.
- Partition size: Including maximum capacity and manual input, the maximum capacity uses all space on the disk, manual input can set the partition size manually, the unit is GB.

-
-
Administrator password: It is recommended to generate a random password, the generated password can be viewed in the password column.
-
Network: Set the IP address of the baremetal server according to your needs, and check “Enable bonding” when there are two network cards connected to the network cable in the environment.
Description
If the IP subnet selected when creating a new baremetal server is the same as the IP subnet of the baremetal hosts where the baremetal is created, the baremetal will reuse the IP address of the baremetal hosts and will not be assigned a new IP address.
-
Scheduler Policy: It is recommended to keep the default and users in the project do not need to configure this item.
-
-
Click the “Create” button to create a baremetal server.