High Availability Deployment
Planning
This document requires at least 4 nodes to form a highly available environment. High availability of the product is achieved by deploying a separate database (or deploying database high availability) with Kubernetes cluster high availability and multiple control nodes (Controllers). The highly available environment allows up to one node to go down without affecting the normal use of the platform.
Description
If there are only three nodes in the user environment, you can also deploy the database on two of the control nodes to form a highly available environment. This deployment method can only guarantee that one of the two nodes deployed with HA is down without affecting the normal use of the platform. Deployment steps are as follows.
- Deploy database high availability on node 1 and node 2 respectively.
- Install k8s Controlplane+Controller on node 1 and node 2, and set HA high availability, where the database IP is VIP.
- Install k8s Controlplane+Controller) on node 3, but do not enable HA high availability.
Example of networking
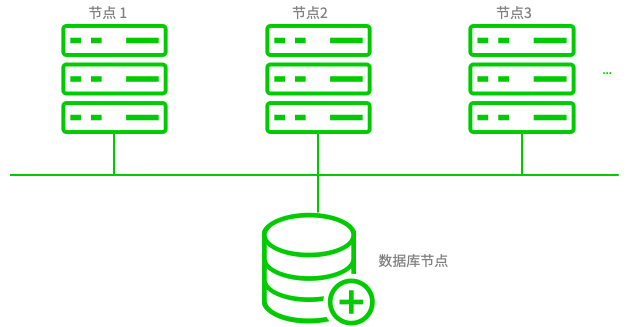
Network description
- All three nodes deploy K8S Controlplane and Controller&host to form Kubernetes high availability cluster and OneCloud high availability cluster.
- Database nodes are deployed separately and can deploy database high availability, for details, please refer to Appendix-High Availability Database Configuration.
- All nodes can access the extranet, if the nodes cannot access the extranet, please contact the technical staff for help.
Example of test node
| Role | IP Address | Description |
|---|---|---|
| VIP | 10.127.190.100 | Idle IP in the same network segment as the node for external access |
| Node 1 (First Node) | 10.127.190.251 | First Node node |
| Node 2 | 10.127.190.245 | Non-First Node node (K8s Controlplane+Onecloud Controller&host) |
| Node 3 | 10.127.190.229 | Non-First Node node (K8s Controlplane+Onecloud Controller&host) |
| Database | 10.127.190.254 | Database node, you can also add another node to deploy database high availability |
| Node N | …… | The number of K8S Controlplane nodes can meet 1, 3, 5 |
Note
If you build a OneCloud highly available environment using a server on the OneCloud platform, you need to pay attention to the following.
-
Servers on OneCloud have source/target checking enabled by default, so VIPs cannot connect to other nodes. You can turn off source/target checking for Servers in the web console, or on First Node nodes via the climc command to turn off source/target checking at
$ climc server-modify-src-check --src-mac-check off . -
Please add the VIP to the reserved IP.
Install and deploy Mariadb database
Install enable Mariadb
$ MYSQL_PASSWD='your-sql-passwd'
### Install mariadb
$ yum install -y epel-release mariadb-server
$ systemctl enable --now mariadb
Configure Mariadb
### Set the database root user password
$ mysqladmin -u root password "$MYSQL_PASSWD"
$ cat <<EOF >/etc/my.cnf
mysqld]
datadir=/var/lib/mysql
socket=/var/lib/mysql/mysql.sock
# Disabling symbolic-links is recommended to prevent assorted security risks
symbolic-links=0
# Settings user and group are ignored when systemd is used.
# If you need to run mysqld under a different user or group,
# customize your systemd unit file for mariadb according to the
# instructions in http://fedoraproject.org/wiki/Systemd
# skip domain name resolve
skip_name_resolve # cancel domain name resolution
# auto delete binlog older than 30 days
expire_logs_days=30 # set binlog timeout to 30 days, binglogs older than 30 days will be deleted automatically
innodb_file_per_table=ON
max_connections = 300

[mysqld_safe]
log-error=/var/log/mariadb/mariadb.log
pid-file=/var/run/mariadb/mariadb.pid

#pid-file=/var/run/mariadb/mariadb.pid
# include all files from the config directory
#
!includedir /etc/my.cnf.d
EOF
# Enable remote access for Mariadb
$ mysql -uroot -p$MYSQL_PASSWD \
  -e "GRANT ALL ON *. * to 'root'@'%' IDENTIFIED BY '$MYSQL_PASSWD' with grant option; FLUSH PRIVILEGES;"
Restart the service
$ systemctl restart mariadb
Control Node Deployment
After version 3.4, high availability deployment of the control node only needs to be configured on the First Node node.
When installing the product on a server with CentOS installed, you need to make sure that the server has disabled selinux and that the server has been restarted. If selinux is not disabled, please follow the steps below to disable selinux and restart the server.
# disable selinux
$ setenforce 0
$ sed -i 's/SELINUX=enforcing/SELINUX=disabled/' /etc/selinux/config
Configure ssh password-free login
This step is used to configure the First Node node to log in to other control nodes unencrypted.
### Generate ssh secret key for First Node (skip this step if you already have ~/.ssh/id_rsa.pub)
$ ssh-keygen

# Copy the generated ~/.ssh/id_rsa.pub public key to other control nodes
$ ssh-copy-id -i ~/.ssh/id_rsa.pub root@10.127.190.245
$ ssh-copy-id -i ~/.ssh/id_rsa.pub root@10.127.190.229

# Verify that the hostnames of other control nodes are available on the First Node unencrypted
$ ssh root@10.127.190.245 "hostname"
$ ssh root@10.127.190.229 "hostname"
Installation and deployment
This section focuses on the configuration of the First Node node after executing the install script. The process of mounting the installation package and executing the script in front of it can be found in Installation - Installation method introduction.
In the configuration page, check “High Availability”.
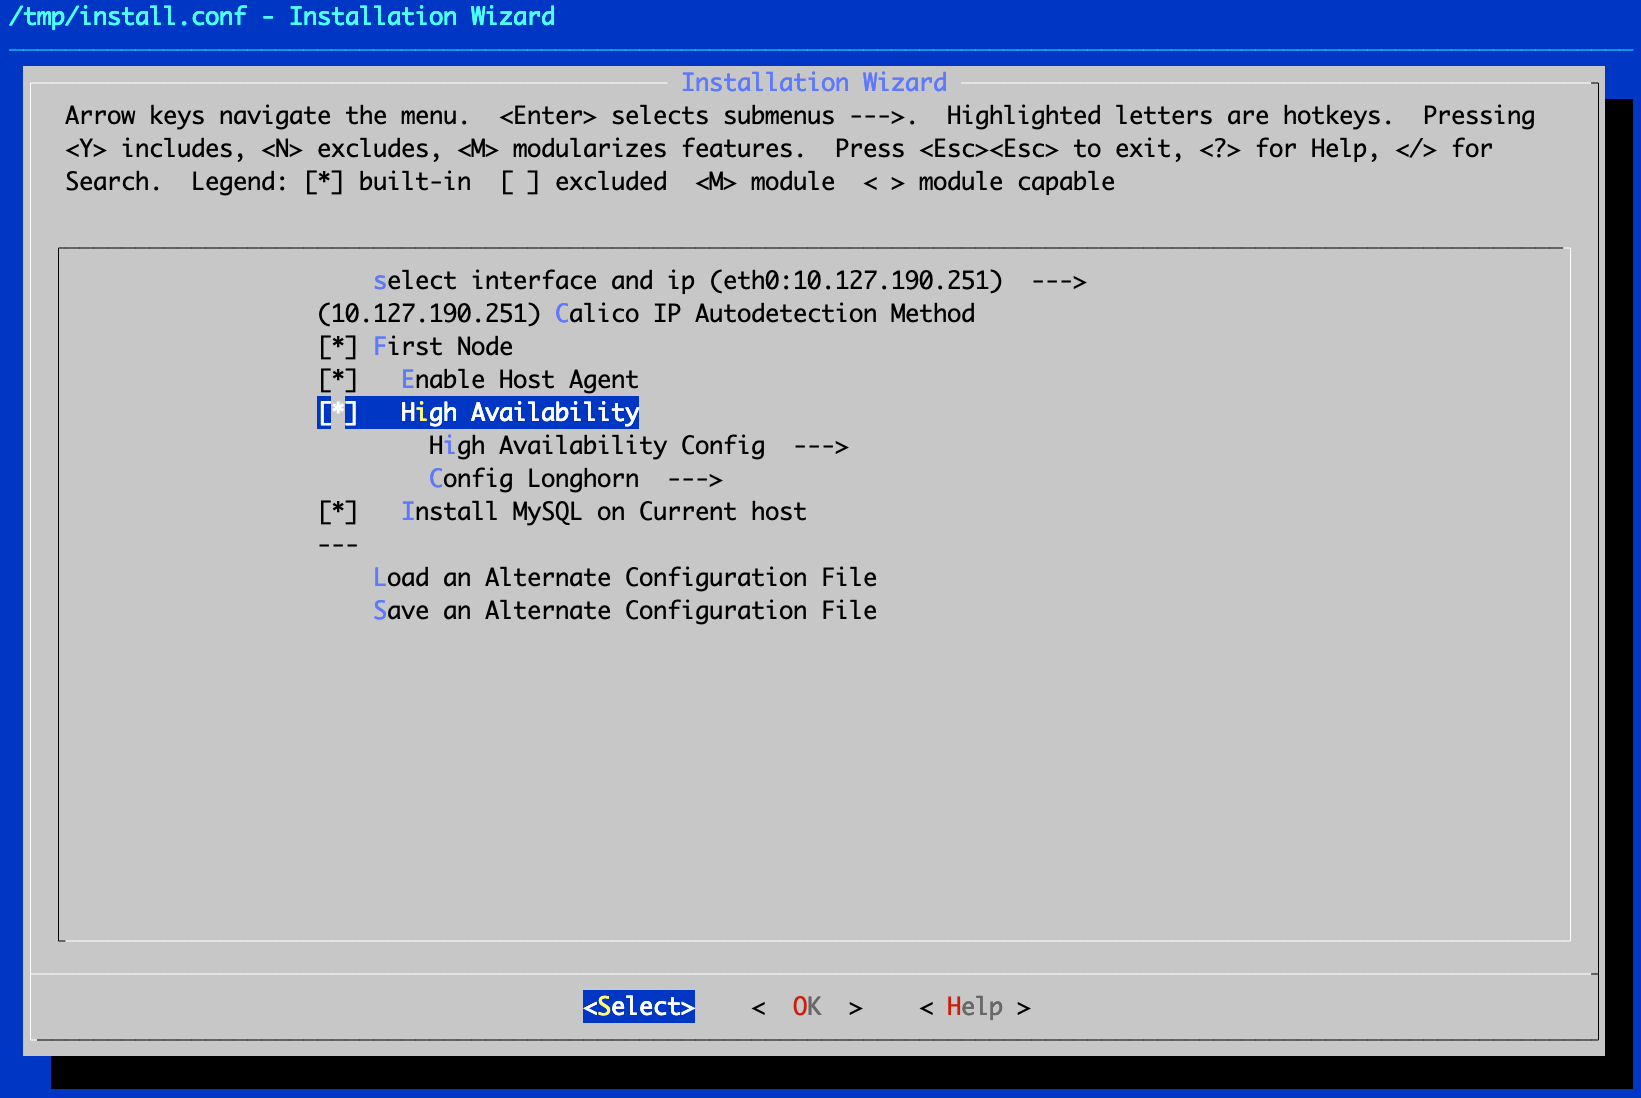
-
Configure the following parameters in High Availability Config.
- High Availability VIP: 10.127.190.100 in this case.
- Using local registry: When the node cannot connect to the external network, this item must be checked; it is recommended to leave this item unchecked.
- High Availability Port: default 6443.
- Controlplane IPs, seperated with comma or space: IP address of two other control nodes, in this case “10.127.190.245 10.127.190.229”.
- Enable Controlplane Host Agent: When enabled, this node can also be used as a compute node. Check this item in this example.

-
Configure the following parameters in Config Longhorn.
- image repository: set the image repository for installing longhorn, we recommend to keep the default option, if you have other requirements, please contact technical support.
- data path(>=300G): set the data path of longhorn, it is recommended to keep the default.
- over provisioning percentage(%): over provisioning percentage, if the test environment user does not have 300G local storage, you can bypass the minimum storage requirement for installing longhorn by setting the over provisioning percentage.

-
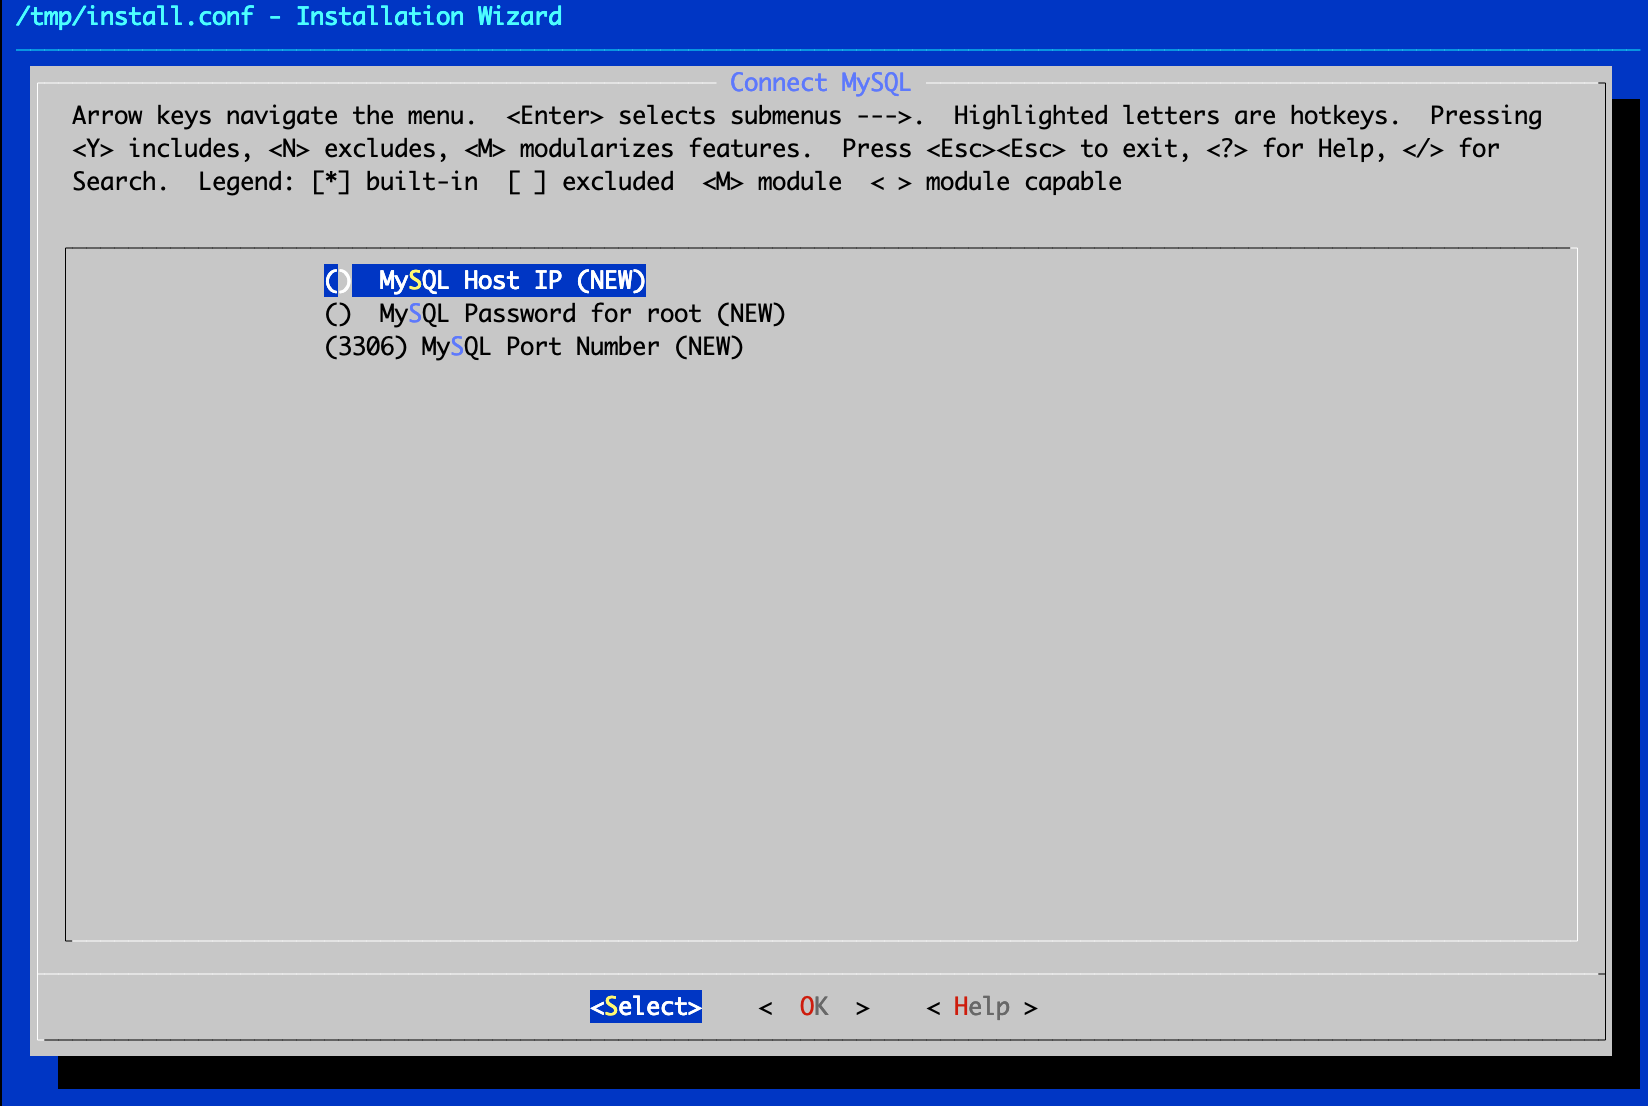
Uncheck “Install MySQL on Current host” and configure the following parameters in Connect MySql.
- MySQL Host IP: IP address of the database or VIP address of the highly available database, in this case, 10.127.190.254.
- MySQL Password for root: the password of the database root user, 123456 in this example.
- MySQL Port Number: default 3306.
-
Start the installation, the installation process is long, please wait patiently until the installation is complete.
Description
- If the server’s current kernel (
uname -rto check the kernel version) does not match the product requirements “3.10.0-1062.4.3.el7.yn20191203.x86_64”, the product will be restarted automatically after installation. - If the server’s current kernel (
uname -ris used to check the kernel version) is the same as the product requirement “3.10.0-1062.4.3.el7.yn20191203.x86_64”, the product will not reboot automatically after installation.
Compute node deployment
The configuration is the same for all compute nodes.
Configuration items
- First Node: unchecked.
- Role of K8S: K8s Node.
- Roles: Host.
- First Node IP: VIP address, not the address of the First Node node.
- First Node Port: default 6443.
- Join Token: for the information obtained using
ocadm token createon the First Node node.
The installation process is long, please wait patiently until the installation is complete.
Description
- When the server’s current kernel (
uname -rto check the kernel version) does not match the product requirements “3.10.0-1062.4.3.el7.yn20191203.x86_64”, the product will automatically reboot after installation. - If the server’s current kernel (
uname -ris used to check the kernel version) is the same as the product requirement “3.10.0-1062.4.3.el7.yn20191203.x86_64”, the product will not reboot automatically after installation.
Accessing the highly available environment
Type https://VIP in your browser to access the OneCloud highly available environment for the Initialization guide operation.
Appendix
Highly available database configuration
If you need the database to be highly available, you need to add another node in the existing network diagram to be the master of the original database node and provide VIPs on the same network segment as the database node for system access. The deployment of database high availability has nothing to do with the high availability of OneCloud , and requires users to deploy database high availability manually.
Please follow the steps below to configure it from the master node and backup node respectively.
Master node configuration
Install and enable mariadb
$ yum install -y mariadb-server
$ systemctl enable --now mariadb
Security Configuration Wizard
$ mysql_secure_installation

 ... ...
Change the root password? [Y/n] y
New password:
Re-enter new password:
Password updated successfully!
Reloading privilege tables..
 ... Success!
 ... ...
Remove anonymous users? [Y/n] y
 ... Success!
 ... ...
Disallow root login remotely? [Y/n] y
 ... Success!
 ... ...
Remove test database and access to it? [Y/n] y
 - Dropping test database...
 ... Success!
 - Removing privileges on test database...
 ... Success! ... ...
Reload privilege tables now? [Y/n] y
 ... Success!
 ... ...
Modify mariadb configuration file
$ cat <<EOF > /etc/my.cnf
[mysqld]
datadir=/var/lib/mysql
socket=/var/lib/mysql/mysql.sock
# Disabling symbolic-links is recommended to prevent assorted security risks
symbolic-links=0
# Settings user and group are ignored when systemd is used.
# If you need to run mysqld under a different user or group,
# customize your systemd unit file for mariadb according to the
# instructions in http://fedoraproject.org/wiki/Systemd
# skip domain name resolve
skip_name_resolve
# auto delete binlog older than 30 days
expire_logs_days=30
innodb_file_per_table=ON
max_connections = 300

server-id = 1
auto_increment_offset = 1
auto_increment_increment = 2
log-bin = mysql-bin
binlog-format = row
log-slave-updates
max_binlog_size = 1G
replicate-ignore-db = information_schema
replicate-ignore-db = performance_schema
max_connections = 1000
max_connect_errors = 0
max_allowed_packet = 1G
slave-net-timeout=10
master-retry-count=0

slow_query_log = 1
long_query_time = 2
slow_query_log_file = /var/log/mariadb/slow-query.log

[mysql]
no-auto-rehash

[mysqld_safe]
log-error=/var/log/mariadb/mariadb.log
pid-file=/var/run/mariadb/mariadb.pid

#
# include all files from the config directory
#
!includedir /etc/my.cnf.d
EOF
Restart Mariadb service
$ systemctl restart mariadb
backup node deployment
install enable mariadb
$ yum install -y mariadb-server
$ systemctl enable --now mariadb
Security Configuration Wizard
$ mysql_secure_installation

 ... ...
Change the root password? [Y/n] y
New password:
Re-enter new password:
Password updated successfully!
Reloading privilege tables..
 ... Success!
 ... ...
Remove anonymous users? [Y/n] y
 ... Success!
 ... ...
Disallow root login remotely? [Y/n] y
 ... Success!
 ... ...
Remove test database and access to it? [Y/n] y
 - Dropping test database...
 ... Success!
 - Removing privileges on test database...
 ... Success! ... ...
Reload privilege tables now? [Y/n] y
 ... Success!
 ... ...
Modify mariadb configuration file
$ cat <<EOF > /etc/my.cnf
[mysqld]
datadir=/var/lib/mysql
socket=/var/lib/mysql/mysql.sock
# Disabling symbolic-links is recommended to prevent assorted security risks
symbolic-links=0
# Settings user and group are ignored when systemd is used.
# If you need to run mysqld under a different user or group,
# customize your systemd unit file for mariadb according to the
# instructions in http://fedoraproject.org/wiki/Systemd
# skip domain name resolve
skip_name_resolve
# auto delete binlog older than 30 days
expire_logs_days=30
innodb_file_per_table=ON
max_connections = 300

server-id = 2
auto_increment_offset = 2
auto_increment_increment = 2
log-bin = mysql-bin
binlog-format = row
log-slave-updates
max_binlog_size = 1G
replicate-ignore-db = information_schema
replicate-ignore-db = performance_schema
max_connections = 1000
max_connect_errors = 0
max_allowed_packet = 1G
slave-net-timeout=10
master-retry-count=0

slow_query_log = 1
long_query_time = 2
slow_query_log_file = /var/log/mariadb/slow-query.log

[mysql]
no-auto-rehash

[mysqld_safe]
log-error=/var/log/mariadb/mariadb.log
pid-file=/var/run/mariadb/mariadb.pid

#
# include all files from the config directory
#
!includedir /etc/my.cnf.d
EOF
Restart Mariadb service
$ systemctl restart mariadb
Import the master node database into the backup node
Master node configuration
Export the database on the master node and import it into the standby node.
# This password is the Mariadb root password set above, for convenience, this password is also used for the read-only account, this password is the database password for later deployment with the installer
$ MYSQL_PASSWD='123456'
# Enable remote access to Mariadb
$ mysql -uroot -p$MYSQL_PASSWD -e "GRANT ALL PRIVILEGES ON *. * TO 'root'@'%' IDENTIFIED BY '$MYSQL_PASSWD' WITH GRANT OPTION;FLUSH PRIVILEGES"
# Create a read-only account
$ mysql -u root -p$MYSQL_PASSWD -e "GRANT REPLICATION SLAVE ON *. * TO repl@'%' IDENTIFIED BY '$MYSQL_PASSWD';FLUSH PRIVILEGES"
# The example is a fresh install of Mariadb that is not yet in use. If you are using the database for master-master replication, you need to lock the tables before exporting the data
$ mysql -uroot -p$MYSQL_PASSWD -e "SHOW PROCESSLIST"
+----+------+-----------+------+---------+------+-------+------------------+----------+
| Id | User | Host | db | Command | Time | State | Info | Progress |
+----+------+-----------+------+---------+------+-------+------------------+----------+
| 4 | root | localhost | NULL | Query | 0 | NULL | SHOW PROCESSLIST | 0.000 |
+----+------+-----------+------+---------+------+-------+------------------+----------+
# Log the binlog file name and position
$ mysql -u root -p$MYSQL_PASSWD -e "SHOW MASTER STATUS\G"
*************************** row ***************************
            File: mysql-bin.000001
        Position: 712
    Binlog_Do_DB:
Binlog_Ignore_DB:
# Export all the data
$ mysqldump --all-databases -p$MYSQL_PASSWD > alldb.db
# Copy alldb.db to the backup node, db2 is the name of the backup node or you can change it to the IP address of the backup node, e.g. 10.127.10.218
$ scp alldb.db db2:/root/
Backup node configuration
Import the database exported by the master node
# This password is the Mariadb root password set above
$ MYSQL_PASSWD='123456'
# Import the data exported from the master node
$ mysql -u root -p$MYSQL_PASSWD < alldb.db
# Overload permissions
$ mysql -u root -p$MYSQL_PASSWD -e "FLUSH PRIVILEGES"
# Record binlog log file name and position
$ mysql -u root -p$MYSQL_PASSWD -e "SHOW MASTER STATUS\G"
*************************** row ***************************
            File: mysql-bin.000001
        Position: 506913
    Binlog_Do_DB:
Binlog_Ignore_DB:
Master-Master Replication
Master node configuration
# Modify MASTER_HOST to be the backup node IP (e.g. 10.127.10.218), modify MASTER_LOG_FILE and MASTER_LOG_POS to be the information logged by the backup node above
$ mysql -u root -p$MYSQL_PASSWD -e "CHANGE MASTER TO MASTER_HOST='10.127.10.218',MASTER_USER='repl',MASTER_PASSWORD='$MYSQL_PASSWD ',MASTER_PORT=3306,MASTER_LOG_FILE='mysql-bin.000001',MASTER_LOG_POS=506913,MASTER_CONNECT_RETRY=2;START SLAVE"
backup node configuration
# Modify MASTER_HOST to be the IP of the master node (10.127.10.211) and MASTER_LOG_FILE and MASTER_LOG_POS to be the information logged by the master node above
$ mysql -u root -p$MYSQL_PASSWD -e "CHANGE MASTER TO MASTER_HOST='10.127.10.211',MASTER_USER='repl',MASTER_PASSWORD='$MYSQL_PASSWD ',MASTER_PORT=3306,MASTER_LOG_FILE='mysql-bin.000001',MASTER_LOG_POS=712,MASTER_CONNECT_RETRY=2;START SLAVE"
Verify the synchronization status
Execute the following command on both nodes.
$ mysql -u root -p$MYSQL_PASSWD -e "SHOW SLAVE STATUS\G" | grep Running
            Slave_IO_Running: Yes
           Slave_SQL_Running: Yes
Deploy and configure Keepalived
Keepalived is used to provide VIP access to the database and to enable automatic switchover after node failure through its own monitoring service, etc. This step is omitted when the database is installed on the control node.
Setting environment variables
Both nodes need to be configured.
# keepalived vip address
$ export DB_VIP=10.127.10.50
# keepalived auth toke
$ export DBHA_KA_AUTH=test
# keepalived network interface, please set the NIC name according to the actual situation, take eth0 as an example
$ export DB_NETIF=eth0
set sysctl option
Both nodes need to be configured.
$ cat <<EOF >>/setc/sysctl.conf
net.ipv4.ip_forward = 1 # Enable IP forwarding
net.ipv4.ip_nonlocal_bind = 1 # Allow processes to bind to non-local addresses
EOF
$ sysctl -p
install Keepalived&nc
Both nodes need to be configured.
$ yum install -y keepalived nc
set up Keepalived configuration file
master node configuration
$ cat <<EOF >/etc/keepalived/keepalived.conf
global_defs {
    router_id onecloud
}

vrrp_script chk_mysql {
    script "/etc/keepalived/chk_mysql"
    interval 1 # script execution interval
}

vrrp_instance VI_1 {
    state MASTER # defined as master
    interface $DB_NETIF # NIC that hosts the drifting ip
    virtual_router_id 99 # Define a hot standby group, think of it as hot standby 99, the master and the standby belong to the same hot standby group
    priority 100 # The primary server has a higher priority than the standby server
    advert_int 1 # Announce each other once a second to check if the other side is dead.
    authentication {
        auth_type PASS #Authentication type
        auth_pass $DBHA_KA_AUTH #Authentication password
    }
    track_script {
        chk_mysql
    }

    virtual_ipaddress {
        $DB_VIP
    }
}
EOF
# Create the monitoring script file
$ cat <<EOF > /etc/keepalived/chk_mysql
#! /bin/bash
echo | nc 127.0.0.1 3306 &> /dev/null
EOF
# Change script file permissions
$ chmod +x /etc/keepalived/chk_mysql
# Start keepalived
$ systemctl enable --now keepalived
backup node configuration
$ cat <<EOF >/etc/keepalived/keepalived.conf
global_defs {
    router_id onecloud
onecloud }

vrrp_script chk_mysql {
    script "/etc/keepalived/chk_mysql"
    interval 1 # script execution interval
}

vrrp_instance VI_1 {
    state MASTER # defined as master
    interface $DB_NETIF # NIC that hosts the drifting ip
    virtual_router_id 99 # Define a hot standby group, think of it as hot standby 99, the master and the standby belong to the same hot standby group
    priority 90 # The primary server has a higher priority than the standby server
    advert_int 1 #Notify each other once a second to check if the other side is dead.
    authentication {
        auth_type PASS #Authentication type
        auth_pass $DBHA_KA_AUTH #Authentication password
    }
    track_script {
        chk_mysql
    }

    virtual_ipaddress {
        $DB_VIP
    }
}
EOF
# Create the monitoring script file
$ cat <<EOF > /etc/keepalived/chk_mysql
#! /bin/bash
echo | nc 127.0.0.1 3306 &> /dev/null
EOF
# Change script file permissions
$ chmod +x /etc/keepalived/chk_mysql
# Start keepalived
$ systemctl enable --now keepalived
Verify Keepalived service
Check the monitoring NIC information on the master and standby nodes respectively. You can try to disable or shut down the mariadb or Keepalived service on the master node to see if the VIP of the master node drifts to the standby node.
# View the ip information of the node
$ ip addr show eth0
2: eth0: <BROADCAST,MULTICAST,UP,LOWER_UP> mtu 1500 qdisc pfifo_fast state UP group default qlen 1000
    link/ether 00:22:50:dd:51:59 brd ff:ff:ff:ff:ff:ff:ff
    inet 10.127.10.211/24 brd 10.127.10.255 scope global dynamic eth0
       valid_lft 100661107sec preferred_lft 100661107sec
    inet 10.127.10.50/32 scope global eth0
       valid_lft forever preferred_lft forever
    inet6 fe80:222:50ff:fedd:5159/64 scope link
       valid_lft forever preferred_lft forever