OSS
OSS is a distributed storage service for storing arbitrary files. Buckets are buckets, which are used to store object files. Users must create buckets before storing files, and the cloud management platform uses buckets as resource units for object storage to allocate to projects. Users can easily upload, download and share files in the object storage through the network.
The cloud management platform currently supports managing and importing object storage services based on S3 protocol MinIO, Ceph Radio and object storage services provided by the public cloud.
Usage flow:
- (Either one) Docking and importing the resources of public cloud accounts with object storage services in MultiCloud Management, and synchronizing the storage buckets on the public cloud platform.
- (Either one) Docking and importing the account resources of the locally deployed object storage server in the multi-cloud management.
- create storage buckets and assign projects to the buckets.
- Users in the project can upload, download and share files in the bucket.
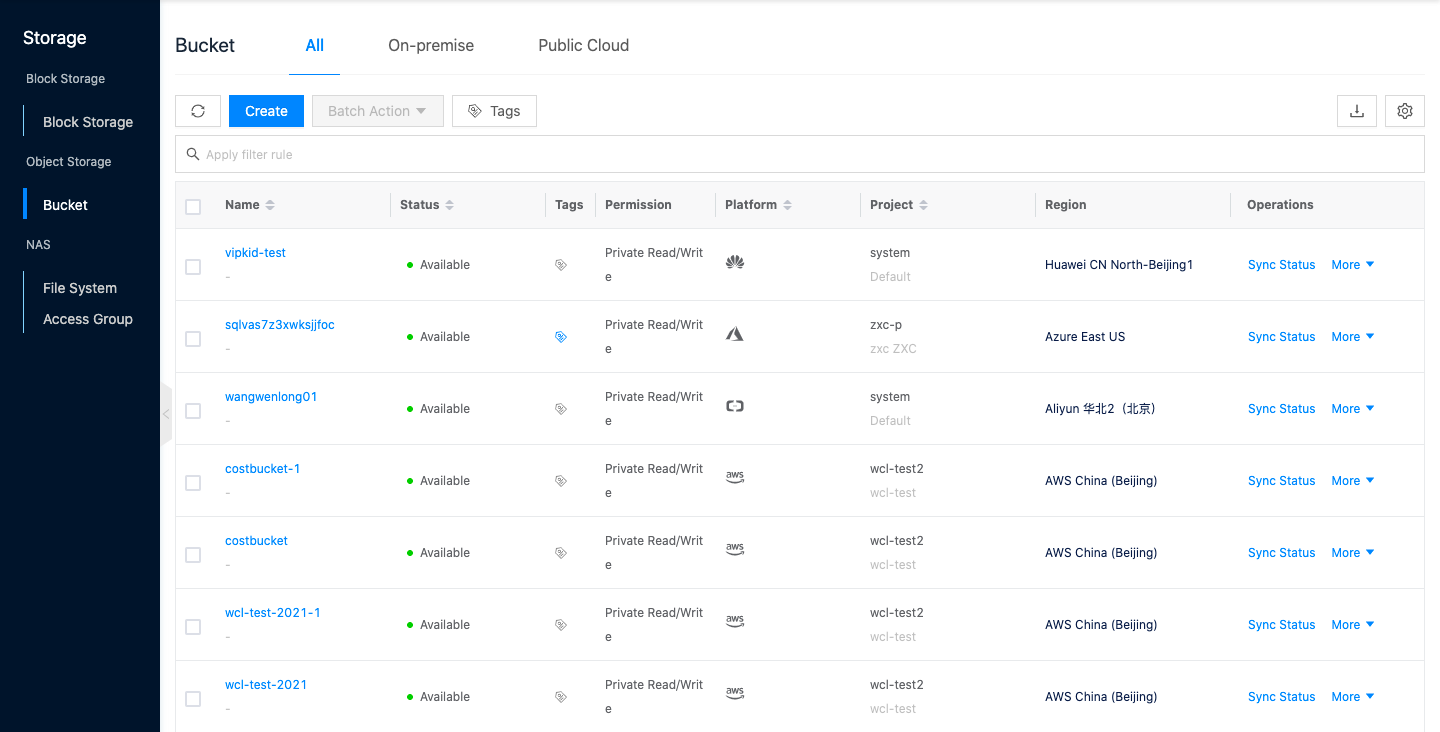
Entry: In the cloud management platform, click on the top left corner of  navigation menu, and click “Storage/Object Storage/OSS” menu item in the left menu bar that pops up to enter the bucket page.
Create Storage Bucket
This function is used to create a new oss bucket.
Description
On the Create Bucket page, you can click the On-premise, Public Cloud tab at the top to switch between creating buckets on different platforms.
Create On-premise bucket
Before creating a new On-premise bucket, make sure you have a cloud account for Object Storage S3/Ceph/XSKY.
On the bucket page, click the “All” or “On-premise” tab at the top, and click the “Create” button at the top of the list to bring up the Create Bucket dialog. 2. Set the following parameters.
- Specify Project: Administrators and domain administrators need to specify the item to which the oss bucket belongs when creating a new oss bucket.
- Region: Select the region where the bucket belongs to.
- Name: Set the name of the oss bucket. The bucket name is globally unique and it is not recommended to use common names such as test to prevent creation failure.
- Specify cloud subscription: Specify the cloud subscription for creating the bucket.
- Click the “OK” button to create the oss bucket.
Create public cloud oss bucket
Before creating a new public cloud platform EIP please ensure that you have a cloud account for the corresponding platform.
Description
Currently, only AliPay Cloud extranet region storage buckets are supported to be created.
- On the bucket page, click the “Public Cloud” tab at the top and click the “Create” button at the top of the list to bring up the Create Bucket dialog.
- Set the following parameters.
- Specify the item: Administrators and domain administrators need to specify the item to which the oss bucket belongs when creating a new oss bucket.
- Region: Select the region where the resilient public IP belongs to. You can filter the appropriate region by city and platform quickly.
- Name: Set the name of the oss bucket.
- Specify cloud subscription: Specify the cloud subscription for creating the oss bucket.
- Click the “OK” button to create the oss bucket.
Sync Status
This function is used to get the current status of the oss bucket.
Sync Status
- On the bucket page, click the “Sync Status” button in the action bar to the right of the bucket to sync the bucket status.
Batch Sync Status
- Check one or more buckets in the bucket list, click the**_“Batch Action”_** button, and select the **_“Sync Status”_** menu item to synchronize the bucket status in batch.
Set upper limit
This function is used to set the maximum size and number of files supported by the oss bucket.
- On the Storage Bucket page, select the method of setting the upper limit according to the number of buckets you want to set the upper limit for.
- To set the limit for a single bucket: Click the “More” button on the right column of the bucket, and select the “Set Limit” menu item to bring up the Set Limit dialog box.
- To set the upper limit for multiple buckets: check one or more buckets in the bucket list, click the**_“Batch Action”_** button, and select the **_“Set Upper Limit”_** menu item to bring up the Set Upper Limit dialog box.
- Set the capacity limit and object limit of the oss bucket (where 0 means no limit), and click the “OK” button. This function is used to set the sharing range of storage.
There are five types of sharing ranges for project resources.
- No sharing (private): I.e. project resources can only be used by users of this project.
- Project Share-Partial (shared by multiple projects in this domain): I.e. project resources can be shared to specified projects (one or more) under the same domain, and only users under this project and the shared project can use the project resources.
- Project Sharing-All (shared by this domain): I.e. project resources can be shared to all projects under the domain, i.e. all users of the project’s domain can use the project resources.
- Domain sharing-part (Multiple Domains sharing): I.e. project resources can be shared to the specified domain (one or more), and only users under the domain where the project resources are located and the shared domain can use the project resources.
- Domain Share-All (Global share): I.e. project resources can be shared to all domains, i.e. all users in the system can use project resources.
Description
To set the conditions for domain sharing.
- Three-level Resource Hierarchy have been turned on in the OneCloud platform.
- The user is in the admin backend.
To set up project sharing.
- The user is in the admin backend or domain admin backend.
Note
- The shared scope of the oss bucket is related to the shared scope of the cloud account.
- When the cloud account is not shared, resources synced down through the cloud account cannot be shared either.
- When the cloud account is enabled for sharing, the resources synced through the cloud account will also be enabled for sharing with the cloud account.
- When the cloud account is enabled for sharing, the resources synced through the cloud account can change the sharing range. Please make sure the sharing range is within the sharing range of the cloud account.
- When the cloud account modifies the sharing range, the sharing range of the resources synced through the cloud account should always remain within the sharing range of the cloud account. E.g. if the cloud account shares domain A, B, C, D, and domain resources share domain A and C, and the cloud account modifies the sharing range to domain A and B, then the domain resources can only be shared to domain A.
- When the cloud account shares cloud subscriptions, the domain resources synced down through the cloud account cannot be shared.
bucket set up sharing.
- On the Storage Bucket page, click the “More” button on the right action bar of the oss bucket, and select the drop-down menu “Set up sharing” menu item to bring up the Set up sharing dialog box.
- Configure the following parameters.
- When “No Sharing” is selected as the sharing scope, the sharing scope of project resources is private and only users of this project can use them.
- When the sharing scope is selected as “Project Sharing”, you need to select the projects that can be shared under this domain.
- When the project selects one or more projects under the same domain, the shared scope of the project resources is Project Shared - Part, and only the users under the project where the project resources are located and the shared project can use the project resources.
- When All is selected for the project, the shared scope of the project resource is Project Shared - All, and all users under the project’s domain can use the project resource.
- When the sharing scope is “Domain Sharing”, you need to select the shared domains.
- When one or more of the domains are selected, the sharing scope of the project resources is Domain Sharing - Partial, and only the users under the domain where the project resources are located and the shared domain can use the domain resources.
- When All is selected for the domain, the sharing scope of the project resource is Domain Shared-All, and all users in the system can use the project resource.
- Click the “OK” button to complete the operation.
Batch Setting Sharing
The scope of sharing for multiple storage buckets set in batch must be the same. Otherwise, set up separate shares for the buckets.
- Select one or more buckets in the bucket list, click the “Batch Action” button at the top of the list, and select the drop-down menu “Set up sharing” menu item to bring up the Set up sharing dialog box.
- Configure the following parameters.
- When “No Sharing” is selected as the sharing scope, the sharing scope of project resources is private and only users of this project can use them.
- When the sharing scope is selected as “Project Sharing”, you need to select the projects that can be shared under this domain.
- When the project selects one or more projects under the same domain, the shared scope of the project resources is Project Shared - Part, and only the users under the project where the project resources are located and the shared project can use the project resources.
- When All is selected for the project, the shared scope of the project resource is Project Shared - All, and all users under the project’s domain can use the project resource.
- When the sharing scope is “Domain Sharing”, you need to select the shared domains.
- When one or more of the domains are selected, the sharing scope of the project resources is Domain Sharing - Partial, and only the users under the domain where the project resources are located and the shared domain can use the domain resources.
- When All is selected for the domain, the sharing scope of the project resource is Domain Shared-All, and all users in the system can use the project resource.
- Click the “OK” button to complete the operation.
Set the read/write permission
This function is used to set the read and write permissions for the oss bucket.
Description
- Tencent Cloud storage buckets do not support public read and write.
- Azure storage buckets do not support authenticated user readable and public read/write.
- AWS storage buckets do not support super authenticated user readable, write public read for this account, and public read and write.
- Alibaba Cloud, Ceph storage buckets do not support authenticated user readable.
- Storage buckets in the AliFinancial cloud intranet region do not support the operation of setting read and write permissions.
- On the bucket page, click the “More” button in the operation column on the right side of the bucket, and select the “Set Read/Write Permissions” menu item to bring up the Set Access Permissions Settings dialog box.
- Set the read/write permission: Including read/write for this account, public read for this account, and public read/write.
- Read and write for this account: Only the user can read and write the data in the specified oss bucket.
- Authenticated user can read: The authenticated user can read the data in the bucket, and only the user can perform the write operation.
- Public read by this account: Any user can read the data in the bucket, but authentication is required to write data to the bucket.
- Public Read/Write: Any user can read and write data in the bucket without authentication. The security risk of this permission is extremely high, so please choose carefully to ensure the security of your data.
- Click the “OK” button to complete the operation.
Change Project
This function is used to change the project to which the oss bucket belongs. Only the users in the project can use the oss bucket to store files.
To change the project for a single bucket
- On the bucket page, click the “More” button on the right action bar of the bucket, and select the drop-down menu “Change Project” menu item to bring up the Change Project dialog box.
- Select the field and project, click “OK” button to finish the operation.
Batch Change Projects
- Check one or more buckets in the bucket list, click the**_“Batch Action”_** button, and select the **_“Change Project”_** menu item to bring up the Change Project dialog box.
- Select the domain and project, click “OK” button to finish the operation.
Delete Storage Bucket
This function is used to delete the oss bucket when no file exists in the oss bucket.
Description
The oss bucket in the AliFinancial Cloud intranet region does not support the operation of setting read and write permissions.
Delete
- On the bucket page, click the “More” button on the right side of the bucket, and select the “Delete” menu item to bring up the action confirmation dialog.
- Click the “OK” button to complete the operation.
Batch Delete
- Check one or more buckets in the bucket list, click the**_“Batch Action”_** button, select the **_“Delete”_** menu item, and the operation confirmation dialog box pops up.
- Click the “OK” button to complete the operation.
View Storage Bucket Details
This function is used to view the details of storage buckets.
- On the Bucket page, click the specified bucket name item to enter the File List page.
- Click the Details tab to enter the bucket details page.
- View the following information
- Basic Information: Including bucket Cloud ID, ID, name, status, domain, project, share scope, platform, region, location (can be used to check whether the AliPay cloud bucket is an intranet region), storage type, available area, cloud account, created at, updated at, notes, etc.
- Access domain name: The corresponding access domain name and S3 gateway will be generated after creating the oss bucket, users can unify the management of oss bucket through S3 gateway, etc.
- CDN acceleration domain name: Display the CDN acceleration domain name set by the oss bucket.
- Static website: Shows the access links of the static website of the oss bucket, etc.
- Usage statistics: Statistics on the used capacity of the oss bucket. Including storage usage and number of files.
- Usage Limit: The capacity limit set for the oss bucket. This includes the maximum storage capacity and the maximum number of files.
- Access rights: Set the access rights of the oss bucket, including read/write for this account, public read for this account, public read/write for this account, and the information of this account can be obtained by viewing the back-end access information of the oss bucket.
- Read and write for this account: Only the user can read and write the data in the specified bucket.
- Authenticated user can read: The authenticated user can read the data in the bucket, and only the user can perform write operations.
- Public read for this account: Any user can read the data in the bucket, but authentication is required to write data to the bucket.
- Public Read/Write: Any user can read and write data in the bucket without authentication. The security risk of this permission is extremely high, so please choose carefully to ensure the safety of your data.
- Anti-theft chain: Show whether the oss bucket is set to anti-theft chain.
Set static website
Object Storage supports hosting static websites on the oss bucket. Users need to upload the configuration files of static websites, etc. to the oss bucket, set the access rights of the files, and set the index page and error page and other information of the static website display through the set static website function. After the configuration is completed, users can access the static website by accessing the domain name, and when the access is successful, it will jump to the index page, and when the access is wrong, it will jump to the error page.
Static website means that all web pages consist of static content, including scripts executed by the client, such as JavaScript. object storage does not support content that involves server-side processing, such as PHP, JSP, ASP.NET, etc.
Description
Currently only supported by Tencent Cloud.
In the bucket page, click the specified bucket name item to enter the file list page. Click the “Details” tab to enter the bucket details page. In the Static Site module, click the “Set Static Site” button to the right of the access address to bring up the Set Static Site dialog box. 4. Configure the following parameters. - Status: Select whether to enable the hosting static site function, after enabling, you can configure the following parameters. - Index document: Index document is the home page of the static site, when the user accesses the static site will default to visit this page. In most cases, the index document is index.html. - Error document: When the user accesses the static website with an error, a 404 error code will be returned along with the information of the specified error document. In most cases, the error document is error.html.
Set anti-theft links
In order to prevent the data in the oss bucket from being pirated and causing unnecessary damage to the user, the object storage supports the function of setting up anti-theft links.
HTTP protocol support through the table header referer field can get access to the source page of the target page, anti-theft chain that is set by the referer, to detect the field information of the requested referer, whether it matches with the black and white list used to set, if it matches with the whitelist then allow access, otherwise block access, etc..
Description
- Currently only supported by Tencent Cloud.
- If the Tencent Cloud oss bucket is accessed with a signature (regardless of URL and Header), then no anti-theft chain verification is performed.
- On the bucket page, click the specified bucket name item to enter the file list page.
- Click the Details tab to enter the bucket details page.
- In the Anti-Theft Link module, click the “Set” button to bring up the Set Anti-Theft Link dialog box.
- Configure the following parameters.
- Empty referer: Whether to allow requests with HTTP or HTTPS header including empty referer (header without referer field or with empty referer field) to access object storage resources.
- Whitelist referer: The default access address for allowing domains in the whitelist to access the oss bucket.
- Click the “OK” button.
File Management
This function is used to manage files and folders.
Note
- Files in the oss bucket on the AWS-China cloud account on the cloud management platform cannot be downloaded via interface download or url sharing, etc. regardless of the permissions set.
- The oss bucket on the AliFinancial cloud intranet region does not support file management and other related operations.
Upload files
This function is used to upload files to the specified bucket. Up to 4 files can be uploaded at the same time, please note that if there are files with the same name, they will overwrite the previously uploaded files.
Note
After importing Azure cloud account resources, Azure storage buckets do not support uploading files in the root directory. Please upload files in the folder under the root directory.
- On the Storage Bucket page, click the specified bucket name item to enter the file list page.
- Click the “Upload File” button at the top of the list to bring up the Upload File dialog box.
- Drag and drop the file directly to the dotted box or click the “Upload directly” hyperlink to select the file to upload, and click the “OK” button to upload the file.
Download Files
This function supports users to download files to local area.
- On the bucket page, click the specified bucket name item to enter the file list page.
- Click the “Download” button in the action column to the right of the file to download or open the file in the browser.
- If the downloaded file format is supported by the browser, the browser will open the file directly without downloading it, so it is recommended to save the file as on the browser and save it locally.
- If the downloaded file format is not supported by the browser, the browser will download the file directly.
Delete files
Support deleting files individually or in batches.
Delete
- On the bucket page, click the specified bucket name item to enter the file list page.
- Click the “Delete” button in the action column to the right of the file to bring up the action confirmation dialog box.
- Click the “OK” button to complete the operation.
Batch Delete
- Check one or more files (folders) in the file list and click the “Delete” button to bring up the operation confirmation dialog box.
- Click the “OK” button to complete the operation.
Generate URL
This function is used to generate a temporary URL address of a file for users to share.
- On the Storage Bucket page, click the specified bucket name item to enter the file list page.
- Click the “More” button in the action bar on the right side of the file, and select the “Generate Url” menu item to bring up the Generate URL dialog box.
- Set the connection validity time (other users can access the file through the URL address within the validity time) to generate a temporary URL, and click “Copy File URL” to copy the file URL address to the clipboard, and users can paste and analyze the URL address.
- Click “Close” button to close the dialog box.
Set read/write permission
This function is used to set the read/write permission of the file (folder). If this item is not set, the read/write permission of the file will be the same as the oss bucket by default.
Note
Files in Azure storage buckets do not support setting read/write permissions, and the read/write permissions for files are the same as the oss bucket.
file set read/write permissions
- On the bucket page, click the specified bucket name item to enter the file list page.
- Click the “More” button in the action bar on the right side of the file, and select the “Set Read/Write Permissions” menu item to bring up the Set Access Permissions Settings dialog box.
- Set the read/write permission: Including read/write for this account, public read for this account, and public read/write.
- Read and write for this account: Only the user can read and write the data in the specified oss bucket.
- Public read for this account: Any user can read the data in the oss bucket, but authentication is required to write data to the oss bucket.
- Public Read/Write: Any user can read and write data in the oss bucket without authentication. The security risk of this permission is extremely high, so please choose carefully to ensure the security of your data.
- Click “OK” button to complete the operation.
Batch set read/write permissions
Description
Set read and write permissions for the folders in the oss bucket. The files in the folders will all be consistent with the folder permissions.
- On the bucket page, click the Specify bucket name item to enter the file list page.
- Select one or more files (folders) in the file list, click the “More” button at the top of the list, and select the “Set Read/Write Permissions” menu item to bring up the Set Access Permissions Settings dialog box.
- Set the read/write permission: Including read/write for this account, public read for this account, and public read/write.
- Read and write for this account: Only the user can read and write the data in the specified oss bucket.
- Public read for this account: Any user can read the data in the oss bucket, but authentication is required to write data to the oss bucket.
- Public Read/Write: Any user can read and write data in the oss bucket without authentication. The security risk of this permission is extremely high, so please choose carefully to ensure the security of your data.
- Click “OK” button to complete the operation.
Set HTTP header
This function is used to set the HTTP header of a file. When the HTTP header encoding of a file does not correspond to the encoding of the file itself, it will cause the file to display garbled code when it is opened by the browser, and then the user can change the default HTTP header encoding of the file by setting the HTTP header function.
Setting HTTP headers for individual files
- On the bucket page, click the specified bucket name item to enter the file list page.
- Click the “More” button in the action bar on the right side of the file, and select the “Set HTTP Header” menu item to bring up the Set HTTP Header dialog box.
- Set the following parameters.
- Content-Type: the file type, such as image/png, “text/html; charset=UTF-8”, etc.
- Content-Encoding: encoding method, such as gzip, compress, identity, etc.
- Content-Language: language, such as de-DE, en-CA, etc.
- Content-Disposition: content presentation, where inline means that it can be displayed in the browser together with the page content (such as images), attachment means that it is the downloaded content.
- Cache-Control: cache control, such as no-cache, no-store, etc.
- Click “OK” button to complete the operation.
Batch Set HTTP Header.
- On the Storage Bucket page, click the Specify Bucket Name item to enter the File List page.
- Select one or more files in the file list, click the “More” button at the top of the list, and select the “Set HTTP Header” menu item to bring up the Set HTTP Header dialog box.
- Set the following parameters.
- Content-Type: the file type, such as image/png, “text/html; charset=UTF-8”, etc.
- Content-Encoding: encoding method, such as gzip, compress, identity, etc.
- Content-Language: language, such as de-DE, en-CA, etc.
- Content-Disposition: content presentation, where inline means that it can be displayed in the browser together with the page content (such as images), attachment means that it is the downloaded content.
- Cache-Control: cache control, such as no-cache, no-store, etc.
- Click the “OK” button to complete the operation.
Folder Management
Folders are mainly used for managing files and classifying them. All functions such as uploading, downloading and sharing of files are supported in the folder. Folders support nesting, i.e. new folders within folders, etc.
Create Folder
This function is used to create a new folder for managing files.
- On the oss bucket page, click the specified bucket name item to enter the file list page.
- Click the “Create Folder” button at the top of the list to bring up the Create Folder dialog box.
- Set the folder name and click the “OK” button.
Delete Folders
This function is used to delete folders and supports individual or batch deletion of folders.
Delete
- On the oss bucket page, click the specified bucket name item to enter the file list page.
- Click the “Delete” button in the action column to the right of the specified folder to bring up the action confirmation dialog box.
- Click the “OK” button to complete the operation.
Batch Delete
- On the Storage Bucket page, click the specified bucket name item to enter the File List page.
- Check one or more folders in the file list, and click the “Delete” button to bring up the operation confirmation dialog box.
- Click the “OK” button to complete the operation.
Cross-domain rules
In normal web requests, due to the same-origin policy, interaction between different domains (same protocol, same domain name (or IP) and same port is considered as one domain) is not possible. Cross-domain resource sharing (CORS) allows the server to declare which source sites have access to which resources through the browser, etc. by adding the Origin field to the HTTP header to enable resource interaction between different domains.
Create Cross-Domain Access Rules
This function is used to create cross-domain access rules.
- On the bucket page, click the specified bucket name item to enter the file list page.
- Click the Cross-Domain Access tab to enter the Cross-Domain Access page.
- Click “Create” button to bring up the Create Cross-Domain Access Rule.
- Configure the following parameters.
- Source: The source for allowing cross-domain requests. Multiple sources can be specified at the same time, and only one can be filled in each line.
- Allowed methods: support GET, PUT, POST, DELETE, HEAD.
- Allowed headers: which custom headers are allowed to be used for request access.
- Exposed headers: Additional headers carried in CORS responses to give the client additional information.
- Cache time: The validity period for the request to get the result.
- Click the “OK” button to complete the operation.
Modify cross-domain access rules
This function is used to modify the cross-domain access rules.
- On the bucket page, click the specified bucket name item to enter the file list page. Click the Cross-Domain Access tab to enter the Cross-Domain Access page.
- Click the “Modify” button on the right column of the cross-domain rules to bring up the Modify cross-domain access rules.
- Support modifying the following parameters.
- Source: the source of the allowed cross-domain requests. Multiple sources can be specified at the same time, and only one can be filled in each line.
- Allowed methods: support GET, PUT, POST, DELETE, HEAD.
- Allowed headers: which custom headers are allowed to be used for request access.
- Exposed headers: Additional headers carried in CORS responses to give the client additional information.
- Cache time: The validity period for the request to get the result.
- Click the “OK” button to complete the operation.
Delete cross-domain access rule
This function is used to delete a cross-domain access rule.
delete
- On the bucket page, click the specified bucket name item to enter the file list page. Click the Cross-Domain Access tab to enter the Cross-Domain Access page.
- Click the “Delete” button in the action column on the right side of the cross-domain rule to bring up the action confirmation dialog box.
- Click “OK” button to complete the operation.
Batch Delete
- On the Storage Bucket page, click the specified bucket name item to enter the file list page. Click the Cross-Domain Access tab to enter the Cross-Domain Access page.
- Select one or more cross-domain rules in the list, and click the “Delete” button at the top of the list to bring up the action confirmation dialog box.
- Click the “OK” button to complete the operation.
Authorization Policy
This function is used to control the access rights of public cloud root account, sub-accounts to storage buckets and objects, etc.
Create Create Authorization Policy
This function is used to create a new authorization policy. The authorization policy is used to define specified operational privileges for specified users for specified resources.
- On the Storage Bucket page, click the specified bucket name item to enter the file list page.
- Click the Authorization Policy tab to enter the Authorization Policy page. Click the “Create” button to bring up the Create Authorization Policy dialog box.
- Configure the following parameters.
- Policy Effect: Currently, only Allow is supported.
- User: The user who supports accessing the resources in the authorization policy, and currently, it supports setting up the root account as well as the sub-account of the current account. When setting the root account, you need to enter the corresponding root account ID.
- Resource: The resource that the user can access, and it supports setting the entire oss bucket or the specified resource under the oss bucket.
- Resource path: When the resource is “whole bucket”, the resource path cannot be set; when the resource is “specified resource”, the specific resource path can be set, and multiple resource paths can be set at the same time.
- Operation: Set the user’s operation rights to the resource, including read-only, read/write, full control, etc. Click “OK” button to complete the operation
Delete authorization policy
This function is used to delete the authorization policy.
delete
- On the Storage Bucket page, click the specified bucket name item to enter the file list page. Click the Authorization Policy tab to enter the Authorization Policy page.
- Click the “Delete” button in the action column on the right side of the authorization policy to bring up the action confirmation dialog box.
- Click the “OK” button to complete the operation.
Batch Delete
- On the Storage Bucket page, click the specified bucket name item to enter the file list page. Click the Authorization Policies tab to enter the Authorization Policies page.
- Select one or more authorization policies in the list, and click the “Delete” button at the top of the list to bring up the operation confirmation dialog box.
- Click the “OK” button to complete the operation
View Storage Bucket Monitoring
This function is used to view the monitoring information of storage buckets. Currently, it only supports the monitoring of storage buckets connected to Alibaba Cloud and Huawei Cloud.
- In the Storage Bucket page, click the specified bucket name item to enter the file list page. Click the “Monitoring” tab to enter the monitoring page. View the number of GET requests and the average delay of the first byte of GET requests for the oss bucket.
View bucket operation log
This function is used to view the log information of the operations performed on the bucket.
- On the bucket page, click the specified bucket name item to enter the file list page.
- Click the Operation Log tab to enter the Operation Log page.
- Load More Logs: In the Operation Logs page, the list displays 20 operation logs by default. To view more operation logs, click the “Load More” button to get more logs.
- View Log Details: Click the “View” button on the right column of the operation log to view the log details. Copy details are supported.
- View logs of specified time period: If you want to view the operation logs of a certain time period, set the specific date in the start date and end date at the top right of the list to query the log information of the specified time period.
- Export logs: Currently, only the logs displayed on this page are supported to be exported. Click the upper-right corner of
 icon, set the export data column in the pop-up Export Data dialog box, and click the “OK” button to export the logs.