IAM
Introduction to the authentication system
The OneCloud platform authentication system supports multi-tenant management, with a domain as a tenant, and a complete user, resource division and permission system under the domain. It also supports multiple secondary identity providers to achieve single sign-on to the platform, etc.
Introduction of common concepts
- Identity Provider: The source of user data and supports managing to external identity providers for secondary authentication.
- Domain: A logical concept based on multi-tenant management, including complete user, resource division and permission system under the domain. Domain administrators can manage the resources in the domain with full autonomy, etc.
- Project: Project is the owner of the resources, i.e. the virtual resources in the platform (such as servers, disks, networks), etc. need to be attributed to the project.
- User: User is the user of the resource, but the user has no direct affiliation with the resource. Only after adding the user to the project, the user can use the resources in the project. The user itself does not have any privileges. When the user joins the project with a certain role, he/she will have the privileges of the corresponding role in the project. E.g. if a user joins the system project in the default domain with the admin role, the user will have the system backend privileges.
- Group: Group is a collection of users, when joining the project with a group, the users in the group will have the same privileges in the project.
- Roles: Roles define the user’s permissions. Roles themselves do not have any permissions and need to be associated with permissions.
- Policies: Policies define specific administrative rights to operate the platform, and need to be associated with roles.
- Quota: Quota is used to limit the number of resources available in a domain or project, and the quota is not related to the actual resources on the platform. The quota check switch is off by default, if users need the quota function, they can turn on the quota check switch in the system configuration-global configuration.
Three levels of permissions usage description
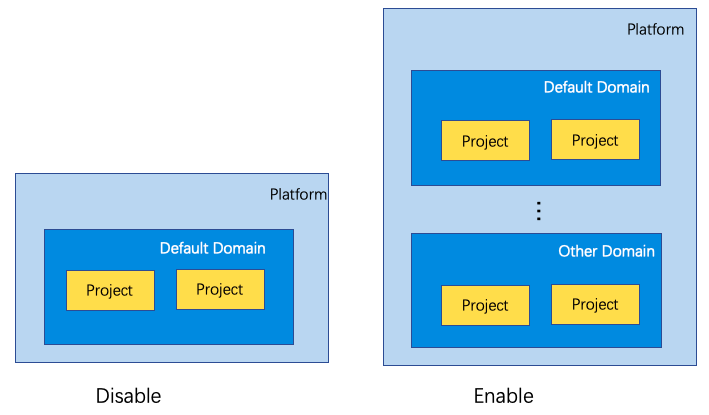
OneCloud Tertiary privileges are turned off by default after the platform is installed, and users can choose whether to turn on tertiary privileges according to the enterprise organization structure.
- When the organization structure is as simple as the diagram on the left below, and there is only one department, the user can keep the three-level permission turned off when using the OneCloud platform.
- When the organization structure is as shown on the right below, with multiple departments and multiple projects under the departments, you need to turn on three-level permissions when using the OneCloud platform.


The OneCloud platform turns on and off the three-level permission pair as shown in the following image.
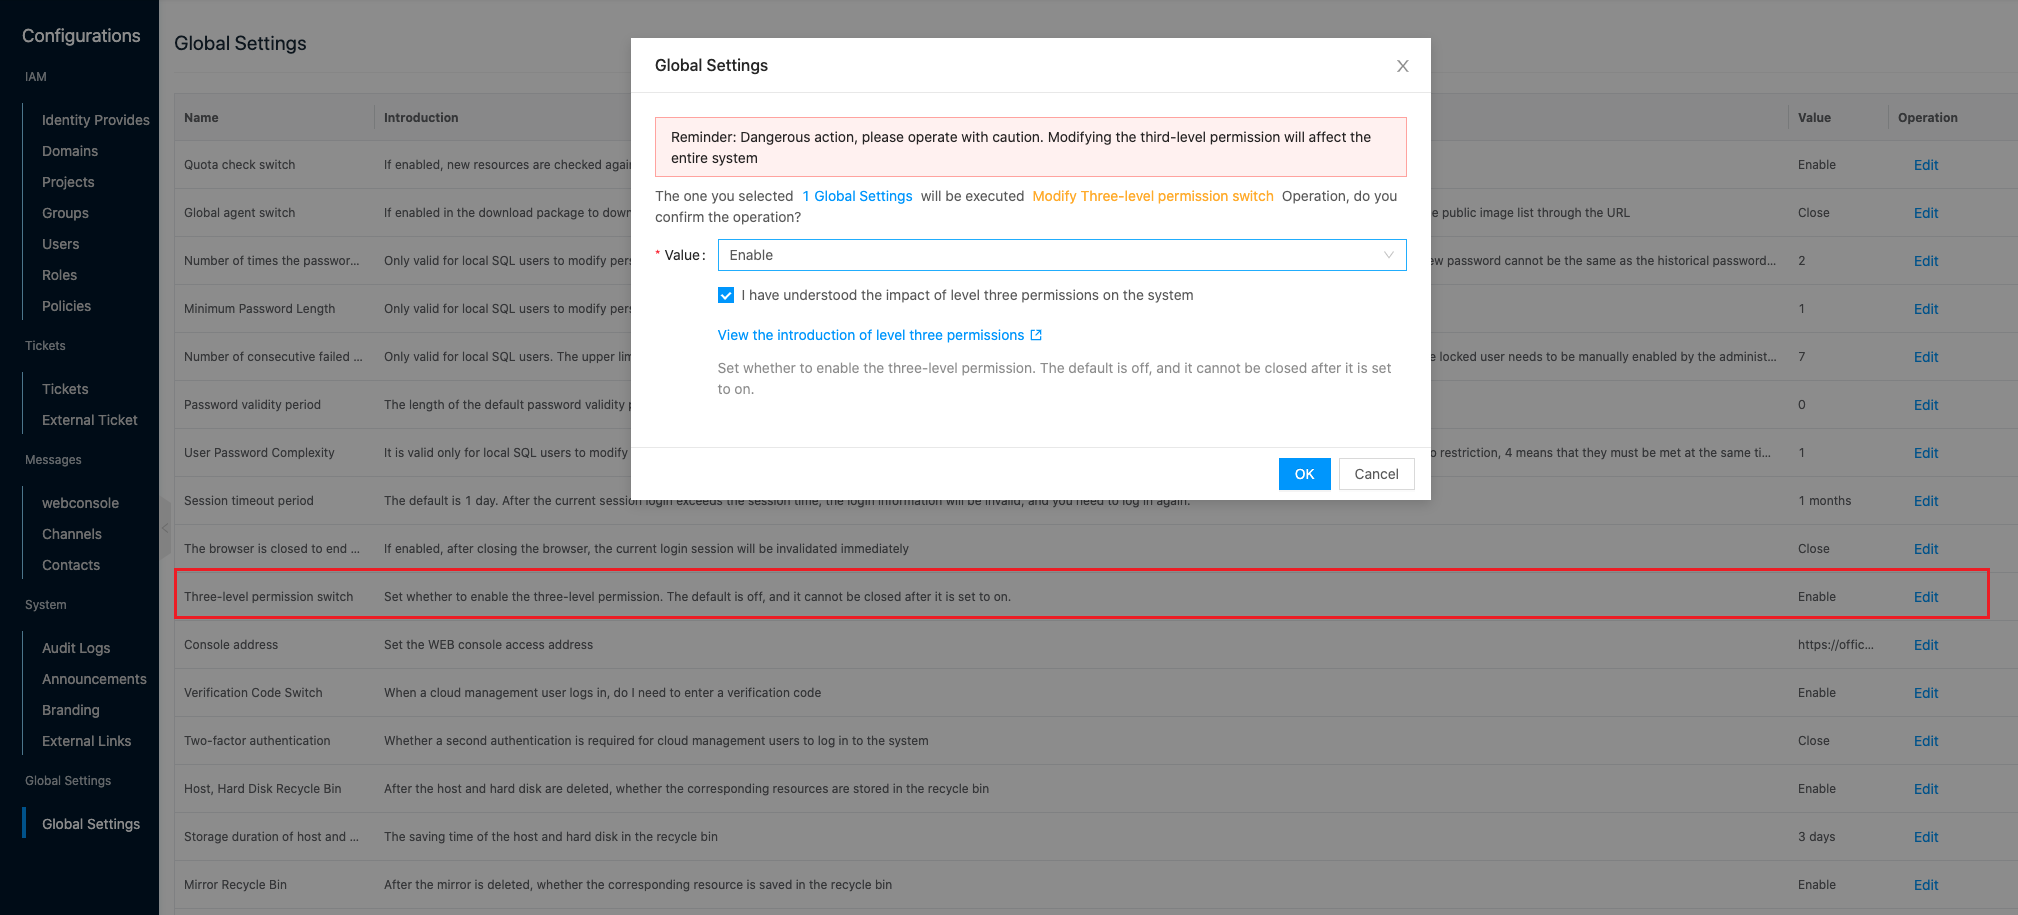
The three levels of permission are turned on as follows.
Note
There is no support for turning off third-level permissions after they are turned on, so please be careful.
-
It is recommended to enable third-level permissions in Configurations - Global Settings on the OneCloud platform.
-
Enable third-level privileges on the First Node node configuration via the climc command.
# Enable third-level privileges
$ climc service-config --config non_default_domain_projects=true common
Configuration process
This section describes building an enterprise authentication system in the OneCloud platform.
- Create Identity Provider:platform local user, and Dingtalk as secondary identity provider for example.
- Create Domain: When the platform opens three levels of permission, users can create a domain according to their needs.
- Create Role and Policies: When the built-in roles and permissions do not meet the needs of users, users can customize the permissions and roles.
- Create Projects: Project is the owner of resources, users can create projects and allocate resources, etc. according to planning.
- Create Users: The user is the user of the resource, and the user needs to import the enterprise user into the platform to use the resources in the platform.
- Add user to project: When the project, user, role and permission are configured, you can add user to project as needed.
- User-associated dingtalk accounts: Use Dingtalk as secondary identity provider for user login.
- Dingtalk SSO login: users can swipe the code to sign in via nails.
Create Identity Provider
The OneCloud platform supports managing multiple identity providers, such as LDAP, Dingtalk, Lark, WeCom, CAS, Github, and so on. It is recommended that enterprise users use any one of these sources as the primary identity provider and others as secondary sources.
Description
- Primary identity provider: The identity provider defines the source of the user. sql and LDAP identity providers are the primary identity provider by default. Other identity providers can be used as the primary source if “auto-create users” is enabled when adding them.
- Auxiliary identity provider: the identity provider is only used as the authentication login method, the user of the main identity provider needs to associate with the auxiliary identity provider first, after successful association, you can use the identity provider to login to the platform.
The sql source is the built-in identity provider of the system, no need to add it. Here’s how to add pins as a secondary identity provider.
Description
For details of other identity providers, please see User Manual - Create Authentication Source
Create a Dingtalk SSO application
Description
For more information, please see the Dingtalk website documentation
-
Log in to the Dingtalk Open Platform as an administrator.
-
Create a code login application authorization in the Mobile Access Application - Login page on the “Application Development” page.
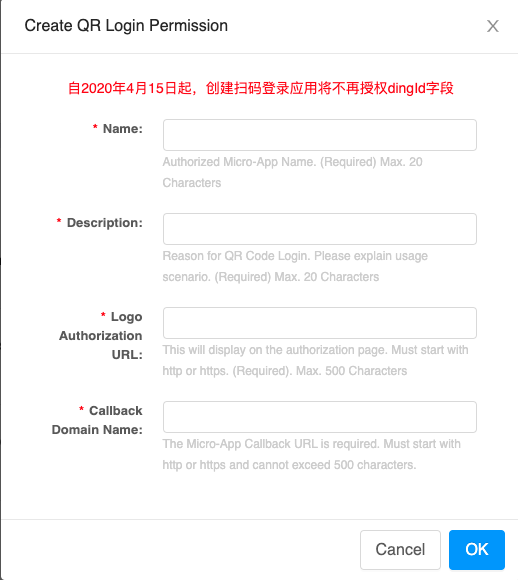
-
Configure the callback domain as “https://
/api/v1/auth/ssologin”. Description
- Set the platform to domain access, set the access domain in the global settings - console address.
- The platform’s callback address can be viewed on the OneCloud platform identity provider page.
-
After the creation, you can get the corresponding AppId and AppSecret.

Create Dingtalk identity provider
-
In the cloud management platform click on the top left corner
 navigation menu, and click " IAM & Security/IAM/Identity Provider" menu item in the pop-up menu bar on the left to enter the Authentication Source page.
-
Click the “Create” button at the top of the list to enter the Create Authentication Source page.
-
Configure the following parameters
- Identity Provider attribution: Set the attribution range of the identity provider. When the identity provider belongs to the system, that is, all users in the system can use the identity provider to log in to the platform. When the identity provider belongs to the domain, only the users in the domain can use the identity provider to log in to the platform. In the Domain View, the identity provider belongs to the domain administrator’s domain.
- Name: The name of the identity provider.
- Authentication protocol: select “OAuth2”.
- Authentication type: select “Dingtalk”.
- AppId: the id of the application. Refer to the previous section to get it.
- AppSecret: the key of the application. Refer to the previous section to get it.

Create Domain
When the platform is not enabled with level 3 privileges, only the default domain can be used to create projects and divide resources. Even if you can create a new domain, you cannot create a new project under the domain. When the platform is enabled with three levels of permissions, users can create domains and divide resources according to multi-tenant requirements.
Description
Domain source.
- When a new identity provider is created, a domain with the same name as the identity provider is created when the user target domain is set to empty.
- Create new as required.
-
In the cloud management platform, click on the top left corner of
navigation menu, and click " IAM & Security/IAM/Domain" menu item in the left menu bar that pops up to enter the domain page.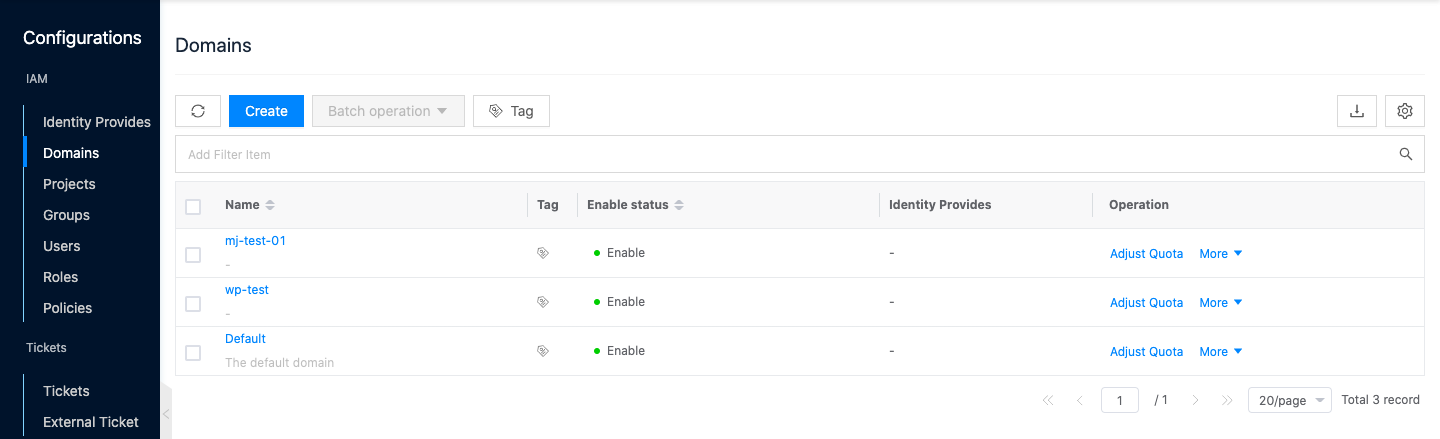
-
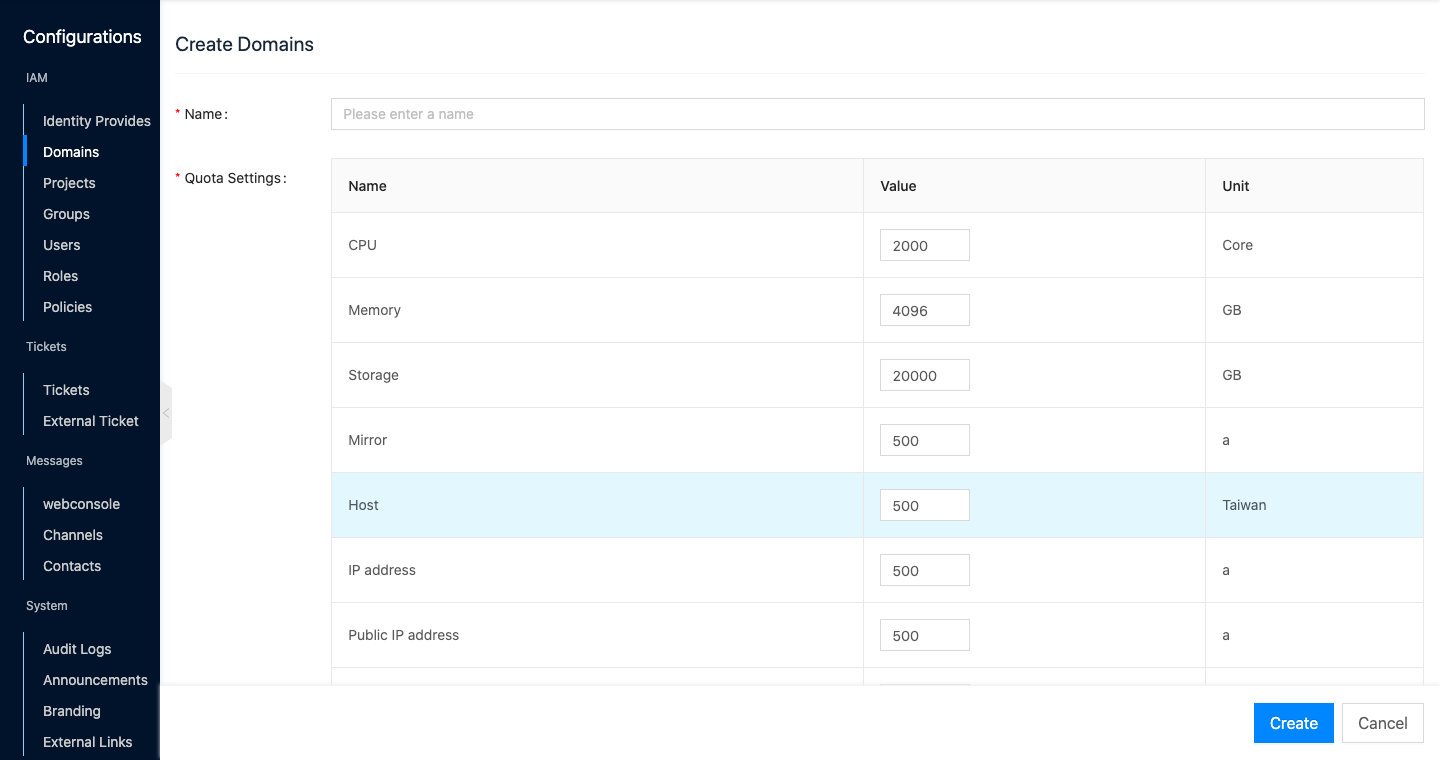
Click the “Create” button at the top of the list to enter the Create Domain page.
-
Set the domain name, quota settings, and click “OK” button to finish the operation.
Create new roles and associate permissions
After the platform is created, the system has a series of built-in roles and permissions. If the built-in roles meet the needs of users, users can skip the section and start to create new projects and users directly.
Introduction to built-in roles
OneCloud The platform currently has the following built-in roles.
| Role | Policies | Whether to share | Permission scope | Permission description |
|---|---|---|---|---|
| admin | sysadmin | Global shared | system | Users can only have full system backend permissions if they join default’s system project as admin. |
| domainadmin | domainadmin | global_share | domain | all_domain_administrative_backend_permissions |
| project_owner | projectadmin | global_sharing | project | all permissions within project scope |
| project_editor | project_editor | global_share | project | Edit access to any resource within the scope of the project |
| member | projectviewer, projectdashboard | Global shared | project | Read-only access to any resource within the scope of the project |
| fa | sysmeteradmin, sysdashboard | Global Share | System | All permissions for billing metering within the system |
Note
The built-in permissions of the member role will become read-only permissions. If a user needs to manipulate the permissions, they can change the user’s role or customize the permissions of the role.
Built-in Policies Description
Policies define permissions to operate resources on the platform. Common permissions are built in after the system is deployed and are called system permissions. System permissions combine user view and operation permissions to generate 9 types of permissions for resources, etc.
- User view is divided into system backend, Domain View and project view.
- operation permissions are divided into administrative permissions, editing permissions, read-only permissions.
- So resource permissions are specifically management, edit, read-only permissions for resources under the global; management, edit, read-only permissions for resources under this domain; management, edit, read-only permissions for resources under this project.
Create Policy
When the built-in permissions do not meet user requirements, users can create new custom permissions.
-
In the cloud management platform, click the top left corner of
navigation menu, and click " IAM & Security/IAM/Policies" menu item in the left menu bar that pops up to enter the permission page.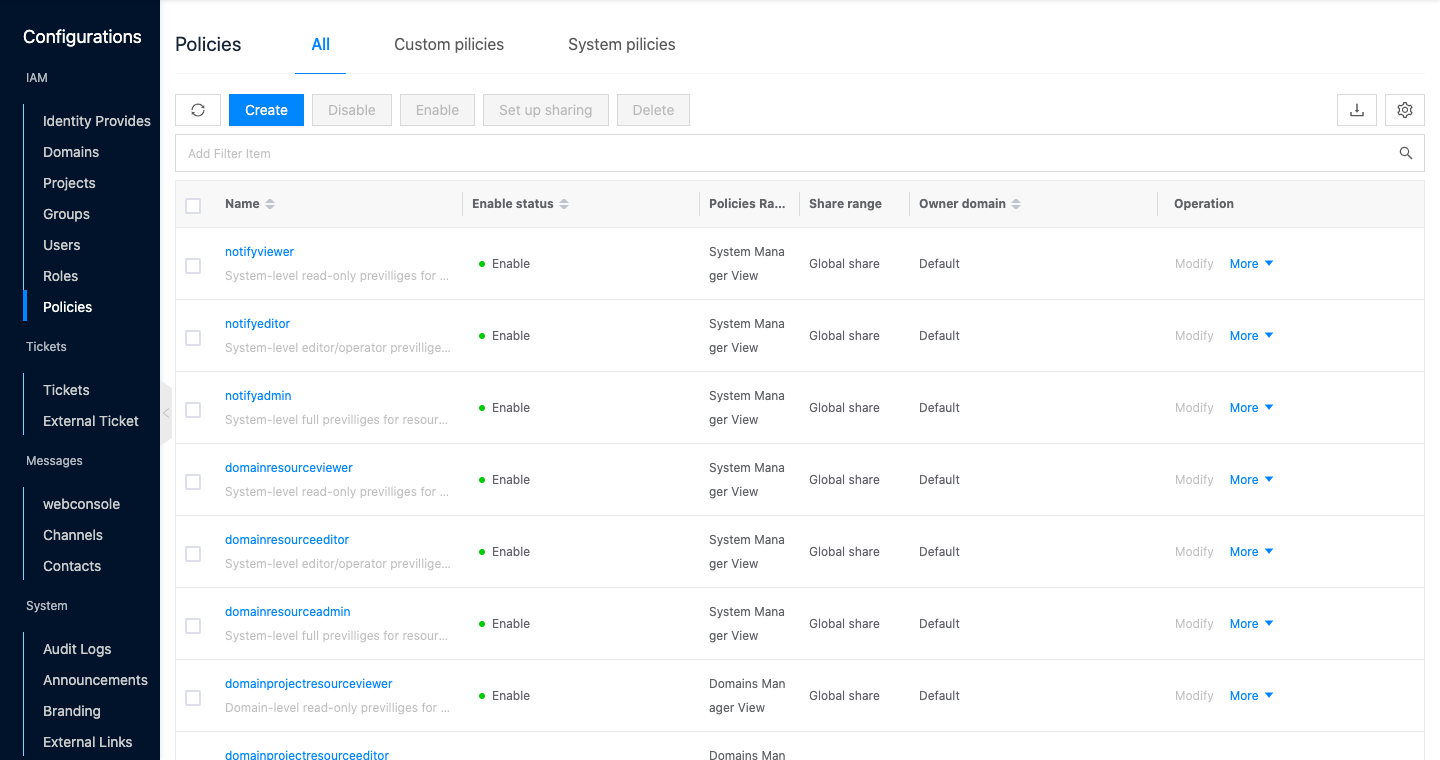
-
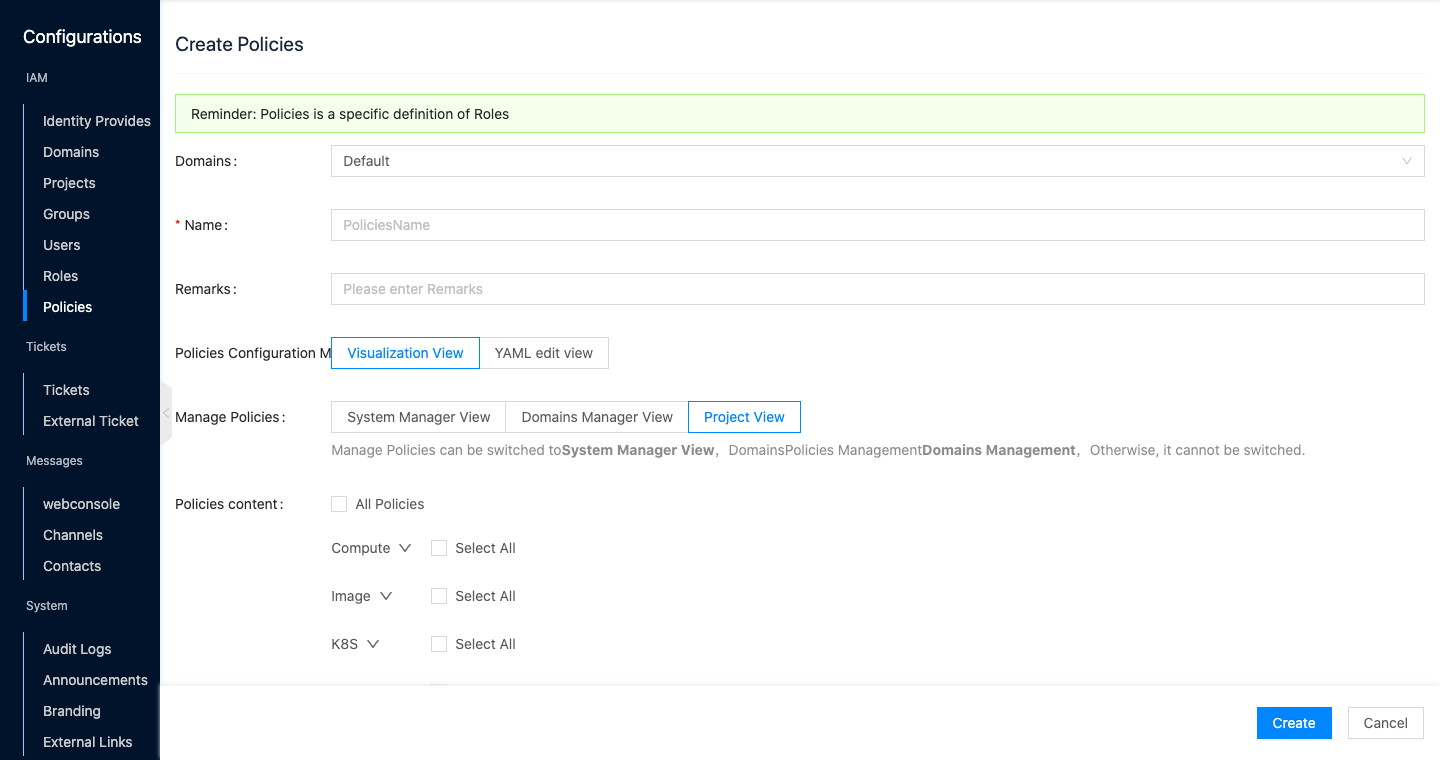
Click the “Create” button at the top of the list to enter the Create Policy page.
-
Set the following parameters.
- Domain: Select the domain to which the permission belongs.
- Name: The name of the custom permission.
- Note: Make a note about the custom permission.
- Permission configuration mode: Support visual view and YAML edit view.
-
Visual view: Configure the following parameters.
- Administrative permissions: administrative permissions include administrative backend, domain administrative backend, and no administrative backend. Administrative permissions correspond to the list of permissions range system, domain, project. And support customizing the node permissions under different views.
- System View: that is, after users join the project with the role of System View privileges, they can switch to the System View, and set custom System View under the user has the privileges, including calculation, image, container, authentication, notification, log, other, billing measurement, alert, process and other module privileges, and support the expansion of set specific functional privileges including list, details, update, create, delete, execute operations and other specific operational privileges.
- Domain View: that is, after the user joins the project with the role of having Domain View privileges, you can switch to the Domain View, and support customizing the domain calendar background view system user-owned privileges. Including computing, mirroring, container, authentication, notification, logging, billing measurement, alert and other module permissions, and support the expansion of set specific functional permissions including list, details, update, create, delete, execute operations and other specific operational permissions.
- No management background: that is, the user who binds this permission only has the project view, and set the user-owned permissions under the custom project view. It includes module permissions for calculation, mirroring, container, notification, log, billing measurement, alert, etc. and supports expanding and setting specific functional permissions including list, details, update, create, delete, execute operation and other specific operation permissions. Since users joining the project in any role will have member permissions, when they join the project in a role with custom project view permissions, the user’s permissions will be a concatenation of custom and member permissions.
- Administrative permissions: administrative permissions include administrative backend, domain administrative backend, and no administrative backend. Administrative permissions correspond to the list of permissions range system, domain, project. And support customizing the node permissions under different views.
-
YAML edit view:the policy format is as follows.
auth: true
policy:
    compute:
        servers:
            create:
                '*': allow
            delete:
                 '*': deny
            get:
                 '*': allow
            vnc: allow
            list:
                '*': allow
            perform:
                '*': allow
            update:
                '*': allow
scope: project
-
-
Click the “OK” button to complete the operation.
Create role and associate permissions
When the built-in roles do not meet the requirements, you can create new roles and associate the corresponding permissions.
-
In the cloud management platform, click on the top left corner of
navigation menu, and click " IAM & Security/IAM/Roles" menu item in the pop-up menu bar on the left to enter the roles page.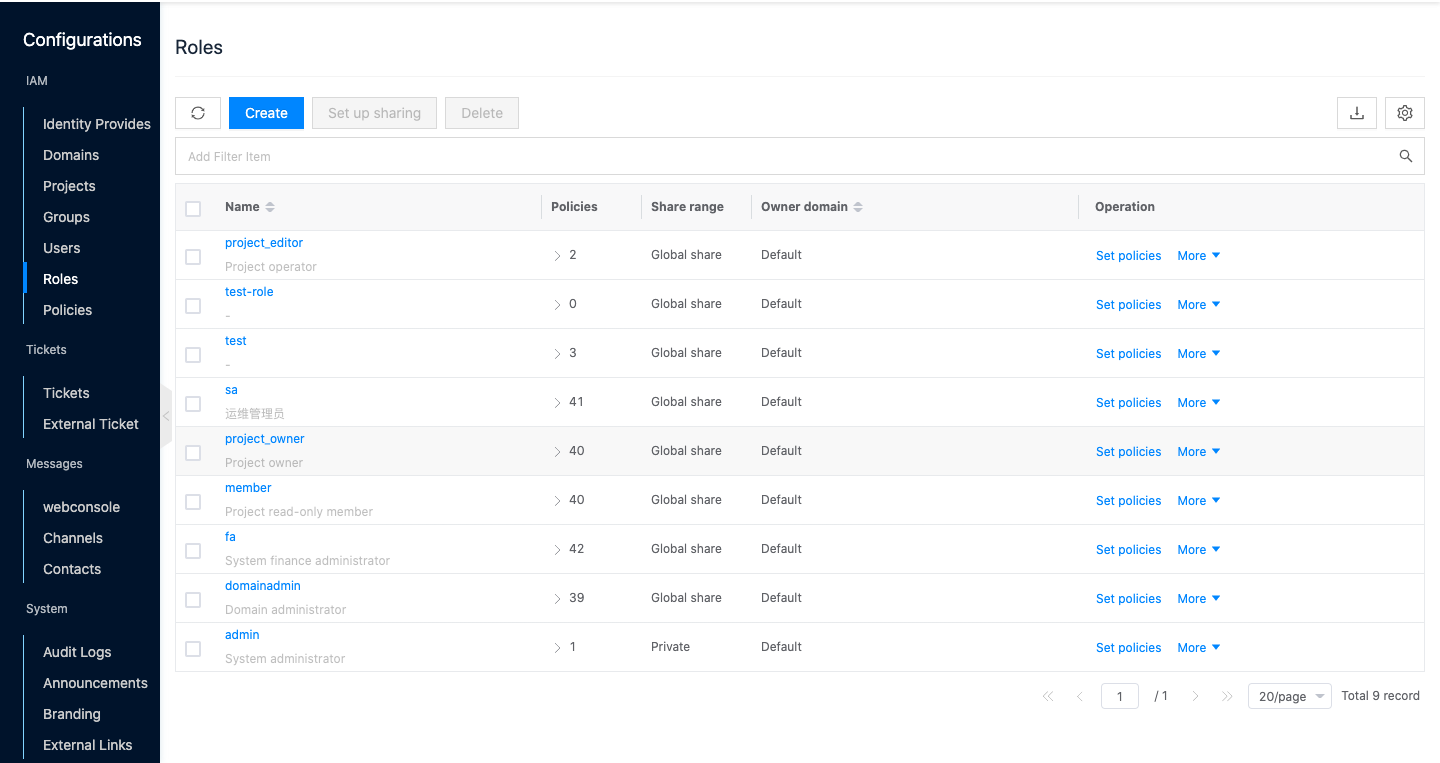
-
Click the “Create” button at the top of the list to bring up the Create Role dialog box.
-
Set the role name, the domain to which the role belongs, and click the “Next” button to enter the Associated Policies dialog box.

-
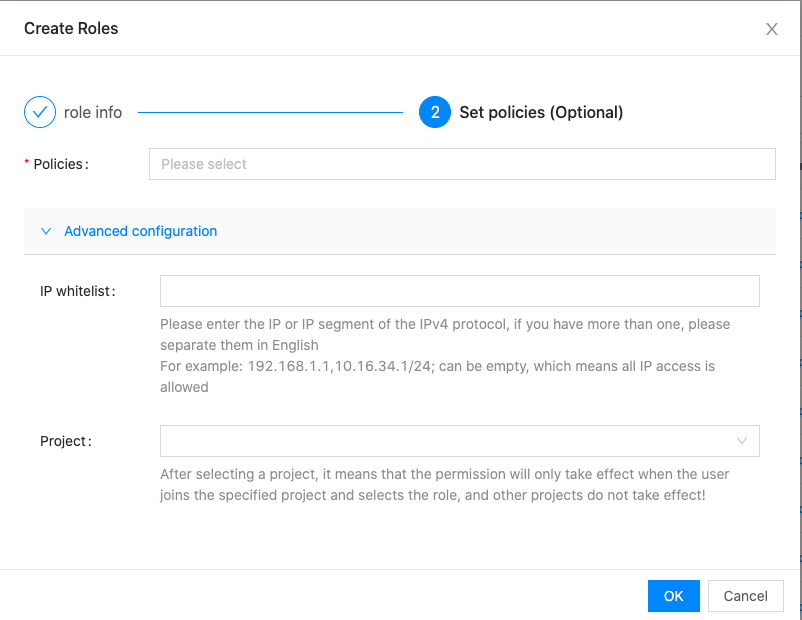
Configure the following parameters.
- Policies: Select the permissions associated with the role, and select the permissions in the pop-up dialog box of Please select permissions, which supports multiple selections.
- IP whitelist: Set the IP whitelist IP address and address segment, only the user logging in the IP whitelist will have the corresponding role and permission, if it is empty, all IP access will be allowed. The format is 192.168.1.1 or 192.168.1.0/24, and multiple IP addresses are split by English “;”.
- Project: set the permission to take effect in the specified project, if no project is specified, the permission takes effect globally; if the project is specified, the permission takes effect only in the specified project, and is invalid in other projects.
-
Click the “OK” button to complete the operation.
Create projects
The project is the owner of the virtual resources, i.e. the virtual resources in the platform (e.g. servers, disks, network) need to be attributed to the project.
Description
Project source.
- When you add a public or private cloud account with “Automatically create projects” enabled, it will sync the cloud projects to the OneCloud platform.
- Create new projects as required.
-
In the cloud management platform, click on the top left corner of
navigation menu, and click " IAM & Security/IAM/Projects" menu item in the left menu bar that pops up to enter the project page.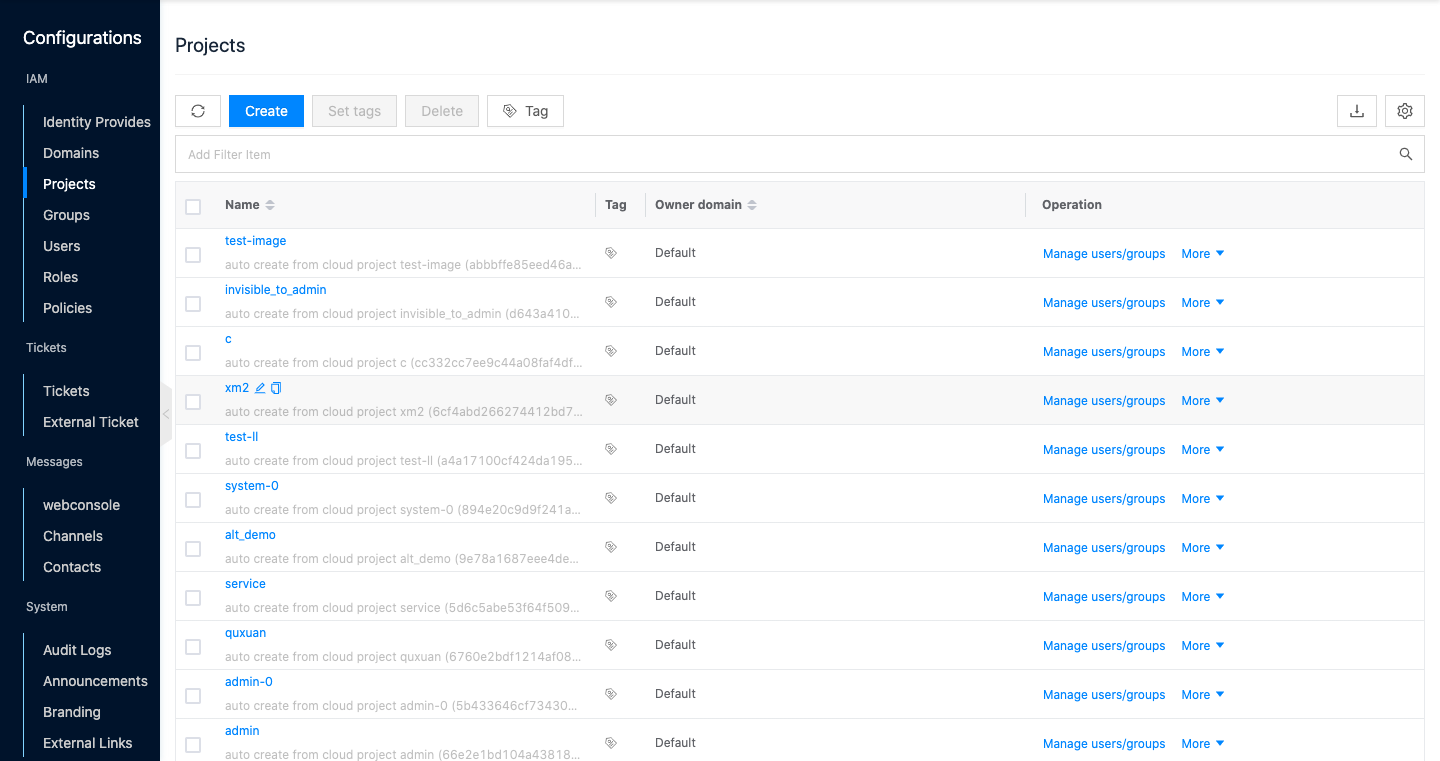
-
Click the “Create” button at the top of the list to enter the Create Project page.
-
Set the name of the project, the domain to which the project belongs, and the project quota, and click the “OK” button.

-
If users and roles that meet the requirements already exist on the platform, you can add the users to the project directly. Configure the following parameters.
- User: Select the users to join the project, and support batch selection of multiple users. Select users in the project domain, if the project belongs to default domain, users can select users in all domains in the system.
- Role: Set the role when users join the project, different roles have different privileges. Select the role in the project’s domain or the role in other domains with shared status, and the role has bound permissions.

-
If there are no users and roles that meet the requirements at the moment, click the “Skip” button directly and add the users to the project after the users and roles are created later.
Create users
This function is used to synchronize enterprise users to the OneCloud platform. Create user only supports local users for new sql sources. And single and batch user creation is supported.
Description
User source.
- Enable automatic user creation when creating a new identity provider.
- Create LDAP identity provider will sync users from LDAP server to OneCloud platform.
- Create local user for sql source as required.
Create Local User
This function is used to create a new local user for sql source.
-
In the cloud management platform, click on the top left corner of
navigation menu, and click " IAM & Security/IAM/User" menu item in the left menu bar that pops up to enter the user page.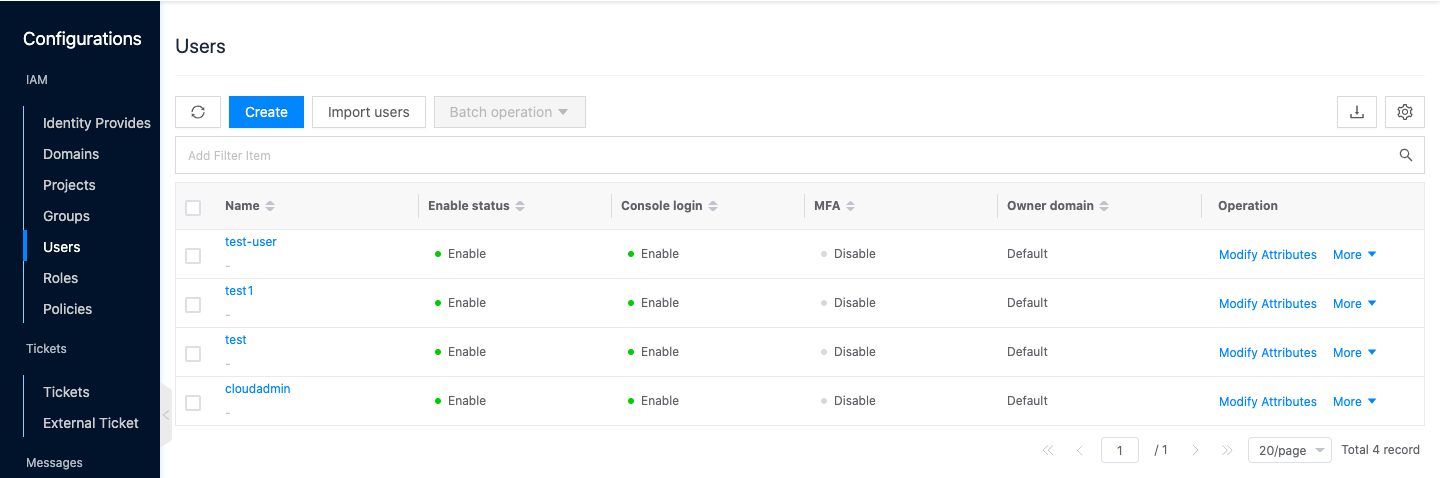
-
Click the “Create” button at the top of the list to enter the Create User page.
-
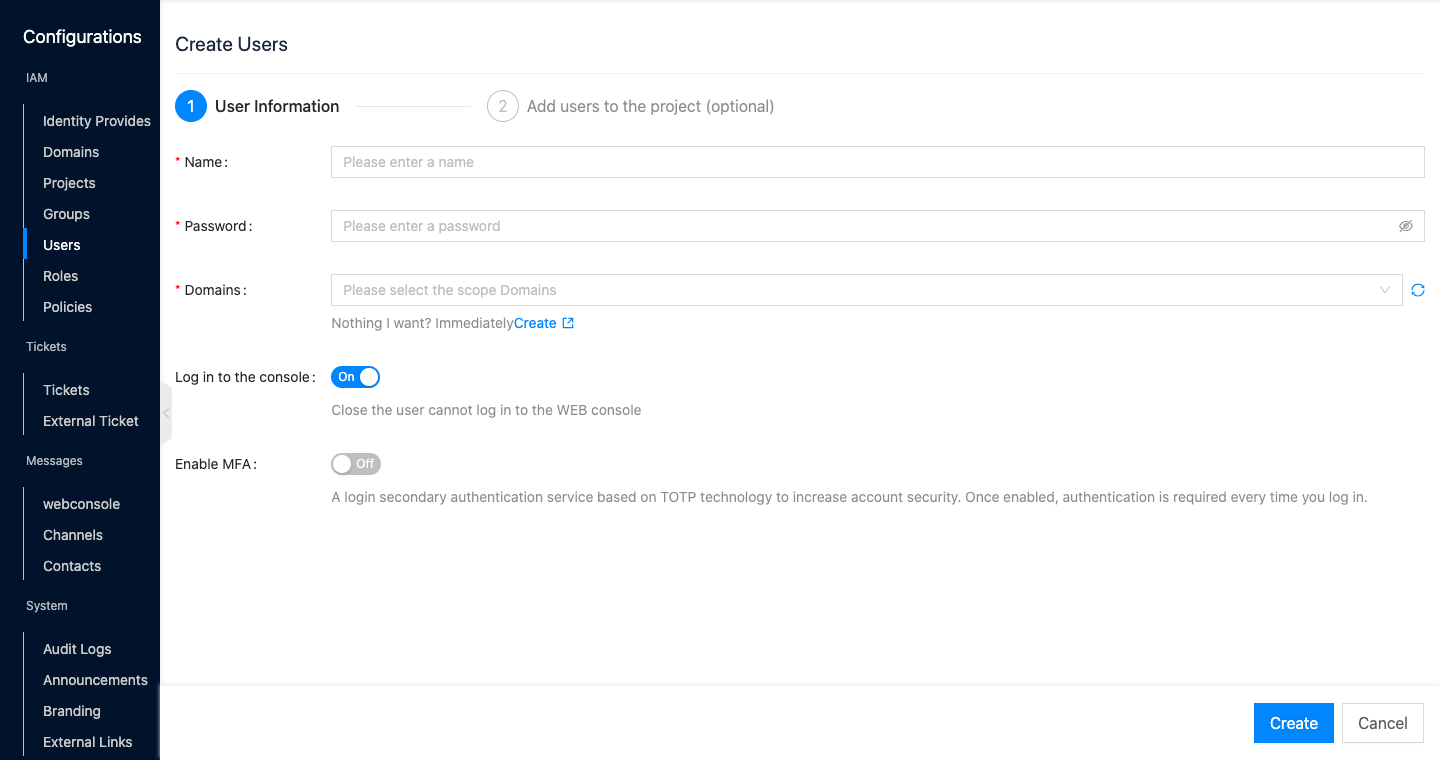
Configure the following information.
- Name: The name of the user.
- Password: The password of the user.
- Domain: Select the domain to which the user belongs.
- Login Console: Set whether the user has the permission to login to the cloud management platform.
- Enable MFA: Multi-Factor Authentication, a multi-factor authentication based on TOTP technology, users need to pass two types of authentication to log in to the OneCloud platform. That is, in addition to user name and password, you also need to use MFA security code to verify login. Please ensure that two-factor authentication is enabled in the global configuration, otherwise MFA cannot be enabled at the user.
-
Click the “OK” button to go to the Add user to project (optional) page.
-
If there are already projects and roles that meet the requirements on the platform, you can directly add the user to the project. Configure the following parameters.
- Project (optional): Select the domain and project that the user needs to join. If the user belongs to default domain, only projects under the default domain can be joined, if the user does not belong to the default domain, projects under the user’s domain and the default domain can be joined.
- Role (optional): Set the role of the user when joining the project, different roles have different permissions.
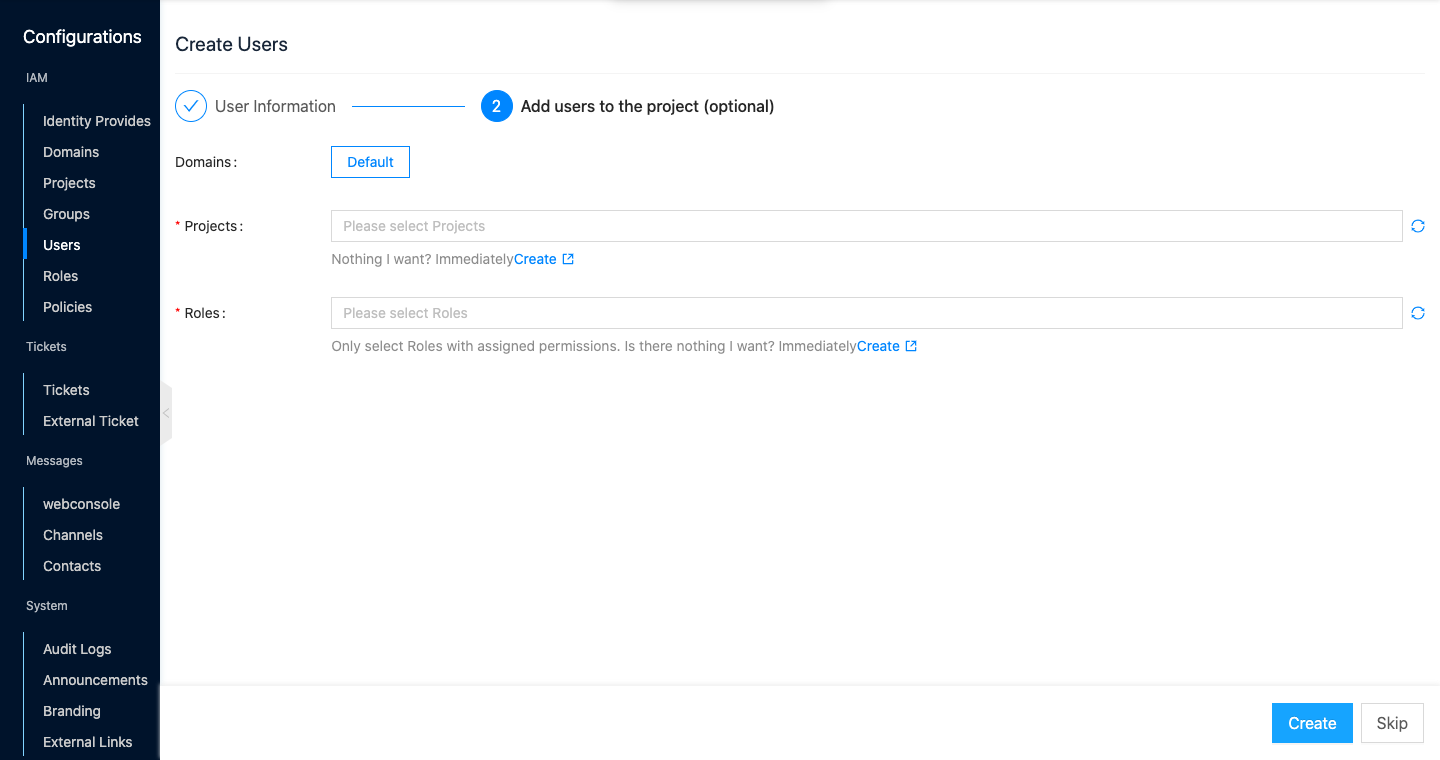
-
If there are no projects and roles that meet your needs at the moment, click the “Skip” button directly and add the users to the project after the projects and roles are created later.
Importing local users
-
In the cloud management platform, click on the top left corner of
navigation menu, and click " IAM & Security/IAM/Users" menu item in the left menu bar that pops up to enter the users page. -
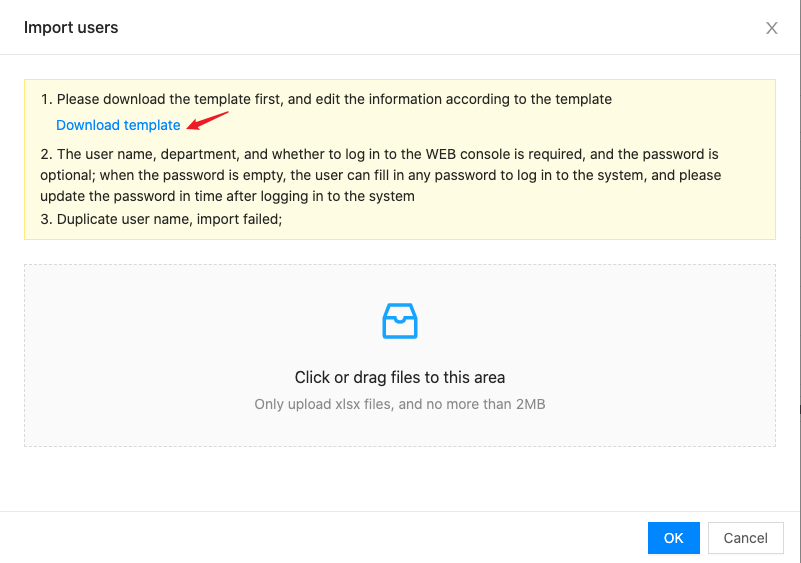
Click the “Import Users” button at the top of the list to bring up the Import Users dialog box.
-
Click the “Download Template” hyperlink and add user information to the downloaded user_template.xlsx file, all user information should be added to one sheet page.

-
After the supplementation is finished, drag the template file to the dashed area of the dialog box and click the “OK” button to import users in batch.
Add the user to the project
The OneCloud platform supports two ways to add users to a project.
- In the user page, add a project for the user; this action can add multiple projects for the user.
- In the project page, add users to a project; this action allows you to add users with the same role permissions to a project in batch.
The administrator can choose the way to add users to the project according to the actual needs.
Users to join projects
With three levels of privileges enabled, users under non-default domains can join the default domain and the user’s domain.
-
In the cloud management platform, click on the top left corner of
navigation menu, and click " IAM & Security/IAM/Users" menu item in the left menu bar that pops up to enter the users page.
-
On the user page, click the “More” button in the action bar to the right of the user, and select the “Manage Projects” menu item to enter the Details - Added Projects page.
-
Click the “Join Project” button at the top of the list to bring up the Join Project dialog box.
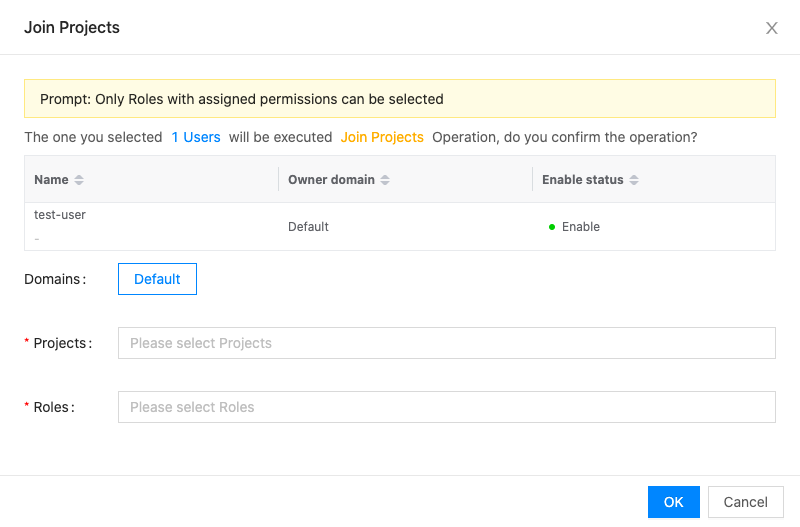
-
Select the domain, project, role, and click the “OK” button to add the user to the project with the specified role.
Adding users to a project
-
In the cloud management platform, click on the top left corner of
navigation menu, and click " IAM & Security/IAM/Projects" menu item in the left menu bar that pops up to enter the project page.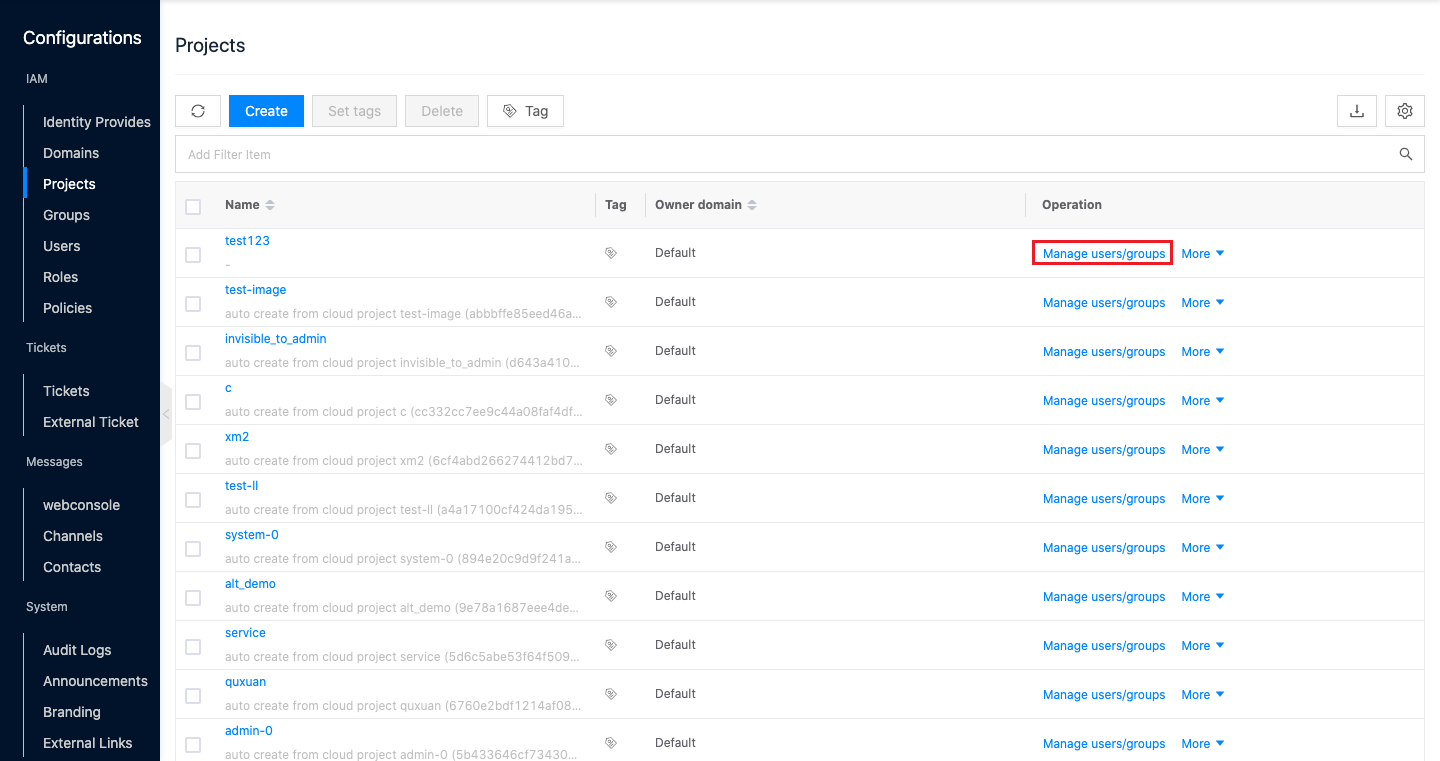
-
Click the “Manage users/groups” button in the action bar on the right side of the project to enter the joined users/groups page.
-
Click the “Add” button at the top of the list to bring up the Add dialog box.

-
Configure the following parameters.
- Type: Select user or group.
- User/Group: Select the user or group in the domain where the project is located. If the project belongs to the default domain, the user can select the users in all domains in the system.
- Role: Select the role in the domain where the project is located or the role with shared status in other domains, and the role has bound permissions.
-
Click the “OK” button to complete the operation.
User Login
User-associated dingtalk accounts
When adding users to the project, users can log in to the OneCloud platform with their username and password. If users want to log in to the platform via Dingtalk, they need to associate the user with the Dingtalk identity provider first.
-
On the cloud management platform login page, login to the platform via username and password.
-
Click the top right corner of
 icon and select the drop-down menu “User Profile” menu item to enter the user information page.
-
In the external account association, click the “Associate” button, and in the page that opens, use the user’s personal Dingtalk client to scan the QR code and authorize login to connect the local user with the Dingtalk account.

Dingtalk SSO login
-
On the Cloud Management Platform login page, click External Ticket Login
 icon to jump to the Dingtalk QR code login page.
-
Scan the QR code and authorize login with your personal Dingtalk client to log in to the OneCloud platform.