RDS Instances
RDS instance is a virtualized relational database server. Users can create or manage multiple databases in an RDS instance. Currently, the OneCloud platform already supports managing and creating RDS instances for Alibaba Cloud, Huawei Cloud, Tencent Cloud, Google Cloud and HCSO, and syncing AWS, Azure, JD Cloud and Tencent Cloud TDSQL. Other platforms are being supported in succession.
Using process
- Create RDS instances of Alibaba Cloud, Huawei Cloud, Tencent Cloud, Google Cloud and HCSO on OneCloud platform, please see Create RDS Instance.
- Create a database in the instance, please see Create Database.
- Create an account and grant privileges in the instance, please see Create Account.
- You can use the database tool to connect remotely to use the database.
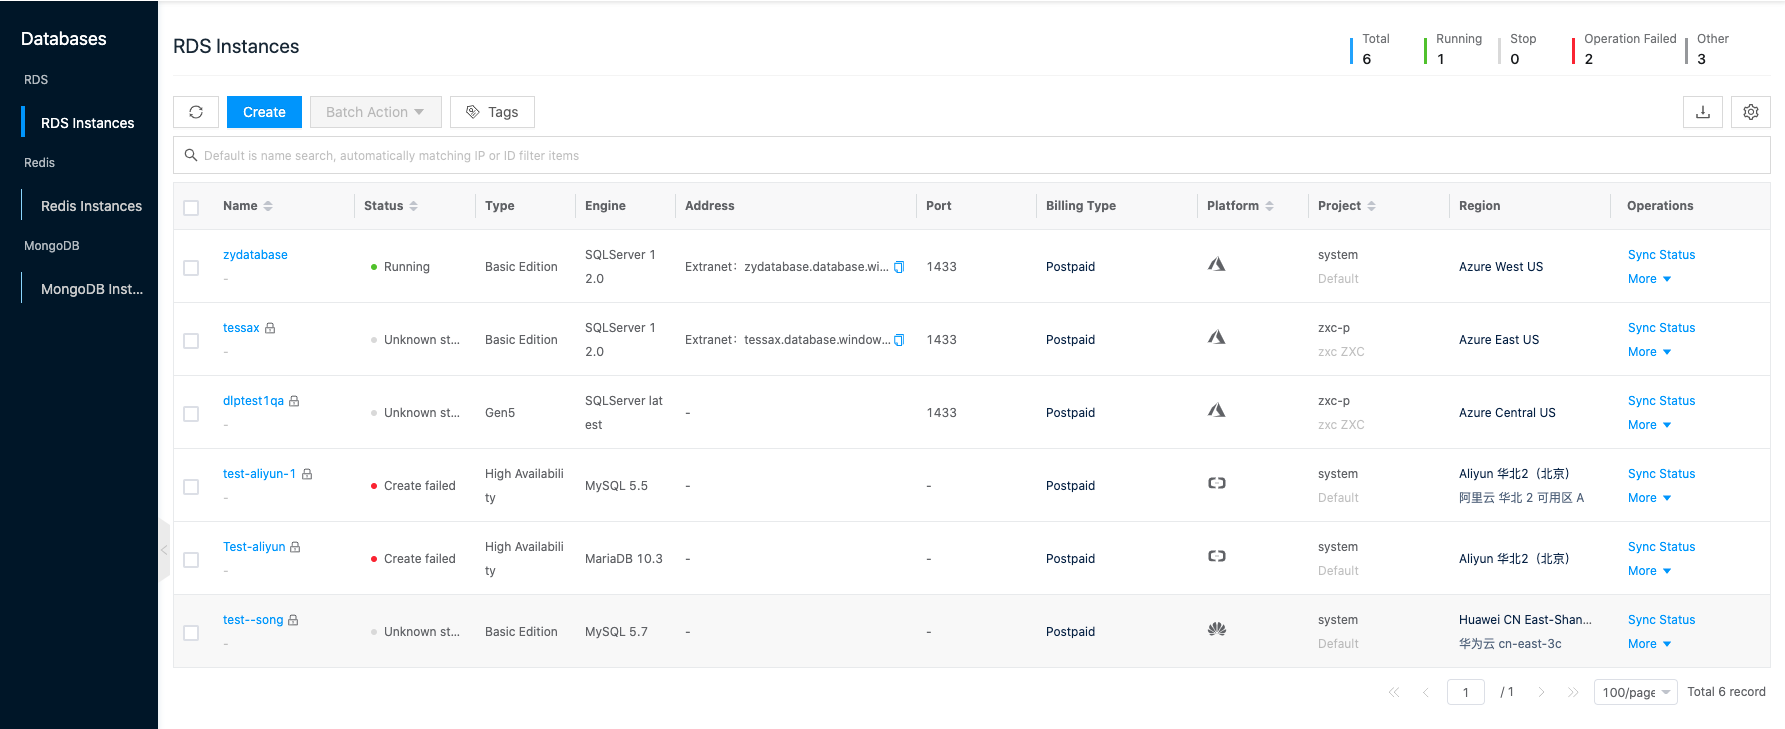
Entry: In the cloud management platform, click the top left corner of  navigation menu, and click “Database/RDS/RDS Instances” menu item in the left menu bar that pops up to enter the RDS instance page.
-
The top right of the list will show the total number of RDS and the number of RDS that are running, shutdown, operation failed, and unknown.

Create RDS instance
This function is used to create a new RDS instance, currently it only supports creating RDS instances of Alibaba Cloud, Huawei Cloud and Google.
- On the RDS Instance page, click the “Create” button at the top of the list to enter the Create RDS Instance page.
- Configure the following information.
- Name: The name of the RDS instance.
Note
Google Cloud Platform cannot reuse the name of the RDS instance for a week after the instance is deleted.
- Specify Project: Specify the project to which the RDS instance belongs when creating a new RDS instance.
- Billing methods: Including pay per volume, prepaid packages. Google Cloud RDS does not support prepaid subscriptions.
- Postpaid: Pay per actual usage of the RDS instance, this model is suitable for scenarios where the demand for devices will increase dramatically in an instant, and the price is more expensive than annual monthly subscriptions.
- This model is suitable for scenarios where the demand for the device is relatively stable, and the price is cheaper than the postpaid model. You also need to set the purchase length after choosing the yearly package.
- Release at expiration: Set the length of time that a newly created RDS instance will be used, and any RDS instance that exceeds the set time will be deleted. Only pay-per-use RDS instances support expiration release.
- Platform and Region: Select the region where the RDS instance is located, and select the platform and zone in the corresponding region. Please see the actual interface as the platform supported by different geographies may be different.
- Database engine, database version: Different platforms support different database engines and versions. Please see [Database engine and version support](# Database engine and version support) for current support.
- Instance type + zone: Currently, it mainly includes three types of instances.
- Standalone (basic version): Only one instance is created and zones are selected for the instance.
- Primary Standby (High Availability, Cluster Edition): Create a primary instance and a standby instance, and select zones for the primary and standby instances. To improve the reliability of the primary and standby instances, it is recommended to distribute the primary and standby instances in different zones. The zone option will display the names of two zones by default. If Alibaba Cloud platform only displays one zone, it means that the primary and standby instances are in the same zone; if the names of two zones in Huawei cloud platform are the same, it also means that the primary and standby instances are in the same zone.
- Financial version (only supported by Alibaba Cloud): Create one primary instance and two backup instances, and they are in three different zones in the same city.
- Instance type (Google Cloud): Only second-generation RDS instances are supported to be created. First-generation RDS instances are only supported for synchronization and are not supported to be created.
- Availability Zone (Google Cloud): Select the zone to which the RDS instance belongs.
- CPU, Memory, instance specifications: Select the instance specifications according to the selected CPU, Memory, etc.
- Storage space: The storage space required for the RDS instance.
- Administrator password (supported by Huawei Cloud only): Support randomly generated and manually entered administrator password.
- Network: Select VPC and IP subnet.
- Security Group: Select the security group to restrict the security access rules of the instance, supported by Huawei Cloud and Tencent Cloud only.
- Name: The name of the RDS instance.
- Click the “OK” button.
Sync Status
This function is used to get the current status of the RDS instance.
Sync Status
- On the RDS instance page, click the “Sync Status” button on the right action bar of the RDS instance to synchronize the RDS instance status.
Batch Sync Status
- Select one or more RDS instances in the RDS Instances list, click the “Batch Operation” button at the top of the list, and select the drop-down menu “Sync Status” menu item to batch synchronize the RDS instance status.
Restart
This function is used to restart RDS instance, restarting RDS instance will cBatch Action interruption, please operate with caution.
RDS Instance Restart
- On the RDS instance page, click the “More” button on the right action bar of the RDS instance, select the drop-down menu “Restart” menu item to bring up the action confirmation dialog.
- Click the “OK” button to complete the operation.
Batch Restart.
- Select one or more RDS instances in the RDS Instances list, click the**_“Batch Operation”_** button at the top of the list, select the drop-down menu **_“Restart”_** menu item, and the operation confirmation dialog box will pop up.
- Click the “OK” button to complete the operation.
Adjust Configuration
Batch Action This function is used to adjust the configuration information of the RDS instance, and the instance configuration can only be adjusted upward.
- On the RDS instance page, click the “More” button on the right action bar of the RDS instance, and select the drop-down menu “Adjust Configuration” menu item to bring up the Adjust Configuration dialog box.
- Support adjusting storage type, CPU, Memory, storage space and other parameters.
- When the configuration adjustment is finished, click “OK” button.
Associated Security Groups
A security group is a virtual packet filtering firewall that controls the access rules of RDS instances, etc. by setting security group rules. Only the RDS instances on Tencent Cloud Platform support association security groups.
- On the RDS instance page, click the “More” button on the right column of the RDS instance, and select the drop-down menu “Associate Security Group” menu item to bring up the Associate Security Group dialog box.
- You can associate or unassociate security groups in the Associated Security Groups dialog box.
- Associated Security Groups: Select the security groups to be bound, up to 5 groups are supported. If there is no security group that meets the requirements, you can click the “Create Security Group” hyperlink, configure the relevant parameters in the Create Security Group pop-up page, and click the “OK” button to create a security group.
- Unassociate security groups: Deselect security groups and keep at least one security group. Click the “OK” button to complete the operation.
Change Project
This function is used to change the item to which the RDS instance belongs.
- On the RDS instance page, click the “More” button on the right action bar of the RDS instance, and select the drop-down menu “Change Project” menu item to bring up the Modify Project dialog box.
- Select the domain and project, click “OK” button to complete the operation.
Auto delete after
Release by expiration means to set the usage time of RDS instance, when the set period is exceeded, the RDS instance will be deleted automatically.
- On the RDS Instance page, click the “More” button on the right-hand column of the RDS instance, and select the drop-down menu “Auto delete after” menu item to bring up the Auto delete after dialog box.
- Select whether to check the due date release, set the release time after checking, and click the “OK” button.
- Click the Release Time input box to display the calendar and other contents. Support entering the date and time directly in the Release Time input box in the format of yyyy-mm-dd hh:mm:ss, and click the “OK” button.
- Select the date in the calendar box, click the Select Time button, it will jump to the Set Time page, select the time and click the “OK” button.
- Support quick selection of “1 hour”, “2 hours”, “3 hours”, “6 hours “1 day”, “2 days”, “1 week” button, the release time will be set to the corresponding time range, click “OK” button.
- After the setting is completed, the billing method column will display information such as how much time is left for the RDS instance to be released.
- If you no longer need the expiration release function, you can uncheck the expiration release in the expiration release dialog box that pops up before the release, and click the “OK” button.
Renewal
This function is used to perform the renewal operation for RDS instances with prepaid subscriptions.
- On the RDS instance page, click the “More” button on the right action bar of the RDS instance, select the drop-down menu “Renewal” menu item to bring up the renewal dialog.
- Select the renewal length and click “OK” button to complete the renewal operation.
Expired release Setting
This function is used to perform auto-renewal operation for RDS instances with prepaid subscriptions.
Description
The renewal period is one week for Servers purchased on a weekly basis, one month for Servers purchased on a monthly basis, and one year for Servers purchased on an annual basis on the Alibaba Cloud platform; the renewal period is one month for all other platforms. Subsequent Servers are automatically renewed before each expiration.
- On the RDS instance page, click the “More” button on the right action bar of the RDS instance, and select the drop-down menu “Automatic renewal settings” menu item to bring up the Automatic renewal settings dialog box.
- Expired release: Check Expired release and click “OK” button to set Expired release.
- Cancel Expired release: Uncheck Expired release and click “OK” button to cancel the auto-renewal.
Delete-Lock Setting
This function is used to set the deletion protection for RDS instances. RDS instance cannot be deleted when deletion protection is enabled for RDS instance; RDS instance can only be deleted when deletion protection is disabled for RDS instance.
RDS Instance Delete-Lock Setting
- To disable delete protection.
- Click on the RDS instance name with
 icon to the right of the RDS instance, click the “More” button in the action bar to the right of the RDS instance, and select the drop-down menu “Delete-Lock Setting” menu item to bring up the Delete-Lock Setting dialog box.
 - Select “Disable” delete protection and click the “OK” button.
- Click on the RDS instance name with
- Enable Delete Protection.
- When the right side of the RDS instance name is not marked with icon, click the “More” button in the action bar on the right side of the RDS instance and select the drop-down menu “Delete-Lock Setting” menu item to bring up the Delete-Lock Setting dialog box.
- Select “Enable” delete protection, and click “OK” button.
- When the right side of the RDS instance name is not marked with
Batch Delete-Lock Setting
- Disable Delete Protection.
- Check one or more RDS instances in the RDS Instances list, click the “Batch Operation” button at the top of the list, select the drop-down menu “Delete-Lock Setting” menu item to bring up the Delete-Lock Setting dialog box.
- Select “Disable” delete protection and click the “OK” button to disable delete protection for RDS instances in bulk.
- Enable Delete Protection.
- Check one or more RDS instances in the RDS Instance list, click the “Batch Operation” button at the top of the list, and select the drop-down menu “Delete-Lock Setting” menu item to bring up the Delete-Lock Setting dialog box.
- Select “Enable” delete protection and click the “OK” button to enabBatch Actionction for RDS instances in bulk.
Delete
Batch Action
This function is used to delete RDS instances when the RDS instance name item has a icon on the right side of the RDS instance name item, it means that the RDS instance is enabled with deletion protection, and the RDS instance cannot be deleted.
delete
- On the RDS instance page, click the “More” button in the operation column on the right side of the RDS instance, and select the drop-down menu “Delete” menu item to bring up the operation confirmation dialog.
- Click the “OK” button to complete the operation.
Batch Delete
- Select one or more RDS instances in the RDS Instances list, click the “Batch Action” button at the top of the list, select the drop-down menu “Delete” menu item, and the operation confirmation dialog box will pop up.
- Click the “OK” button to complete the operation.
View RDS Instance Details
This function is used to view RDS instance details information.
- On the RDS Instance page, click the RDS Instance Name item to enter the RDS Instance Details page.
- View the following information.
- Basic Information: Including Cloud ID, ID, name, status, domain, project, platform, billing method, region, zone (if there is a backup zone, it will also be displayed here), cloud account, created at, updated at, and description.
- Database Information:: Including database engine, maintainable time period, instance specification, maximum IOPS, instance type, storage type, CPU, memory.
- Link Information:: Including open external network address (only supported by Alibaba Cloud), external network address (only supported by Alibaba Cloud), internal network address, database port number, VPC, subnet, security group.
- Open external network address is only supported by Alibaba Cloud RDS instance, after opening, you need to wait for a minute all before opening successfully, after opening successfully, users can connect to the database through the external network address and port after.
- Storage/backup statistics: Including storage space.
- Other Information: Support to turn on or off the deletion protection.
Account Management
Supports creating multiple accounts for RDS instances and assigning different permissions, so as to manage RDS instances more flexibly.
- Huawei Cloud’s RDS instance will create root user by default after successful creation, and the root user has all the permissions of all databases under the instance, and cannot delete or modify them.
- Alibaba Cloud currently only supports creating users with normal privileges, and does not support creating users with root privileges on the OneCloud platform.
- Google Cloud currently only supports creating users with root privileges.
Create account
This function is used to create a new database account with support for setting permissions.
Note
- Alibaba Cloud does not support creating accounts with special names such as test, root, etc.
- Google Cloud RDS accounts do not support authorization databases.
- On the RDS instance page, click the RDS instance name item to enter the RDS details page.
- On the RDS Instance page, click the RDS Instance Name item to enter the RDS Instance Details page. Click the Account tab to enter the Account page. Click the “Create” button at the top of the list to bring up the Create Account dialog box.
- Set the following parameters.
- Name: The name of the account.
- Host: Specify the host address to access the database, support IP form, also support filling in % (means no IP range restriction); multiple host addresses are separated by separators, the separators support line breaks, spaces and ; , |. Only Tencent Cloud supports this.
- Database: Grant permission to one or more databases for this account. You can leave it blank, create an account and then grant database privileges to the account through the Modify Privileges function.
- Select one or more databases in the unauthorized databases, click
 icon to add to the authorized database.
 - In the authorized database, set the read/write or read-only permission of the account to the database.
- Select one or more databases in the unauthorized databases, click
- Password: Support randomly generated and manually entered password.
- Click the “OK” button to create the database account.
Reset Password
This function is used to reset the database account password. Huawei Cloud RDS instance accounts do not support password reset operations. The account information synchronized from the public cloud platform does not display the password information in the password column of the list, and when the user forgets the password, he or she can reset the password through this function.
- On the RDS instance page, click the name of the RDS instance to enter the RDS instance details page. Click the Account tab to enter the Account page. Click the “Reset Password” button on the right side of the account to bring up the Reset Password dialog box.
- Set the account password as randomly generated or manually entered, if you choose manually entered, you need to enter a new password.
- When the setting is finished, click “OK” button.
Delete Account
This function is used to delete accounts. The root accounts of Huawei Cloud and Tencent Cloud Platform RDS instances do not support deletion.
- On the RDS instance page, click the name of the RDS instance to enter the RDS instance details page. Click the “Account” tab to enter the account page. Click the “Delete” button on the right side of the account to bring up the operation confirmation dialog box. Click the “OK” button to complete the operation.
Modify Permissions
This function is used to modify the database associated with the account and the database permissions. Google Cloud RDS account does not support modifying permissions.
- On the RDS instance page, click the name of the RDS instance to enter the RDS instance details page. Click the “Account” tab to enter the account page. Click the “Modify Permissions” button on the right side of the account to bring up the Modify Permissions dialog box. Click the “OK” button to complete the operation.
View account operation log
This function is used to view the detailed error reason through the operation log after the account creation fails.
- On the RDS instance page, click the RDS instance name item to enter the RDS instance details page.
Click the Account tab to enter the Account page.
Click the Account Name item to enter the Account Operation Log page.
- Load More Logs: In the Operation Logs page, the list shows 20 operation logs by default. To view more operation logs, please click the “Load More” button to get more logs.
- View Log Details: Click the “View” button on the right column of the operation log to view the log details. Copy details are supported.
- View logs of specified time period: If you want to view the operation logs of a certain time period, set the specific date in the start date and end date at the top right of the list to query the log information of the specified time period.
- Export logs: Currently, only the logs displayed on this page are supported to be exported. Click the upper-right corner of
 icon, set the export data column in the pop-up Export Data dialog box, and click the “OK” button to export the logs.
Database Management
A database is a collection of data that is stored together in some way, can be shared with multiple users, has as little redundancy as possible, and is independent of the application.
Create Database
This function is used to create a database.
Note
- Alibaba Cloud does not support creating databases with the name test.
- Google Cloud RDS does not support setting up accounts for databases.
- Tencent Cloud does not support creating a new database in the interface, you need to log in to the RDS instance to manage the database operation.
- On the RDS instance page, click the name of the RDS instance to enter the RDS instance details page. Click the Database Management tab to enter the Database Management page. Click the “Create” button at the top of the list to bring up the Create Database dialog box.
- Set the following parameters.
- Database Name: Set the database name, the database name must be unique within the instance.
- Character set: Character set is the set of letters and symbols in the database, and their encoding rules.
- Account: Select the authorized account to access the database.
- Select one or more accounts among the unauthorized accounts and click icon to add to the authorized accounts.
- In the authorized accounts, set the account’s read-write or read-only permissions to the database.
- Select one or more accounts among the unauthorized accounts and click
- Click the “OK” button to complete the operation.
Delete Database
This function is used to delete a database.
- On the RDS instance page, click the name of the RDS instance to enter the RDS instance details page. Click the Database Management tab to enter the Database Management page. Click the “Delete” button on the right column of the database to bring up the operation confirmation dialog box. Click the “OK” button to complete the operation.
View Database Operation Log
This function is used to view the operation log of the database. When the database creation fails, you can view the detailed error reason through the operation log.
- On the RDS instance page, click the name of the RDS instance to enter the RDS instance details page. Click the Database Management tab to enter the Database Management page. Click the Database Name item to enter the Database Operation Log page. Click the “View” button in the Remarks column to view the details in the pop-up dialog box, and the details support copy operation.
Backup Management
In order to protect data security and improve system reliability, RDS supports backup restore operation to backup database data, when data is damaged or lost, users can use backup to restore data.
Create Backup
This function is used to create backups for RDS instances.
- On the RDS instance page, click the RDS instance name item to enter the RDS instance details page. Click the “Backup Management” tab to enter the Backup Management page. Click the “Create” button at the top of the list to bring up the Create Backup dialog box.
- Enter the backup name and description, and click the “OK” button to create a backup for the RDS instance.
Restore Backup
This function is used to restore the RDS instance to the state it was in when the backup was created.
Note
- Alibaba Cloud, Huawei Cloud and HCSO currently only supports restoring backups to new instances.
- Tencent Cloud RDS does not support restoring backups at this time.
- Google Cloud RDS only supports restoring backups to the current instance.
- On the RDS instance page, click the RDS instance name item to enter the RDS instance details page. Click the Backup Management tab to enter the Backup page. Click the “Restore” button on the right column of the RDS instance backup to bring up the Restore dialog box.
- Select the recovery method.
- Current Instance: When the current instance is selected, the current instance will be restored to the state at the time of backup, and the data modification of the instance after backup will be lost.
- Existing Instance: When you select Existing Instance, you need to select an instance with the same or higher version of the database engine, and the storage space of the selected existing instance is larger than the storage space of the current backup instance. The data before the existing instance will be lost.
- Create Instance: When you select a new instance, set the new instance name and a new RDS instance with the same configuration will be created based on the backup file.
- Click the “OK” button to complete the operation.
Sync Status
This function is used to synchronize the status information of the backup file.
- On the RDS instance page, click the RDS instance name item to enter the RDS instance details page.
- Click the Backup Management tab to enter the Backup page. Click the “Sync Status” button on the right column of the RDS instance backup to synchronize the status information of the backup file.
Delete Backup
This function is used to delete a backup.
Note
Alibaba Cloud does not support deleting backups at the moment.
- On the RDS instance page, click the name of the RDS instance to enter the RDS instance details page. Click the “Backup List” tab to enter the backup management page. Click the “Delete” button on the right column of the RDS instance backup to bring up the action confirmation dialog.
- Click the “OK” button to complete the operation.
View RDS Instance Monitor
This function is used to view the monitoring data of the RDS instance.
- On the RDS Instance page, click the RDS Instance Name item to enter the RDS Instance Details page. Click the Monitoring tab to enter the Monitoring page.
- View the following monitoring information.
- Support to view the performance monitoring information of last 1 hour, last 1 day, last 1 week, last 1 month, last 3 months, last 6 months, and support to set the time granularity, the size of time granularity is related to the length of view.
- The monitoring metrics supported for viewing are listed in the table below.
| Platform | Supported metric items to view |
|---|---|
| Alibaba Cloud | CPU usage, Memory usage, disk usage, MySql network incoming traffic, MySql network outgoing traffic, SQLServer network incoming traffic, SQLServer network outgoing traffic, total number of database connections |
| Huawei Cloud | CPU usage, Memory usage, Disk usage, Mysql network inbound traffic,Mysql network outbound traffic, SQL Server network inbound traffic, SQL Server network outbound traffic, total database connections |
| HCSO | CPU usage, Memory usage, Disk usage, Mysql network inbound traffic,Mysql network outbound traffic, SQL Server network inbound traffic, SQL Server network outbound traffic, total database connections |
| Tencent Cloud | CPU usage, Memory usage, Disk usage, Mysql network inbound traffic,Mysql network outbound traffic, SQL Server network inbound traffic, SQL Server network outbound traffic, total database connections |
| JD Cloud | CPU usage, Memory usage, Disk usage, Mysql network inbound traffic,Mysql network outbound traffic, SQL Server network inbound traffic, SQL Server network outbound traffic, total database connections |
| Azure | CPU usage, Disk I/O usage, Disk usage, Valid Connection Count, Failed connection Count |
View RDS Instance Operation Log
This function is used to view the log information of RDS instance related operations.
- On the RDS instance page, click the name of the RDS instance to enter the RDS instance details page.
- Click the Operation Log tab to enter the Operation Log page.
- Load More Logs: In the Operation Logs page, the list shows 20 operation logs by default. To view more operation logs, please click the “Load More” button to get more logs.
- View Log Details: Click the “View” button on the right column of the operation log to view the log details. Copy details are supported.
- View logs of specified time period: If you want to view the operation logs of a certain time period, set the specific date in the start date and end date at the top right of the list to query the log information of the specified time period.
- Export logs: Currently, only the logs displayed on this page are supported to be exported. Click the upper-right corner of icon, set the export data column in the pop-up Export Data dialog box, and click the “OK” button to export the logs
Reference
Database engine and version support
| Database Engine | Alibaba Cloud | Huawei Cloud | Tencent Cloud | Google Cloud | AWS | Azure | JD Cloud | HCSO |
|---|---|---|---|---|---|---|---|---|
| Mariadb | 10.3 | N | 10.1.9(TDSQL) | N | N | 10.2, 10.3, 10.4, 10.5 | 10.2, 10.3 | 10.2 |
| Mysql | 5.5, 5.6, 5.7, 8.0 | 5.5, 5.6 | 5.5, 5.6, 5.7, 8.0, 8.0.18(TDSQL) | 5.6, 5.7 | 5.6, 5.7, 8.0 | 5.6, 5.7, 8.0 | 5.6, 5.7, 8.0 | 5.6, 5.7, 8.0 |
| PPAS | 9.3, 10.0 | N | N | N | N | N | N | N |
| SQL Server | 2008 R2 Enterprise Edition, 2012 Enterprise Edition/Standard Edition/web Edition, 2016 Enterprise Edition/Standard Edition/web Edition, 2017 Enterprise Edition/Standard Edition/web Edition | 2008 R2 Enterprise Edition/web Edition, 2012 Enterprise Edition/Standard Edition/web Edition, 2014 Enterprise Edition/Standard Edition/web Edition, 2016 Enterprise/Standard/web Edition, 2017 Enterprise/Standard/web Edition | N | 2017 Enterprise, 2017 Express, 2017 Standard, 2017 Web | 2012 Enterprise Edition/Standard Edition/web Edition/Express Edition, 2016 Enterprise Edition/Standard Edition/web Edition/Express Edition, 2017 Enterprise Edition/Standard Edition/web Edition/Express Edition, 2019 Enterprise Edition/Standard Edition/web Edition/Express Edition | Y | 2008R2 Enterprise Edition/Standard Edition/web Edition, 2012 Enterprise Edition/Standard Edition/web Edition, 2014 Enterprise Edition/Standard Edition/web Edition, 2016 Enterprise Edition/Standard Edition/web Edition, 2017 Enterprise Edition/Standard Edition/web Edition | N |
| PostgreSQL | N | 9.5, 9.6, 10, 11, Enhanced | N | 9.6, 10, 11 | 9.6, 10, 11, 12, 13 | 9.5, 9.6, 10, 11 | 9.6, 10, 11, 12, 13 | N |
| percona | N | N | 5.7.17(TDSQL) | N | N | N | 5.7 | N |