Accounts
The cloud management platform establishes connections with different platforms through cloud accounts, and synchronizes resources on the platforms to the cloud management platform for management. The cloud resources corresponding to an account belong to a domain, and the resources in different domains are isolated, and the cloud account resources can be used by other domains through the sharing function. When the system is not enabled with three-level permission, all cloud resources belong to default domain by default.
The current OneCloud platforms that support nano-management are as follows
- Public cloud: Alibaba Cloud (public and financial clouds), Azure, Tencent cloud, AWS, Huawei cloud, UCloud, Google cloud, eCloud cloud, etc. More cloud platforms will be supported to meet the needs of users.
- Private clouds: VMware, ZStack, DStack, OpenStack, Apsara Private Cloud, etc..
Public cloud platform bill collection rules.
- Only Alibaba Cloud, AWS, Azure, Huawei cloud, Google support configuring bill file access information to collect bills, and Tencent cloud can collect bill information through API.
- When users configure or modify the bill file information, the bill of the current month will be collected, for example: If the bill file access information is configured on the 3rd, the bill files of the 1st~2nd will be collected; if the bill file access information is configured on the 30th, the bill files of the 1st~29th will be collected; if the bill file access information is configured on the 1st, the bill of the 1st~31st of the previous month will be collected.
- When the bill triggers multiple collections, the last collection result will prevail.
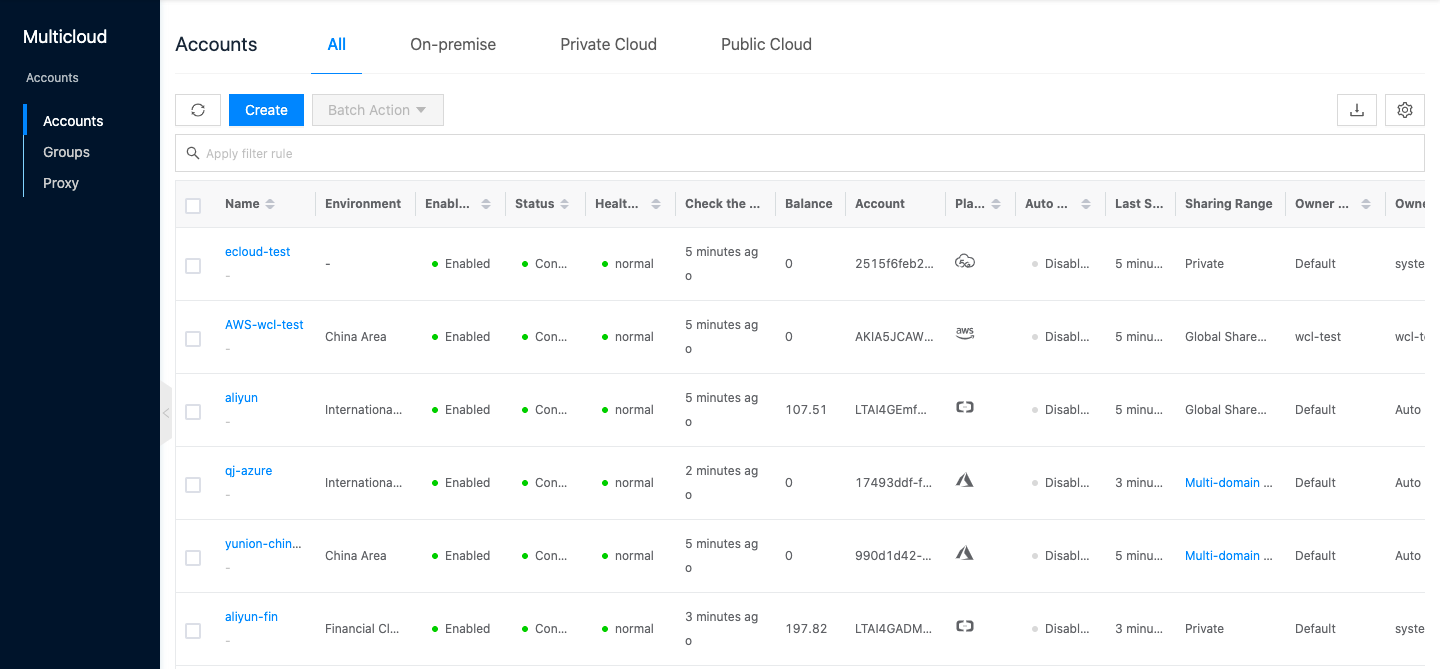
Entry: In the cloud management platform, click the top left corner of  navigation menu, and click “Multicloud/Accounts/Accounts” menu item in the left menu bar that pops up to enter the cloud account page.
Create Cloud Account
Description
- To manage the public cloud platform on the OneCloud platform, at least the cloud account is required to have administrative privileges for the resources it operates. It is recommended that the cloud account be granted administrative privileges for all features of the platform.
- The added cloud account does not support changing the domain. If users need to synchronize the resources on the cloud account to other domains, they can delete the cloud account on OneCloud and re-add the cloud account to the specified domain. The delete cloud account operation on OneCloud platform only cancels the nano-managed cloud account resources and does not affect the resources on the cloud account.
Create Alibaba Cloud account
- Click the “Create” button at the top of the list on the cloud account page to enter the new cloud account page.
- Select the cloud platform as Alibaba Cloud, click “Next: Configure Cloud Account” button, and enter the Configure Accounts page.
- Set the following parameters.
- Name: The name of the Alibaba Cloud account.
- Account type: Alibaba Cloud account that currently supports managing public cloud and financial cloud.
- Access Key ID/Access Key Secret: Docking to Alibaba Cloud platform through Access Key authentication method, Access Key consists of Access Key ID and Access Key Secret. Please see How to get Alibaba cloud account related parameters?.
- Domain: Select the domain to which the cloud account belongs. When the cloud account is private, all project users under the domain can use the cloud account to create resources.
- Owner Projects: Select the local project that synchronizes the resources on the cloud account to the OneCloud platform. If you want to categorize the resources on the cloud account according to the projects on the cloud, please specify the default resource attribution project first and check the box to create the project automatically. After checking the box, a local project with the same name as the project on the cloud will be created in the OneCloud platform and the resources will be synchronized to the corresponding project. Resources without project attribution on the cloud will be synchronized to the default resource attribution project.
- Proxy: Set this item when the cloud account needs a proxy to access normally, leave it blank for direct connection. If there is no suitable proxy, click “Create” hyperlink directly and set relevant parameters in the pop-up Create Proxy dialog box to create a proxy.
- Enable SSO Login: After enabling this item, it will automatically synchronize the system’s SAML information to the cloud account and become the identity provider for login on the cloud. Realize single sign-on to the public cloud platform through this system.
- Auto sync: Set whether to automatically synchronize the information on Alibaba Cloud platform, and set the time of auto-sync.
- Sharing range: Set the sharing range of the cloud account. If the default is no sharing, only the domain where the cloud account is located can use the account, if set to global sharing, all users on the platform can use the cloud account to create resources.
- Click the “Connection Test” button to test whether the input parameters are correct.
- After successful test, click “OK” button to create Alibaba Cloud account. And go to the Billing File Access Information page to configure the billing parameters of the cloud account so that users can view the billing information of the cloud account in the fees.
- The Billing File Access Information page is optional, if you do not need to view the cloud account billing information in
OneCloud
platform, you can directly click the Skip button. If you need to view billing information etc. in
OneCloud
platform, please configure relevant parameters, and click “OK” button after the configuration is done and the test is passed.
Note
If the added Alibaba Cloud account is a new account, please open the OSS service on Alibaba Cloud platform first.
- Cloud account type: Including main account and associated account, please make sure the main account has been imported into OneCloud platform before using the associated account, and select this main account when using the associated account.
- Bucket URL: The URL of the oss bucket where the billing file is located. please see How to get the Expense OSS Bucket URL?.
- File prefix: When other files are stored in the Expense OSS Bucket in addition to the billing file, you need the configuration file prefix to get only the billing file in the bucket, etc. Alibaba Cloud’s billing file prefix is account ID, you can check the account ID in Account Management - Security Settings.
- Scope of Bill Analysis: Set the scope of the platform to analyze cloud account billing. Only Accounts Managed by Platform is supported.
- Accounts Managed by Platform: that is, the billing information of the main account and the sub-account associated with the main account is collected. If the account is only used as the payment account of other accounts, the billing files of other accounts collected will be discarded.
- Collect bills immediately: OneCloud The platform automatically collects bills at 4am every day by default. After enabling this item, bills will be collected immediately after configuring the bill file access information.
- Time range: When collect bills immediately is enabled, it supports setting the time range to immediately collect bills within the time range, please make sure there is bill data within the selected time range. It is recommended to collect bills within 1~6 months, otherwise there will be too much data, which will cause much pressure on the system and affect the daily task of collecting bills.
- Click “Connection Test” button to test whether the parameters entered are correct.
How to get Alibaba cloud account related parameters?
How to get Accesskey way for main account
-
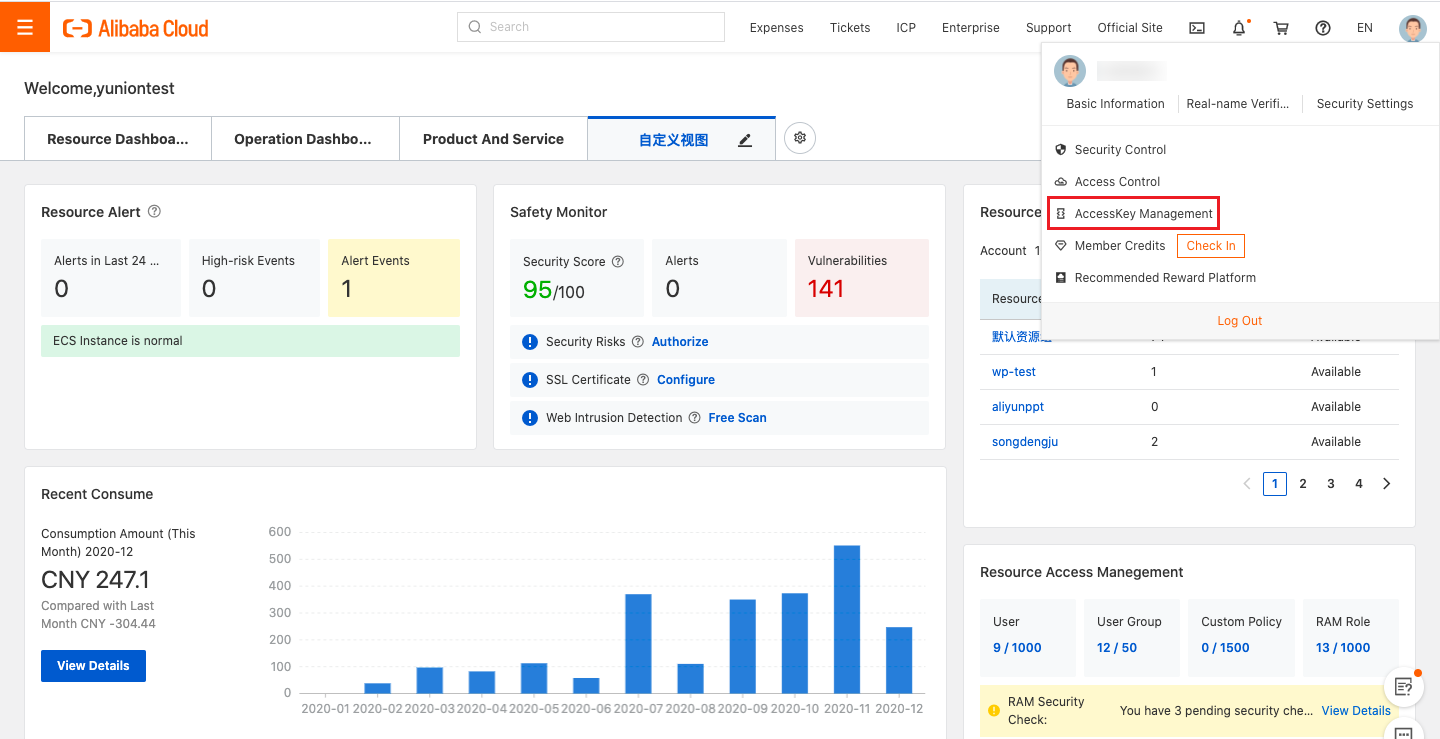
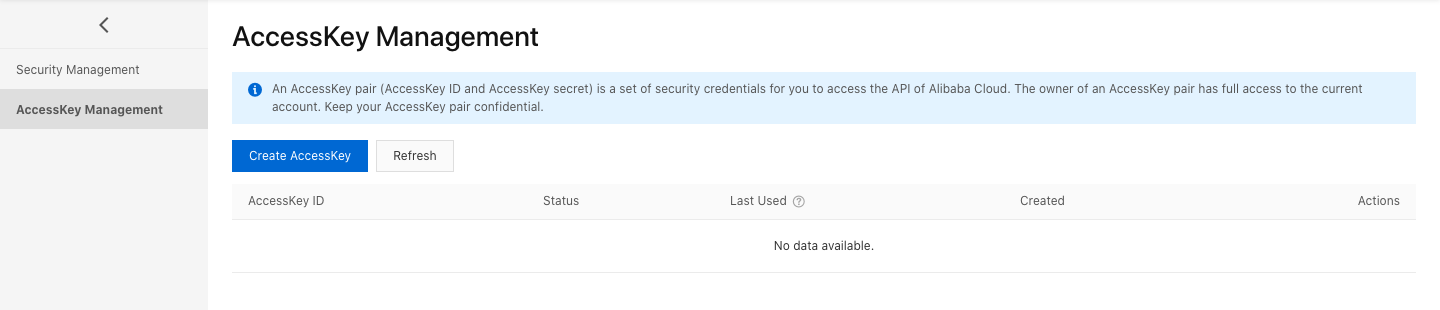
Login to Alibaba Cloud console with your master account, click Personal Information at the top right corner of the page, expand the drop-down menu, click “accesskeys” menu item to enter the security information management page.
-
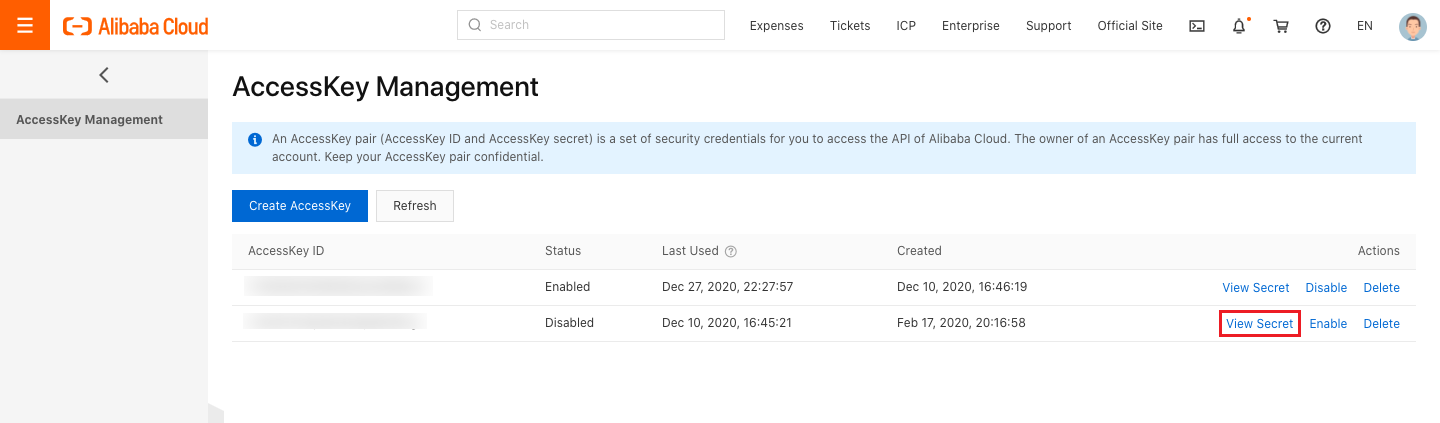
In the security information management page, you can view the existing AccessKey information, you can also click “Create AccessKey” button to create a new user AccessKey, when creating a new AccessKey Alibaba Cloud will send a verification code to the account contact phone, after the verification is passed, you can create an AccessKey.

-
Access Key Secret is not shown by default, click the “Show” link, Alibaba Cloud will send a verification code to the contact phone to which the account belongs, and the Access Key Secret will be shown only after the verification is passed.
How to get Accesskey way for sub-accounts
-
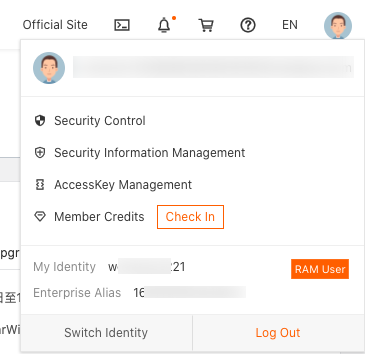
Login to Alibaba Cloud console with your sub-account, click Personal Information on the top right corner of the page, expand the drop-down menu, click “**accesskey… **” to enter the security information management page.
-
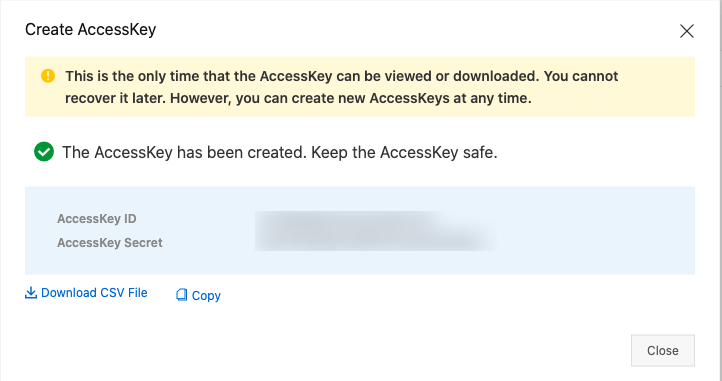
On the Security Information Management page, click the “Create AccessKey” button to create the AccessKey.
-
After successful creation, the AccessKeySecret information will only be displayed once, please save it in time.
Note
AccessKey already created, can no longer view AccessKeySecret.
Alibaba Cloud account permission requirements
| Features | Read-only permissions | Read-write permissions |
|---|---|---|
| All Features | ReadOnlyAccess | AdministratorAccess |
| VM instance, Security Group, Images, Disks, Snapshots | AliyunECSReadOnlyAccess | AliyunECSFullAccess |
| VPC, VPC Peering, Routing table | AliyunVPCReadOnlyAccess | AliyunVPCFullAccess |
| EIP | AliyunEIPReadOnlyAccess | AliyunEIPFullAccess |
| Elastic NIC | AliyunVPCNetworkIntelligenceReadOnlyAccess | AliyunECSNetworkInterfaceManagementAccess |
| OSS | AliyunOSSReadOnlyAccess | AliyunOSSFullAccess |
| NAT | AliyunNATGatewayReadOnlyAccess | AliyunNATGatewayFullAccess |
| LB instance | AliyunSLBReadOnlyAccess AliyunALBFullAccess |
AliyunSLBFullAccess AliyunALBFullAccess |
| RDS | AliyunRDSReadOnlyAccess | AliyunRDSFullAccess |
| Redis | AliyunKvstoreReadOnlyAccess | AliyunKvstoreFullAccess |
| Log | AliyunActionTrailFullAccess | AliyunActionTrailFullAccess |
| NAS | AliyunNASReadOnlyAccess | AliyunNASFullAccess |
| WAF | AliyunYundunWAFReadOnlyAccess | AliyunYundunWAFFullAccess |
| IAM | AliyunRAMReadOnlyAccess | AliyunRAMFullAccess |
| DNS | AliyunDNSReadOnlyAccess AliyunPubDNSFullAccess |
AliyunDNSFullAccess AliyunPubDNSFullAccess |
| Billing,Balance,Charges | AliyunFinanceConsoleReadOnlyAccess | AliyunFinanceConsoleFullAccess |
| Monitoring | AliyunCloudMonitorReadOnlyAccess | AliyunCloudMonitorFullAccess |
How to give authorization to sub-account
-
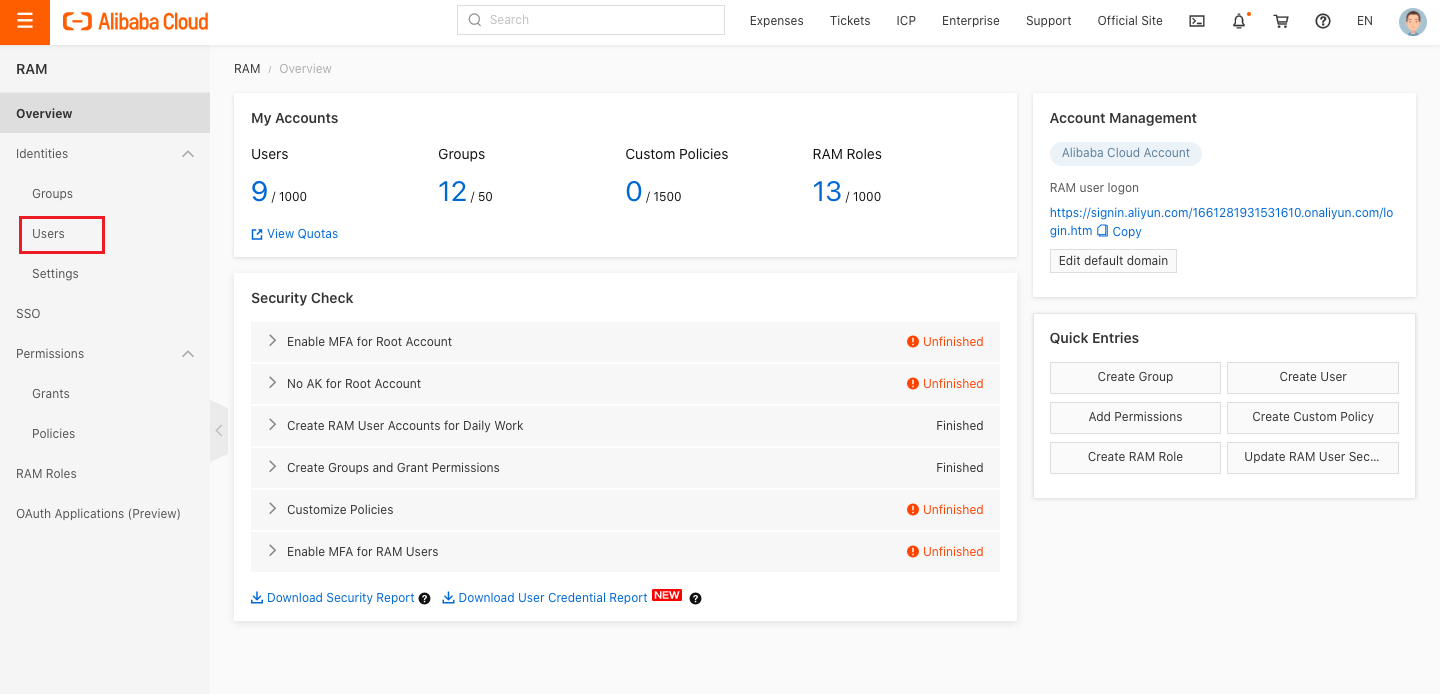
Log in to Alibaba Cloud console with your main account, click Personal Information at the top right corner of the page, expand the drop-down menu, click “Access Control” menu item , enter the access control page.

-
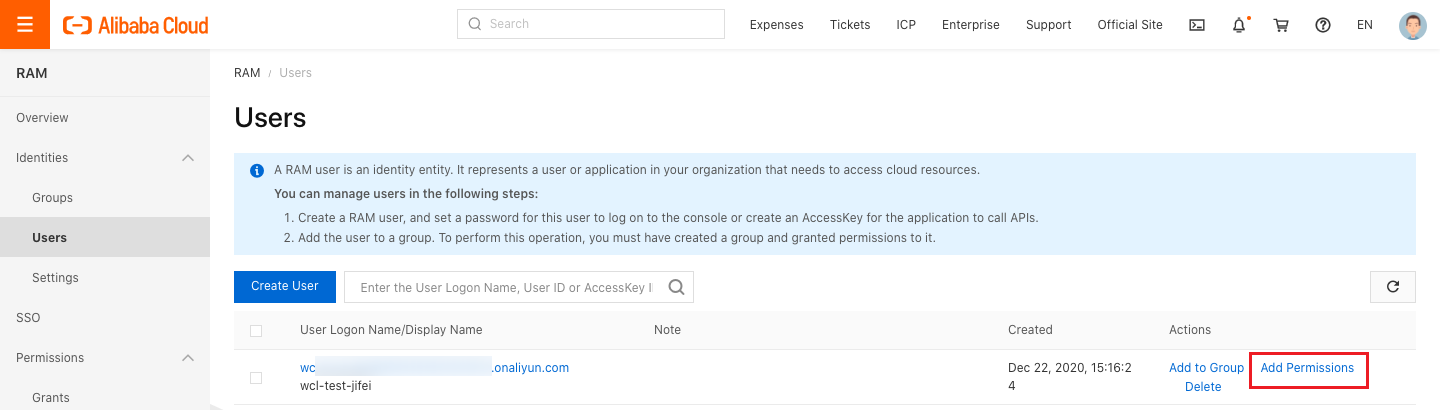
Click the “User Management” menu item on the left menu bar to enter the user management page.
-
On the user management page, click the “Authorize” button in the specified user action column to perform the authorization operation. Please see [What permissions do sub-accounts need to have to manage Alibaba Cloud resources through the platform](# What permissions do sub-accounts need to have to manage Alibaba Cloud resources through the platform) for the permissions required to manage Alibaba Cloud resources using OneCloud .
How to get the Expense OSS Bucket URL?
-
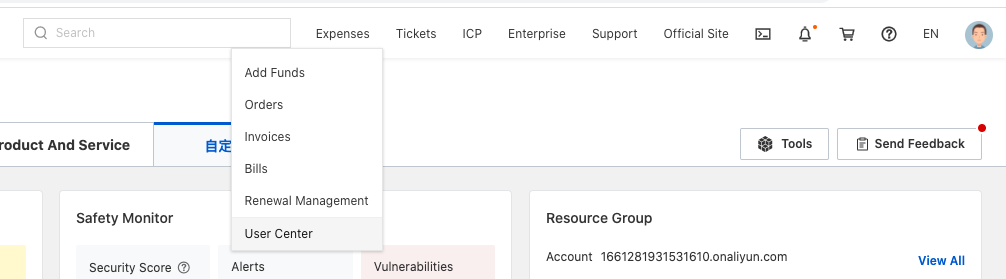
Take Alibaba Cloud main account as an example, login to Alibaba Cloud console with your main account, click the drop-down menu “User Center” menu item in the top [Expenses] menu to enter the Expenses user center page.
-
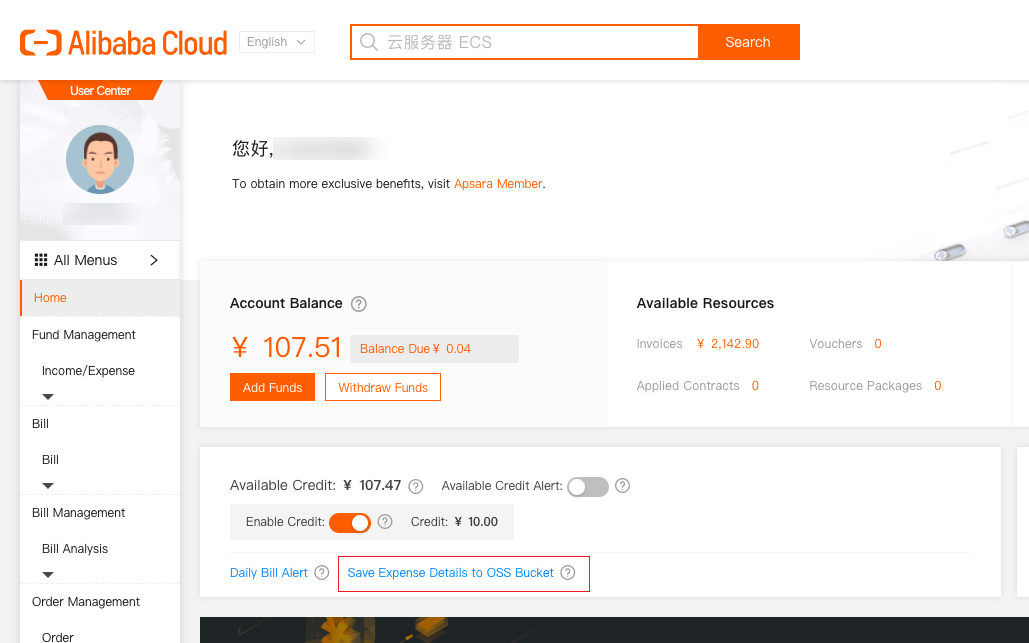
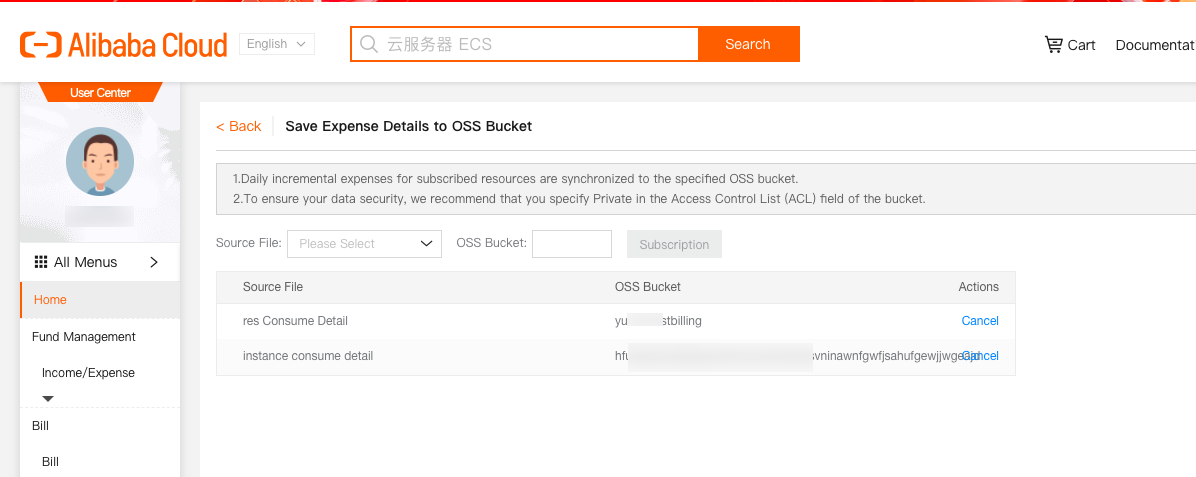
Click the “Save Expense Details to OSS Bucket” button to enter the Billing Data Storage page.
-
View and record the bucket name of the billing item consumption impact and instance consumption details, if not set, you need to add the subscription bucket for storing files in this page, after the setting is completed, the daily incremental billing data will be stored to the corresponding OSS synchronously. It is recommended that only billing files are stored in this bucket.
-
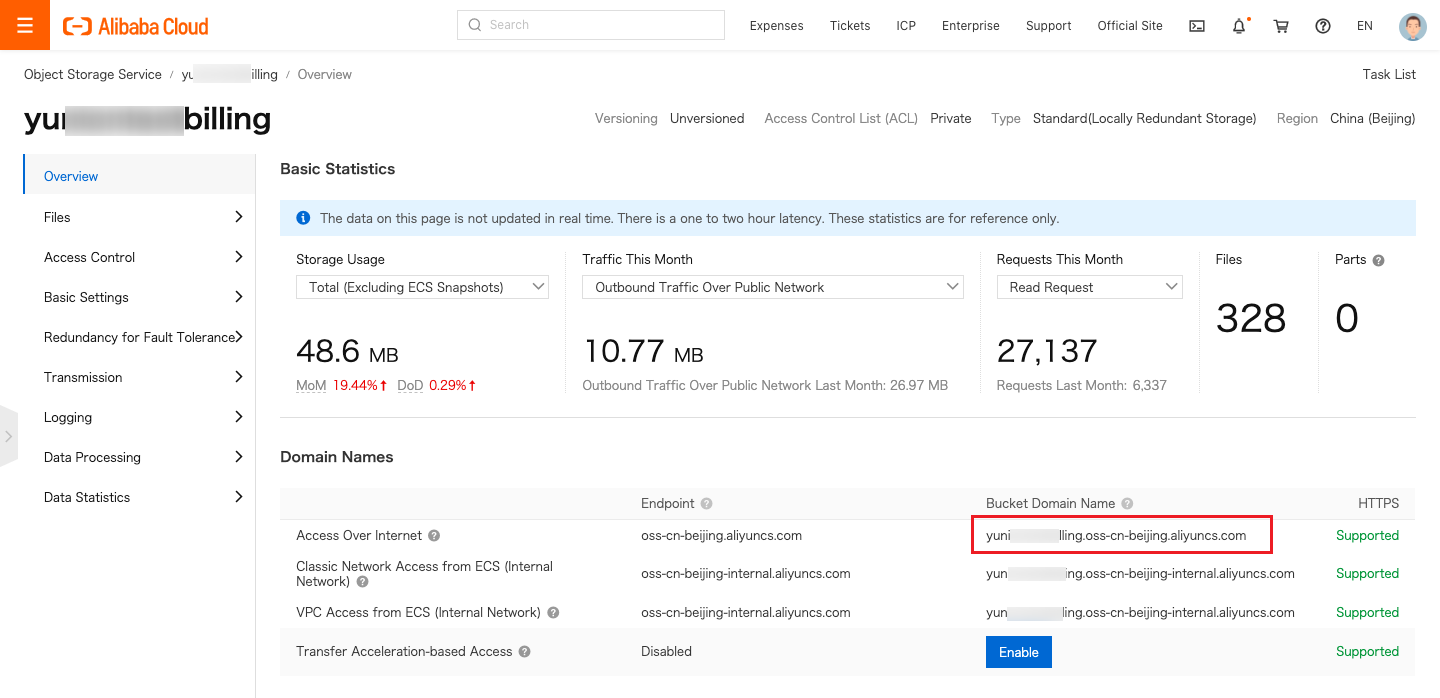
In the Alibaba Cloud console object storage page, check the overview information of the corresponding bucket, the bucket domain is the oss bucket URL.
Create AWS Account
- Click the “Create” button at the top of the list on the cloud account page to enter the new cloud account page.
- Select the cloud platform as AWS, click “Next: Configure Cloud Account” button, and enter the Configure Accounts page.
- Set the following parameters.
- Name: The name of the AWS account.
- Account type: Currently supports managing AWS cloud accounts in Global Zone and China Zone.
- Key ID/Password: The key ID and password information of the managed AWS platform. For details, please see How to get AWS related parameters?.If you need to manage an AWS Organization account, please refer to How to manage an AWS Organization account. The organization account associated with AWS Organization will be displayed as a cloud subscription.
- Domain: Select the domain to which the cloud account belongs. When the cloud account is private, all project users under the domain can use the cloud account to create resources.
- Owner Projects: Select the local project that synchronizes the resources on the cloud account to the OneCloud platform. If you want to categorize the resources on the cloud account according to the projects on the cloud, please specify the default resource attribution project first and check the box to create the project automatically. After checking the box, a local project with the same name as the project on the cloud will be created in the OneCloud platform and the resources will be synchronized to the corresponding project. Resources without project attribution on the cloud will be synchronized to the default resource attribution project.
- Proxy: Set this item when the cloud account needs a proxy to access normally, leave it blank for direct connection. If there is no suitable proxy, click “Create” hyperlink directly and set relevant parameters in the pop-up Create Proxy dialog box to create a proxy.
- Enable SSO Login: After enabling this item, it will automatically synchronize the system’s SAML information to the cloud account and become the identity provider for login on the cloud. Realize single sign-on to the public cloud platform through this system.
- Auto sync: Set whether to automatically synchronize the information on AWS platform, and set the time interval for auto-sync.
- Click the “Connection Test” button to test whether the parameters entered are correct.
- Click “OK” button to create AWS account. And go to the Billing File Access Information page to configure the billing parameters for the cloud account so that the user can view the billing information for the cloud account in Expenses.
- If you do not need to view the cloud account billing information in
OneCloud
platform, you can directly click the Skip button. If you need to view billing information in
OneCloud
platform, etc. please configure relevant parameters, and click “OK” button after the configuration is completed and the test is passed.
- Cloud account type: Including main account and associated account, please make sure the main account has been imported into OneCloud platform before using the associated account, and select the main account when using the associated account.
- Bucket URL: The URL of the oss bucket where the billing file is located. please see How to get the Expense OSS Bucket URL? for details.
- File prefix: When there are other files stored in the Expense OSS Bucket besides the billing file, you need the file prefix to get only the billing file in the bucket, etc. The file prefix for AWS is the account ID.
- Scope of Bill Analysis: Set the scope of the platform to analyze cloud account billing. Including Accounts Managed by Platform and All Accounts.
- Accounts Managed by Platform: that is, the billing information of the main account and the sub-account associated with the main account is collected. If the account is only used as the payment account of other accounts, the billing files of other accounts collected will be discarded.
- All Accounts: All bills of the master account will be collected, For the account that was not managed by this platform. the billing information will be displayed as a subscription of the master account with a name ending with its original account ID.
- Collect bills immediately: OneCloud The platform automatically collects bills at 4am every day by default. When this item is enabled, bills will be collected immediately after the billing file access information is configured.
- Time range: When collect bills immediately is enabled, it supports setting the time range to immediately collect bills within the time range, please make sure there is bill data within the selected time range. It is recommended to collect bills within 1~6 months, otherwise there will be too much data, which will cause much pressure on the system and affect the daily task of collecting bills.
- Click the “Connection Test” button to test whether the parameters entered are correct.
How to get AWS related parameters?
How to get Access key for AWS?
-
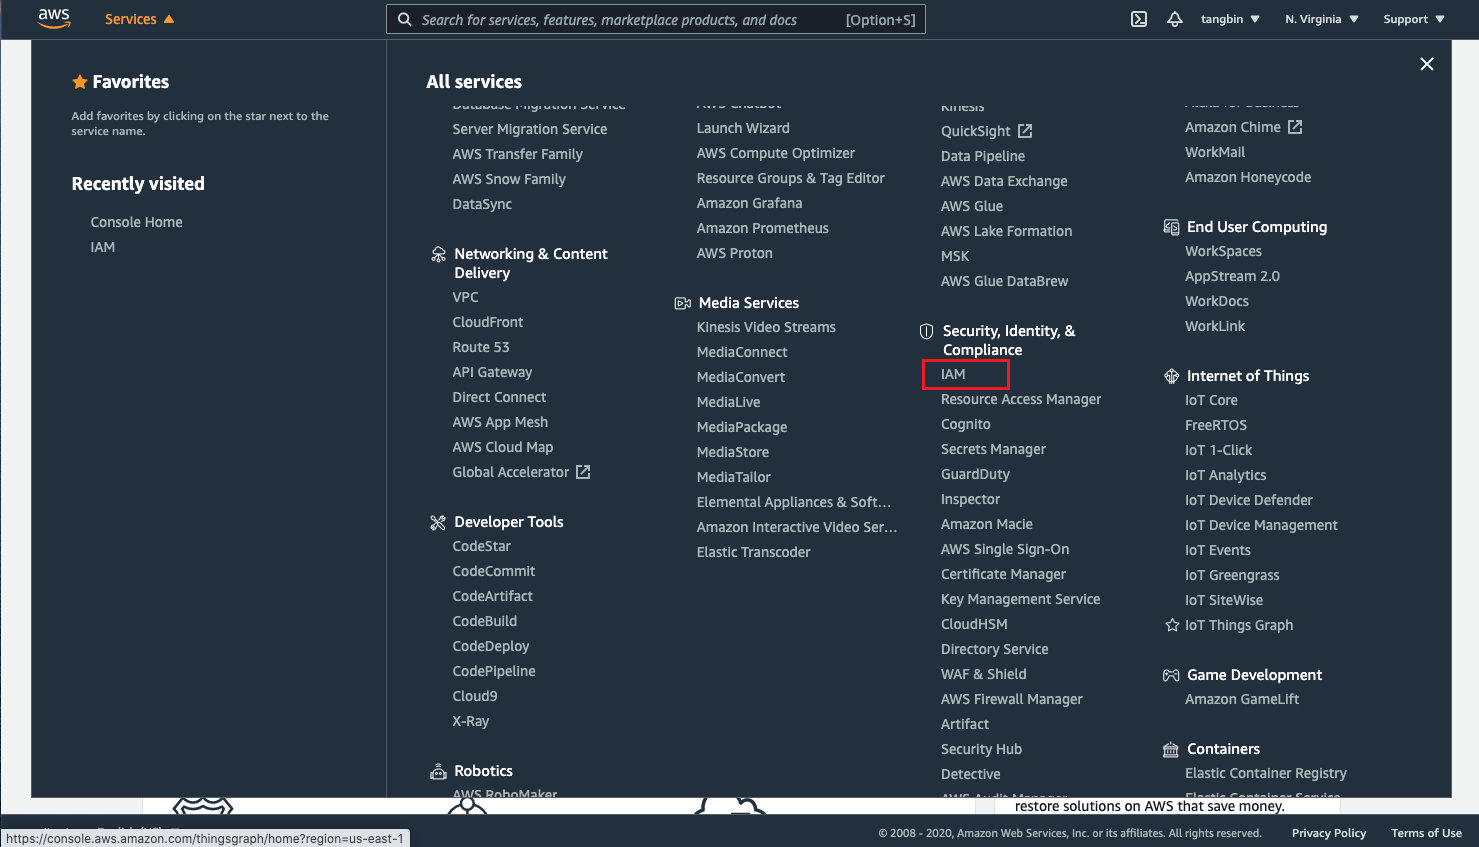
Log in to the AWS Management Console using the AWS master account (or a sub-account with Administrator Access administrative privileges) and click the “IAM” menu item to access the IAM Control Panel page.
-
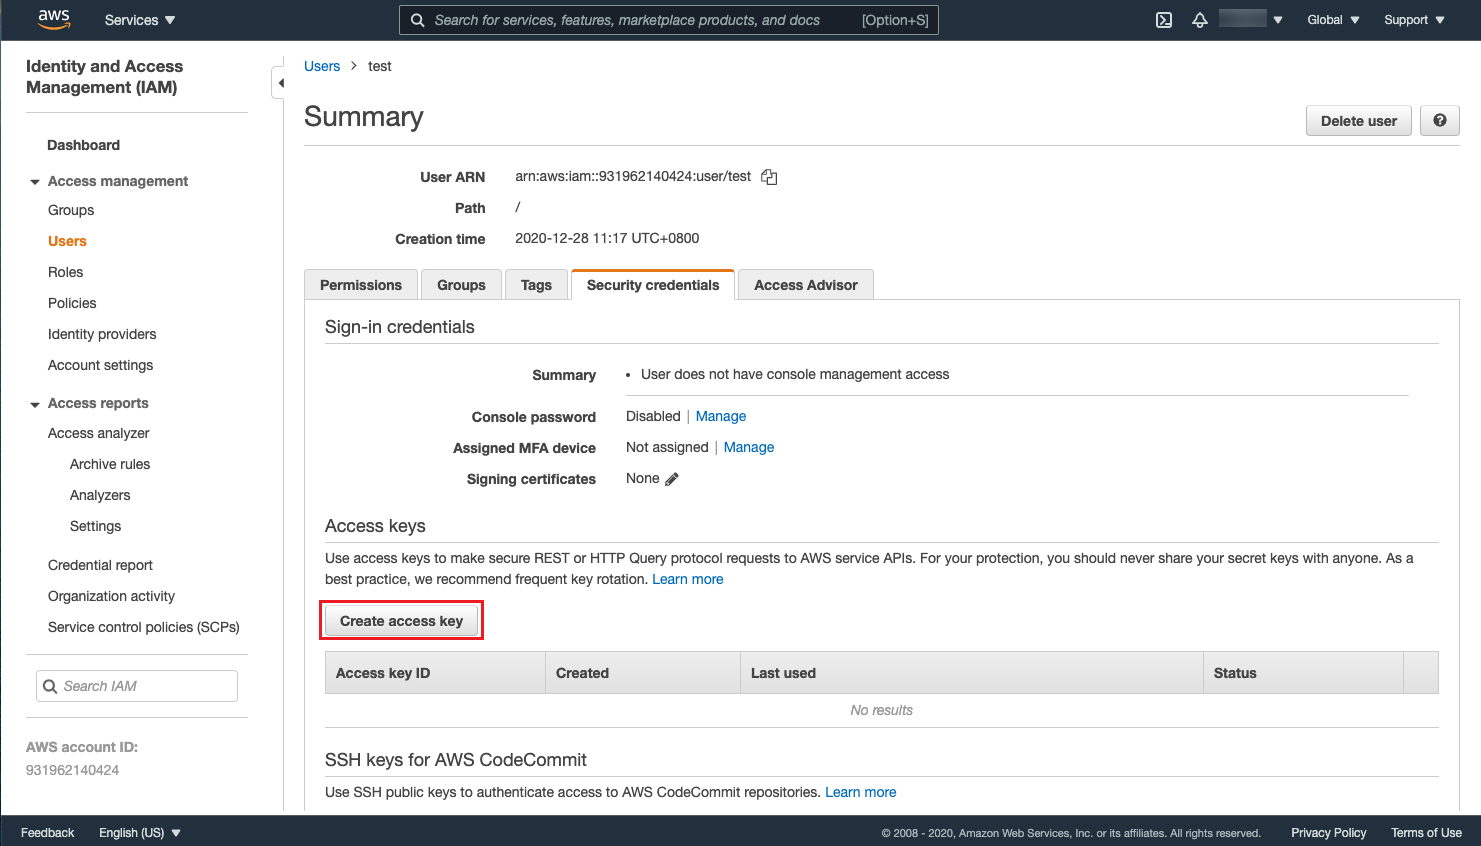
Click the “Users” menu item on the left menu bar to enter the user management list, and click the user name item to enter the specified user details page. Note that you need to select a user with sufficient administrative privileges.

-
Click on the “Security Certificate” tab.
-
Click the “Create Access Key” button, and you can see the key information, i.e. the key ID (Access Key ID) and password (Access Key Secret) in the Create Access Key dialog box that pops up.
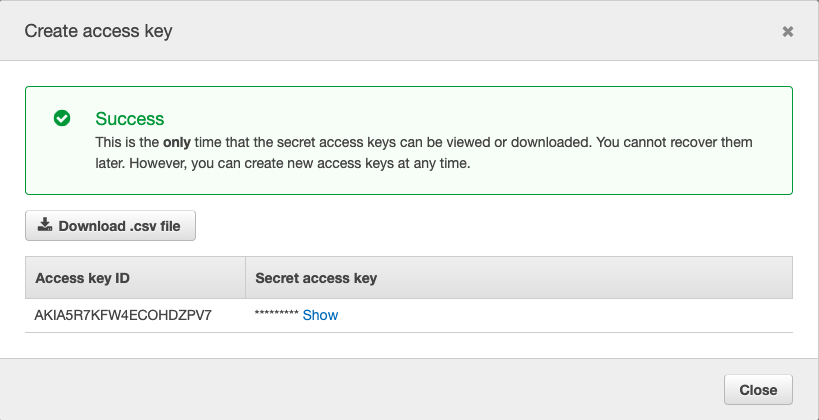
Note
The private access key is only visible when it is created, please copy it and save it, if you accidentally lose it, just create it again.
AWS account permission requirements
| Feature | Read-only permissions | Read-write permissions |
|---|---|---|
| All Features | ReadOnlyAccess | AdministratorAccess |
| VM Instance, Security groups, Images, Snapshots, Disks | AmazonEC2ReadOnlyAccess | AmazonEC2FullAccess |
| Project | - | - |
| Vpc, Vpc Peering, Routing Table, NAT, Elastic NIC,EIP, NAT | AmazonVPCReadOnlyAccess | AmazonVPCFullAccess |
| OSS | AmazonS3ReadOnlyAccess | AmazonS3FullAccess |
| LB Instance | ElasticLoadBalancingReadOnly | ElasticLoadBalancingFullAccess |
| RDS | AmazonRDSReadOnlyAccess | AmazonRDSFullAccess |
| Redis | AmazonElastiCacheReadOnlyAccess | AmazonElastiCacheFullAccess |
| Log | AWSCloudTrailReadOnlyAccess | AWSCloudTrail_FullAccess |
| NAS | AmazonElasticFileSystemReadOnlyAccess | AmazonElasticFileSystemFullAccess |
| WAF | AWSWAFReadOnlyAccess | AWSWAFFullAccess |
| IAM | IAMReadOnlyAccess | IAMFullAccess |
| DNS | AmazonRoute53DomainsReadOnlyAccess | AmazonRoute53DomainsFullAccess |
| Billing | AWSBillingReadOnlyAccess | Billing |
| Monitoring | CloudWatchReadOnlyAccess | CloudWatchFullAccess |
How to get the Expense S3 Bucket URL?
New Version
AWS accounts created after the 07/08/2019 must use this method to configure and obtain the URL and file prefix for the S3 bucket.
-
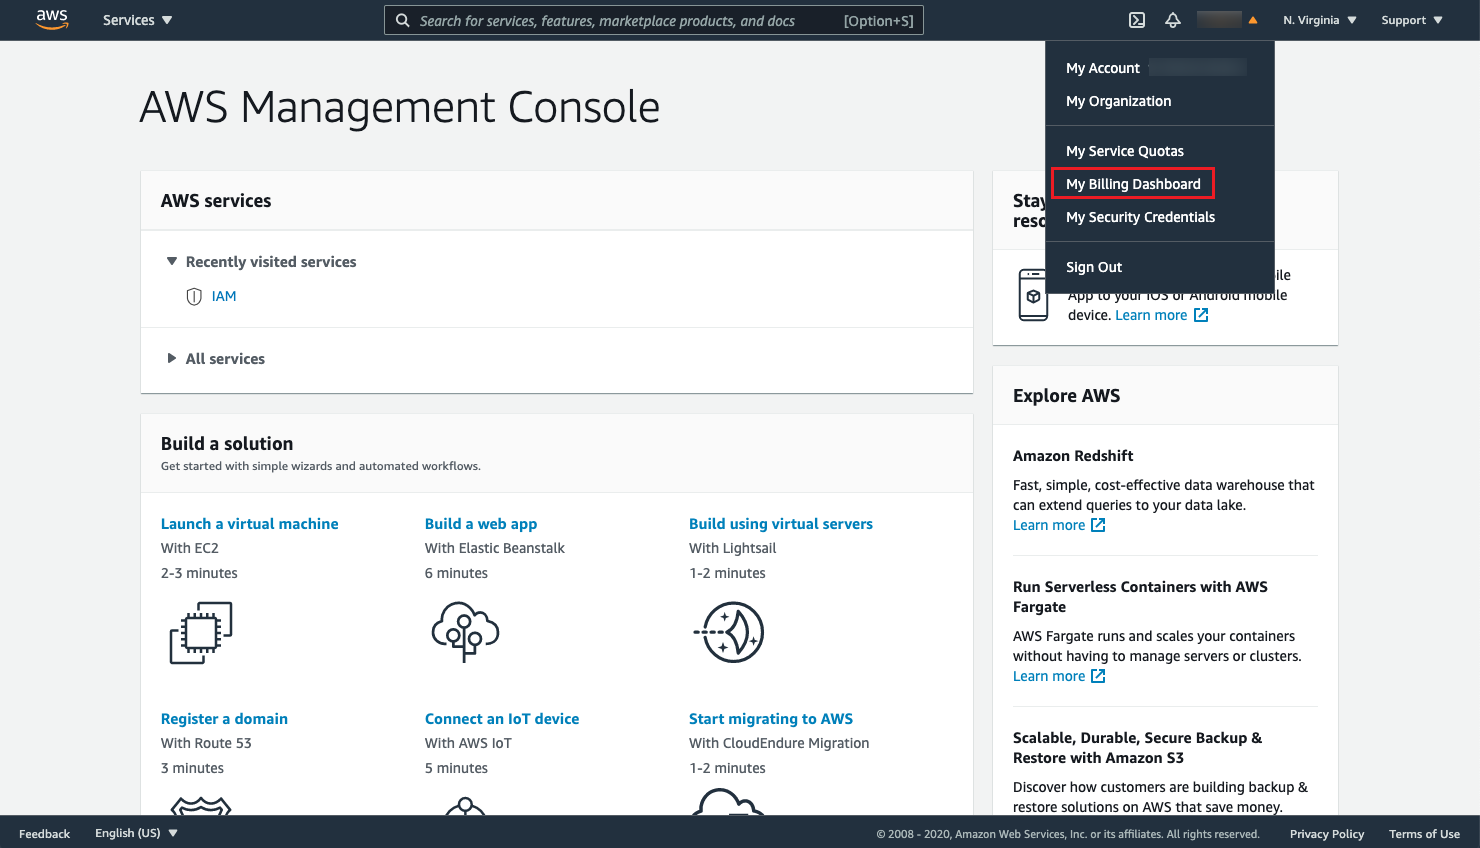
Sign in to the AWS Management Console using the AWS master account and click the drop-down menu “My Billing Dashboard” menu item in the upper right corner of [username] to access the Billing and Cost Management Dashboard page.
-
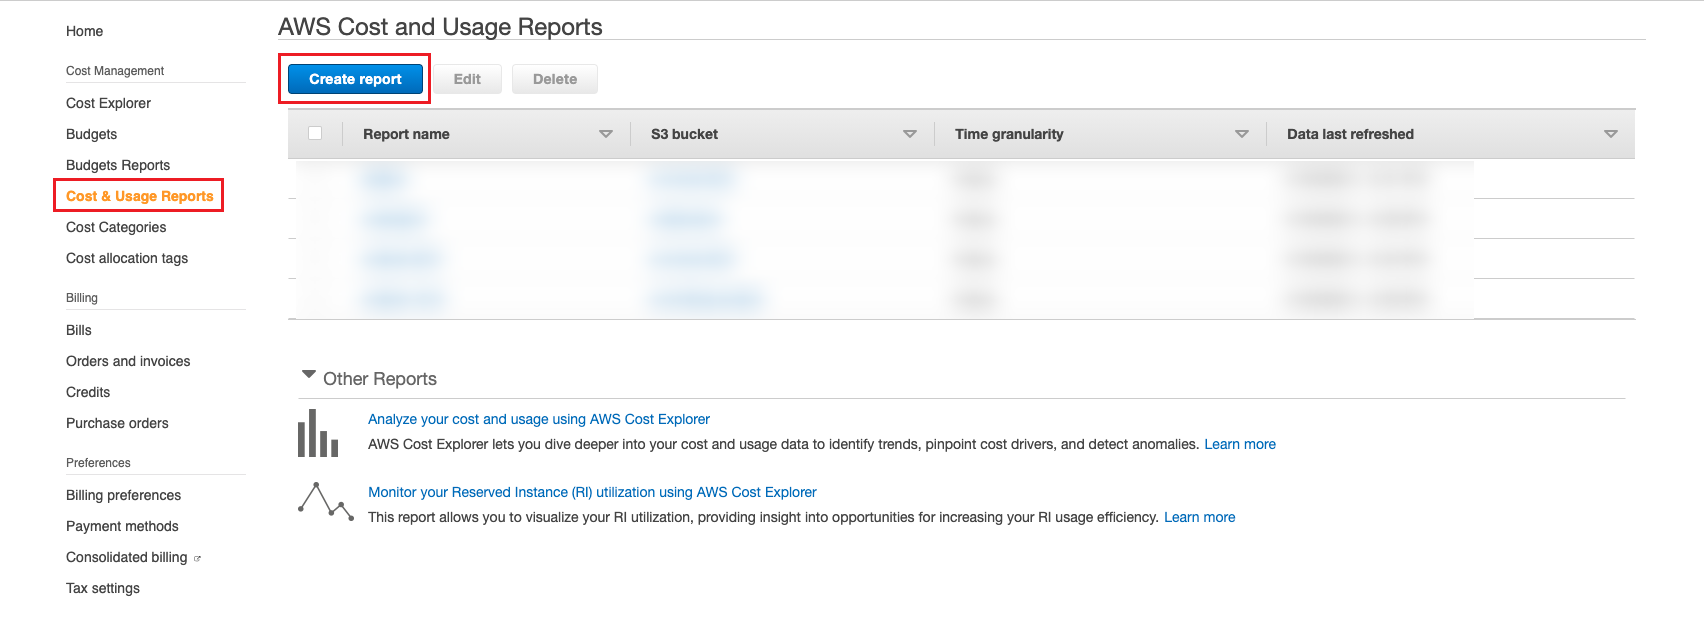
Click “Cost & Usage Reoports” on the left menu, and on the AWS Cost and Usage Reports page, click the “Create Report” button to enter the Create Report page.
-
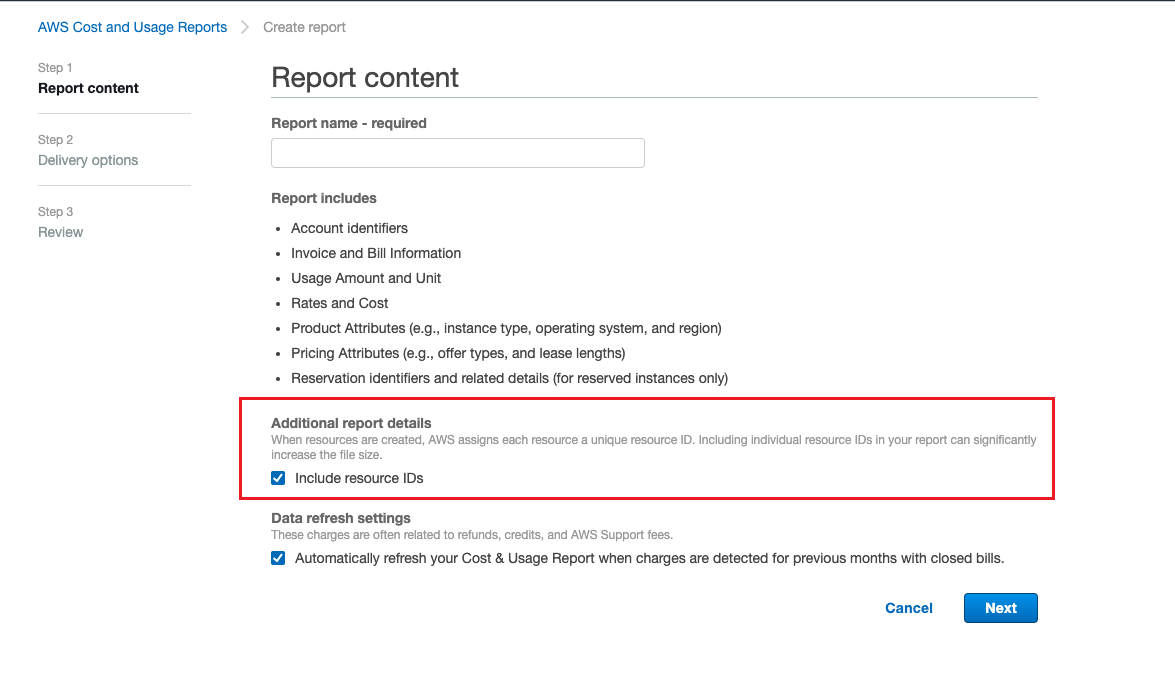
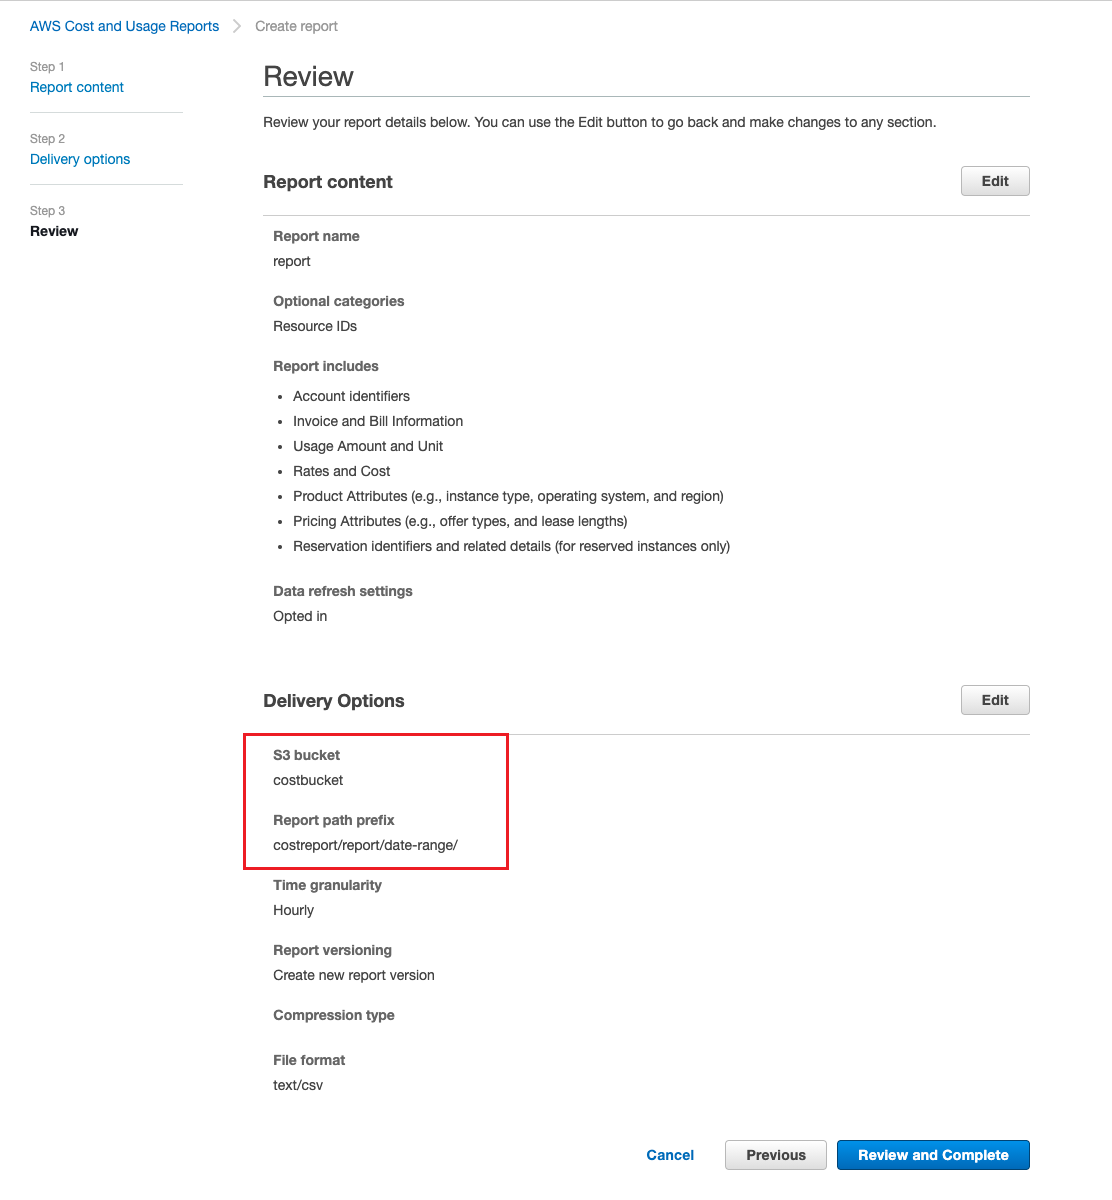
Configure the report name, check “Include resource IDs”, and click “Next” button to enter the Delivery Options page.
-
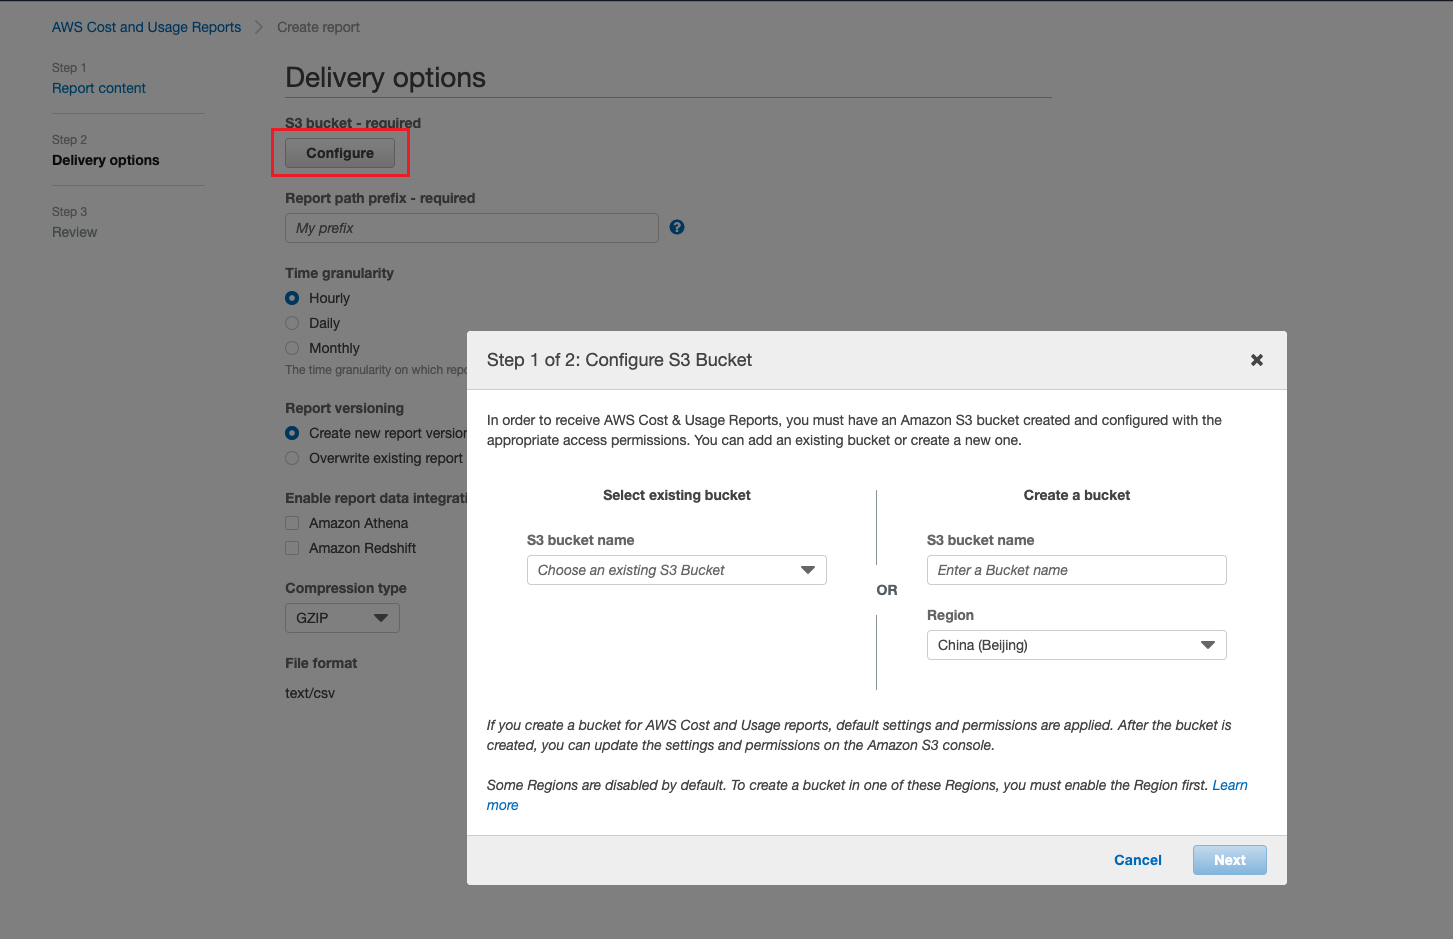
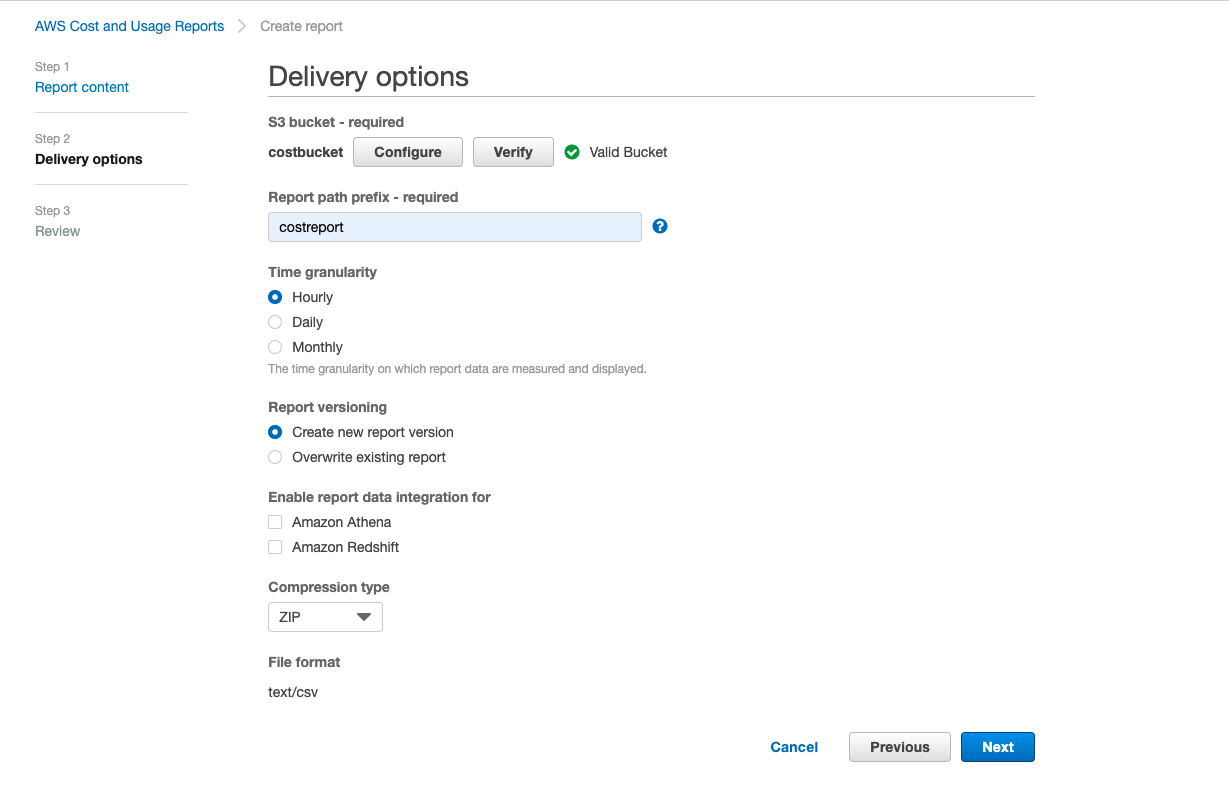
Configure S3 storage buckets to support selecting existing buckets or creating new ones.
-
Configure the report path prefix, choose “Hourly” for the time granularity, “Create new report version” for the report version, and “ZIP” for the compression type, and click the " Next" button to enter the audit page.
-
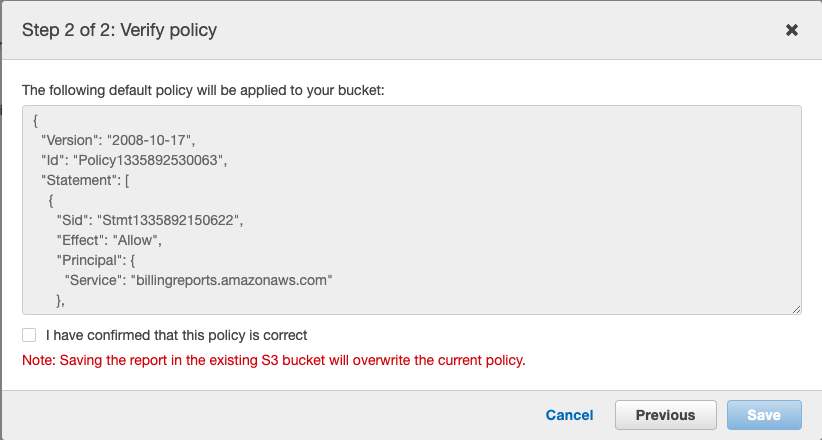
After confirming that the configuration is correct, record the S3 storage bucket and report path prefix in the red box, and click the “Review and Complete” button to complete the configuration and create the report.
-
View the overview information of any billing file in the corresponding storage bucket in the S3 storage management page of the AWS console and record the object URL, the storage bucket URL is the URL with the file name removed from the back, as shown in the red box.

-
The file prefix is the report path prefix in the red box in step 6.
Old Version
-
Sign in to the AWS Management Console using the AWS master account and click the drop-down menu “My Billing Dashboard” menu item in the upper right corner of [username] to access the Billing and Cost Management Dashboard page.
-
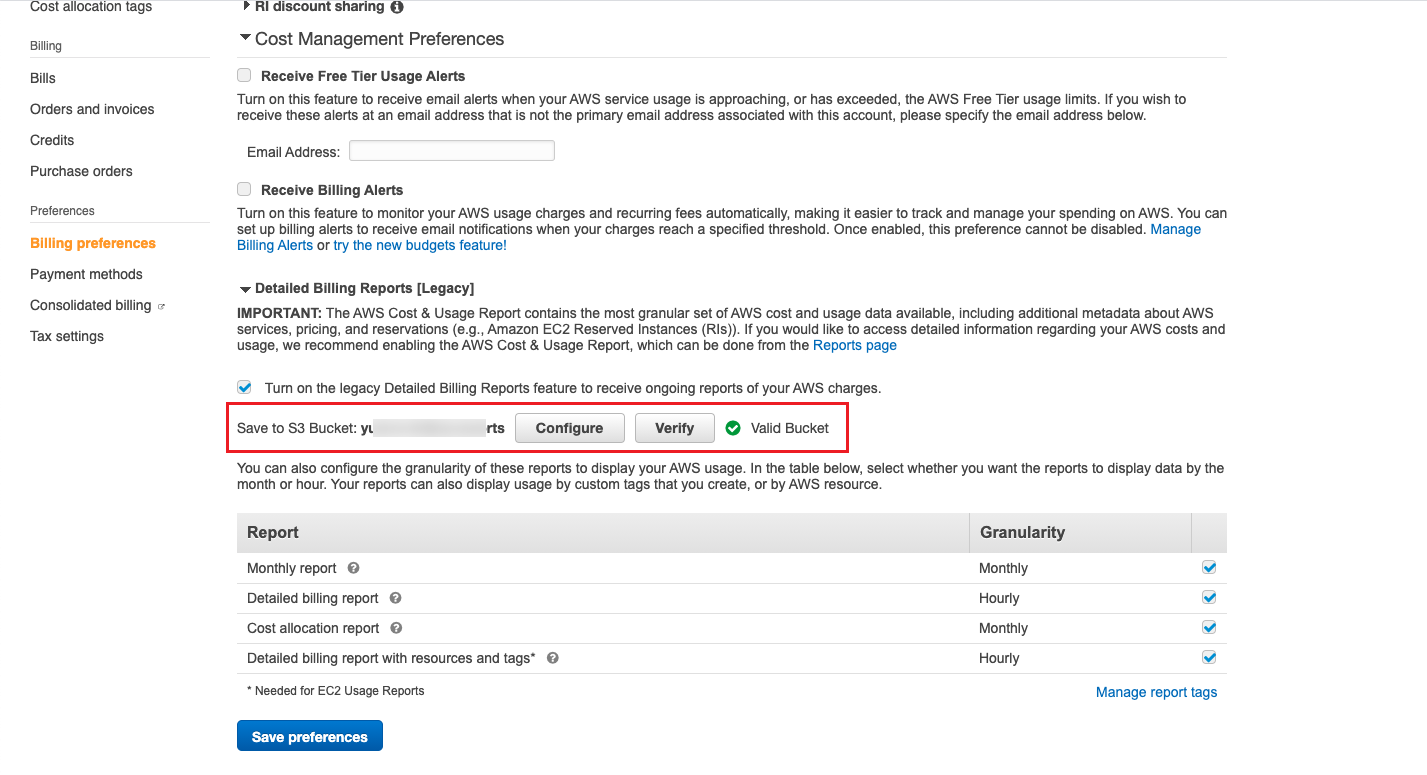
Click “Billing Preferences” on the left menu, and check and record the S3 oss bucket for “Receive Billing Reports” in “Cost Management Preferences” on the Preferences page you entered. If not configured, you need to check “Receive Billing Reports” and configure the S3 bucket and verify it, after the setting is completed, the incremental billing data will be stored to the corresponding S3 according to the set granularity. It is recommended that only billing files are stored in this bucket.
-
View the overview information of any billing file in the corresponding oss bucket in the S3 storage management page of AWS console, and record the object URL, the oss bucket URL is the URL with the file name removed from the back, as shown in the red box.

-
The AWS file prefix is the AWS account ID.
Description
When the Expense S3 Bucket holds other files in addition to the billing file, you need the file prefix to get only the billing file in the bucket, etc.
How to manage AWS Organizations accounts?
- Configure AWS Organizations: Use AWS organization account to associate AWS accounts, support creating new AWS accounts and inviting existing AWS accounts; the invited AWS accounts need to have “OrganizationAccountAccessRole” on them. The invited AWS account needs to have the “OrganizationAccountAccessRole” role.
- How to get Access Key for AWS: Create the access key for the IAM user of the administrative account on the AWS organization account; it is recommended to use a user with AdministratorAccess privileges.
Configure AWS Organizations
-
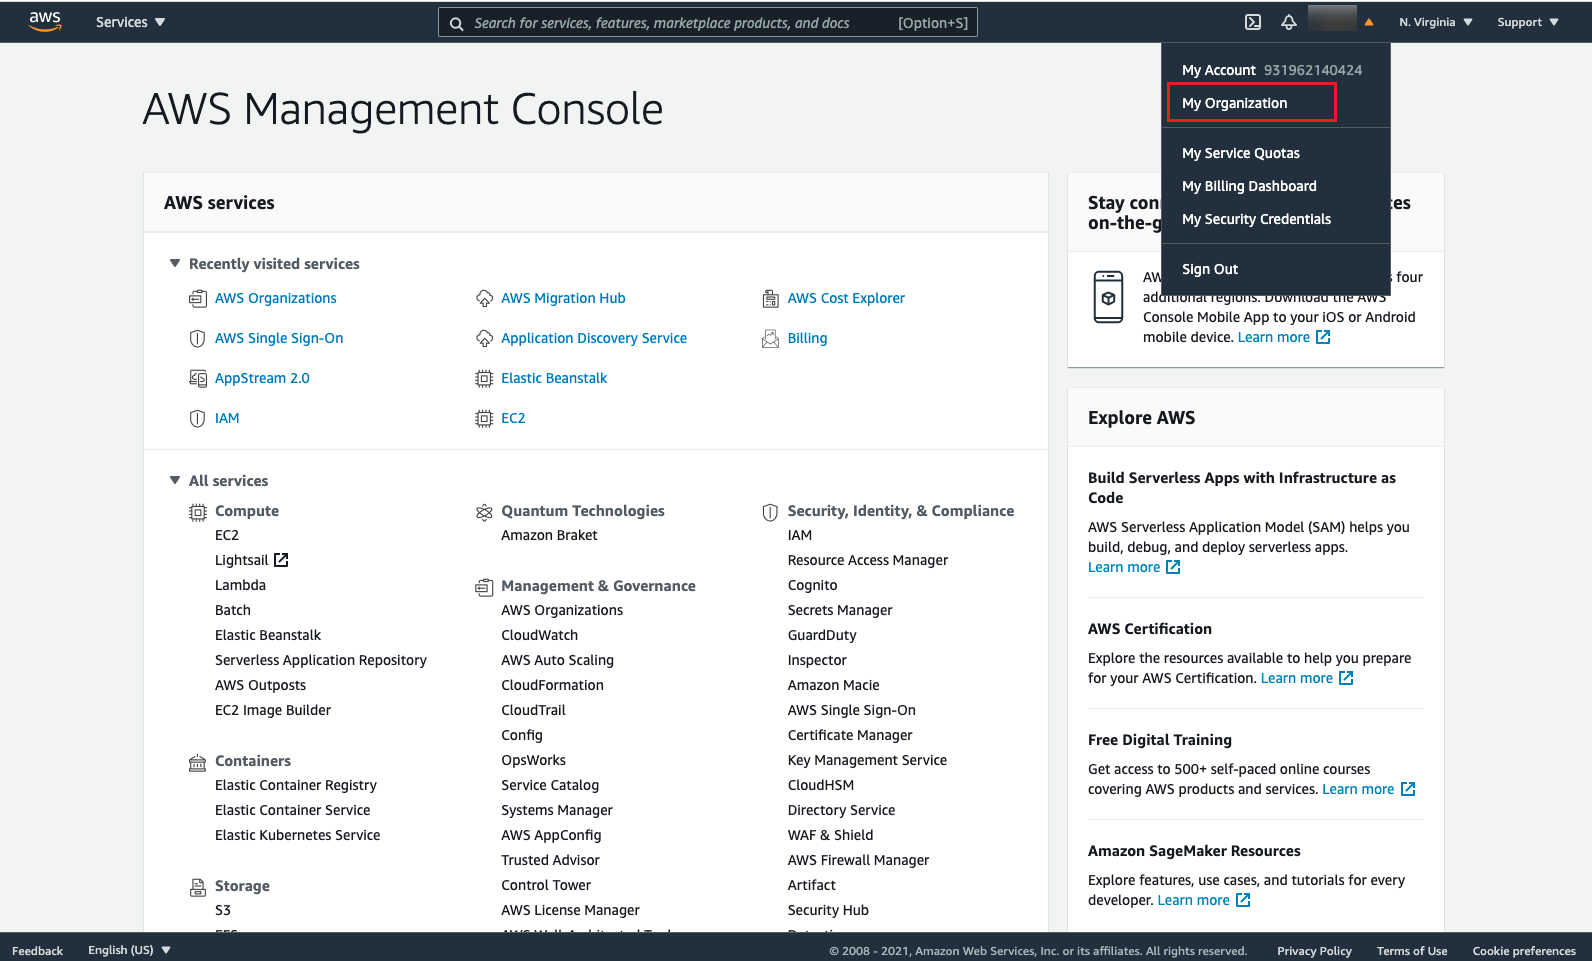
Log in to the AWS Management Console using the AWS Root user (or a IAM user with AdministratorAccess privileges) and click the drop-down menu “My Organizations” to go to the AWS Organizations page.
-
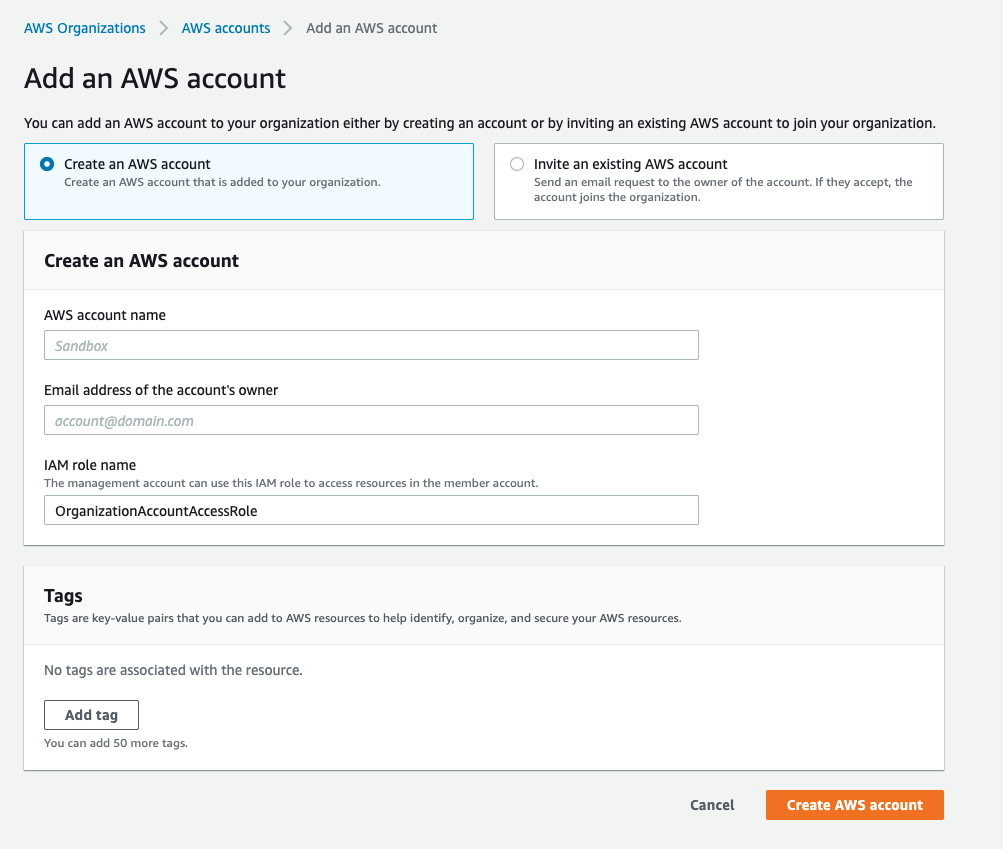
On the AWS Organizations - AWS Accounts page, add an AWS account. Two ways of adding AWS accounts to Organizations are currently supported.
-
Create AWS account: Set the AWS account name, the email address of the account owner, and the IAM role name (OrganizationAccountAccessRole), and click the “Create AWS Account” button to create the AWS account.
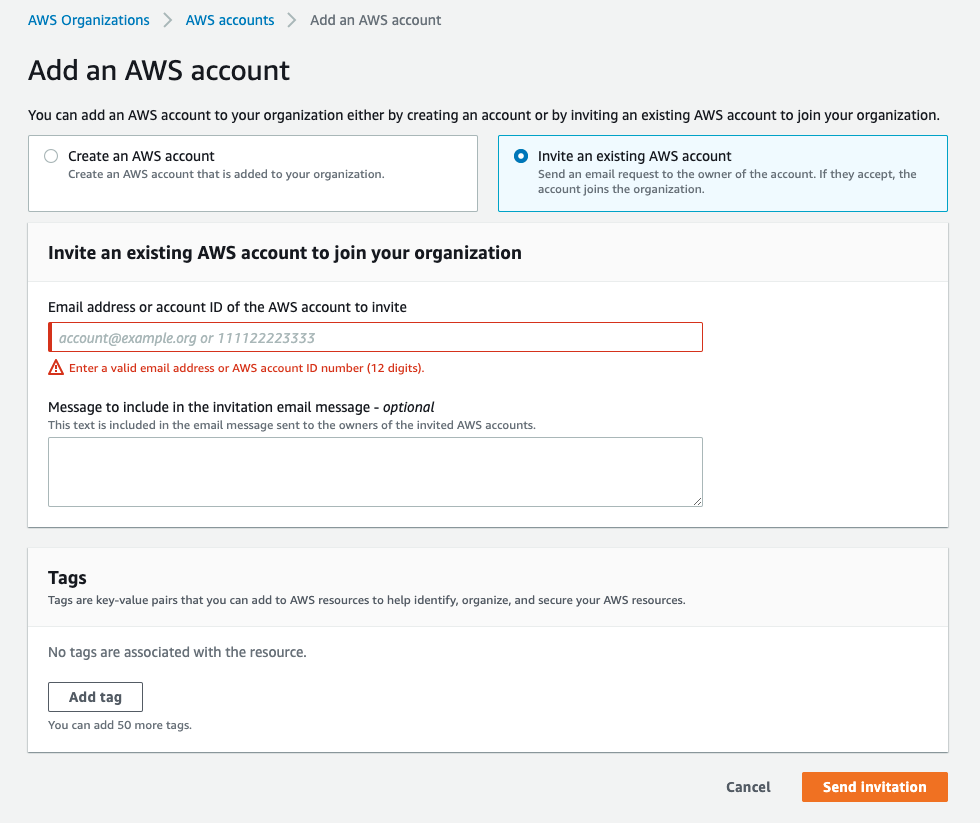
-
Invite an existing AWS account: Set the email address or account ID of the AWS account to be invited, click the “Send Invitation” button and wait for the account owner to receive the request to join Organizations, in addition to the existing AWS account requires the existence of the OrganizationAccountAccessRole role If not, please refer to How to add the role of OrganizationAccountAccessRole in AWS account?.
-
How to get Access key for AWS?
- To get the access key on the administrative account of AWS Organizations. It is recommended to use an IAM user with AdministratorAccess privileges to create the access key.
- For the specific steps to obtain the access key, please refer to How to get Access key for AWS?.
How to add the role of OrganizationAccountAccessRole in AWS account?
-
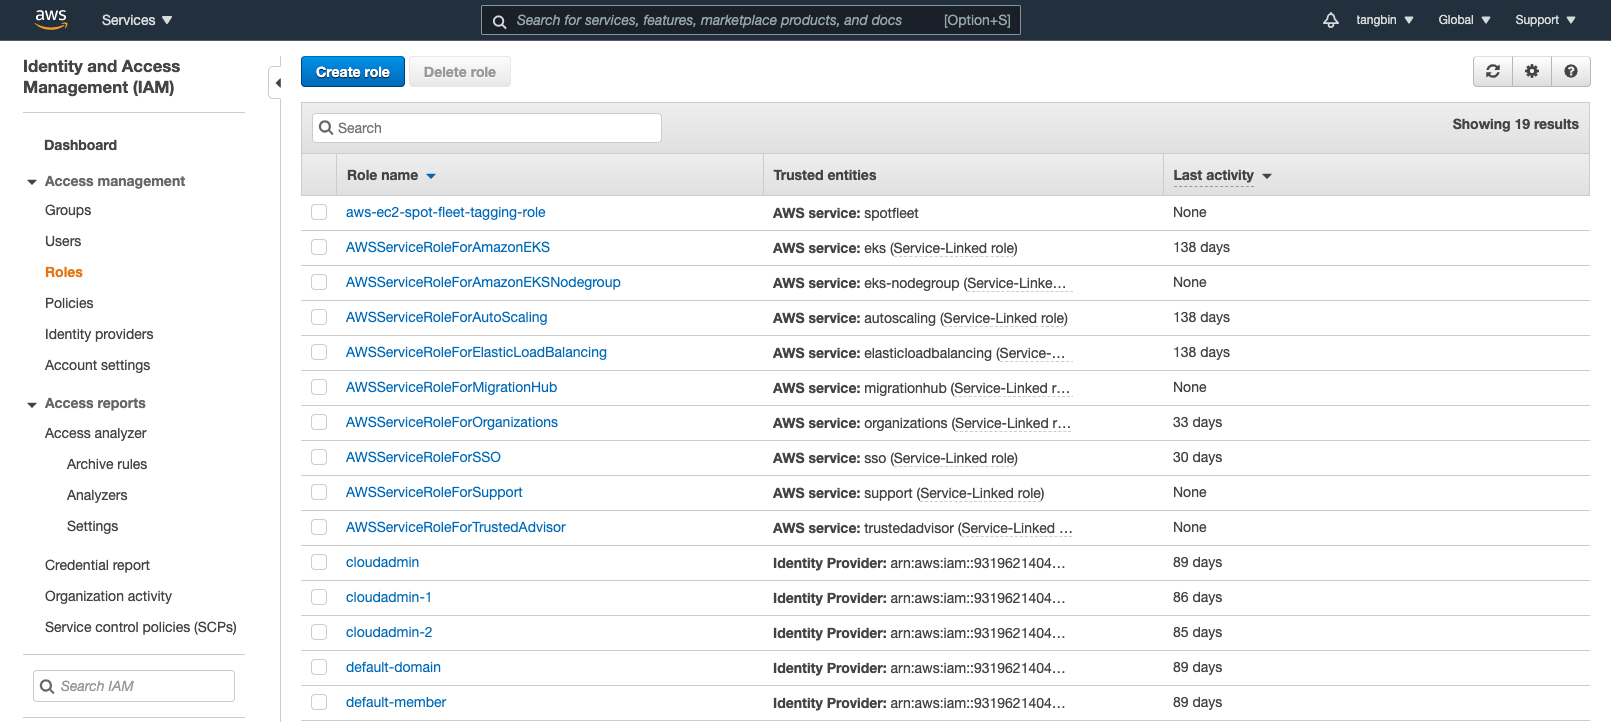
Log in to the AWS Management Console using the AWS master account (or a sub-account with AdministratorAccess administrative privileges) and click the “IAM” menu item to enter the IAM Control Panel page.
-
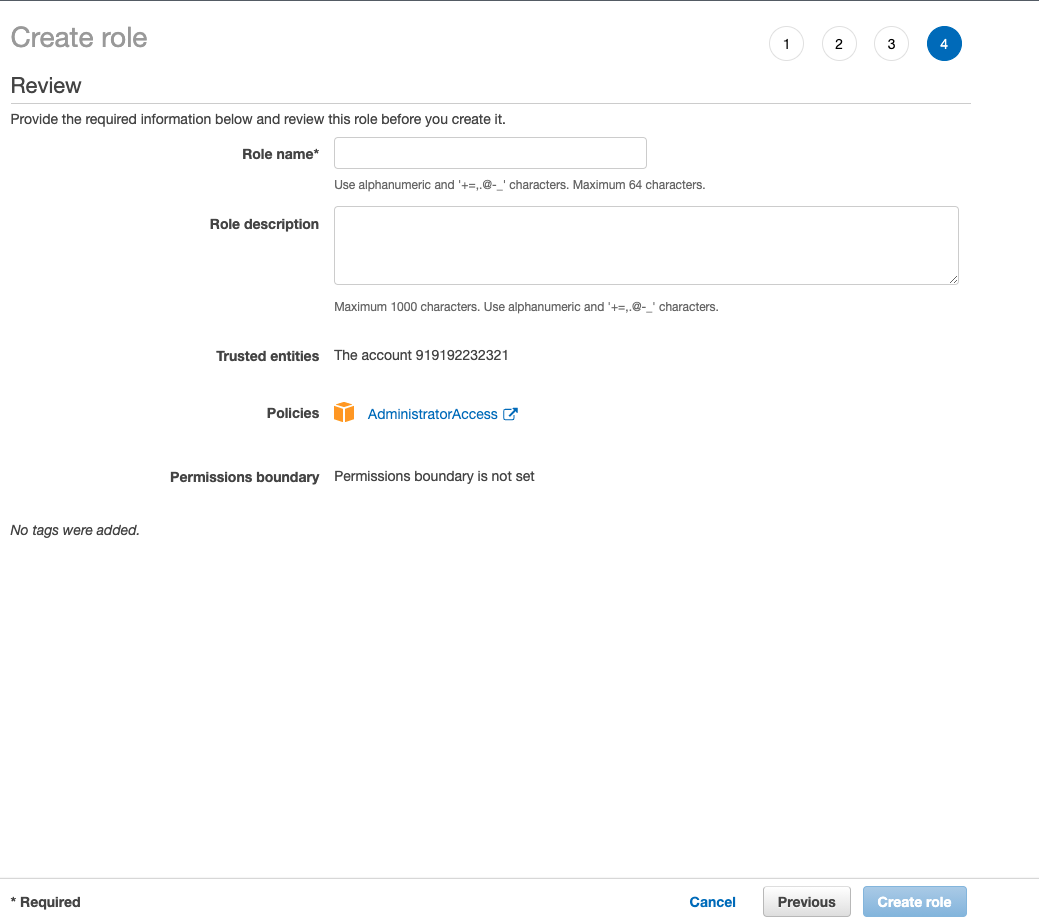
Click the “Roles” menu item on the right, and on the Roles page, click the “Create Role” button to enter the Create Role page.
-
Select the Trusted Entity type as “Another AWS Account”, fill in the account ID of the managed AWS organization, and click the “Next: Permissions” button.
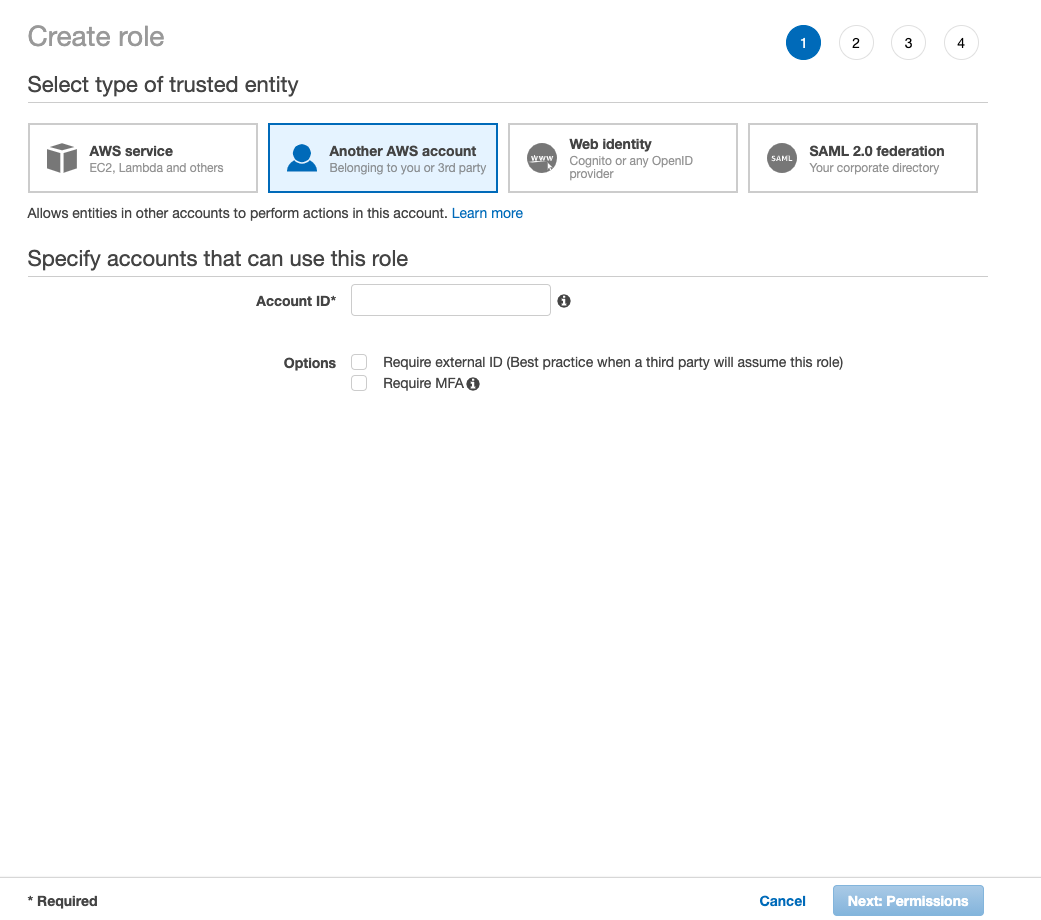
Attach Permissions Policy Select “AdministratorAccess”, click the “Next: Tags” button.

-
Please configure the tags according to your requirements, and click the “Next: Review” button after the configuration is complete.
-
Configure the role name as “OrganizationAccountAccessRole” and click the “Create Role” button.
Create Azure account
- Click the “Create” button at the top of the list on the cloud account page to enter the new cloud account page.
- Select the cloud platform as Azure, click “Next: Configure Cloud Account” button, and enter the Configure Accounts page.
- Set the following parameters.
- Name: Name of Azure account
- Account type: Currently, it supports managing Azure cloud accounts in Global Zone, China Zone, US Government Zone, and Germany Zone.
- Tenant ID/Client ID/Client password please see How to get Azure related parameters?.
- Domain: Select the domain to which the cloud account belongs. When the cloud account is private, all project users under the domain can use the cloud account to create resources.
- Owner Projects: Select the local project that synchronizes the resources on the cloud account to the OneCloud platform. If you want to categorize the resources on the cloud account according to the projects on the cloud, please specify the default resource attribution project first and check the box to create the project automatically. After checking the box, a local project with the same name as the project on the cloud will be created in the OneCloud platform and the resources will be synchronized to the corresponding project. Resources without project attribution on the cloud will be synchronized to the default resource attribution project.
- Proxy: Set this item when the cloud account needs a proxy to access normally, leave it blank for direct connection. If there is no suitable proxy, click “Create” hyperlink directly and set relevant parameters in the pop-up Create Proxy dialog box to create a proxy. Enable SSO Login: After enabling this item, the system becomes the identity provider for login on the cloud. The system enables single sign-on to the public cloud platform through this system. Currently, only Azure Global Zone supports the function of password-free login, in addition, you need to do the necessary configuration on the Azure platform, please see Configure Azure External Identies and Setup Chrome.
- Auto sync: Set whether to automatically synchronize the information on Azure platform, and set the time interval for auto-sync.
- Click the “Connection Test” button to test whether the parameters entered are correct.
- Click the “OK” button to create an Azure cloud account and go to the Billing File Access Information page to configure the billing parameters for the cloud account so that users can view the billing information for the cloud account in Expenses.
- EA (Enterprise Agreement) account expenses get billing information through Contract ID and key, please configure relevant parameters, after the configuration is completed and tested successfully, click the “OK” button.
- Contract ID: Unique identifier of the online Advanced Service Agreement association, a number starting with V570.
- Key: API access key. Please see How to get Azure Contract ID and key? for details.
- Scope of Bill Analysis: Set the scope of the platform to analyze cloud account billing. Including Accounts Managed by Platform and All Accounts.
- Accounts Managed by Platform: that is, the billing information of the main account and the sub-account associated with the main account is collected. If the account is only used as the payment account of other accounts, the billing files of other accounts collected will be discarded.
- All Accounts: All bills of the master account will be collected, For the account that was not managed by this platform. the billing information will be displayed as a subscription of the master account with a name ending with its original account ID.
- Collect bills immediately: OneCloud The platform automatically collects bills at 4am every day by default. When this item is enabled, bills will be collected immediately after the bill file access information is configured.
- Time range: When collect bills immediately is enabled, it supports setting the time range to immediately collect bills within the time range, please make sure there is bill data within the selected time range. It is recommended to collect bills within 1~6 months, otherwise there will be too much data, which will cause much pressure on the system and affect the daily task of collecting bills.
- Click the “Connection Test” button to test if the parameters entered are correct.
- Click “Skip” button for Not an EA account or when you do not need to manage billing data on the OneCloud platform.
How to get Azure related parameters?
How to get the Tenant ID and Client information for Azure
-
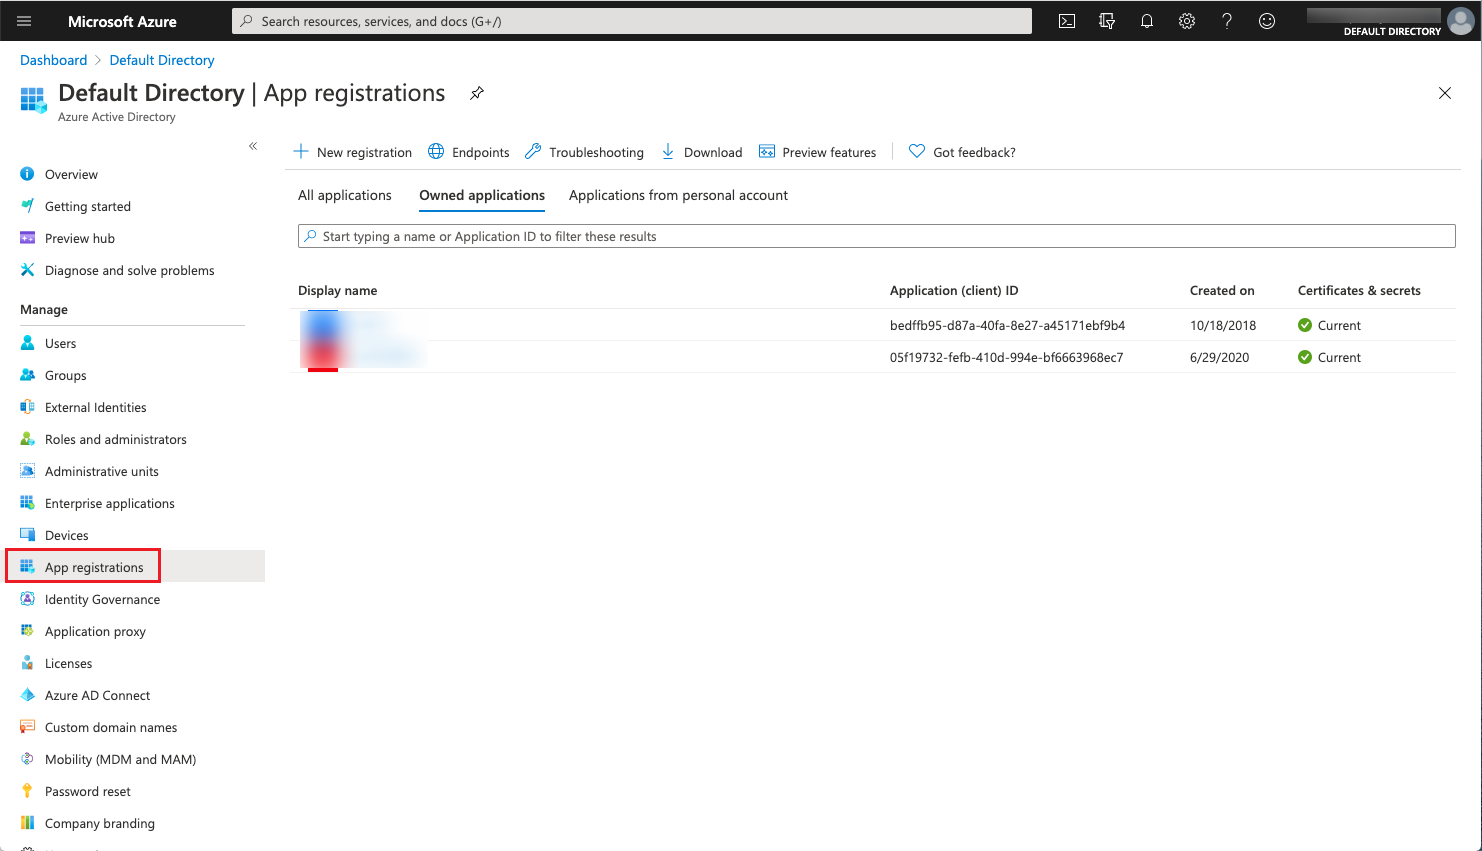
Log in to the Azure console and click on the “Azure Active Directory/App registrations” menu item on the left navigation bar to enter the application registration page. It is recommended to create a new dedicated application for the cloud management platform to call the Azure API.
-
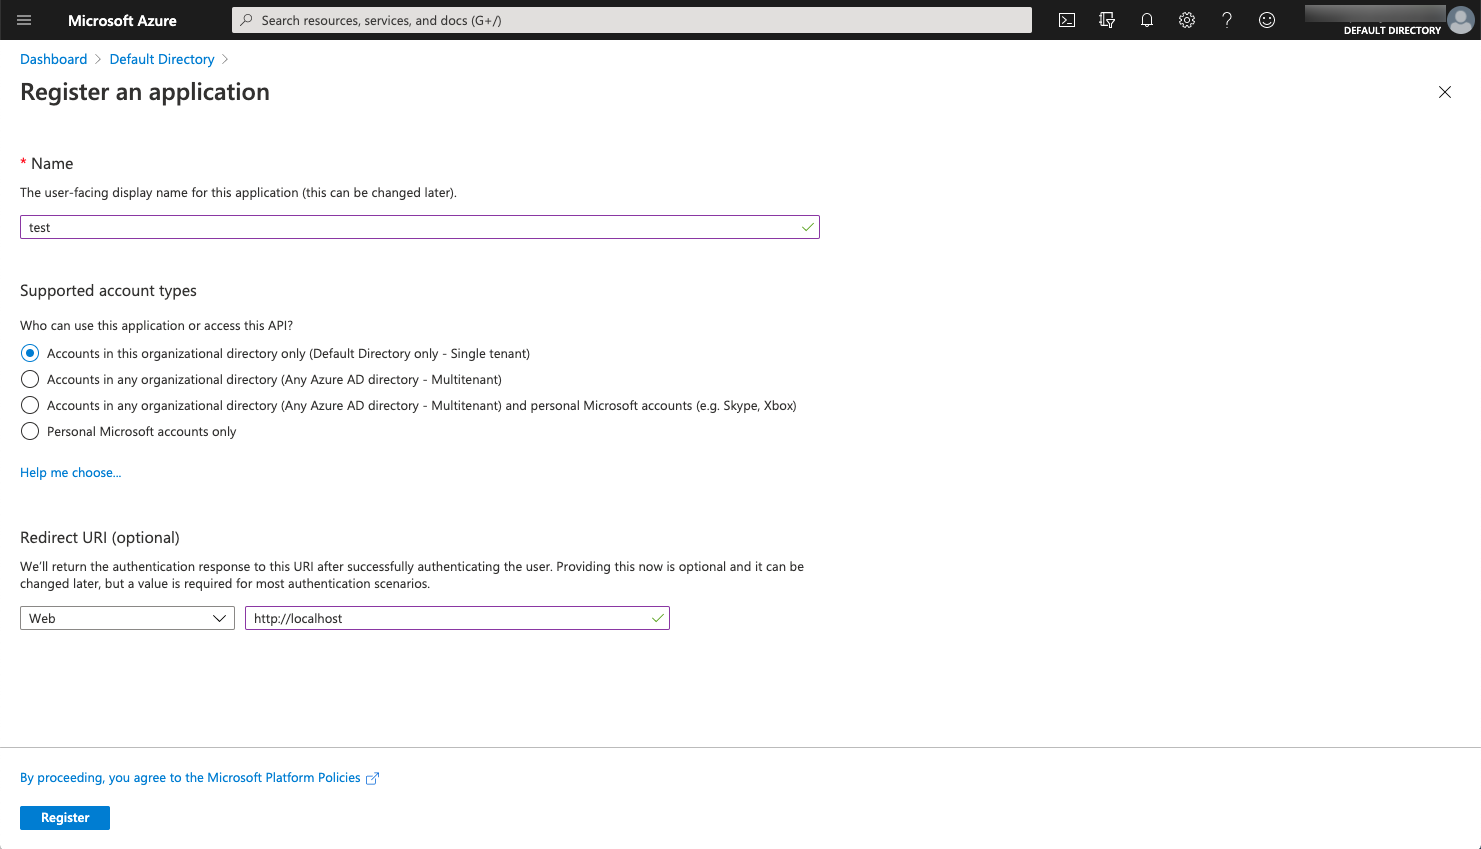
Click the Create_Registration button, and on the registered application page, set the name to any value, set the supported account type to “Only accounts in this directory”, set the redirect URI to web, and enter a name starting with “https://” or “"http://localhost” and click the “Register” button.
-
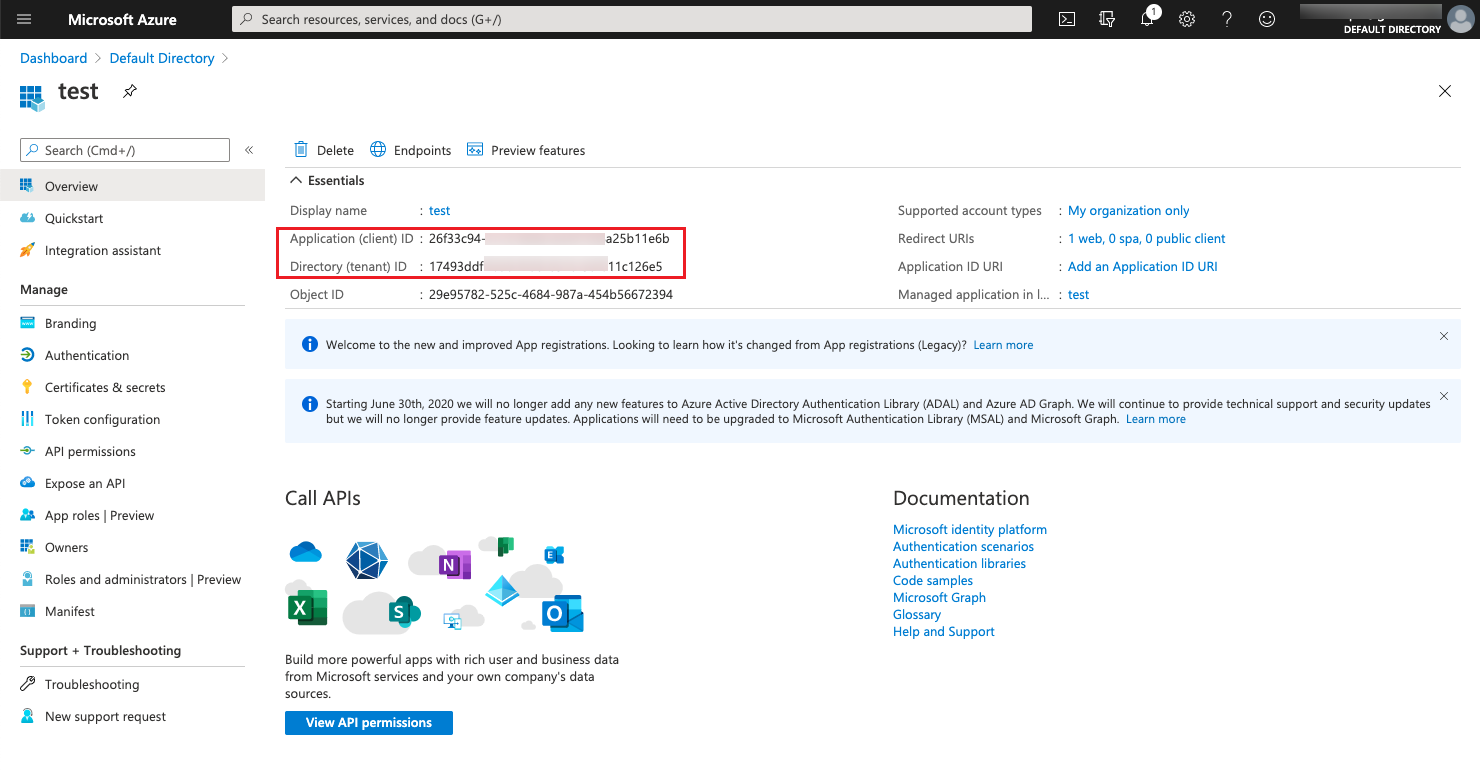
After successful creation, the system automatically displays the application details page just created. The application (client) ID on this page is the required client ID and the directory (tenant) ID is the required tenant ID.
-
Click the “Certificates and secrets” menu item on the Application Details page. Go to the Certificates and secrets page. Click the “Create Client Password” button.
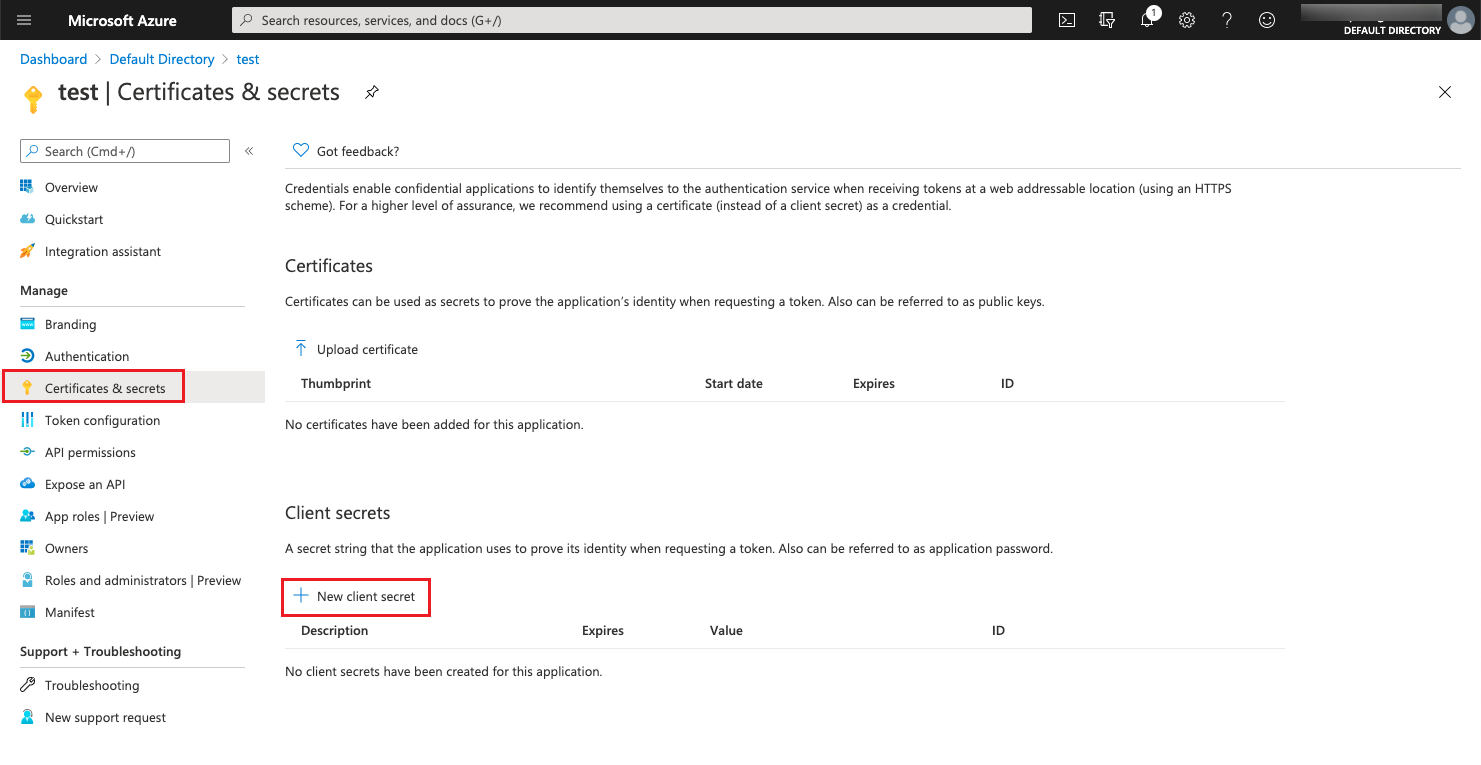
-
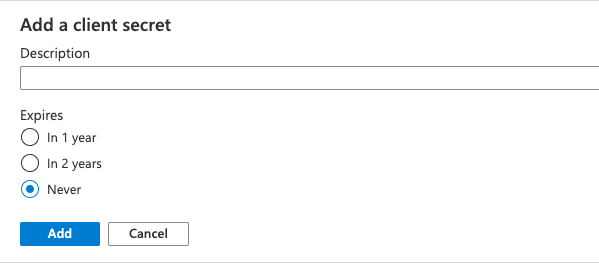
In the Add Client dialog box that pops up, enter the password description, the expiration date as “Never”, and click the “Add” button to create a new client password.
-
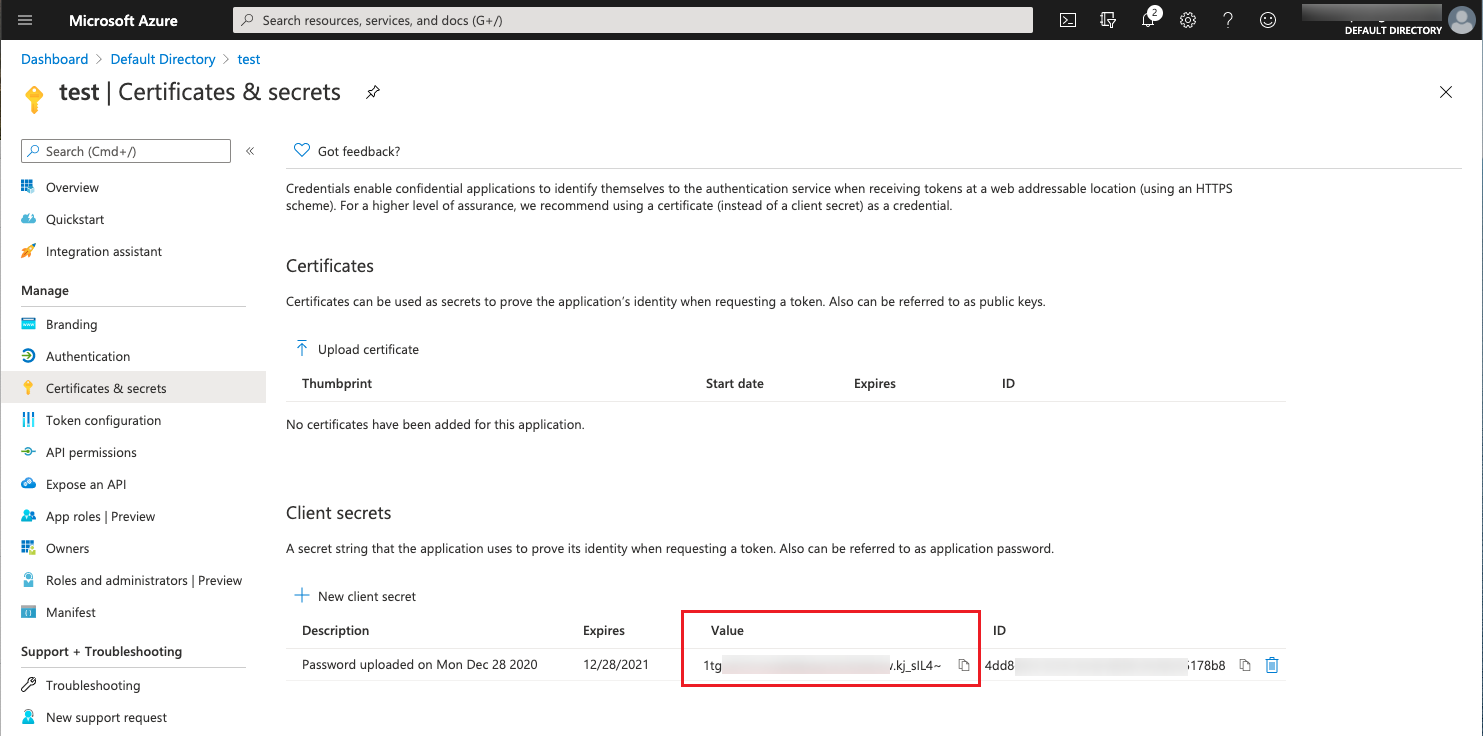
After successful saving, the value of the page password will be the required client password information.
How to grant subscription permissions to an application?
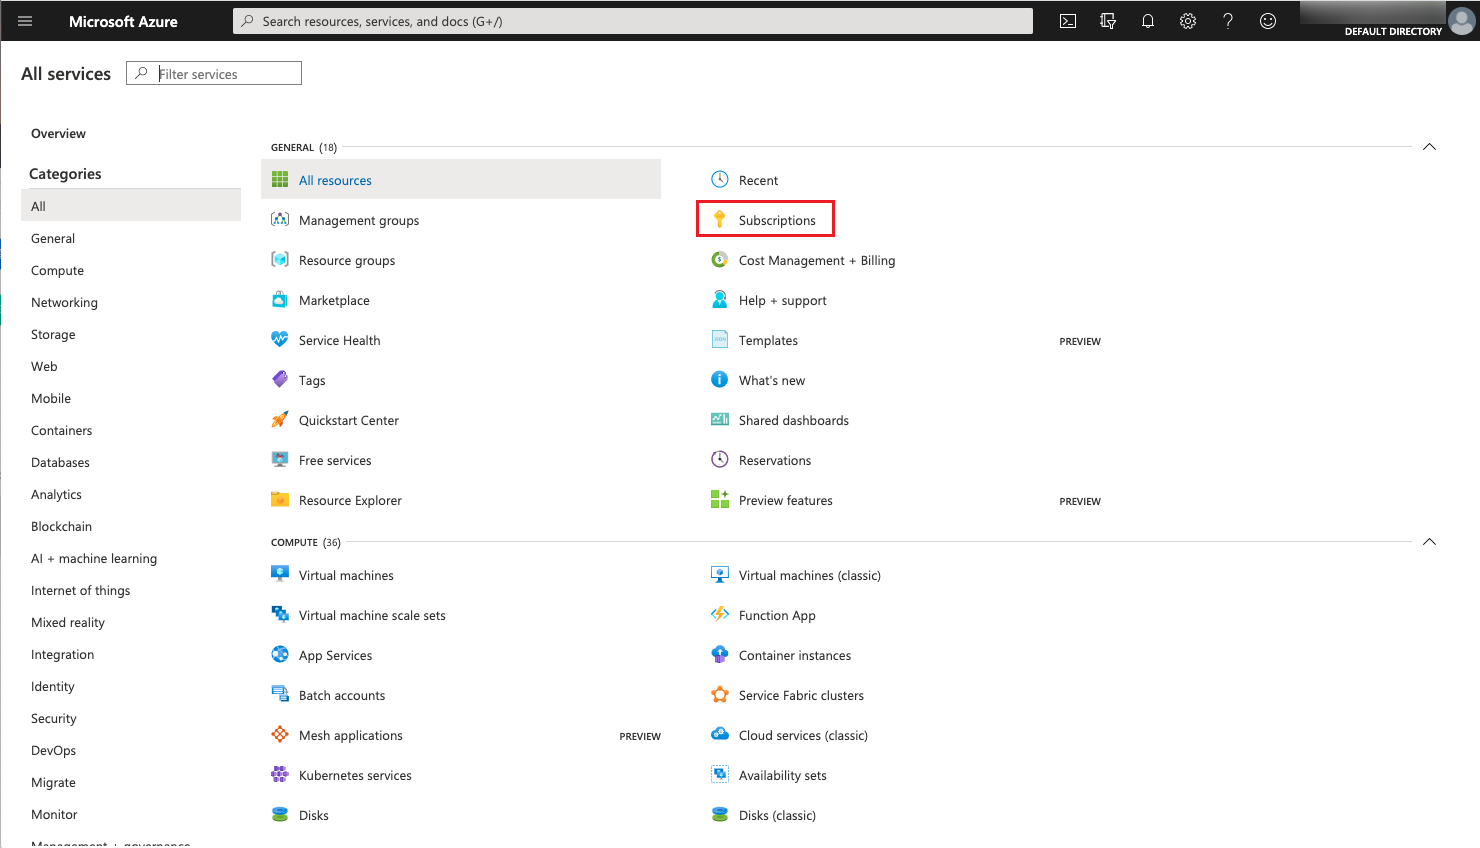
-
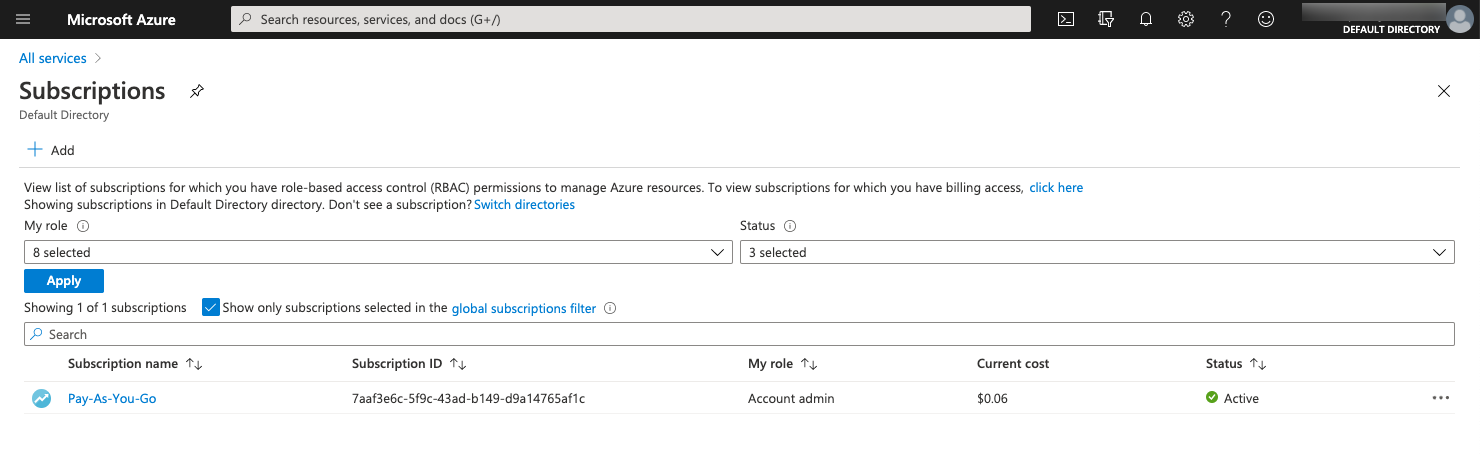
Log in to the Azure console, click the “All Services” menu item in the left navigation bar, and click the “Subscriptions” menu item in the All Services list to enter the list of subscriptions.
-
click on the subscriptions that need to be authorized to enter the subscription details page.
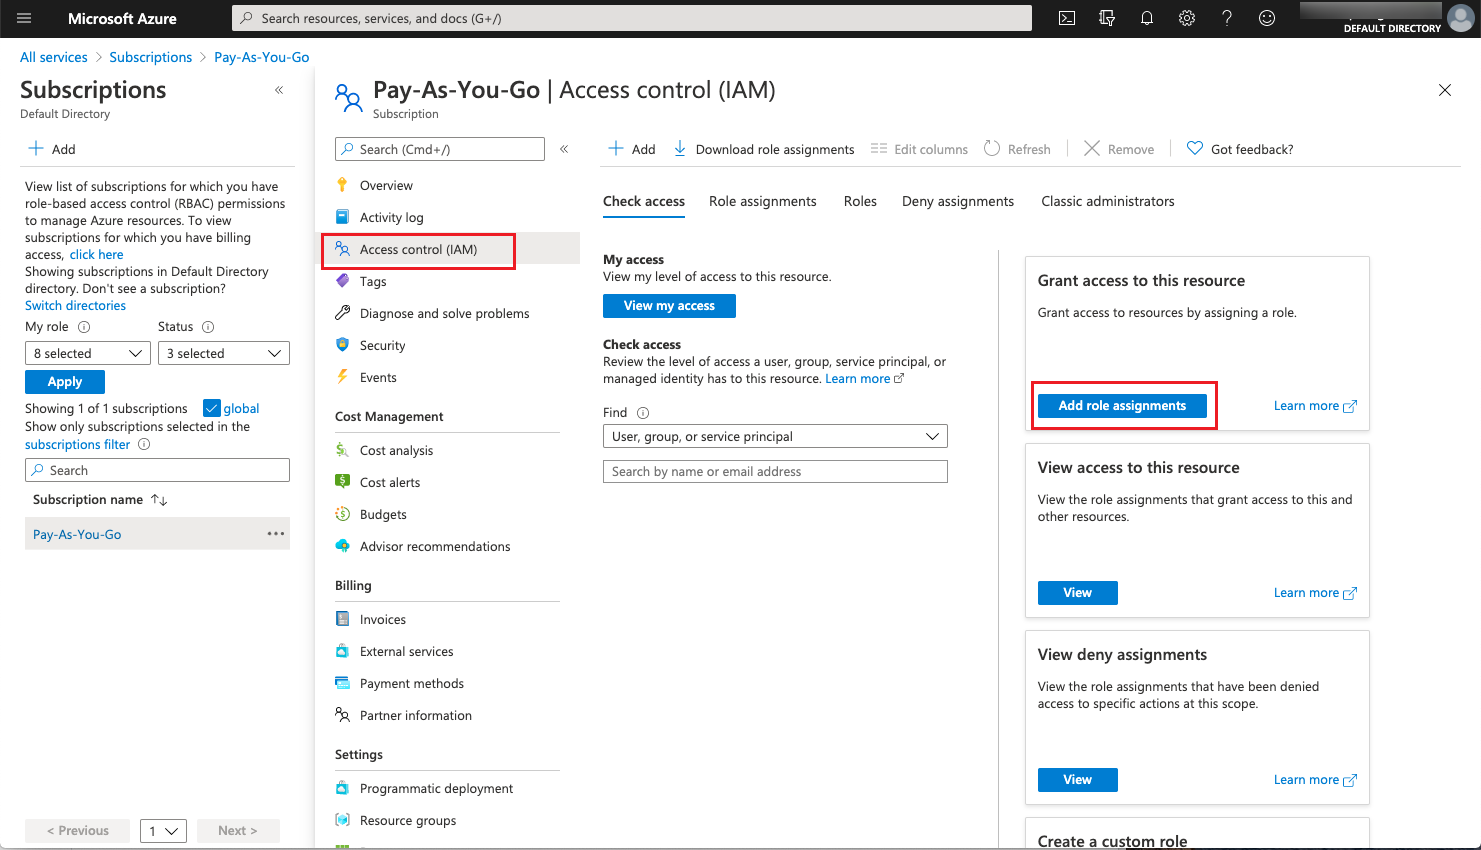
-
Click “Access Control (IAM)" , and click the “Add Role Assignment” button on the Access Control (IAM) page to enter the Add Role Assignment page.
-
On the Add Role Assignment page, set the role to “Owner” , assign the access rights to the dialog box “User, group or service principal”, search for the name of the application created in the previous step in the Select Search box, and select the application. Search for the name of the application created in the previous step in the Select Search box, select the application, and click the “Save” button.
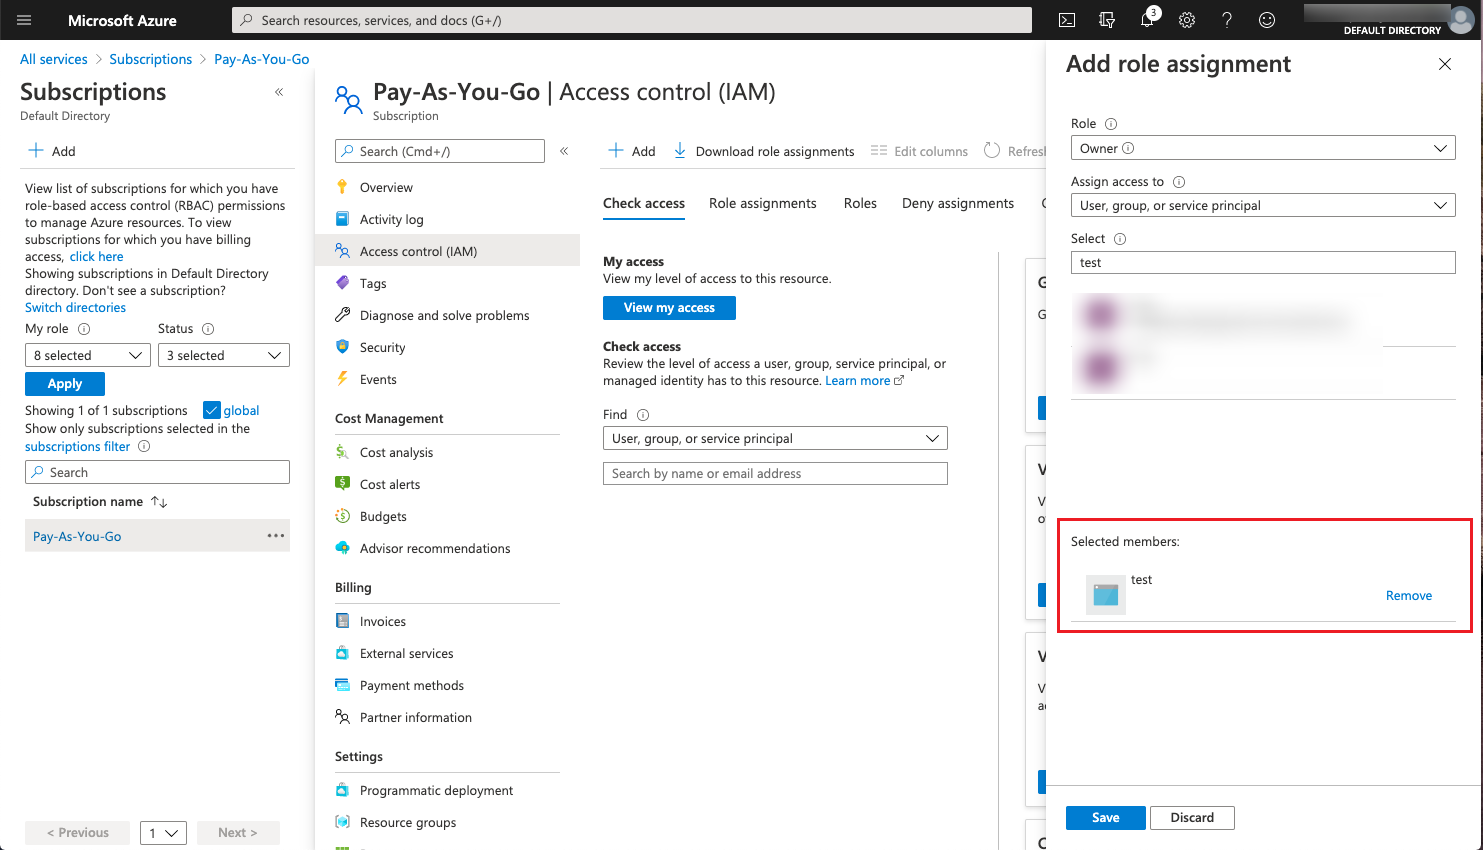
-
On the Role Assignment page, The aubscription permissions have been granted to the application.

API permissions setting
Make sure the application has the following permissions under the Azure Active Directory API.
| Region | API Permissions |
|---|---|
| Azure China | Dictionary: Dictionary.Read.All, Dictionary.ReadWrite.All Domain: Domain.Read.All |
| Azure | Dictionary: Dictionary.Read.All, Dictionary.ReadWrite.All Domain: Domain.Read.All, Domain.ReadWrite.All; Member: Member.Read.Hidden; Policy: Policy.Read.All; |
View and setup steps
Take Azure Global as an example.
-
In the Azure console, click the “Azure Active Directory/App registration” menu item in the left navigation bar to enter the application registration page.
-
On the newly registered application details page, click “API Permissions” menu item to enter the API Permissions page and view the API permissions.
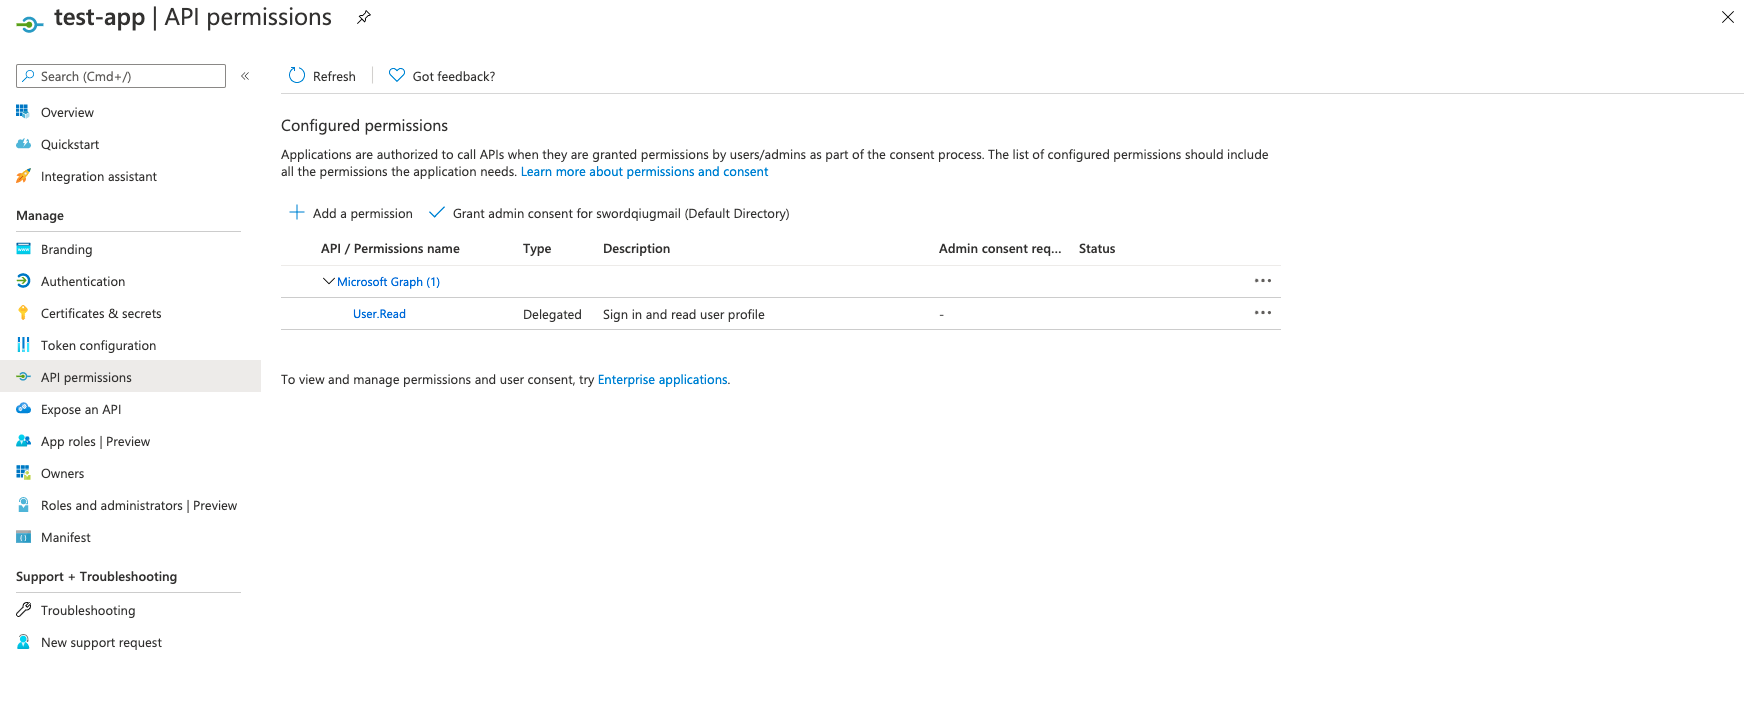
-
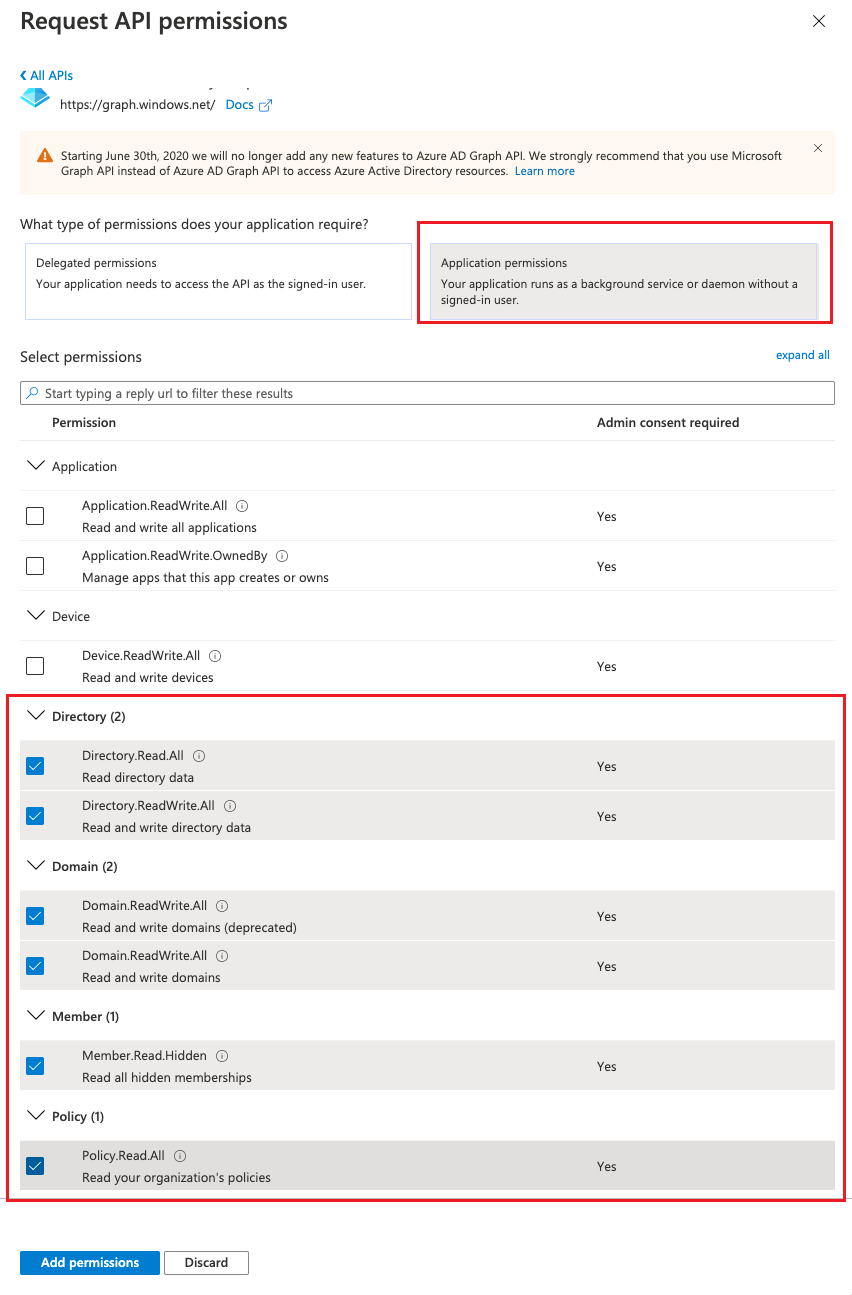
Check whether the API permission of the application meets the above requirements, if not, click “Add a Permission” button to bring up the Request API Permissions dialog.
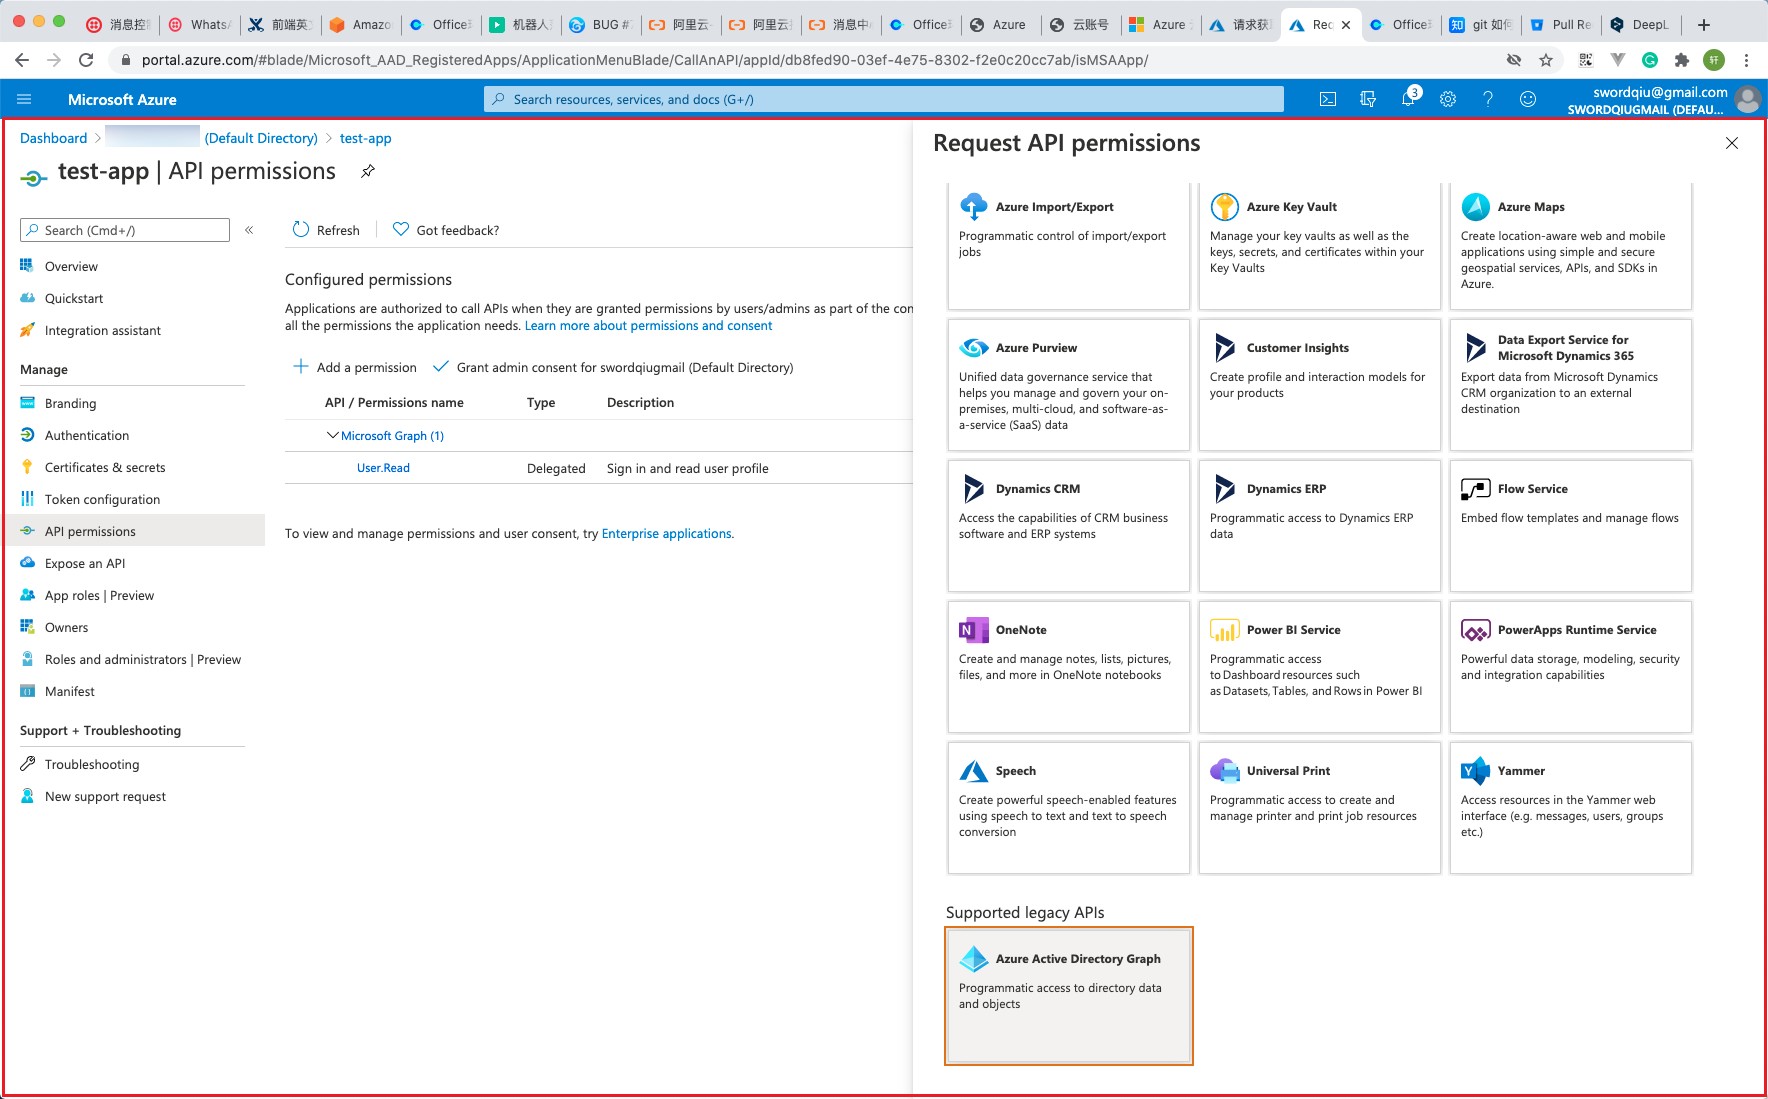
-
Select “Azure Active Directory”, select “Application Permissions” for the application, and check all permissions under Dictionary and Domian, click “Add Permissions” button to complete the configuration.
Azure account permission requirements
| Feature | Read-only permissions | Read-write permissions |
|---|---|---|
| All Features | Reader | Owner |
| VM Instance, Disks, Security Groups, Images, Snapshot, LB Instance | - | Virtual Machine Contributor Classic Virtual Machine Contributor |
| Project | - | - |
| Vpc, Vpc Peering, Routing Table, NAT, Elastic NIC,EIP, NAT, WAF | - | Network Contributor, Classic Network Contributor |
| OSS | Storage Blob Data Reader | Storage Blob Data Owner |
| RDS | Cloud SQL Viewer | Cloud SQL Admin |
| Redis | Redis Enterprise Cloud Viewer | Redis Enterprise Cloud Admin |
| NAS | Storage File Data SMB Share Reader | Storage File Data SMB Share Contributor |
| WAF | - | - |
| IAM | - | Graph Owner Resource Policy Contributor |
| DNS | - | DNS Zone Contributor Private DNS Zone Contributor |
| Billing | Billing Reader Cost Management Reader |
Cost Management Contributor |
| Monitoring | Monitoring Reader | Monitoring Contributor |
How to get Azure Contract ID and key?
-
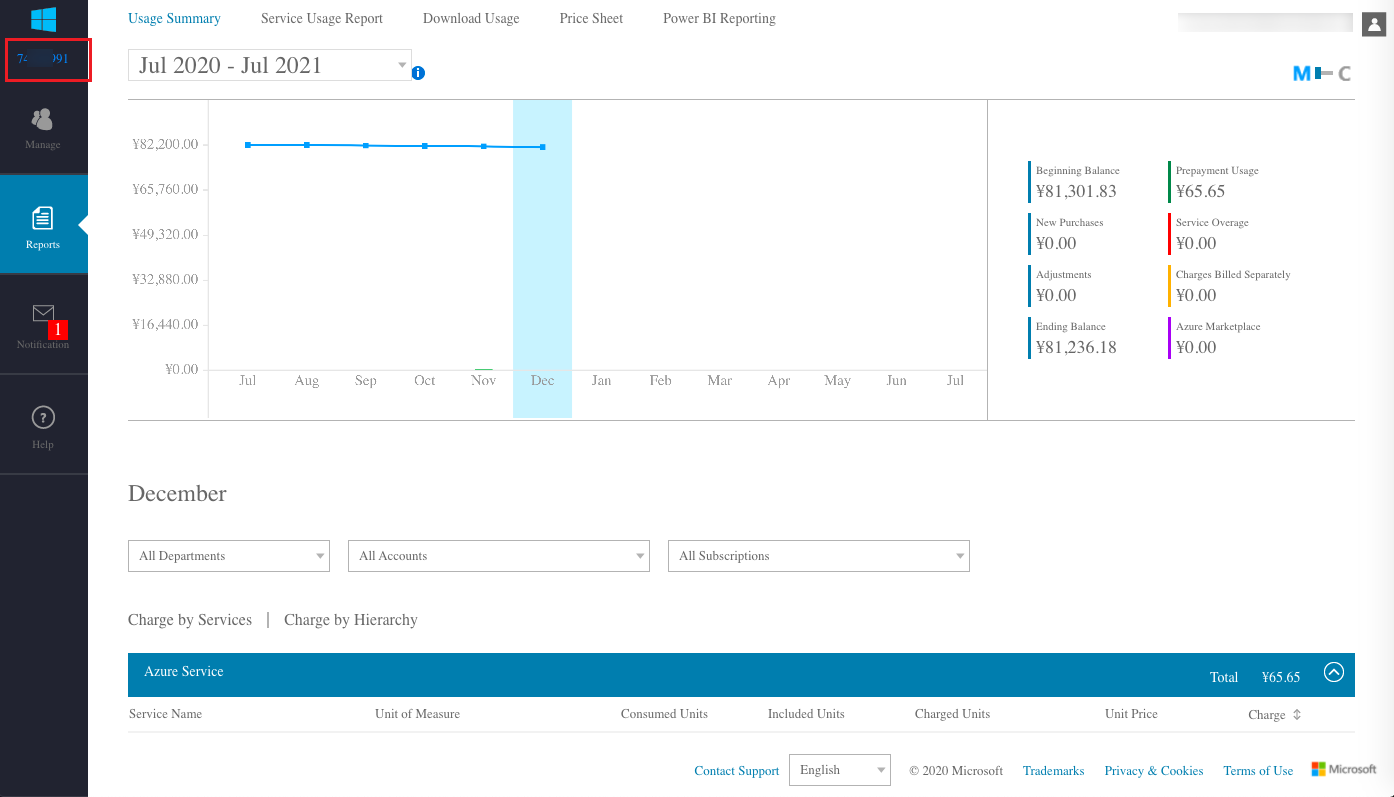
Login to Azure EA Portal China or EA Portal, after signing in the system, the number in the top left corner is the Contract ID.
-
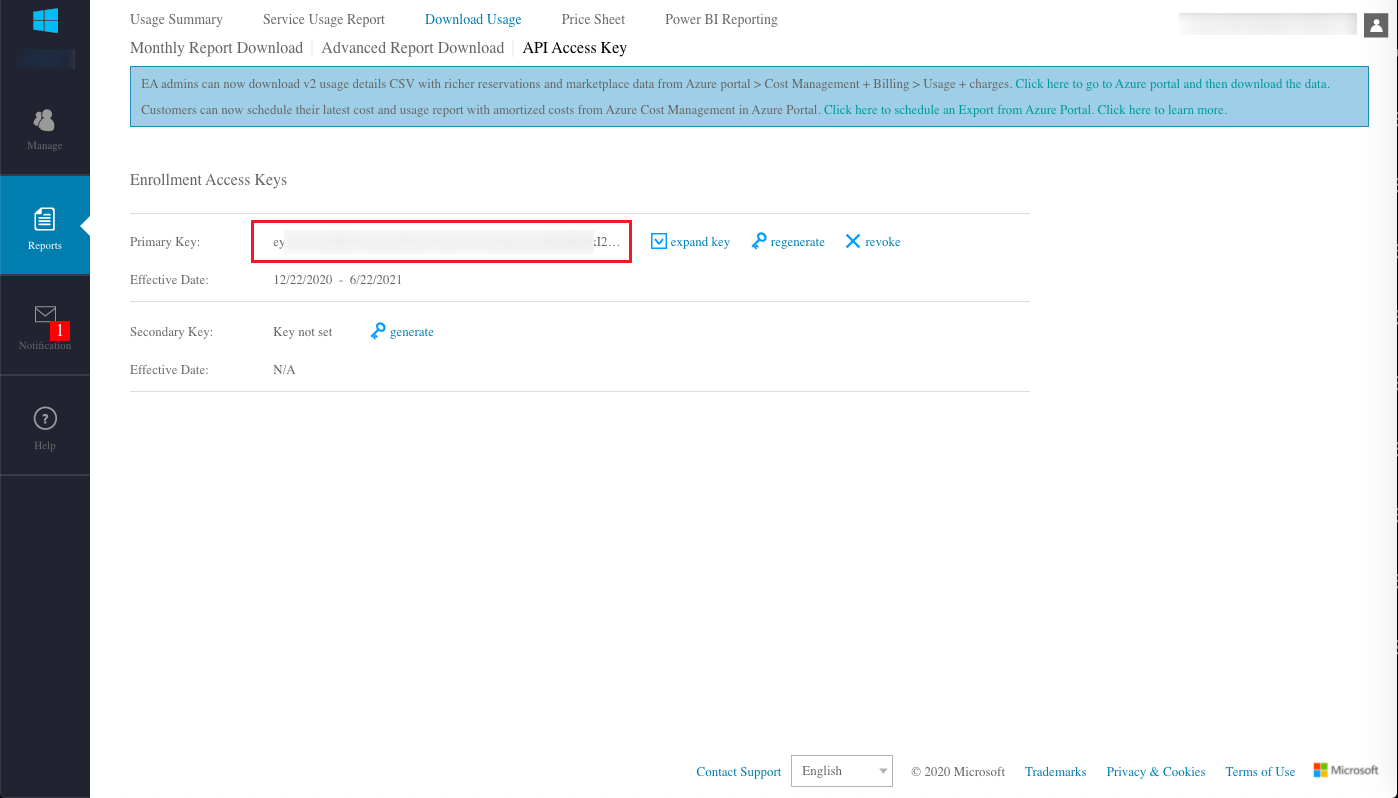
Click the “Reports” menu item on the left navigation bar, and select the “Download Usage > API Access Keys” tab, the main key on this page is the key.
Create Huawei cloud account
- Click the “Create” button at the top of the list on the Accounts page to enter the Create Accounts page.
- Select the cloud platform as Huawei Cloud, click the “Next: Configure Cloud Account” button, and enter the Configure Accounts page.
- Set the following parameters.
- Name: The name of the Huawei cloud account.
- Account type: Currently supports managing global and China Huawei Cloud accounts.
- Key ID/Password: The key ID and password information of the managed Huawei Cloud platform. For details, please see How to get Huawei Cloud related parameters?.
- Domain: Select the domain to which the cloud account belongs. When the cloud account is private, all project users under the domain can use the cloud account to create resources.
- Owner Projects: Select the local project that synchronizes the resources on the cloud account to the OneCloud platform. If you want to categorize the resources on the cloud account according to the projects on the cloud, please specify the default resource attribution project first and check the box to create the project automatically. After checking the box, a local project with the same name as the project on the cloud will be created in the OneCloud platform and the resources will be synchronized to the corresponding project. Resources without project attribution on the cloud will be synchronized to the default resource attribution project.
- Proxy: Set this item when the cloud account needs a proxy to access normally, leave it blank for direct connection. If there is no suitable proxy, click “Create” hyperlink directly and set relevant parameters in the pop-up Create Proxy dialog box to create a proxy.
- Enable SSO Login: After enabling this item, it will automatically synchronize the system’s SAML information to the cloud account and become the identity provider for login on the cloud. Realize single sign-on to the public cloud platform through this system.
- Auto sync: Set whether to automatically synchronize the information on Huawei Cloud Platform, and set the time interval for auto-sync.
- Sharing range: Set the sharing range of the cloud account. If the default is no sharing, only the domain where the cloud account is located can use the account, if set to global sharing, all users on the platform can use the cloud account to create resources.
- Click the “Connection Test” button to test whether the input parameters are correct.
- Click the “OK” button to create a Huawei Cloud account. And go to the Billing File Access Information page to configure the billing parameters of the cloud account so that users can view the billing information of the cloud account in Expense.
- The Billing File Access Information page is optional. If you do not need to view the cloud account billing information in the
OneCloud
platform, you can directly click the Skip button. If you need to view billing information in
OneCloud
platform, etc. please configure relevant parameters, and click “OK” button after the configuration is completed and the test is passed.
- Cloud account type: Including main account and associated account, please make sure the main account has been imported into OneCloud platform before using the associated account, and select the main account when using the associated account.
- Storage bucket URL: The URL of the oss bucket where the bill file is located. please see How to get the Expense OSS Bucket URL? for details.
- Scope of Bill Analysis: Set the scope of the platform to analyze cloud account billing. Only Accounts Managed by Platform is supported.
- Accounts Managed by Platform: that is, the billing information of the main account and the sub-account associated with the main account is collected. If the account is only used as the payment account of other accounts, the billing files of other accounts collected will be discarded.
- Collect bills immediately: OneCloud The platform automatically collects bills at 4am every day by default. After enabling this item, bills will be collected immediately after configuring the bill file access information.
- Time range: When collect bills immediately is enabled, it supports setting the time range to immediately collect bills within the time range, please make sure there is bill data within the selected time range. It is recommended to collect bills within 1~6 months, otherwise there will be too much data, which will cause much pressure on the system and affect the daily task of collecting bills.
- Click the “Connection Test” button to test whether the parameters entered are correct.
How to get Huawei Cloud related parameters?
How to get the API key of Huawei Cloud?
-
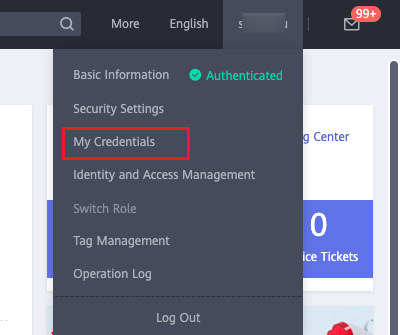
Login to the Huawei Cloud console, hover over the user name in the upper right corner, and select the drop-down menu “My Credentials” menu item to enter the My Credentials page.
-
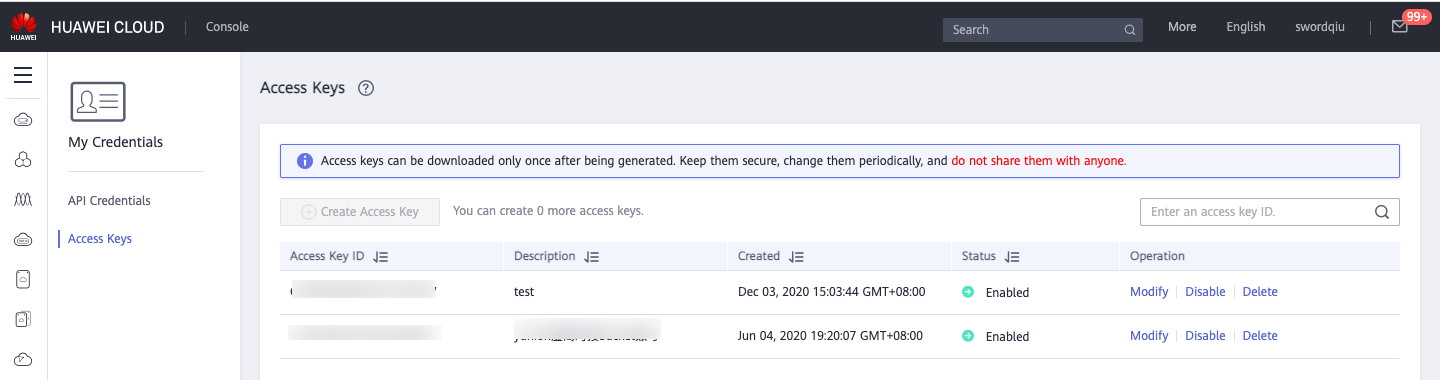
Click the Access Key menu on the left, and click the “Create Access Key” button on the Access Key page.
-
After passing the verification, the Excel table with the credentials name will be downloaded, and you can get the Access Key ID and Secret Access Key after opening the table.

Huawei Cloud account permission requirements
| Feature | Read-Only Permission | Read-Write Permissions |
|---|---|---|
| All Features | Tenant Guest IAM ReadOnlyAccess |
Tenant Administrator Security Administrator |
| VM Instance | ECS ReadOnlyAccess | ECS FullAccess |
| Disks, Snapshots | EVS ReadOnlyAccess | EVS FullAccess |
| Project | EPS ReadOnlyAccess | EPS FullAccess |
| Images | IMS ReadOnlyAccess | IMS FullAccess |
| VPC, VPC Peering, Routing table, Elastic NIC,EIP, Security Group | VPC ReadOnlyAccess | VPC FullAccess |
| NAT | NAT ReadOnlyAccess | NAT FullAccess |
| OSS | OBS ReadOnlyAccess | OBS Administrator |
| LB Instance | ELB ReadOnlyAccess | ELB FullAccess |
| RDS | RDS ReadOnlyAccess | RDS FullAccess |
| Redis | DCS ReadOnlyAccess | DCS FullAccess |
| Log | CTS ReadOnlyAccess | CTS FullAccess |
| NAS | SFS ReadOnlyAccess SFS Turbo ReadOnlyAccess |
SFS FullAccess SFS Turbo FullAccess |
| WAF | WAF ReadOnlyAccess | WAF FullAccess |
| IAM | IAM ReadOnlyAccess | Security Administrator |
| DNS | DNS ReadOnlyAccess | DNS FullAccess |
| Billing | BSS Operator | BSS Administrator |
| Monitoring | CES ReadOnlyAccess | CES FullAccess |
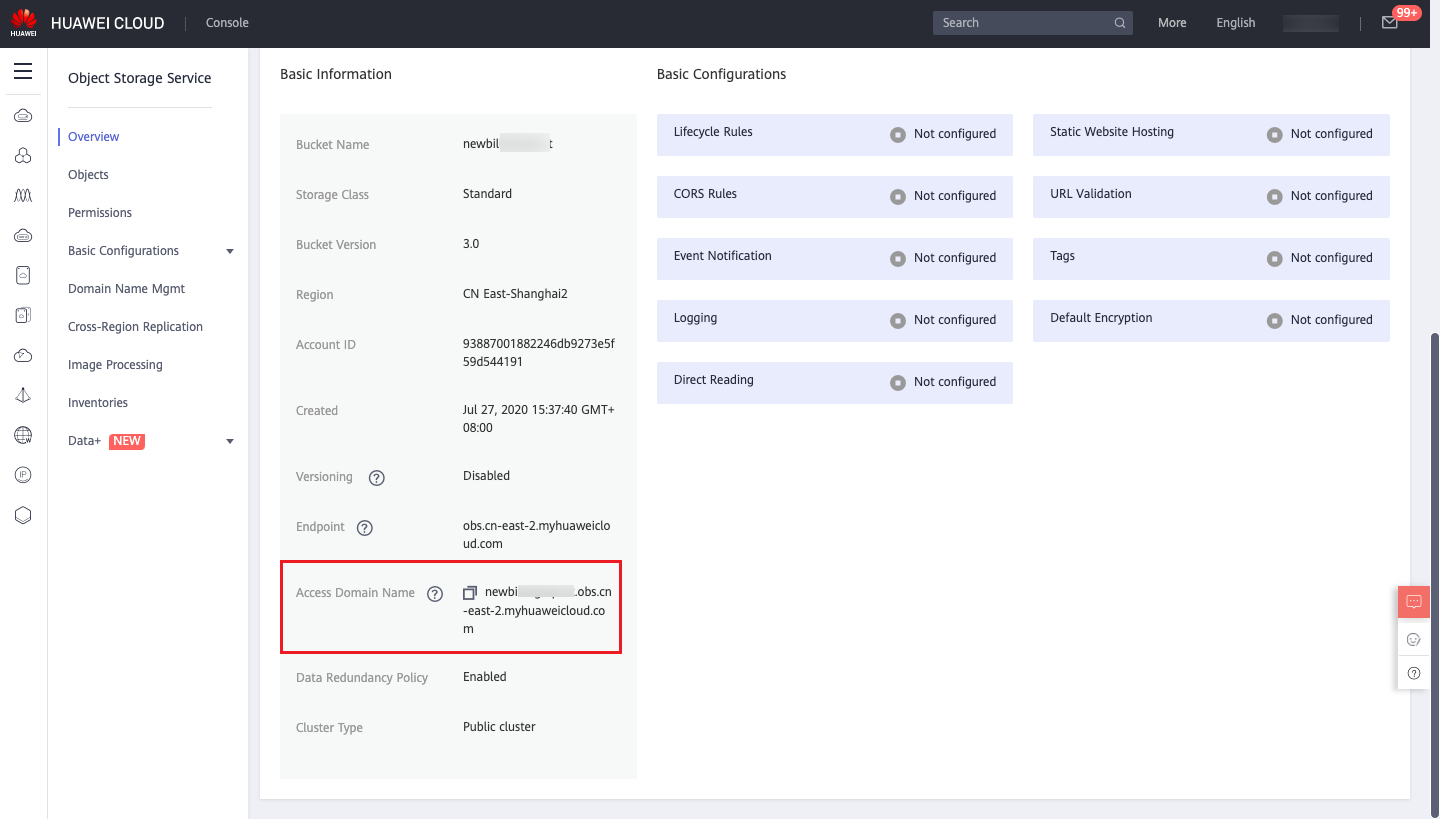
How to get the Expense OSS Bucket URL?
-
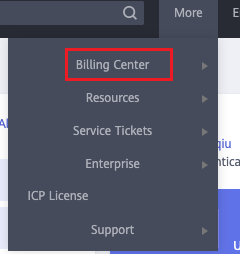
Log in to Huawei Cloud Platform and click the top “Expense Center” menu item to enter the Expense Center page.
-
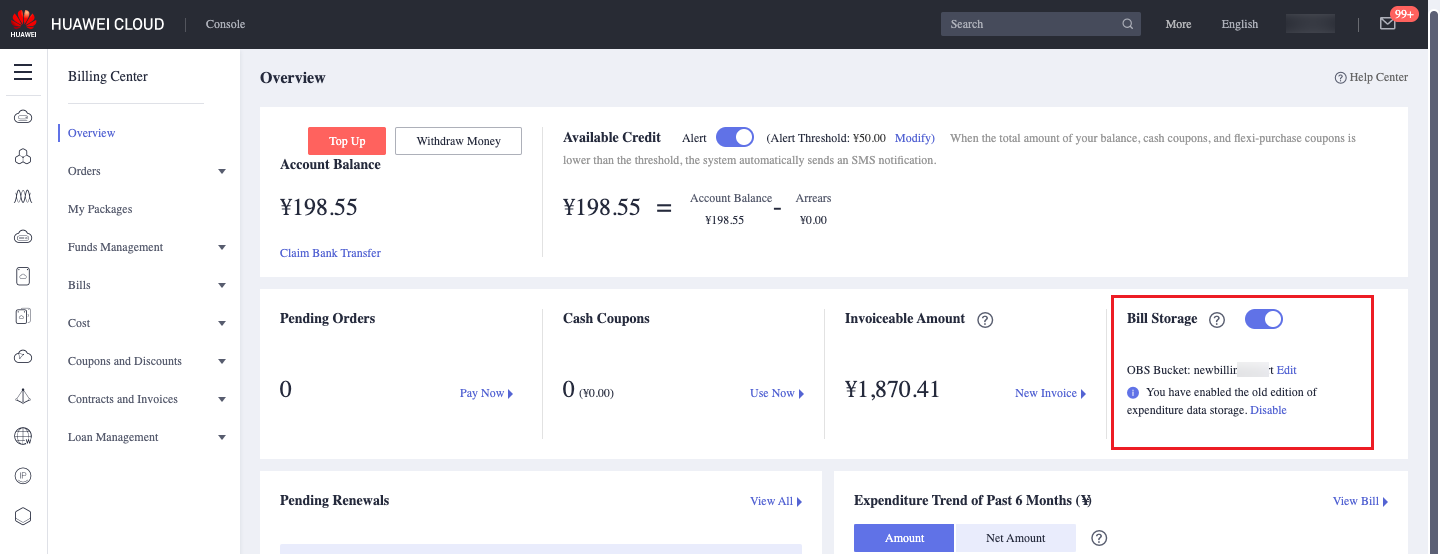
Click the [Overview] menu on the left, and check and record the object storage name in the “Billing Data Storage” section on the right side of the overview page, if not configured, you need to enable the billing data storage in this page, and configure the OBS bucket for storage and perform authorization verification operation, etc. After the setting is completed, the daily incremental billing data will be stored on the corresponding OBS synchronously. After setting, the daily incremental billing data will be stored on the corresponding OBS. It is recommended that only billing files are stored in this bucket.
-
Check the overview information of the corresponding oss bucket in the Object Storage Service (OBS) of Huawei Cloud Console, and get the access domain name which is the oss bucket URL.
Create Tencent cloud account
- Click the “Create” button at the top of the list on the cloud account page to enter the new cloud account page.
- Select the cloud platform as Tencent Cloud and click the “Next: Configure Cloud Account” button to enter the Configure Accounts page.
- Set the following parameters.
- Name: The name of Tencent cloud platform.
- APP ID/Key ID/Password: The APP ID of the Tencent Cloud account has a unique correspondence with the account ID. APP ID/key ID/password of the managed Tencent Cloud platform. For details, please see [Tencent Cloud-related parameters acquisition methods](# Tencent Cloud-related parameters acquisition methods).
- Domain: Select the domain to which the cloud account belongs. When the cloud account is private, all project users under the domain can use the cloud account to create resources.
- Owner Projects: Select the local project that synchronizes the resources on the cloud account to the OneCloud platform. If you want to categorize the resources on the cloud account according to the projects on the cloud, please specify the default resource attribution project first and check the box to create the project automatically. After checking the box, a local project with the same name as the project on the cloud will be created in the OneCloud platform and the resources will be synchronized to the corresponding project. Resources without project attribution on the cloud will be synchronized to the default resource attribution project.
- Proxy: Set this item when the cloud account needs a proxy to access normally, leave it blank for direct connection. If there is no suitable proxy, click “Create” hyperlink directly and set relevant parameters in the pop-up Create Proxy dialog box to create a proxy.
- Enable SSO Login: After enabling this item, the SAML information of the system will be automatically synchronized to the cloud account and become the identity provider for login on the cloud. Realize single sign-on to the public cloud platform through this system.
- Auto sync: Set whether to automatically synchronize the information on Tencent Cloud Platform and set the time interval for auto-sync.
- Sharing range: Set the sharing range of the cloud account. If the default is no sharing, only the domain where the cloud account is located can use the account, if set to global sharing, all users on the platform can use the cloud account to create resources.
- Click the “Connection Test” button to test whether the parameters entered are correct.
- Click the “OK” button to create a Tencent Cloud account and enter the Billing File Access Information page.
- Tencent Cloud Billing is acquired through API, so you only need to configure the following parameters on this page.
- Collect bills immediately: OneCloud The platform automatically collects bills at 4am every day by default. After enabling this item, bills will be collected immediately after configuring the bill file access information.
- Time range: When immediate bill collection is enabled, it supports setting the time range to immediately collect bills within the time range, please make sure there is bill data within the selected time range. It is recommended to collect bills within 1~6 months, otherwise there will be too much data, which will cause much pressure on the system and affect the daily task of collecting bills.
- Click “OK” button to create Tencent Cloud account and collect bills.
How to get Tencent Cloud related parameters?
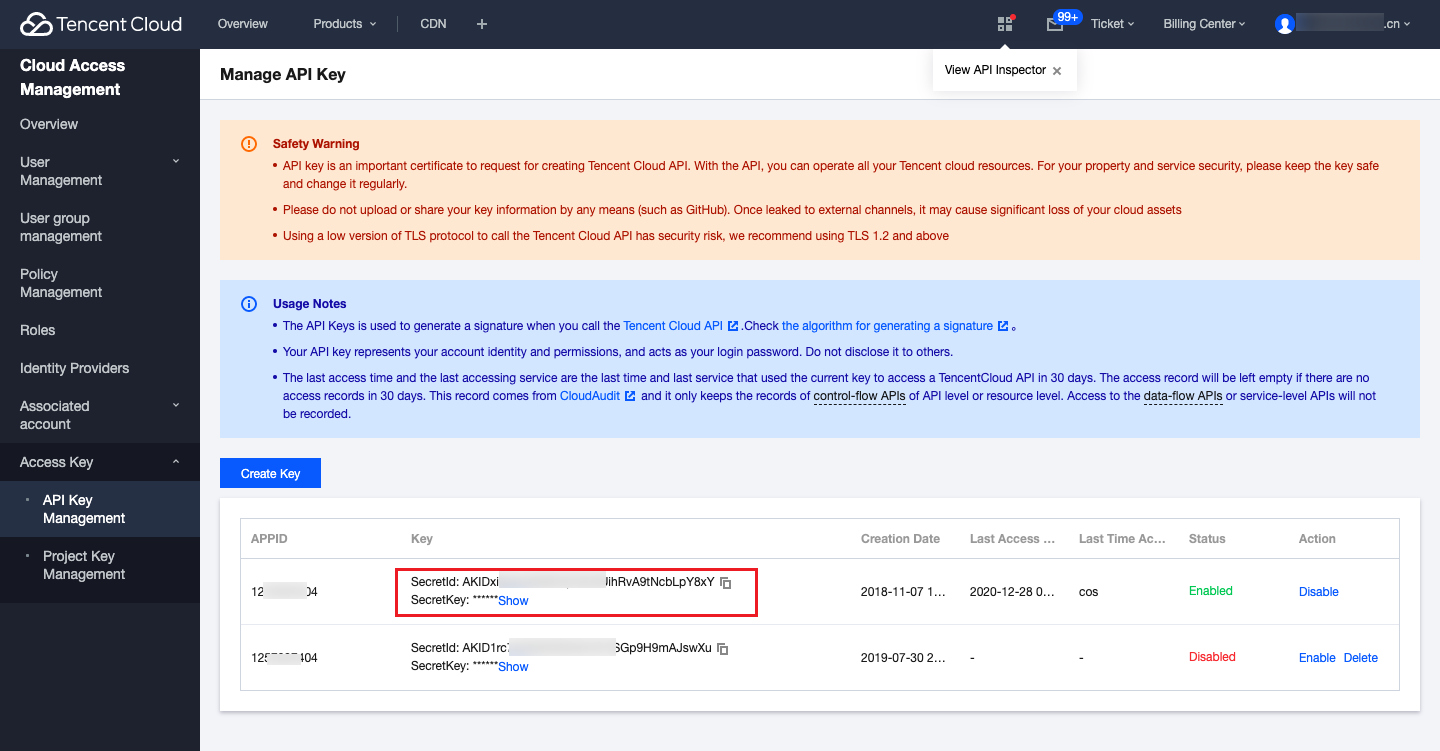
How to get Tencent Cloud API key?
-
Login to Tencent Cloud console, click “Cloud Products” menu item in the upper right corner, and search for “Cloud API Key” menu item in the expanded menu, and click to enter the API key management page.
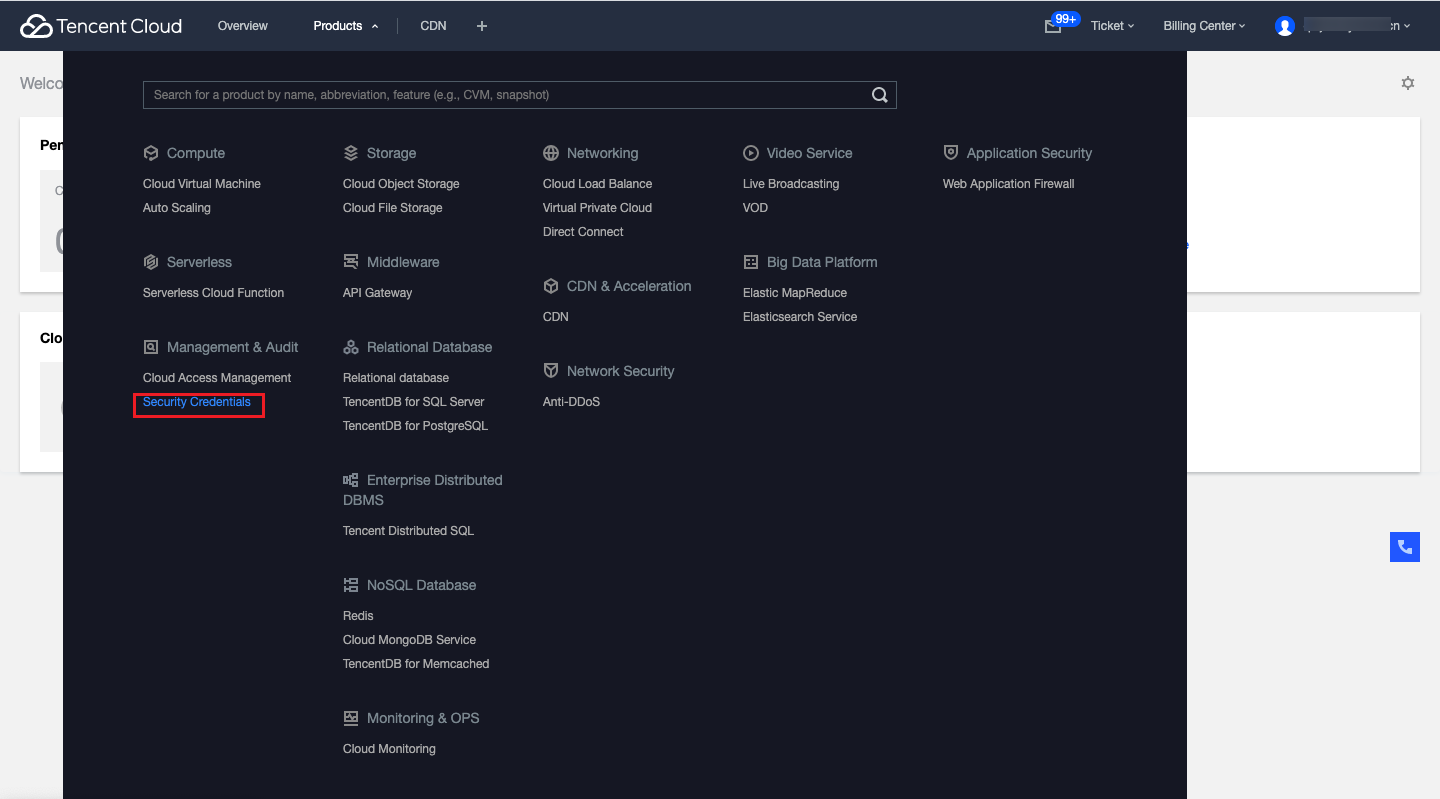
-
Get the values corresponding to APP ID, key ID (SecretId) and password (SecretKey) in the API key management page.
Tecent Cloud account permission requirements
| Feature | Read-only permissions | Read-write permissions |
|---|---|---|
| All Features | ReadOnlyAccess | AdministratorAccess |
| VM Instance, Security Groups, Images, Disks, Snapshots | QcloudCVMReadOnlyAccess | QcloudCVMFullAccess |
| VPC, VPC peering, Routing Table, NAT, Elastic NIC | QcloudVPCReadOnlyAccess | QcloudVPCFullAccess |
| EIP | - | QcloudEIPFullAccess |
| OSS | QcloudCOSReadOnlyAccess | QcloudCOSFullAccess |
| LB Instance | QcloudCLBReadOnlyAccess | QcloudCLBFullAccess |
| RDS | QcloudMariaDBReadOnlyAccess QcloudCDBReadOnlyAccess QcloudSQLServerReadOnlyAccess QcloudPostgreSQLReadOnlyAccess |
QcloudMariaDBFullAccess QcloudCDBFullAccess QcloudSQLServerFullAccess QcloudPostgreSQLFullAccess |
| Redis | QcloudRedisReadOnlyAccess | QcloudRedisFullAccess |
| Log | QcloudAuditReadOnlyAccess | QcloudAuditFullAccess |
| NAS | - | - |
| WAF | - | - |
| IAM | QcloudCamReadOnlyAccess | QcloudCamFullAccess |
| DNS | QcloudDNSPodReadOnlyAccess QcloudPrivateDNSReadOnlyAccess |
QcloudPrivateDNSFullAccess QcloudDNSPodFullAccess |
| Billing | - | QCloudFinanceFullAccess |
| Monittoring | QcloudMonitorReadOnlyAccess | QcloudMonitorFullAccess |
Create UCloud account
- Click the “Create” button at the top of the list on the cloud account page to enter the new cloud account page.
- Select the cloud platform as UCloud, click “Next: Configure Cloud Account” button, and enter the Configure Accounts page.
- Set the following parameters.
- Name: the name of UCloud platform.
- Public/private key: Please see How to get UCloud related parameters? for details.
- project_id: This item must be configured when using a UCloud sub-account. This item is not required when using a master account.
- Domain: Select the domain to which the cloud account belongs. When the cloud account is private, all project users under the domain can use the cloud account to create resources.
- Owner Projects: Select the local project that synchronizes the resources on the cloud account to the OneCloud platform. If you want to categorize the resources on the cloud account according to the projects on the cloud, please specify the default resource attribution project first and check the box to create the project automatically. After checking the box, a local project with the same name as the project on the cloud will be created in the OneCloud platform and the resources will be synchronized to the corresponding project. Resources without project attribution on the cloud will be synchronized to the default resource attribution project.
- Proxy: Set this item when the cloud account needs a proxy to access normally, leave it blank for direct connection. If there is no suitable proxy, click “Create” hyperlink directly and set relevant parameters in the pop-up Create Proxy dialog box to create a proxy.
- Auto sync: Set whether to automatically synchronize the information on UCloud platform and set the time interval for auto-sync.
- Click the “Connection Test” button to test whether the parameters entered are correct.
- Click the “OK” button to create a UCloud account.
How to get UCloud related parameters?
How to get UCloud API key?
-
log in to the UCloud console, click “All Products” at the top, search or select the “UAPI” menu item to access the API products page.

-
Click the “API Key” tab to enter the API Key page, click the “Show” button to perform secondary verification by SMS.
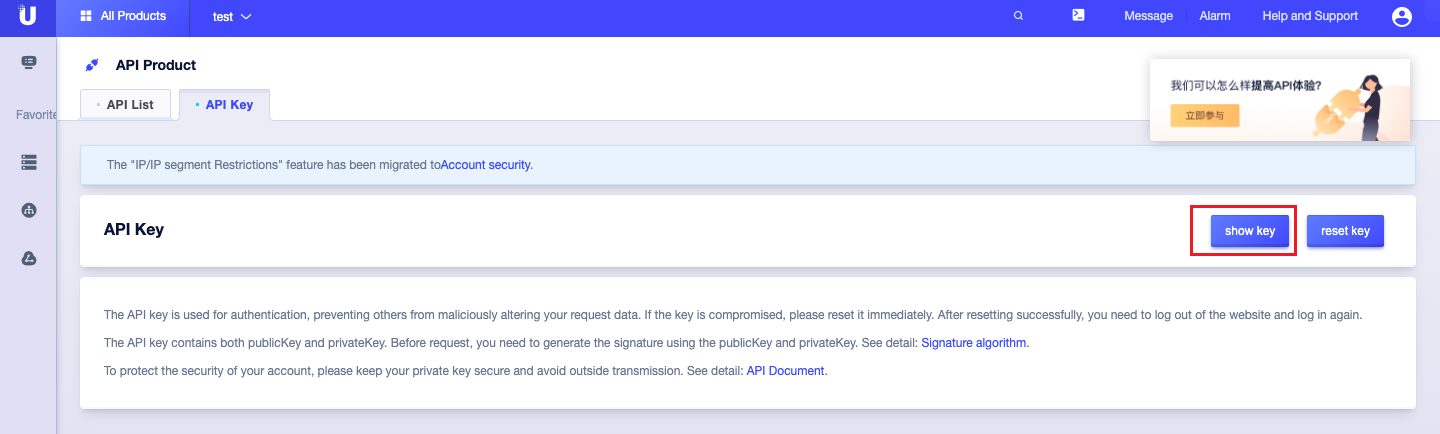
-
Get the public key and private key values after passing the cell phone verification.
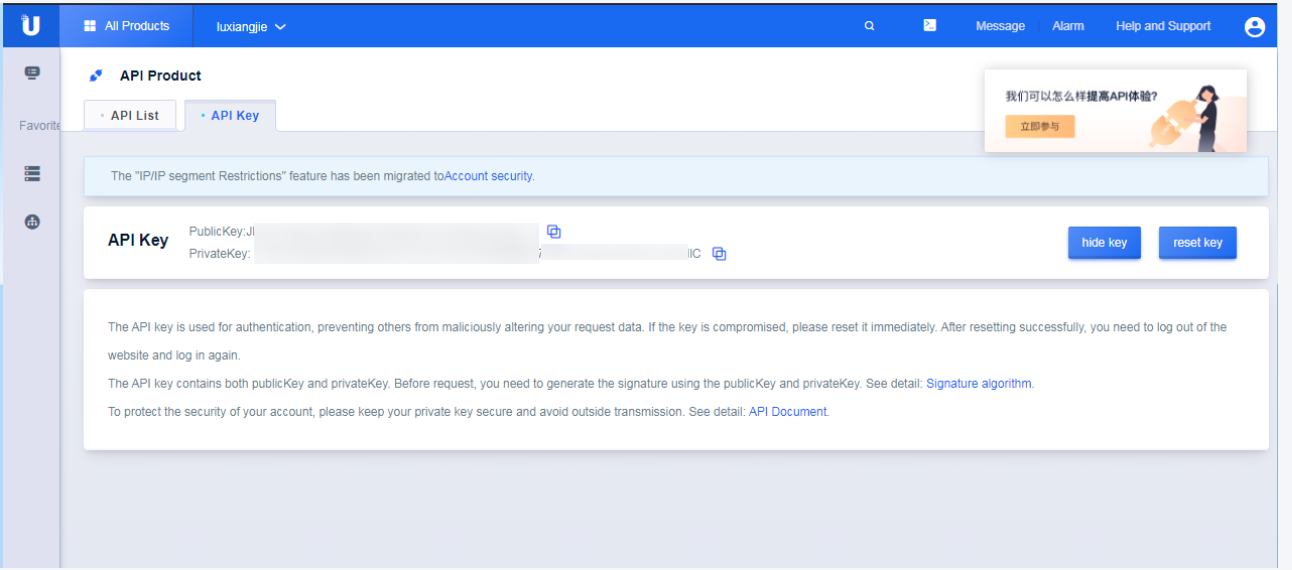
-
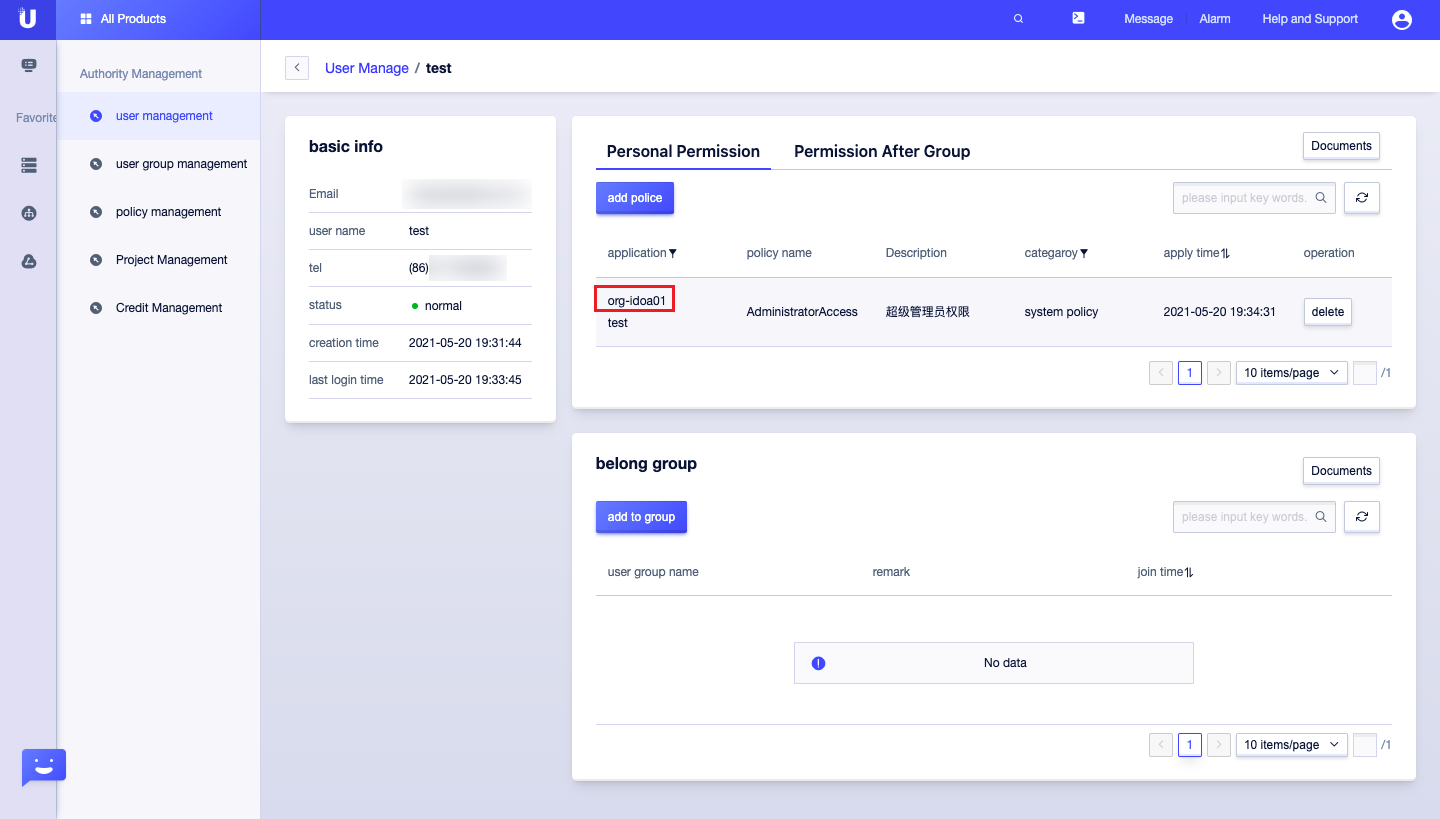
If you use sub-account, besides getting the public key or private key, you also need to get the project_id, and get the project_id in “Authority Management - User Management - Sub-account Details” as the project ID of the application project in personal permission.
UCloud account permission requirements
| Permissions Policy | Policy Description |
|---|---|
| AdministratorAccess | Super administrator privileges |
Create Google account
Note
- Please ensure that the OneCloud platform is interoperable with the Google Cloud network.
- If the OneCloud platform is not interoperable with the Google Cloud network, you can access Google Cloud by configuring a proxy.
- Click the “Create” button at the top of the list on the cloud account page to enter the new cloud account page.
- Select the cloud platform as “Google” and click “Next: Configure Cloud Account” button to enter the Configure Accounts page.
- Set the following parameters.
- Name: The name of the cloud account of Google Cloud.
- Project_id, private_key_id, private_key, client_email and other parameters can be specifically referred to [Google related parameters to get the way](#google related parameters to get the way).
- Domain: Select the domain to which the cloud account belongs. When the cloud account is private, all project users under the domain can use the cloud account to create resources.
- Owner Projects: Select the local project that synchronizes the resources on the cloud account to the OneCloud platform. If you want to categorize the resources on the cloud account according to the projects on the cloud, please specify the default resource attribution project first and check the box to create the project automatically. After checking the box, a local project with the same name as the project on the cloud will be created in the OneCloud platform and the resources will be synchronized to the corresponding project. Resources without project attribution on the cloud will be synchronized to the default resource attribution project.
- Proxy: Set this item when the cloud account needs a proxy to access normally, leave it blank for direct connection. If there is no suitable proxy, click “Create” hyperlink directly and set relevant parameters in the pop-up Create Proxy dialog to create a proxy.
- Auto sync: Set whether to automatically synchronize the information on Google platform, and set the time interval of auto-sync.
- Sharing range: Set the sharing range of the cloud account. If the default is no sharing, only the domain where the cloud account is located can use the account, if set to global sharing, all users on the platform can use the cloud account to create resources.
- Click the “Connection Test” button to test whether the parameters entered are correct.
- Click the “OK” button to create a Google account. And go to the Billing File Access Information page to configure the billing parameters for the cloud account so that the user can view the billing information for the cloud account in Expenses.
- The Billing File Access Information page is optional, if you do not need to view the cloud account billing information in
OneCloud
platform, you can directly click Skip button. If you need to view the billing information in
OneCloud
platform, etc. please configure the relevant parameters, and click “OK” button after the configuration is completed.
- Bill data source: choose the path of Google Billing, including Bigquery and bucket, currently Google Billing no longer supports bucket.
- When you choose “Bigquery” as the billing data source, you need to configure the following parameters.
- Cloud account type: Including main account and associated account, please make sure the main account has been imported into OneCloud platform before using the associated account, and select this main account when using the associated account.
- Bigquery table ID: The table ID of the dataset that stores Google Billing, please refer to [How to configure and get Bigquery configuration information in Google Cloud Platform?] (# How to configure and get bigquery configuration information in Google Cloud Platform).
- Scope of Bill Analysis: Set the scope of the platform to analyze cloud account billing. Only Accounts Managed by Platform is supported.
- Accounts Managed by Platform: that is, the billing information of the main account and the sub-account associated with the main account is collected. If the account is only used as the payment account of other accounts, the billing files of other accounts collected will be discarded.
- When “Bucket” is selected as the billing data source, the following parameters need to be configured.
- Cloud account type: Including main account and associated account, please make sure the main account has been imported into OneCloud platform before using the associated account, and select this main account when using the associated account.
- Billing file/oss bucket URL: the URL of the oss bucket where the billing file is located. please see [How to get the oss bucket URL of the billing file and the file prefix?] (# How to get the oss bucket url of the billing file and the file prefix).
- Billing file/file prefix: that is, the report prefix information exported for the file. When other files are stored in the Expense OSS Bucket in addition to the billing file, the file prefix is needed to get only the billing file in the bucket, etc.
- Scope of Bill Analysis: Set the scope of the platform to analyze cloud account billing. Only Accounts Managed by Platform is supported.
- Accounts Managed by Platform: that is, the billing information of the main account and the sub-account associated with the main account is collected. If the account is only used as the payment account of other accounts, the billing files of other accounts collected will be discarded.
- Usage file/oss bucket URL: I.e. URL of the oss bucket where the usage is located. for details, please see [How to get the usage file oss bucket URL and file prefix?] (# How to get the oss bucket url of the billing file and the file prefix).
- Usage file/file prefix: It is the report prefix information of the setup page. When there are other files stored in the usage bucket besides the usage files, you need the file prefix to get only the usage files in the bucket, etc.
- Collect bills immediately: OneCloud The platform automatically collects bills at 4am every day by default. After enabling this item, bills will be collected immediately after configuring the bill file access information.
- Time range: When collect bills immediately is enabled, it supports setting the time range to immediately collect bills within the time range, please make sure there is bill data within the selected time range. It is recommended to collect bills within 1~6 months, otherwise there will be too much data, which will cause much pressure on the system and affect the daily task of collecting bills.
- Click the “Connection Test” button to test whether the parameters entered are correct.
How to get Google related parameters?
How to get Google Cloud Services account key information?
Managing specified project
-
Open the “IAM and Administration in GCP Console - IAM page” page and login.
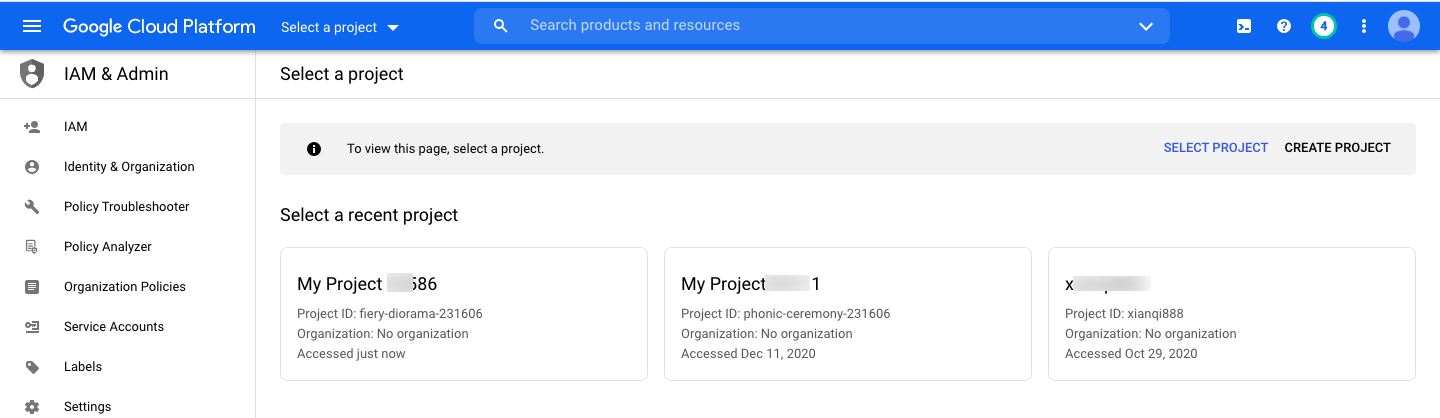
-
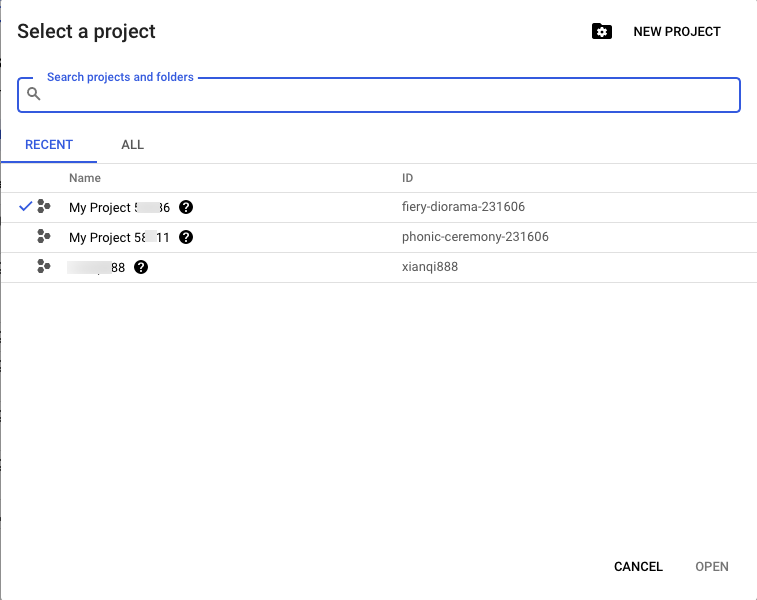
Select a recent project,or click “Select a Project” at the top and select the project you want to license.
-
Select “Service Accounts” in the left navigation bar to enter the service account page of the specified project.
-
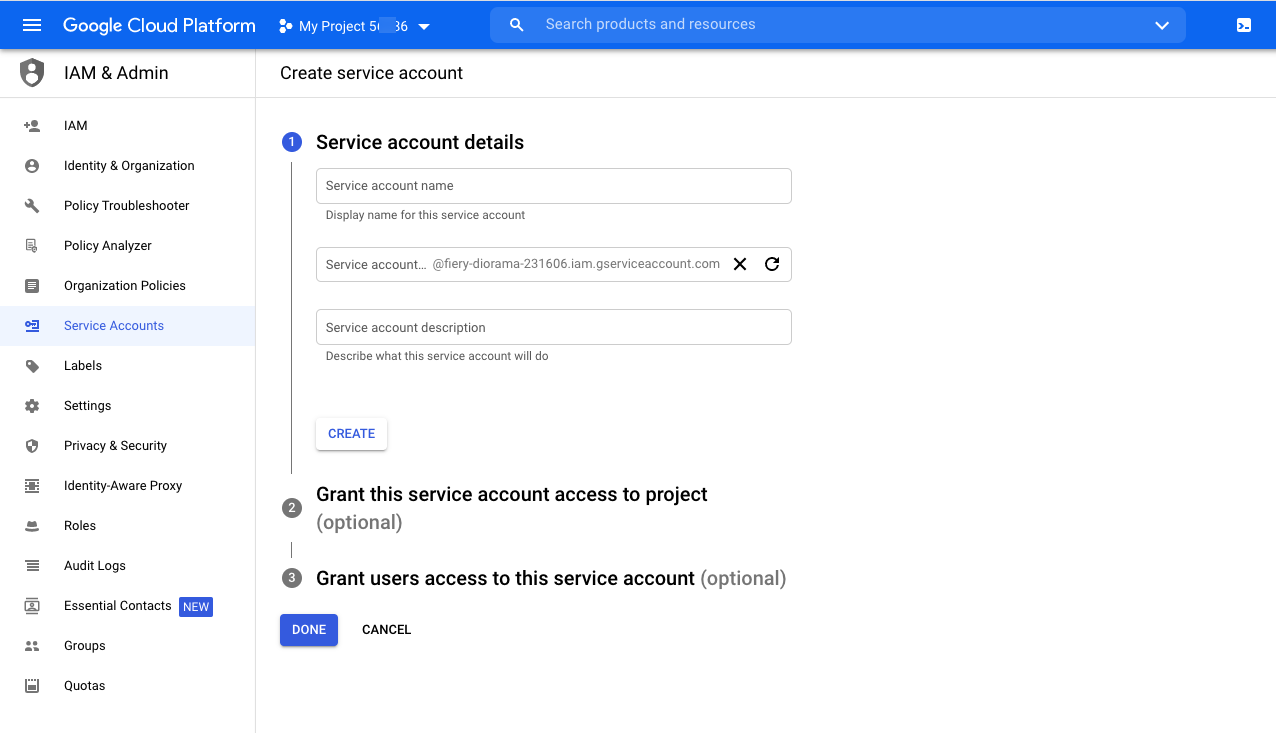
Click the “Create Service Account” button to enter the Create Service Account page.
-
Configure the service account name, service account ID, service account description, etc. Click the “Create” button to create a service account and grant access to the project to this service account.
-
Select the Project-Owner or Project-Viewer role, Owner represents the administrative rights to the project, Viewer represents the read-only rights to the project, if you need the cloud management platform to manage the Google Cloud account resources, please select the Project-Owner role, click “Continue” button.

-
Grant the user access to this service account (optional) step has no effect on the cloud management platform, please set the user according to the requirements, after the configuration is complete, click the “Continue” button.
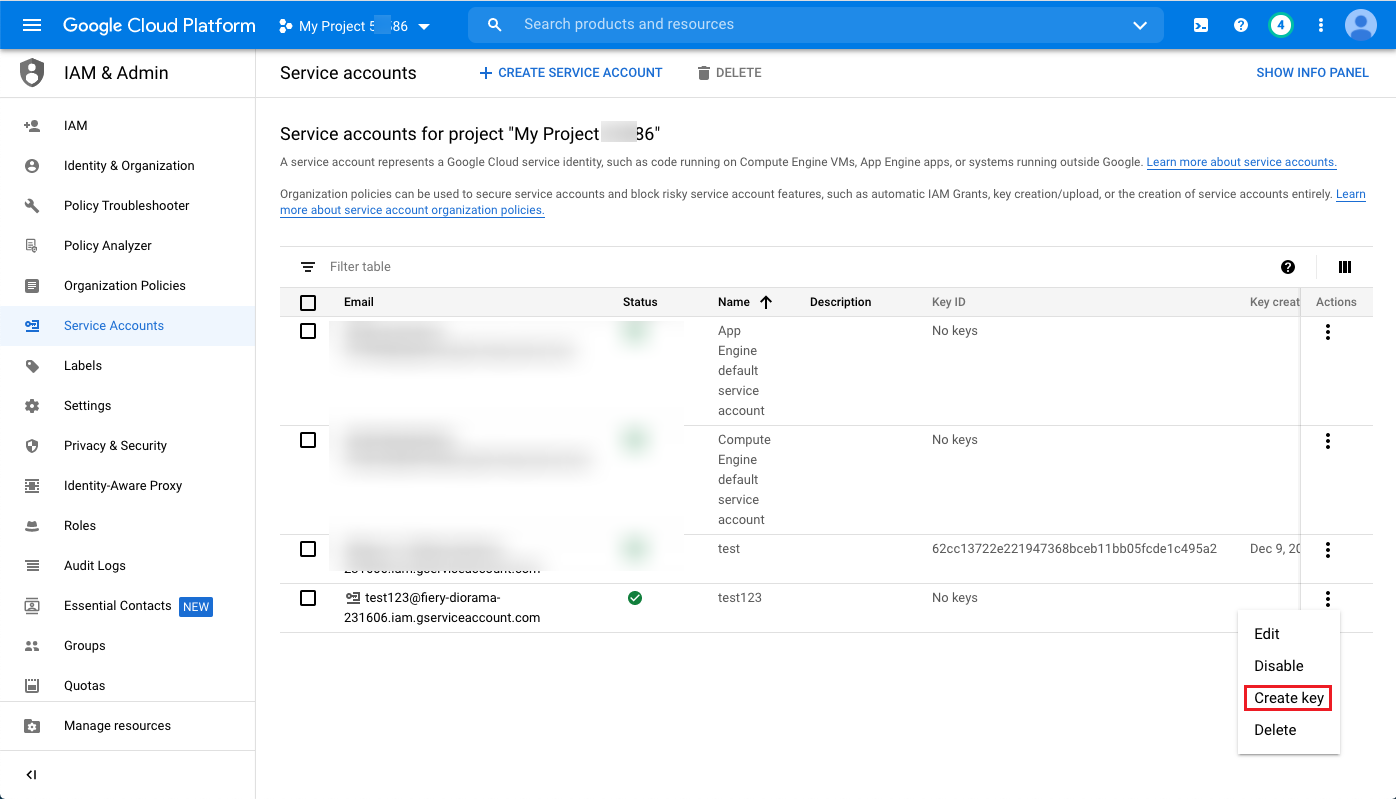
-
In the service account page, click the action column to the right of the newly created service account! colum button and click on the “Create key” menu item.
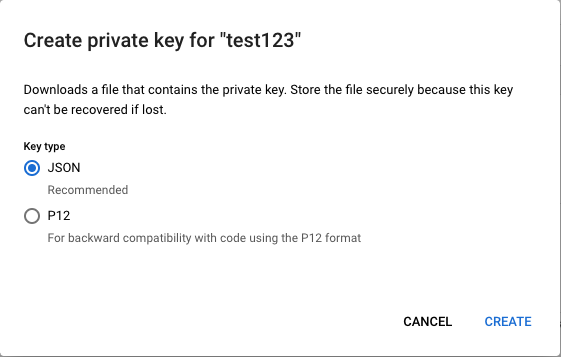
-
Select the key type as “JSON”, click “Create” button, and download the key file in json format with the following contents: project_id, private_key_id, private_key, client_email, etc. email, etc.
{
 "type": "service_account",
 "project_id": "[PROJECT-ID]",
 "private_key_id": "[KEY-ID]",
 "private_key": "-----BEGIN PRIVATE KEY-----\n[PRIVATE-KEY]\n-----END PRIVATE KEY-----\n",
 "client_email": "[SERVICE-ACCOUNT-EMAIL]",
 "client_id": "[CLIENT-ID]",
 "auth_uri": "https://accounts.google.com/o/oauth2/auth",
 "token_uri": "https://accounts.google.com/o/oauth2/token",
 "auth_provider_x509_cert_url": "https://www.googleapis.com/oauth2/v1/certs",
 "client_x509_cert_url": "https://www.googleapis.com/robot/v1/metadata/x509/[SERVICE-ACCOUNT-EMAIL]"
 }
Managing Multiple projects
If you need to use the key of the service account obtained above to manage multiple projects, you can follow the steps below to set it up.
-
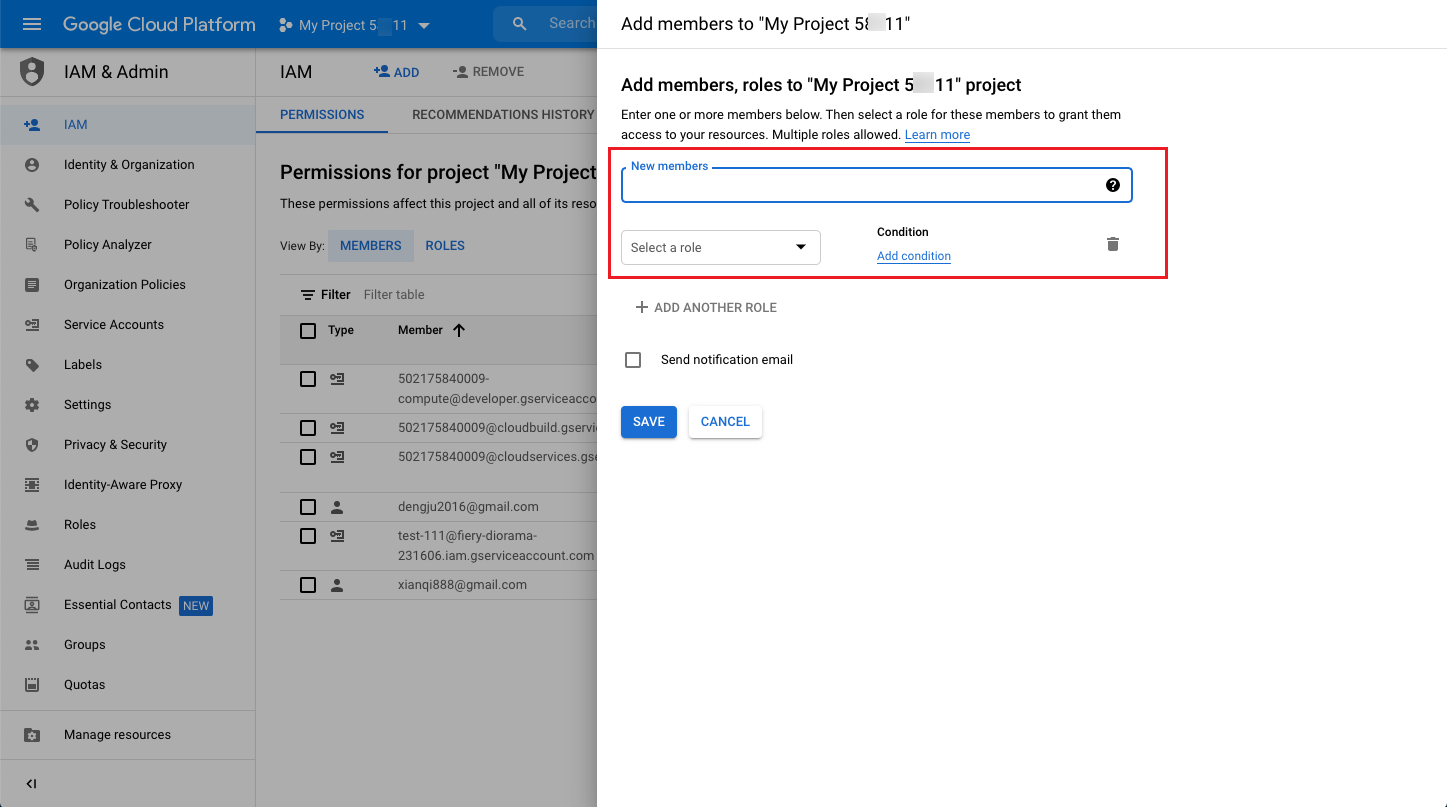
Open the “IAM and Admin in GCP Console - IAM Page” page and select other projects to be managed.
-
Click “Add” button at the top, add the service account created in the above steps to the new members, and set the role as Project-Owner or Project-Viewer, Owner represents the administrative rights to the project, Viewer represents the read-only rights to the project, if you need the cloud management platform to Google Cloud account resources for If you need the cloud management platform to manage Google Cloud account resources, please select the Project-Owner role and click the “Save” button.
-
Repeat the above steps to nano manage more projects.
Enable related APIs
Description
The Google Cloud API has a project attribute, so when you need to manage multiple projects on Google Cloud, you need to enable the related APIs in each project separately.
OneCloud to manage Google Cloud you need to enable the API.
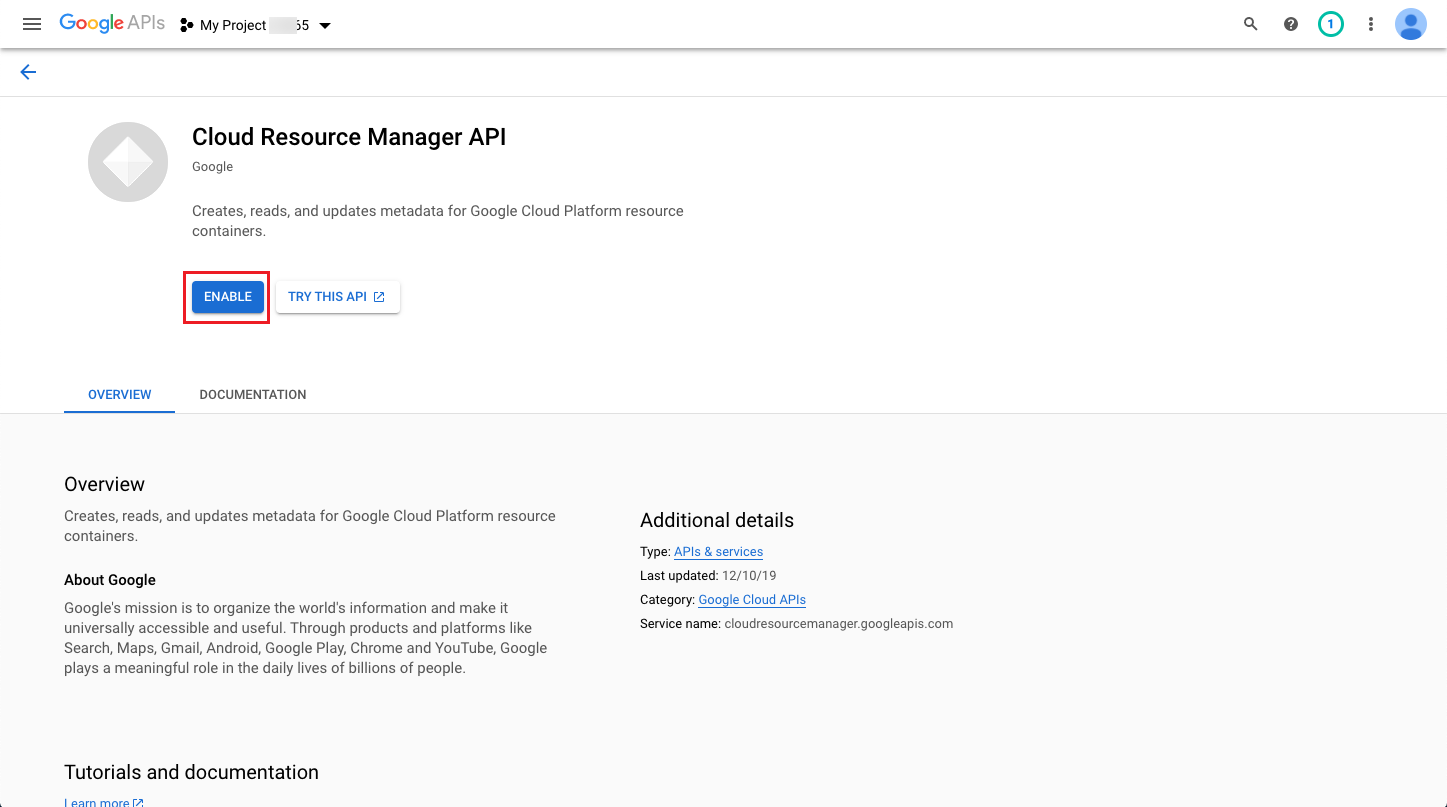
After obtaining the key file, you also need to enable the Project Resource Manager API (Cloud Resource Manager API) and Custom Image Builder API (Cloud Build API) in the Google API repository for licensed projects. After enabling the APIs, users can manage the use of Google Cloud in the OneCloud platform.
-
Enable the Cloud Resource Manager API in the Cloud Resource Manager API page of the API library Cloud Resource Manager API for authorized projects. You can switch authorized projects from the top.
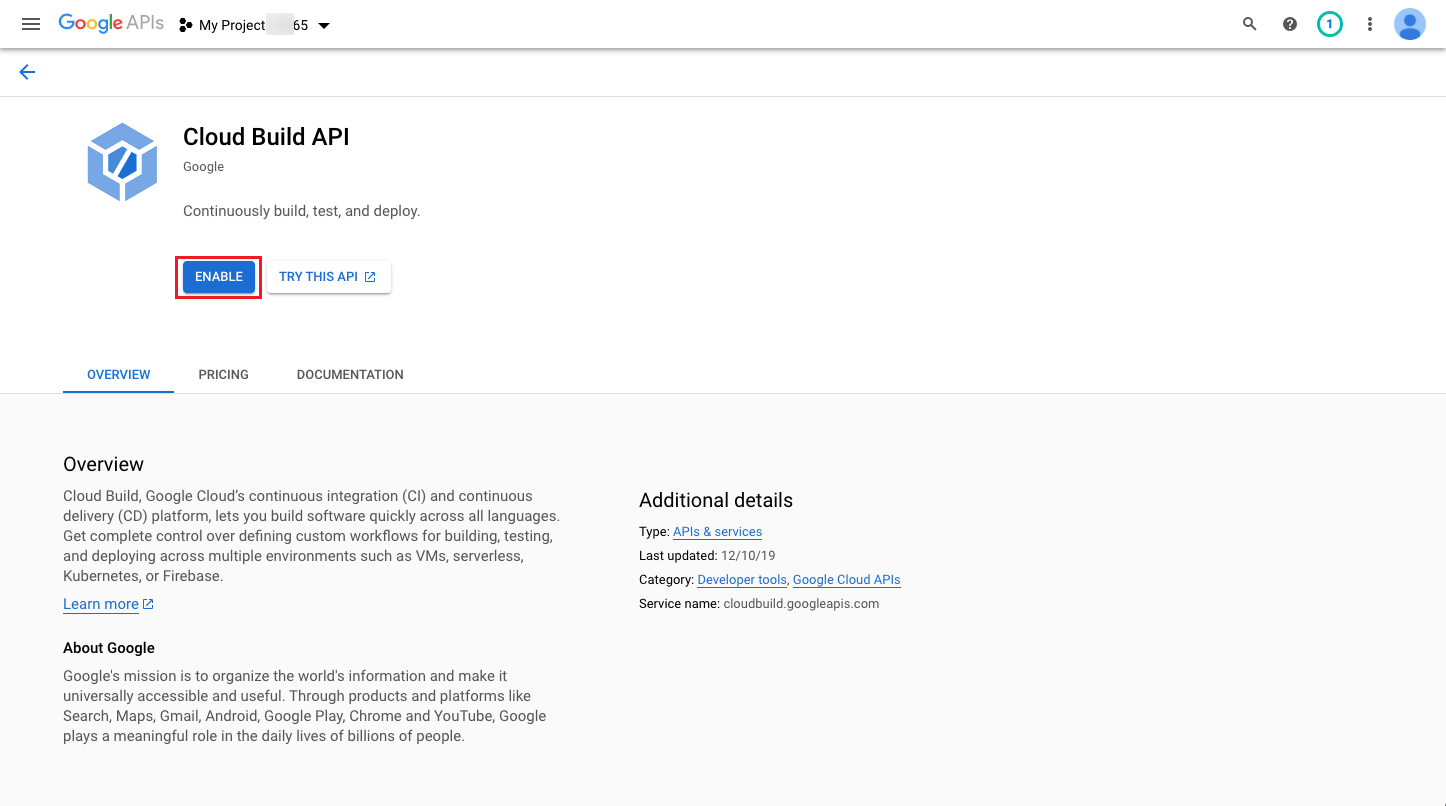
-
Enable the Cloud Build API for the license projects in the Cloud Build API page of the API library. You can toggle the license item from the top.
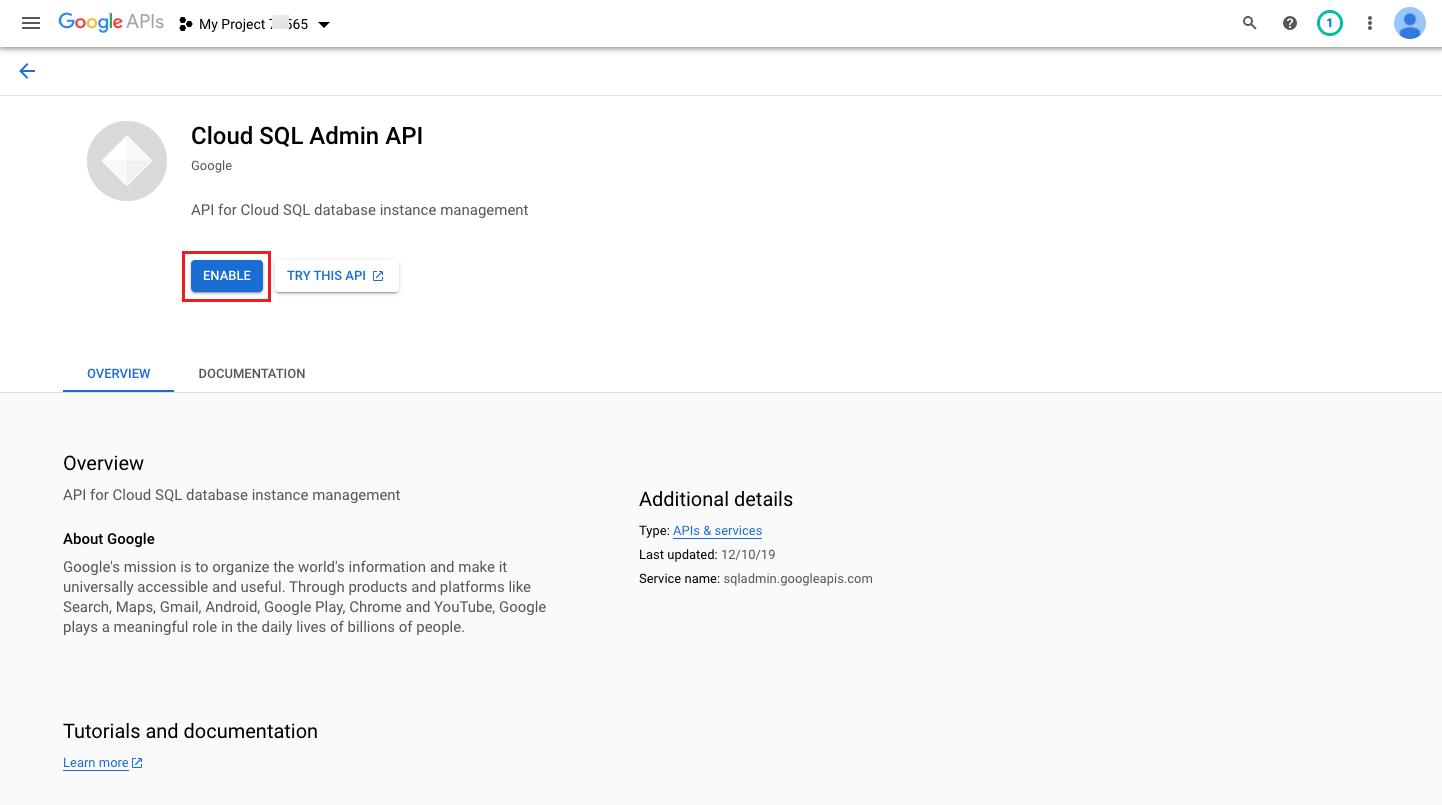
OneCloud to manage Google Cloud RDS you need to enable the API.
-
Enable Cloud SQL Admin API in the Cloud SQL Admin API page of the API library. The authorization projects can be toggled from the top.
Google Cloud account permission requirements
| Feature | ead-only permissions | Read-write permissions |
|---|---|---|
| All Features | Viewer | Editor |
| VM Instance, Disks, Security Group, Images, Snapshots, LB Instance | Compute Viewer | Compute Editor |
| Project | - | - |
| VPC, VPC Peering, Routing table, NAT, Elastic NIC,EIP, NAT | Compute Network Viewer | Compute Network Admin |
| OSS | Storage Legacy Bucket Reader Storage Object Viewer |
Storage Admin |
| RDS | Cloud SQL Viewer | Cloud SQL Admin |
| Redis | Redis Enterprise Cloud Viewer | Redis Enterprise Cloud Admin |
| log | Logs Viewer | Logging Admin |
| NAS | Cloud Filestore Viewer | Cloud Filestore Editor |
| WAF | - | - |
| IAM | Role Viewer | Role Administrator |
| DNS | DNS Reader | DNS Administrator |
| Billing | Billing Account Viewer | Billing Account Administrator |
| Monitoring | Monitoring Viewer | Monitoring Admin |
How to configure and get Bigquery configuration information in Google Cloud Platform.
-
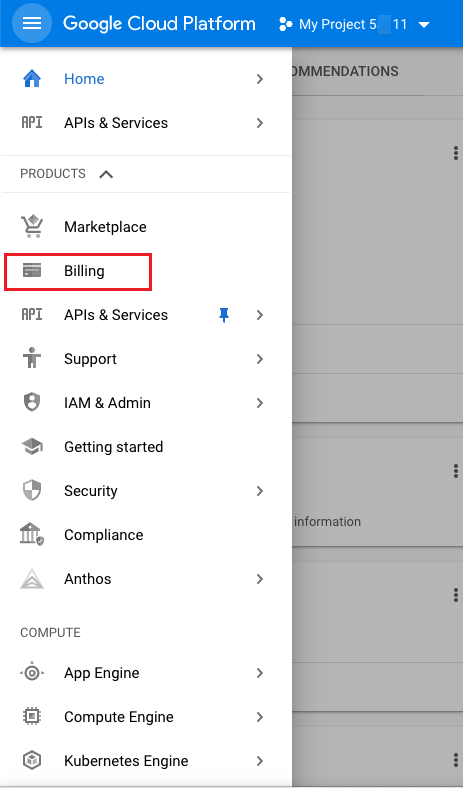
Login to Google Cloud Console, click the left menu “Billing” menu item to enter the Billing page.
-
Click the [Billing Export] menu item on the left, under the BIGQUERY EXPORT tab, enable detailed usage fees and configure the project and dataset names.

-
Click the dataset name, jump to Bigquery, expand the right node, select the partition table under the dataset name, and click the “Details” tab at the top of the entered page to get the table ID information.
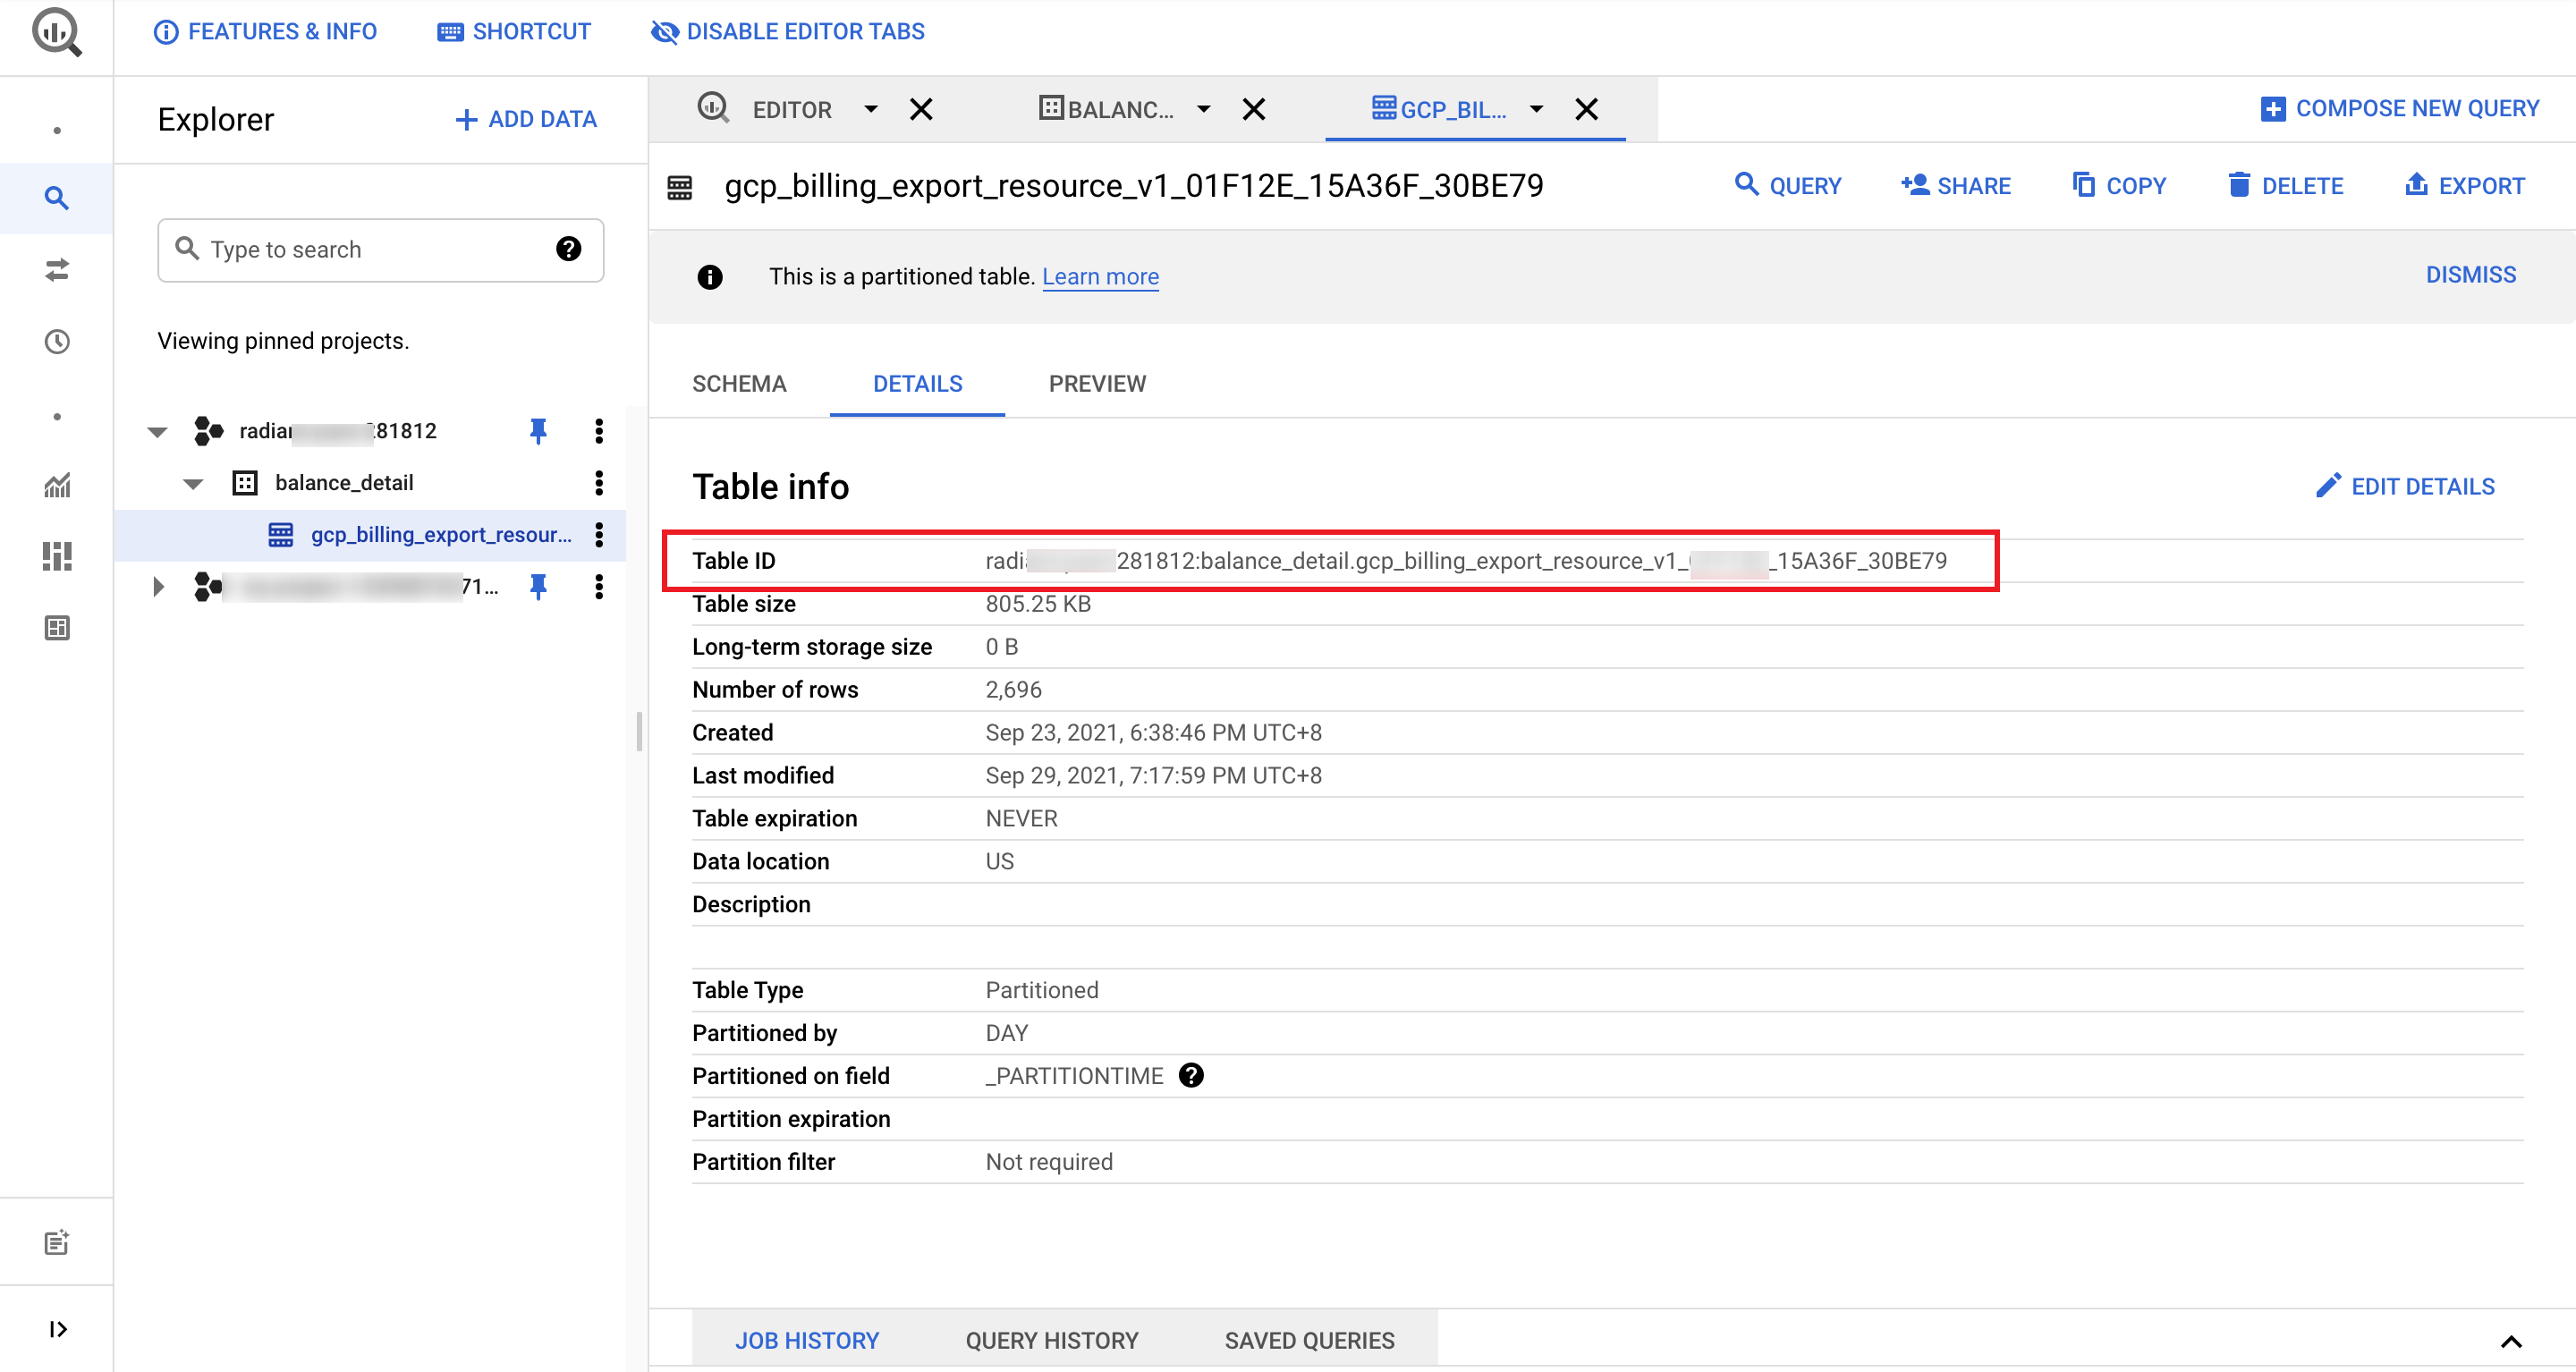
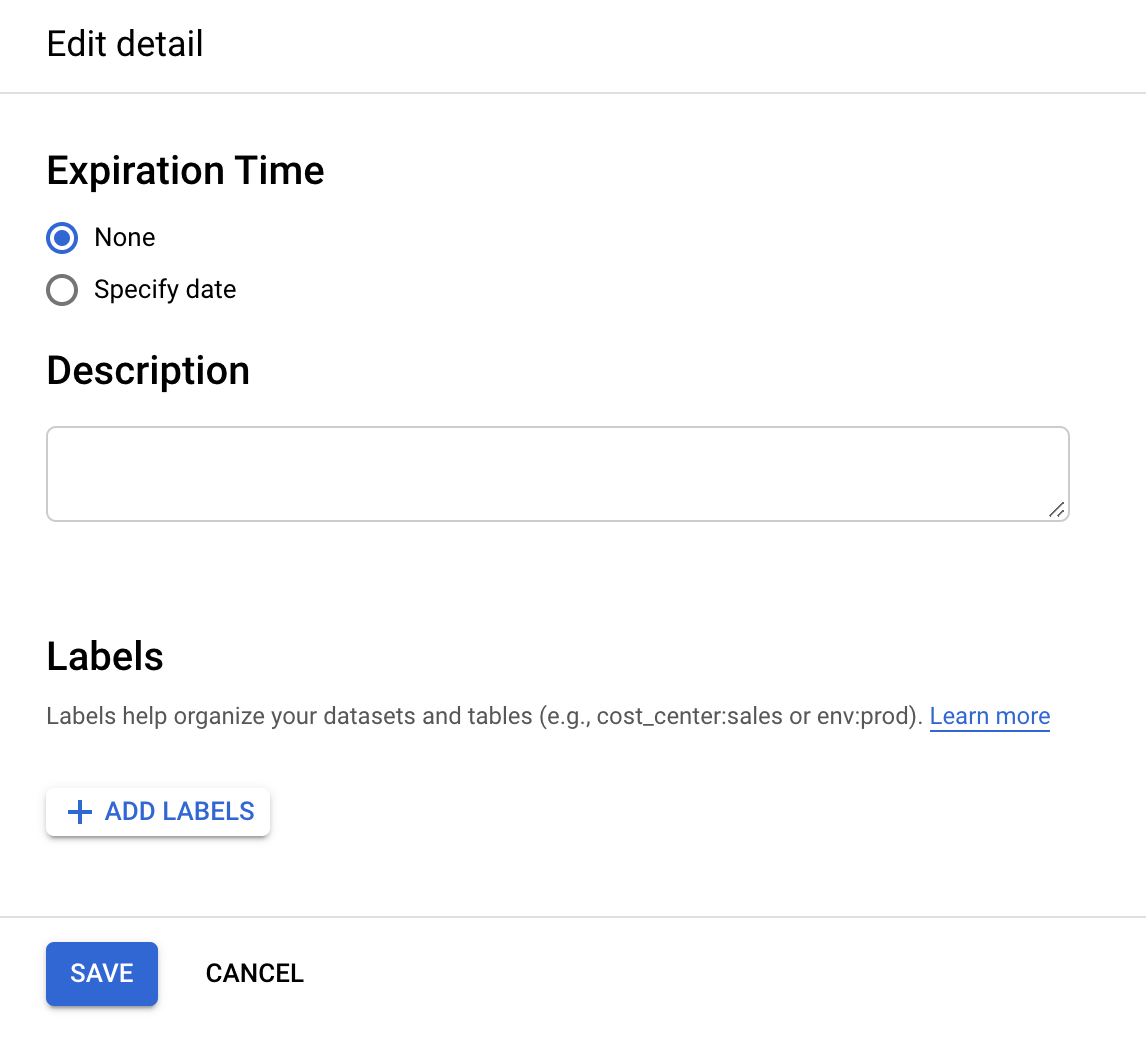
-
In the table details page, click the “Edit Details” button in the upper right corner and set the expiration time to None. if you set the expiration time, the expired time will be cleared from the bigquery, so please set it carefully.
How to get the Expense OSS Bucket URL and the expense file prefix as well as the usage file in Google Cloud?
How to get the Expense OSS Bucket URL and the expense file prefix?
-
Login to Google Cloud Console, click the left menu “Billing” menu item to enter the billing page.
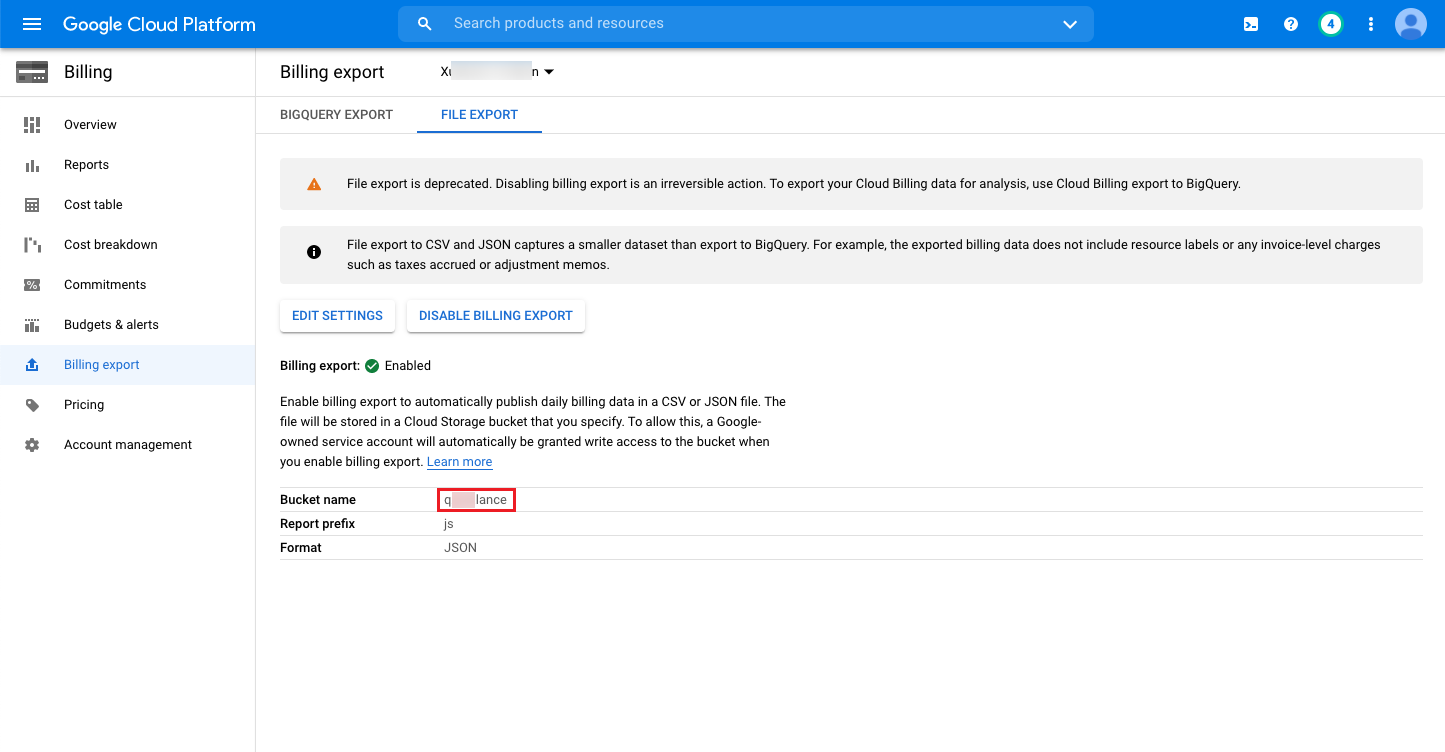
-
Click “Billing Export” on the left menu, and click the “File Export” tab on the billing page to view and record the storage partition name and report prefix information. The report prefix is the file prefix. If it is not set, you need to configure the storage partition name and report prefix information in this page, after the setting is completed, the daily incremental billing data will be stored to the corresponding storage. It is recommended that only billing files are stored in this bucket.
-
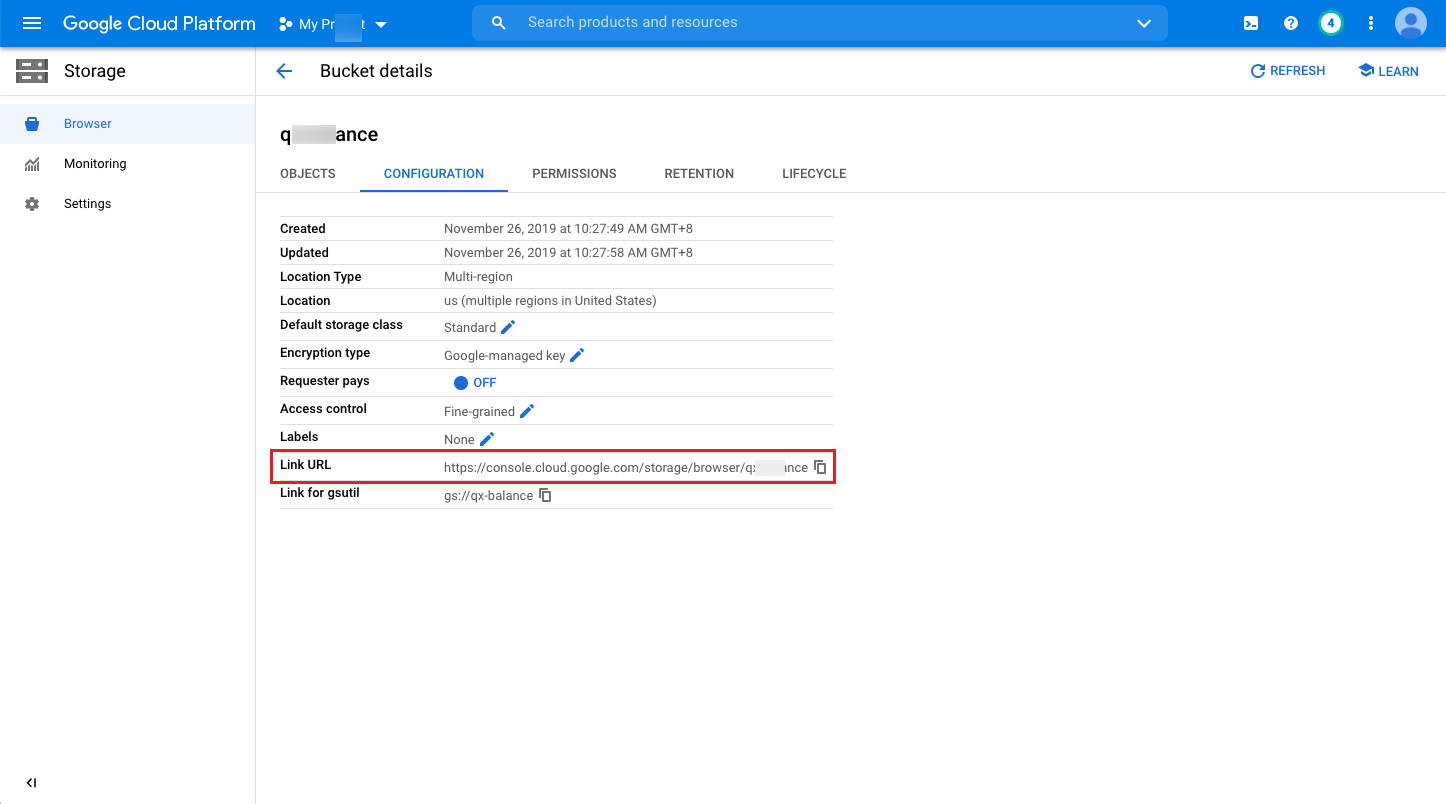
Click “Storage/Browser” on the left menu, click the name of the corresponding storage partition in the storage page, and click the “CONFIGURATION” tab to view the overview information of the storage partition, where the link URL is the oss bucket URL.
-
When other files are stored in the Expense OSS Bucket in addition to the billing files, the configuration file prefix is needed to get only the billing files in the bucket, etc.
How to get the usage file oss bucket URL and file prefix?
-
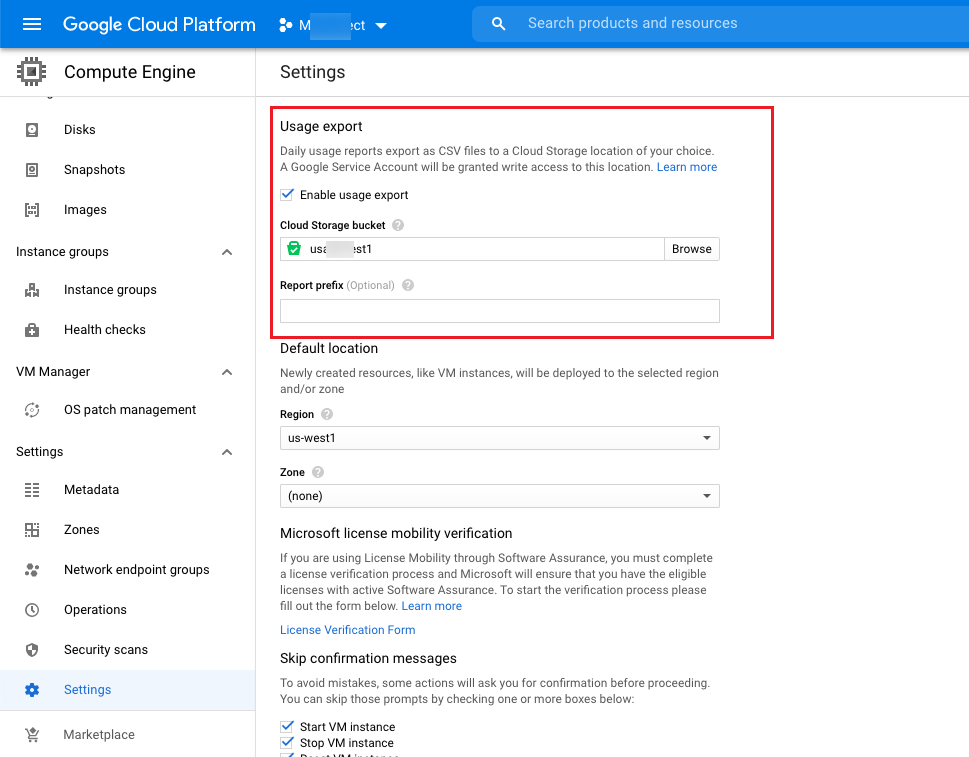
Click “Compute Engine/Settings” on the left menu in Google Cloud Console to enter the settings page.
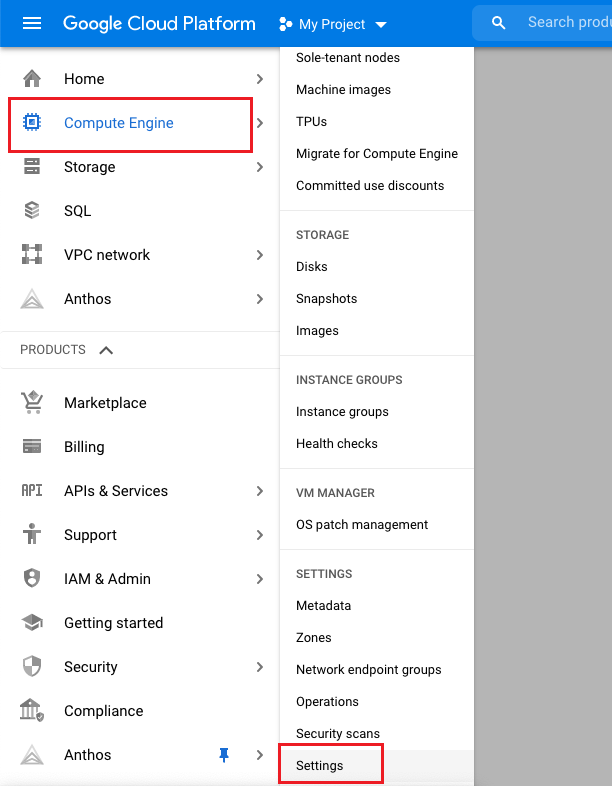
-
Make sure “Enable Usage Export” is checked and record the storage partition name and report prefix information, where report prefix is the file prefix. If not, you need to check “Enable Usage Export” and configure the storage partition, etc.
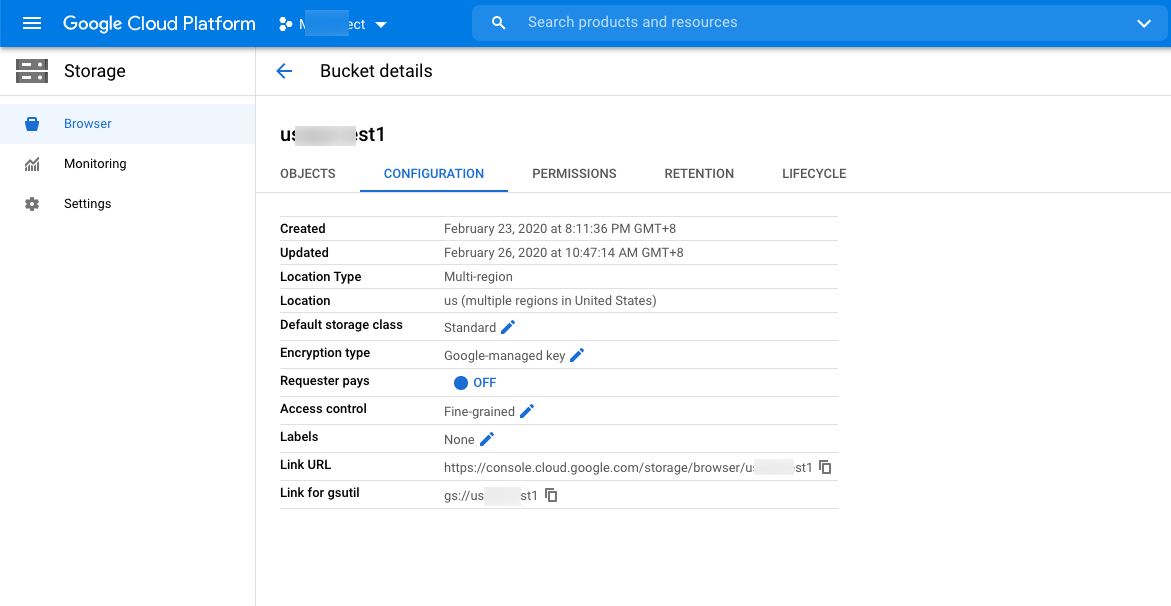
-
Click “Storage/Browser” on the left menu, click the name of the corresponding storage partition in the storage page, and click the “CONFIGURATION” tab to view the overview information of the storage partition, where the link URL is the oss bucket URL.
-
When there are other files stored in the usage bucket in addition to the usage files, you need to prefix the configuration file to get only the usage files in the bucket, etc.
Create eCloud account
- Click “Create” button at the top of the list in the cloud account page to enter the new cloud account page.
- Select the cloud platform as “eCloud”, click “Next: Configure Cloud Account” button, and enter the Configure Accounts page.
- Set the following parameters.
- Name: The cloud account name of eCloud.
- Account type: Currently supports managing global and China eCloud accounts.
- Key ID and password acquisition method: Currently, you cannot directly use the key information applied on the eCloud official website interface, you need to contact eCloud technical support to obtain Access Key Id and Secret Access Key information, and you need to configure the ip whitelist on eCloud. If users are not sure how to get it, they can directly contact operation and maintenance staff for help.
- Domain: Select the domain to which the cloud account belongs. When the cloud account is private, all project users under the domain can use the cloud account to create resources.
- Owner Projects: Select the local project that synchronizes the resources on the cloud account to the OneCloud platform. If you want to categorize the resources on the cloud account according to the projects on the cloud, please specify the default resource attribution project first and check the box to create the project automatically. After checking the box, a local project with the same name as the project on the cloud will be created in the OneCloud platform and the resources will be synchronized to the corresponding project. Resources without project attribution on the cloud will be synchronized to the default resource attribution project.
- Proxy: Set this item when the cloud account needs a proxy to access normally, leave it blank for direct connection. If there is no suitable proxy, click “Create” hyperlink directly and set relevant parameters in the pop-up Create Proxy dialog box to create a proxy.
- Auto sync: Set whether to automatically synchronize the information on eCloud Platform, and set the time interval for auto-sync.
- Sharing range: Set the sharing range of the cloud account. If the default is no sharing, only the domain where the cloud account is located can use the account, if set to global sharing, all users on the platform can use the cloud account to create resources.
- Click the “Connection Test” button to test whether the input parameters are correct.
- After the test is passed, click the “OK” button to create a eCloud account.
Create mCloud account
Currently, it only supports syncing resources on mCloud accounts and does not support manipulating resources.
- Click the “Create” button at the top of the list on the cloud account page to enter the new cloud account page.
- Select the cloud platform as mCloud, click “Next: Configure Cloud Account” button, and enter the Configure Accounts page.
- Set the following parameters.
- Name: the name of mCloud platform.
- Key ID/Password: Please see How to get mCloud related parameters? for details.
- Domain: Select the domain to which the cloud account belongs. When the cloud account is private, all project users under the domain can use the cloud account to create resources.
- Owner Projects: Select the local project that synchronizes the resources on the cloud account to the OneCloud platform. If you want to categorize the resources on the cloud account according to the projects on the cloud, please specify the default resource attribution project first and check the box to create the project automatically. After checking the box, a local project with the same name as the project on the cloud will be created in the OneCloud platform and the resources will be synchronized to the corresponding project. Resources without project attribution on the cloud will be synchronized to the default resource attribution project.
- Proxy: Set this item when the cloud account needs a proxy to access normally, leave it blank for direct connection. If there is no suitable proxy, click “Create” hyperlink directly and set relevant parameters in the pop-up Create Proxy dialog box to create a proxy.
- Auto sync: Set whether to automatically synchronize the information on mCloud platform and set the time interval for auto-sync.
- Click the “Connection Test” button to test whether the parameters entered are correct.
- Click the “OK” button to create a mCloud account.
How to get mCloud related parameters?
How to get the API key of mCloud?
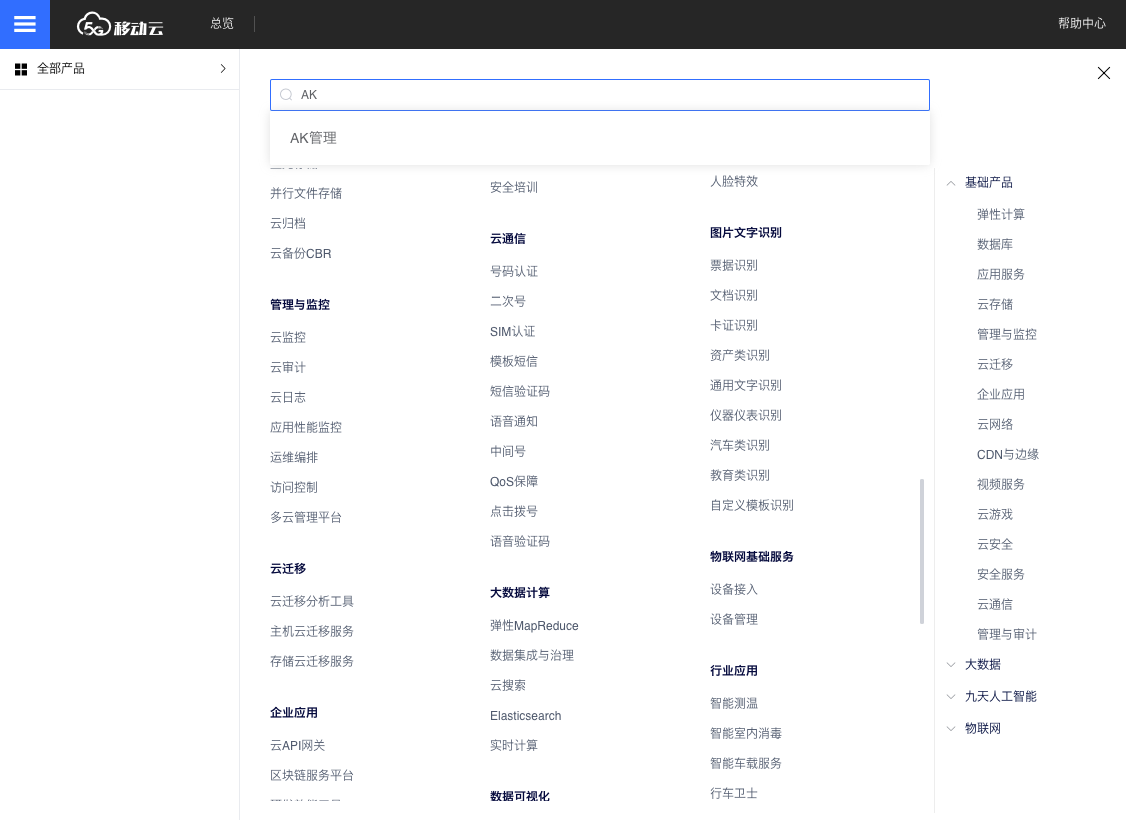
-
Login to mCloud console, search “AK Management” in all products, and enter the AccessKey management page.
-
Create a key or view the Access key and Secret key of the existing key in the AccessKey management page.
Manage mCloud resources and what permissions are required for the cloud account
| Permissions Policy | Policy Description |
|---|---|
| Admin | Administrator Role |
Create JD Cloud account
Currently, it only supports syncing resources on JD Cloud accounts and does not support manipulating resources.
- Click the “Create” button at the top of the list on the cloud account page to enter the new cloud account page.
- Select the cloud platform as JD Cloud, click “Next: Configure Cloud Account” button, and enter the Configure Accounts page.
- Set the following parameters.
- Name: the name of JD Cloud platform.
- Key ID/Password: Please see How to get JD Cloud related parameters? for details.
- Domain: Select the domain to which the cloud account belongs. When the cloud account is private, all project users under the domain can use the cloud account to create resources.
- Resource attribution project: Select the local project that synchronizes the resources on the cloud account to the OneCloud platform. If you want to categorize the resources on the cloud account according to the projects on the cloud, please specify the default resource attribution project first and check the box to create the project automatically. After checking the box, a local project with the same name as the project on the cloud will be created in the OneCloud platform and the resources will be synchronized to the corresponding project. Resources without project attribution on the cloud will be synchronized to the default resource attribution project.
- Proxy: Set this item when the cloud account needs a proxy to access normally, leave it blank for direct connection. If there is no suitable proxy, click “Create” hyperlink directly and set relevant parameters in the pop-up Create Proxy dialog box to create a proxy.
- Auto sync: Set whether to automatically synchronize the information on mCloud platform and set the time interval for auto-sync.
- Sharing range: Set the sharing range of the cloud account. If the default is no sharing, only the domain where the cloud account is located can use the account, if set to global sharing, all users on the platform can use the cloud account to create resources.
- Click the “Connection Test” button to test whether the parameters entered are correct.
- After the test passes, click the “OK” button to create a JD Cloud account and enter the billing file access information page.
- JD Cloud billing is acquired through API, so you only need to configure the following parameters in this page.
- Collect bills immediately: OneCloud The platform automatically collects bills at 4am every day by default. After enabling this item, bills will be collected immediately after configuring the bill file access information.
- Time range: When immediate bill collection is enabled, it supports setting the time range to immediately collect bills within the time range, please make sure there is bill data within the selected time range. It is recommended to collect bills within 1~6 months, otherwise there will be too much data, which will cause much pressure on the system and affect the daily task of collecting bills.
- Click “OK” button to create JD Cloud account and collect bills.
How to get JD Cloud related parameters?
How to get the API key of JD Cloud
-
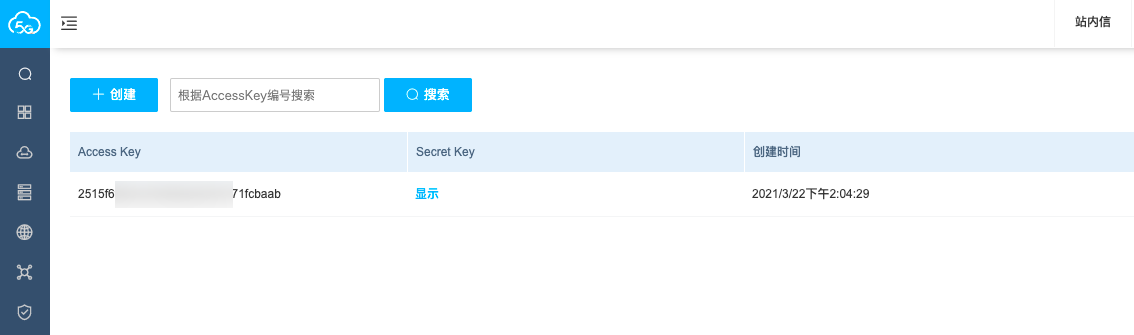
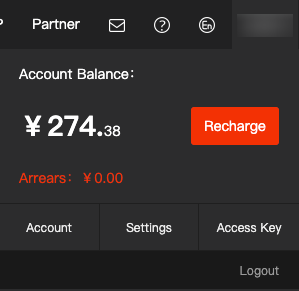
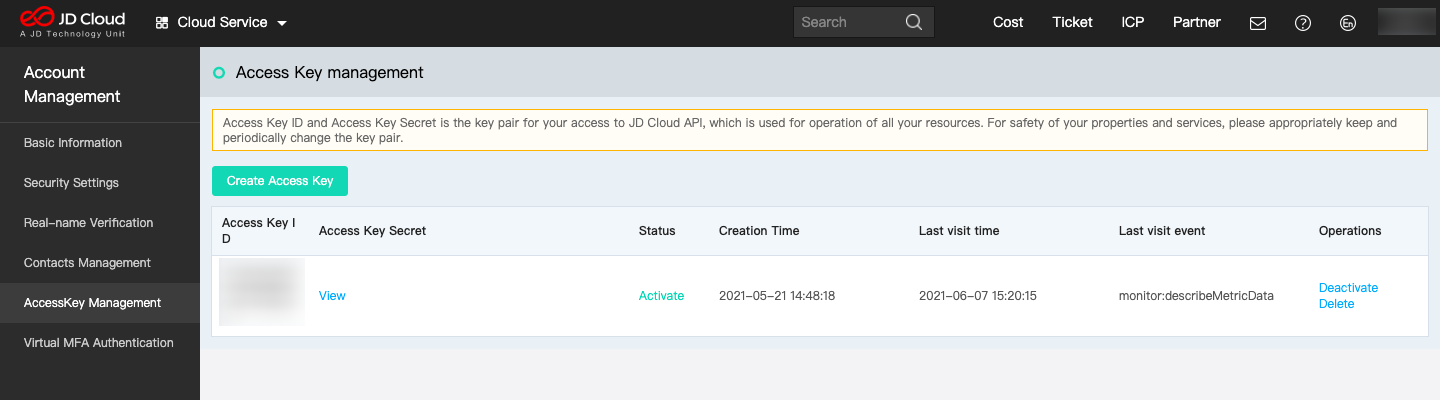
Login to JD Cloud console, hover over your username in the upper right corner, select the drop-down menu “Access Key” menu item, and enter the Access Key Management page.
-
View the existing Access Key information, or click “Create Access Key” button to create a new Access Key, and click “View” button to get the Access Key Secret information.
Create VMware account
Supported Versions
Support for VMware version 5.0~7.0.
VMware resource management process.
- Create VMware account and automatically create a L2 Network and IP subnet in the {{oem_name>}} platform. The VMware network corresponds to the {{oem_name>} platform L2 Network and IP subnet as follows.
- A vSwitch or Distributed vSwitch corresponds to a L2 Network.
- Consecutive IP address segments of the specific same VLAN under the same L2 Network for one IP subnet.
- After the VMware cloud account is added, if the automatically added L2 Network and IP subnet do not meet the networking requirements, please merge wire and merge IP subnet according to the actual network environment of VMware; the merge wire operation is irreversible, if the configuration is wrong, please delete the cloud account and add it again.
Steps
- Click the “Create” button at the top of the list on the Accounts page to enter the Create Accounts page.
- Select the cloud platform as VMware and click the “Next: Configure Cloud Account” button to enter the Configure Accounts page.
- Set the following parameters.
- Name: The name of the VMware account.
- vCenter Address: The domain name or IP address of the vCenter server.
- Port number: The default is 443.
- Account: The administrator user name of the vCenter.
- Password: The password of the vCenter administrator user.
- Domain: Select the domain to which the cloud account belongs. When the cloud account is private, all project users under the domain can use the cloud account to create resources.
- Owner Projects: Select the local project that synchronizes the resources on the cloud account to the OneCloud platform. If you want to categorize the resources on the cloud account according to the projects on the cloud, please specify the default resource attribution project first and check the box to create the project automatically. After checking the box, a local project with the same name as the project on the cloud will be created in the OneCloud platform and the resources will be synchronized to the corresponding project. Resources without project attribution on the cloud will be synchronized to the default resource attribution project.
- Proxy: Set this item when the cloud account needs a proxy to access normally, leave it blank for direct connection. If there is no suitable proxy, click “Create” hyperlink directly and set relevant parameters in the pop-up Create proxy dialog to create a proxy.
- Auto sync: Set whether to automatically synchronize the information on vCenter, if enabled, you need to set the time interval for auto-sync.
- Sharing range: Set the sharing range of the cloud account. If the default is no sharing, only the domain where the cloud account is located can use the account, if set to global sharing, all users on the platform can use the cloud account to create resources.
- Click the “Connection Test” button to test whether the parameters entered are correct.
- After the test is passed, click the “OK” button to create the VMware cloud account, related IP subnets, and start synchronizing the resources on the cloud account.
Create OpenStack account
Supported Versions
Support for NaTAC OpenStack version M and later.
Caution
If the authentication address of OpenStack platform of Nadir is a domain name, you also need to configure domain name resolution on the control node, otherwise you will not be able to synchronize the resources of OpenStack platform because you cannot resolve the domain name.
The steps are as follows.
# Modify coredns' configmap
$ kubectl edit cm -n kube-system coredns

   Corefile: |
       .:53 {
           errors
           health
           kubernetes cluster.local in-addr.arpa ip6.arpa {
              pods insecure
              upstream
              fallthrough in-addr.arpa ip6.arpa
              ttl 30
           }
           hosts {
               192.168.1.2 domain

               fallthrough
           }
           prometheus :9153
           forward ./etc/resolv.conf
           cache 30
           loop
           reload
           loadbalance
       }

# Add hosts-related information above "prometheus :9153" and configure the IP address and domain name.
   hosts {
               192.168.1.2 domain

               fallthrough
           }
# restart coredns
$ kubectl rollout restart deployment -n kube-system coredns
Step by Step
Description
After successfully creating an OpenStack account, since the cloud management platform does not get the real capacity of the storage on the OpenStack platform, you need to create an OpenStack account in Storage - Block Storage page to set the OpenStack storage capacity. Please try to set the storage capacity to the real capacity of the storage to use the storage as much as possible, to avoid the disk creation failure due to the set capacity exceeding the real capacity of the storage
- Click the “Create” button at the top of the list on the Accounts page to enter the Create Accounts page.
- Select the cloud platform as OpenStack and click the “Next: Configure Cloud Account” button to enter the Configure Accounts page.
- Set the following parameters.
- Name: Name of the OpenStack account.
- Authentication address: The authentication address of the OpenStack management platform, such as http://host:port/v3.
- Account: The user name of the administrator of the OpenStack platform, such as admin.
- Password: The password of the OpenStack platform administrator user.
- Project: The project on the OpenStack platform, such as admin project.
- Domain Name: The Domain name on the OpenStack platform, such as default.
- Domain: Select the domain to which the cloud account belongs. When the cloud account is private, all project users under the domain can use the cloud account to create resources.
- Owner Projectss: The OpenStack platform only supports categorizing the resources on the cloud account according to the projects on the cloud and the default resource attribution projects cannot be specified manually. Checking Auto create project will create a local project with the same name as the project on cloud in OneCloud platform and sync the resources to the corresponding project. Resources without project attribution on the cloud will be synchronized to the default resource attribution project.
- Proxy: Set this item when the cloud account needs a proxy to access normally, leave it blank for direct connection. If there is no suitable proxy, click “Create” hyperlink directly and set relevant parameters in the pop-up Create Proxy dialog to create a proxy.
- Auto sync: Set whether to automatically synchronize the information on OpenStack platform, and set the time interval of auto-sync, minimum is 30 minutes.
- Sharing range: Set the sharing range of the cloud account. If the default is no sharing, only the domain where the cloud account is located can use the account, if set to global sharing, all users on the platform can use the cloud account to create resources.
- Click the “Connection Test” button to test whether the parameters entered are correct.
- After the test passes, click the “OK” button to create an OpenStack account.
Create ZStack/DStack account
Supported Versions
Support for NaPan ZStack version 3.5.0 and later versions.
Steps
-
Click the “Create” button at the top of the list on the Accounts page to enter the Create Accounts page.
-
Select the cloud platform as ZStack or DStack, click the “Next: Configure Cloud Account” button, and enter the Configure Accounts page.
-
Set the following parameters.
- Name: Name of the ZStack or DStack account.
- Authentication address: The authentication address of the ZStack or DStack platform, usually http://host:8080/, host is the IP address of the ZStack or DStack control node.
- Key ID: I.e. the Access Key ID on the ZStack or DStack platform.
- Password: I.e. Access Key Secret on ZStack or DStack platform.
Description
Users can generate new Access Key information or use an existing Access Key from the [Platform Management - Access Key] page of the ZStack Management Platform.
- Domain: Select the domain to which the cloud account belongs. When the cloud account is private, all project users under the domain can use the cloud account to create resources.
- Owner Projects: Select the local project that synchronizes the resources on the cloud account to the OneCloud platform. If you want to categorize the resources on the cloud account according to the projects on the cloud, please specify the default resource attribution project first and check the box to create the project automatically. After checking the box, a local project with the same name as the project on the cloud will be created in the OneCloud platform and the resources will be synchronized to the corresponding project. Resources without project attribution on the cloud will be synchronized to the default resource attribution project.
- Proxy: Set this item when the cloud account needs a proxy to access normally, leave it blank for direct connection. If there is no suitable proxy, click “Create” hyperlink directly and set relevant parameters in the pop-up Create Proxy dialog to create a proxy.
- Auto sync: Set whether to automatically synchronize the information on ZStack/DStack platform, and set the time interval for auto-sync.
- Sharing range: Set the sharing range of the cloud account. If the default is no sharing, only the domain where the cloud account is located can use the account, if set to global sharing, all users on the platform can use the cloud account to create resources.
-
Click the “Connection Test” button to test whether the input parameters are correct.
-
After the test is passed, click “OK” button to create ZStack/DStack account.
Create Apsara Accounts
This feature is used to manage Apsara private cloud, currently only supports synchronization of resources on Apsara private cloud.
Supported Versions
Support for Apsara version 3.12.0 and later versions.
Steps
- Click “Create” button at the top of the list on the cloud account page to enter the new cloud account page.
- Select the cloud platform as Apsara, click “Next: Configure Cloud Account” button to enter the Configure Accounts page.
- Configure the following information.
- Name: The name of the Apsara cloud account.
- Key ID/Password: Docking to Alibaba Cloud platform through Access Key authentication method, Access Key consists of key ID (Access Key ID) and password (Access Key Secret). For details, please see How to get Apsara Cloud related parameters?
- Server Endpoint: Required, through the ESC Endpoint information of Apsara API to connect to the server resources of Apsara Cloud.
- VPC Endpoint: Required, manage the VPC resources of Apsara Cloud through the VPC Endpoint information of Apsara API.
- Load Balancing Endpoint: Optional, connect to the load balancing resources of Apsara Cloud through the SLB Endpoint information of Apsara API.
- Object Storage Endpoint: Optional, connect to the object storage resources of Apsara Cloud through the OSS Endpoint information of Apsara API.
- RDS Endpoint: optional, connect to the RDS resources of Apsara Cloud through the RDS Endpoint information of Apsara API.
- Redis Endpoint: optional, connect to the Redis resources of Apsara Cloud through the Redis Endpoint information of Apsara API.
- Operation Log Endpoint: Optional, connect to the operation log of Apsara Cloud through the ActionTrai Endpoint information of Flying Sky API.
- Monitoring Endpoint: Optional, managek to the monitoring of the Apsara Cloud through the Metrics Endpoint information of the Apsara Cloud API.
- Domain: Select the domain to which the cloud account belongs. When the cloud account is private, all project users under the domain can use the cloud account to create resources.
- Resource Attribution Project: Select the local project that synchronizes the resources on the cloud account to the OneCloud platform.
- Proxy: Set this item when the cloud account needs a proxy for normal access, and leave it blank for direct connection. If there is no suitable proxy, click “Create” hyperlink directly and set relevant parameters in the pop-up Create proxy dialog to create a proxy.
- Auto sync: Set whether to automatically synchronize the information on ZStack/DStack platform, and set the time interval for auto-sync.
- Sharing range: Set the sharing range of the cloud account. If the default is no sharing, only the domain where the cloud account is located can use the account, if set to global sharing, all users on the platform can use the cloud account to create resources.
- Click the “Connection Test” button to test whether the input parameters are correct.
- After the test is passed, click “OK” button to create Apsara private cloud account.
How to get Apsara Cloud related parameters?
Get Accesskey for Apsara Cloud
Only the operations administrator and the first-level organization administrator can get the organization AccessKey.
- The administrator logs into the ASCM console.
- On the menu bar at the top of the page, click “Enterprise” .
- On the “Enterprise” page, in the left navigation bar, click “Organization Management” . In Organization, click the Settings icon behind the parent organization you want to add.
- In the drop-down menu that appears, select “Get AccessKey” .
- In the pop-up dialog box, view the organization Accesskey information.
Apsara Cloud Get Endpoint
- In the address bar, enter the ASO access address region-id.aso.intranet-domain-id.com and press Enter.
- Enter the correct user name and password, click “Login” , and enter the ASO page.
- In the navigation bar on the left side of the page, click “Product O&M > Product List > Skybase” to jump to the Skybase console page. Select “Reports” in the left navigation bar of the Skybase console. Search for “Service Registration Variables” on the “All Reports” page. Click “Service Registration Variables” .
- On the Service Registration Variables page, click the icon next to Service and search for the corresponding product service.
- In the Service Registration column of the service, click the right mouse button and select “Select More” .
- Check the Endpoint address of the product service on the “Details” page.
Create HCSO account
This function is used for nano-managed HCSO accounts.
- Click the “New” button at the top of the list on the Cloud Account page to enter the New Cloud Account page.
- Select the cloud platform as HCSO and click the “Next: Configure Cloud Account” button to enter the Configure Cloud Account page.
- Configure the following parameters.
- Name: Name of the HCSO account.
- Key ID/Password: Docking to AliCloud platform through Access Key authentication method, Access Key consists of key ID (Access Key ID) and password (Access Key Secret). For details, please refer to How to get HCSO related parameters
- Default region ID/Endpoint Domain: iam.cn-north-1.test.com is an example. Where
iamrefers to IAM Service,cn-north-1refers to the endpoint region, andtest.comis the Endpoint domain. - IAM Endpoint/ECS Endpoint/VPC Endpoint/IMS Endpoint/EVS Endpoint/DCS Endpoint/ELB Endpoint/OBS Endpoint/RDS Endpoint/NAT Endpoint/CTS Endpoint/CES Endpoint/EPS Endpoint/SFS Turbo Endpoint: optional, via API When using the resource, you need to specify the corresponding endpoint node, please get the endpoint node information from the enterprise administrator.
- Default DNS for Subnet: Set the default DNS address of the subnet in the environment, you can set up to two, please use English ‘,’ to separate them. For example: 10.125.0.26,10.125.0.27.
- Domains: Select the domain to which the cloud account belongs. When the cloud account is private, all project users under the domain can use the cloud account to create resources.
- Owner Projects: Select the local project that synchronizes the resources on the cloud account to the OneCloud platform.
- Proxy: Set this item when the cloud account needs a proxy for normal access, and leave it blank for direct connection. If there is no suitable proxy, click “New” hyperlink directly and set relevant parameters in the pop-up New proxy dialog to create a proxy.
- Auto sync: Set whether to automatically synchronize the information on the HCSO platform and set the time interval for auto-sync.
- Sharing range: Set the sharing range of the cloud account. If the default is no sharing, only the domain where the cloud account is located can use the account, if set to global sharing, all users on the platform can use the cloud account to create resources.
- Click the “Connection Test” button to test whether the parameters entered are correct.
- After the test is passed, click “OK” button to create HCSO account.
How to get HCSO related parameters?
Get AccessKey for HCSO
-
Login to the HCSO console, hover over the user name in the upper right corner, select the drop-down menu “My Credentials” menu item, and enter the My Credentials page.
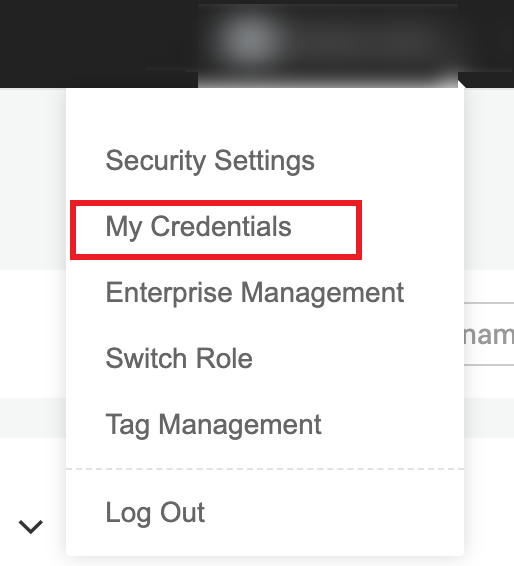
-
Click the Access Key menu on the left, and click the “Create Access Key” button on the Access Key page.
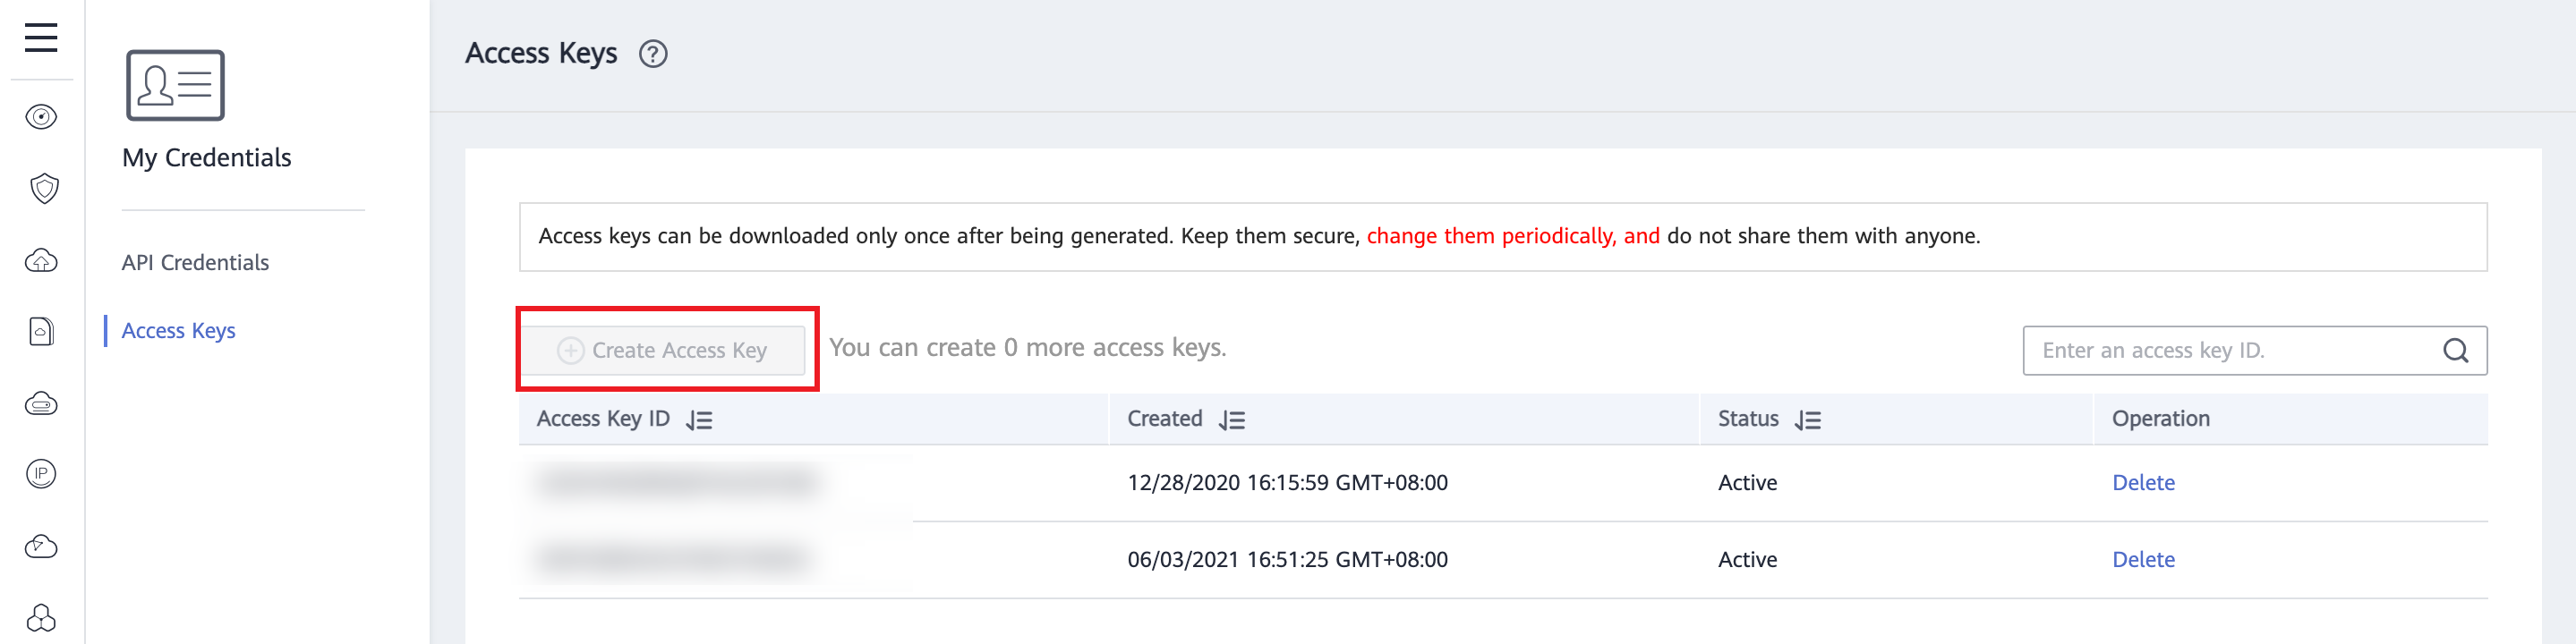
-
After passing the authentication, the Excel table with the credentials name will be downloaded, and you can get the key ID (Access Key ID) and password (Secret Access Key) after opening the table.
Create Cloudpods account
This function is used to manage Cloudpods accounts.
- Click the “New” button at the top of the list on the Cloudpods page to enter the New Cloudpods page.
- Select Cloudpods as the cloud platform and click “Next: Configure cloud account” button to enter the Configure cloud account page.
- Configure the following parameters.
- Name: The name of the Cloudpods cloud account.
- Authentication Address: The corresponding keystone service address, which can be obtained at the Cloudpods control node via the
ocadm cluster rcadmincommand as OS_AUTH_URL. typically http://域名(IP):30500/v3. - Key ID/Password: Dock to Cloudpods by Access Key authentication, please refer to How to get Cloudpods related parameters?.
- Domains: Select the domain to which the cloud account belongs. When the cloud account is private, all project users under the domain can use the cloud account to create resources.
- Owner Projects: Select the local project that synchronizes the resources on the cloud account to the OneCloud platform.
- Proxy: Set this item when the cloud account needs a proxy for normal access, and leave it blank for direct connection. If there is no suitable proxy, click “New” hyperlink directly and set relevant parameters in the pop-up New proxy dialog to create a proxy.
- Auto-sync: Set whether to automatically synchronize the information on the HCSO platform and set the time interval for auto-sync.
- Sharing range: Set the sharing range of the cloud account. If the default is no sharing, only the domain where the cloud account is located can use the account, if set to global sharing, all users on the platform can use the cloud account to create resources.
- Click the “Connection Test” button to test whether the parameters entered are correct.
- After the test passes, click the “OK” button to create a Cloudpods account.
How to get Cloudpods related parameters?
Get AccessKey for Cloudpods
-
Login to Cloudpods platform, hover over your username in the upper right corner, select the drop-down menu “Access Credentials” menu item, and enter the Access Credentials page.
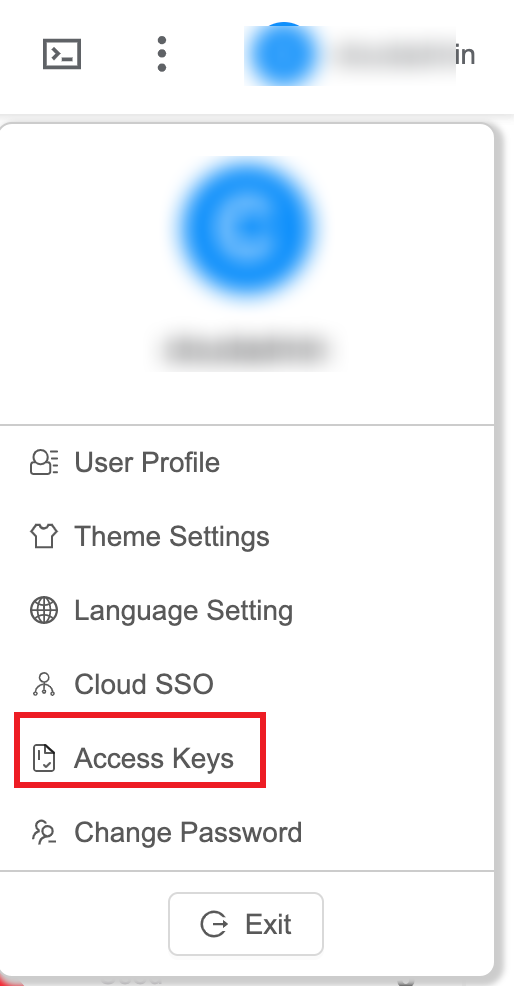
-
Click the “Create” button in the AccessKey management page to create a new Accesskey.

-
already have AccessKey, then the corresponding ID, Client Secret that corresponds to the key ID and password information.
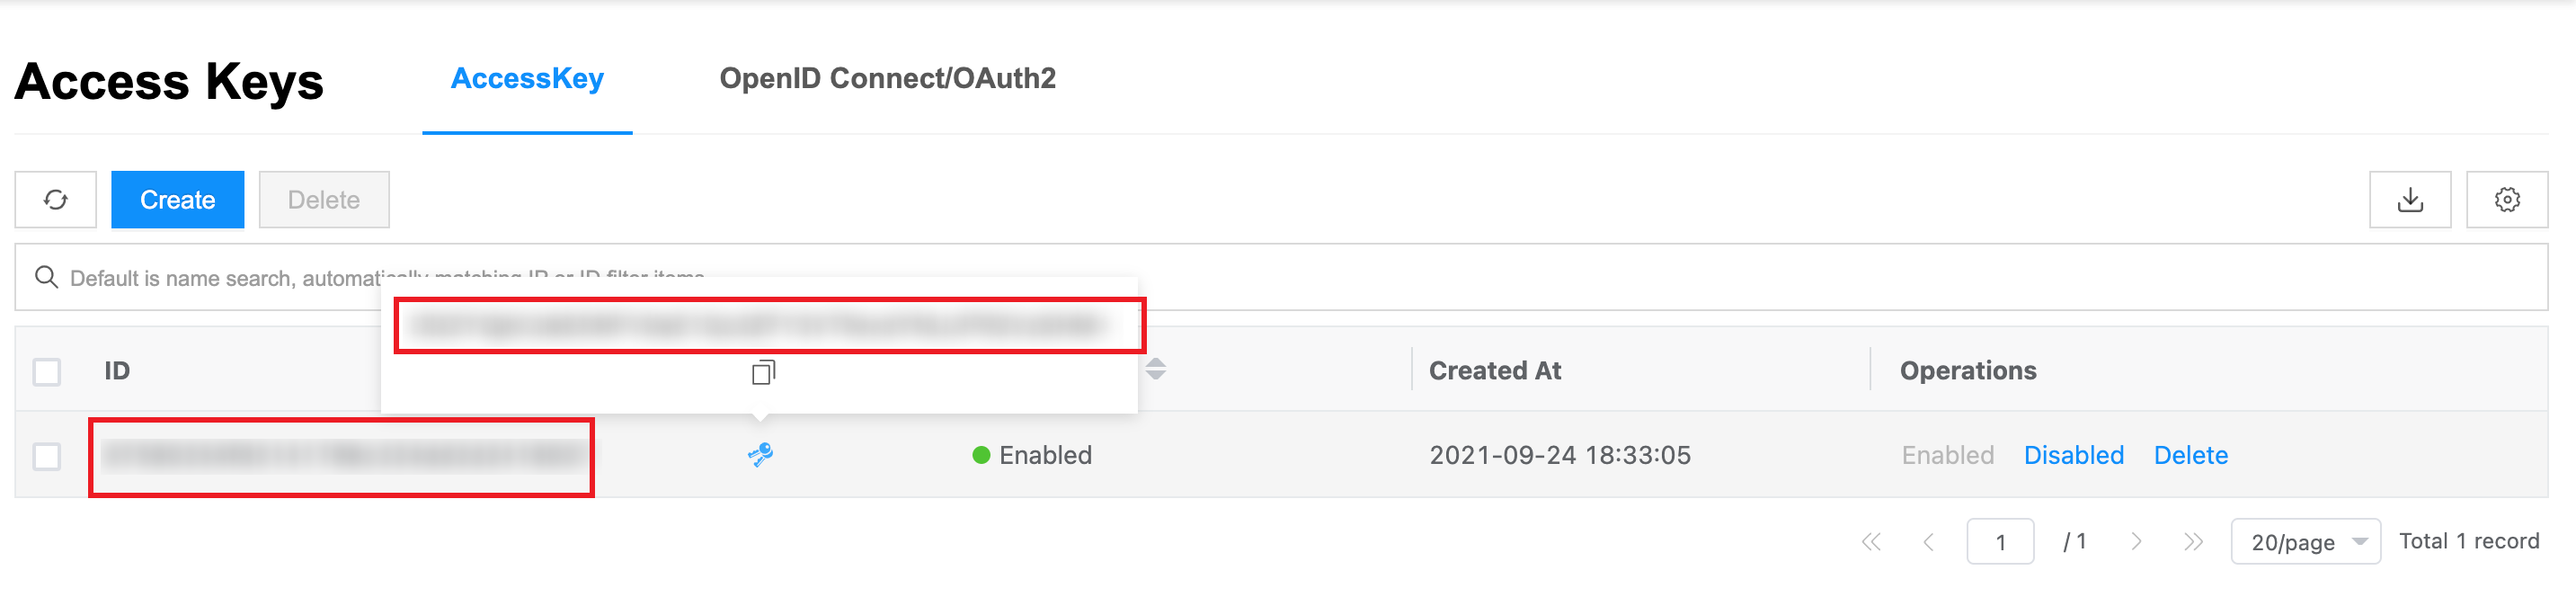
Create S3 account
S3 is Simple Storage service. Before creating S3 account, you need to deploy S3 protocol-based object storage server, such as MinIO, etc. The installation and deployment of MinIO see the link.
-
Click the “Create” button at the top of the list on the Accounts page to enter the Create Accounts page.
-
Select the cloud platform as S3 and click the “Next: Configure Cloud Account” button to enter the Configure Accounts page.
-
Set the following parameters.
- Name: The name of the S3 object storage server.
- Access Address: The access address of the S3 object storage server. If MinIO server is deployed, the access address format is http://IP地址:9000.
- Key ID: I.e. Access Key.
- Password: I.e. Secret Key.
# Execute the following commands on the MinIO storage server to get the access address (Endpoint), key ID (Access Key), and password (Secret Key) information # $ ./minio server /mnt/data Endpoint: http://10.127.10.201:9000 http://127.0.0.1:9000 AccessKey: XRSN7GL67M70AM342UGV SecretKey: mUd+e+h0DS3oIDEvF27b2EE4l+WN5MuZ2ZI+VOag- Domain: Select the domain to which the cloud account belongs. When the cloud account is private, all project users under the domain can use the cloud account to create resources.
- Owner Projects: Select the local project that will sync the resources on the cloud account to the OneCloud platform. If you want to categorize the resources on the cloud account according to the projects on the cloud, please specify the default resource attribution project first and check the box to create the project automatically. After checking the box, a local project with the same name as the project on the cloud will be created in the OneCloud platform and the resources will be synchronized to the corresponding project. Resources without project attribution on the cloud will be synchronized to the default resource attribution project.
- Proxy: Set this item when the cloud account needs a proxy to access normally, leave it blank for direct connection. If there is no suitable proxy, click “Create” hyperlink directly and set relevant parameters in the pop-up Create Proxy dialog box to create a proxy.
- Auto sync: Set whether to automatically synchronize the information on S3 object storage server, and set the time interval for auto-sync.
- Sharing range: Set the sharing range of the cloud account. If the default is no sharing, only the domain where the cloud account is located can use the account, if set to global sharing, all users on the platform can use the cloud account to create resources.
-
Click the “Connection Test” button to test whether the parameters entered are correct.
-
After the test passes, click the “OK” button to create the S3 account.
Create Ceph account
This function is used to manage ceph object storage resources.
- Click the “Create” button at the top of the list on the Accounts page to enter the Create Accounts page.
- Select the cloud platform as Ceph, click “Next: Configure Cloud Account” button to enter the Configure Accounts page.
- Set the following parameters.
- Name: The name of the ceph object storage server.
- Access Address: The access address of the ceph object storage server.
- Key ID: The key ID of the ceph object storage server.
- Password: The password information corresponding to the key ID.
- Domain: Select the domain to which the cloud account belongs. When the cloud account is private, all project users under the domain can use the cloud account to create resources.
- Owner Projects: Select the local project that synchronizes the resources on the cloud account to the OneCloud platform. If you want to categorize the resources on the cloud account according to the projects on the cloud, please specify the default resource attribution project first and check the box to create the project automatically. After checking the box, a local project with the same name as the project on the cloud will be created in the OneCloud platform and the resources will be synchronized to the corresponding project. Resources without project attribution on the cloud will be synchronized to the default resource attribution project.
- Proxy: Set this item when the cloud account needs a proxy to access normally, leave it blank for direct connection. If there is no suitable proxy, click “Create” hyperlink directly and set relevant parameters in the pop-up Create Proxy dialog box to create a proxy.
- Auto sync: Set whether to automatically synchronize the information on Ceph object storage and set the time interval for auto-sync.
- Sharing range: Set the sharing range of the cloud account. If the default is no sharing, only the domain where the cloud account is located can use the account, if set to global sharing, all users on the platform can use the cloud account to create resources.
- Click the “Connection Test” button to test whether the parameters entered are correct.
- After the test passes, click the “OK” button to create a Ceph account.
Create XSKY account
This function is used to manage XSKY storage resources and requires the presence of XSKY object storage in the user’s environment.
- Click the “Create” button at the top of the list on the Accounts page to enter the Create Accounts page.
- Select the cloud platform as XSKY and click the “Next: Configure Cloud Account” button to enter the Configure Accounts page.
- Set the following parameters.
- Name: The name of the XSKY storage server.
- Access Address: The access address of the XSKY storage server.
- Key ID: The key ID of the XSKY object storage server.
- Password: The password information corresponding to the key ID.
- Domain: Select the domain to which the cloud account belongs. When the cloud account is private, all project users under the domain can use the cloud account to create resources.
- Owner Projects: Select the local project that synchronizes the resources on the cloud account to the OneCloud platform. If you want to categorize the resources on the cloud account according to the projects on the cloud, please specify the default resource attribution project first and check the box to create the project automatically. After checking the box, a local project with the same name as the project on the cloud will be created in the OneCloud platform and the resources will be synchronized to the corresponding project. Resources without project attribution on the cloud will be synchronized to the default resource attribution project.
- Proxy: Set this item when the cloud account needs a proxy to access normally, leave it blank for direct connection. If there is no suitable proxy, click “Create” hyperlink directly and set relevant parameters in the pop-up Create Proxy dialog to create a proxy.
- Auto sync: Set whether to automatically synchronize the information on XSKY object storage, and set the time interval for auto-sync.
- Sharing range: Set the sharing range of the cloud account. If the default is no sharing, only the domain where the cloud account is located can use the account, if set to global sharing, all users on the platform can use the cloud account to create resources.
- Click the “Connection Test” button to test whether the parameters entered are correct.
- After the test passes, click the “OK” button to create an XSKY account.
Full Sync
This function is used to fully synchronize the resource information on the account.
Note
- Cloud accounts in disabled state do not support full sync.
cloud account full sync
- On the cloud account page, click the “Full Sync” button on the right column of the cloud account to fully synchronize the resource information on the cloud account.
Batch Full Sync
- Check one or more cloud accounts in the cloud account list, click the**_“Batch Operation”_** button at the top of the list, and select the drop-down menu **_“Full Sync”_** menu item to fully synchronize the resource information on the cloud account.
Set up auto sync
This function is used to set whether to enable auto-sync for the cloud account and set the auto-sync interval. Automatic synchronization means incremental synchronization of resources on the cloud account.
Set up auto sync
- On the cloud account page, click the “More” button on the right action bar of the cloud account, and select the drop-down menu “Set Auto Sync” menu item to bring up the Set Auto Sync dialog box.
- Check whether to enable auto-sync, and if auto-sync is enabled, set the time interval for auto-sync (interval is more than 30 minutes), and click “OK” button.
Batch set up auto sync
- Check one or more cloud accounts in the cloud account list, click the**_“Batch Operation”_** button at the top of the list, select the drop-down menu **_“Set Auto Sync”_** menu item, and the Set Auto Sync dialog box pops up.
- Check whether to enable auto-sync, if auto-sync is enabled, set the time interval of auto-sync (interval is more than 30 minutes), and click “OK” button. This function is used to update the account and password information of the cloud account. The parameters of the cloud account are different for different platforms. Please see the corresponding Create Accounts chapter for the way to get the account password for different platforms. This operation is not supported for disabled cloud accounts.
Note
VMware cloud accounts do not support account updates at this time.
- In the cloud account list, click the “More” button in the different platform cloud account operation column, and select the “Update Account Password” menu item to bring up the Update Account Password dialog box.
- Modify the account password information of different platforms, and click the “OK” button after the modification is completed.
Update Billing File
This function is used to update the billing file of the cloud account, which is only supported by Alibaba Cloud, Huawei Cloud, AWS, Azure, and Google. The billing file parameters are different for different platforms, please see the corresponding Create Accounts chapter for the password for different platforms.
- In the cloud account list, click the “More” button in the operation column of different platform cloud accounts, select the drop-down menu “Update Billing File” menu item, and enter the update billing file page.
- Modify the billing file parameters of different platforms, and click the “OK” button after the modification is completed.
Connection Test
This function is used to test the connection status of the account and synchBatch Actionurce information on the cloud account. This operation is not supported for disabled cloud accounts.
Accounts Connection Test
- On the cloud account page, click the “More” button on the right side of the cloud account, select the drop-down menu “Connection Test” menu item to test the connection status of the account, and synchronize the resource information on the cloud account if it is in the cloud account connection status.
Batch Connection Test
- Check one or more cloud accounts in the cloud account list, click the**_“Batch Operation”_** button at the top of the list, select the drop-down menu **_“Connection Test”_** menu item, test the account connection status, and synchronize the resource information on the cloud account if it is in the cloud account connection status.
Set discount
This function is used to set the discount rate for the public cloud account. After setting the discount rate, the estimated price displayed when the user creates a public cloud resource is the discounted price. Batch Action
Description
- Setting a discount rate for a public cloud account does not affect the actual billing costs on the public cloud.
- Only resources created within the shared scope of the cloud account will show the discounted price.
- On the cloud account page, click the “More” button on the right action bar of the cloud account, and select the drop-down menu “Set discount” menu item to bring up the Set Discount Rate dialog box.
- Set the discount rate (price after discount = original price * (1 - discount rate)), click “OK” button to finish the operation.
Set up sharing
This function is used to set the sharing status of the cloud account.
The cloud account is different from other domain resources and there are 5 sharing cases.
- No sharing (private): That is, the resources on the cloud account are only available to the domain to which the cloud account belongs.
- Shared Cloud Subscription-Partial (Multi-domain Shared Cloud Subscription): When a cloud subscription is shared and a partial domain is specified, the administrator can change the projects on the subscription page and can only choose to subscribe to the projects under the shared domain. After the setting is completed, the cloud account resources are only available to the users in the domain where the item is located.
- Shared Cloud Subscription-All (Global Shared Cloud Subscription): After the Shared Cloud Subscription selects all domains, the administrator can change the projects in the subscription page and can select projects under any domain. After the setting is completed, the cloud account resources are only used by users in the domain where the item is located.
- Shared Accounts-Partial (Multi-domain Shared Accounts): That is, the cloud account can be shared to a specified domain (one or more), and only the users under the domain where the cloud account is located and the shared domain can use the cloud account.
- Shared cloud account-All (global shared cloud account): That is, the cloud account can be shared to all domains, that is, all users in the system can use the cloud account.
Description
Set the conditions for sharing: both need to be satisfied
- The current user is in the system backend.
- Three-level Resource Hierarchy have been enabled in OneCloud
Note
The shared scope of resources synced down through the cloud account (except for security groups) are affected by the shared scope of the cloud account. The availability of the resources on the cloud account to other domains depends on the specific sharing scope of the resources.
- On the cloud account page, click the “More” button in the action bar on the right side of the cloud account, and select the drop-down menu “Set up sharing” menu item to bring up the Set up sharing dialog box.
- Configure the following parameters.
- When the sharing scope is selected as “No Sharing”, the sharing scope of the cloud account is private, and only the domain to which the cloud account belongs can use the resources of the cloud account.
- When the shared scope is selected as “Shared Cloud Subscriptions”, you need to select the domain(s) to share.
- When one or more of the domains are selected, the shared scope of the cloud account is Shared Cloud Subscriptions-Partial, and subsequent subscriptions to change projects are selected for any item under the shared domain. After the project is changed, only the domain to which the project belongs can use the resources of the cloud account.
- When All is selected for the domain, the shared scope of the cloud account is Shared Cloud Subscription - All, and the optional scope for subsequent subscriptions to change the project is any project under any domain. After the project is changed, only the domain to which the project belongs can use the resources of the cloud account.
- When the shared scope is selected as “Shared Accounts”, you need to select the domain(s) to be shared.
- When one or more of the domains are selected, the shared scope of the cloud account is Shared Accounts-Partial, and only the users under the domain where the cloud account is located and the shared domain can use the resources of the cloud account.
- When the domain is selected as all, the shared scope of the cloud account is Shared Accounts-All, and all users in the system can use the cloud account resources.
- Click the “OK” button to complete the operation.
Set up proxy
This function is used to help the created cloud account to bind a proxy.
- On the cloud account page, click the “More” button on the right column of the cloud account, and select the “Set Proxy” menu item to bring up the Set Proxy dialog box.
- Select the proxy, click “OK” button.
Enable SSO
This function is used to enable the SSO login function of the cloud account, synchronize the SAML information of the system to the cloud account, and become the identity provider for login on the cloud. After opening, the SAML users added in the cloud account details - SAML users page can login to the public cloud platform without password. Currently, we do not support closing this feature.
Description
Public cloud platforms that support SSO login: Alibaba Cloud, Tencent Cloud, Huawei Cloud, AWS.
- On the cloud account page, click the “More” button on the right side of the cloud account, select the drop-down menu “Enable SSO” menu item, and the operation confirmation dialog box pops up.
Enable
This feature is used to enable the “disabled” state of the cloud account, and the resources of the disabled cloud account cannot be used.
Enable
- On the cloud account page, click the “More” button in the action bar to the right of the “disabled” cloud account, and select the “Enable” menu item to bring up the action confirmation dialog.
- Click the “OK” button to enable the cloud account.
Batch Enable
- Check one or more “disabled” cloud accounts in the cloud account list, click the “Batch Operation” button at the top of the list, select the drop-down menu “Enable” menu item, and the operation confirmation dialog box pops up.
- Click the “OK” button to enable the cloud account.
Disable
This function is used to disable a cloud account that is “enabled”. You need to disable the cloud account before deleting it.
Individually Disable
- On the cloud account page, click the “More” button in the action bar to the right of the “enabled” cloud account, and select the “Disable” menu item to bring up the action confirmation dialog.
- Click the “OK” button to disable the cloud account.
Batch Disable
- Check one or more “enabled” cloud accounts in the cloud account list, click the “Batch Operation” button at the top of the list, select the drop-down menu “Disable” menu item, and the action confirmation dialog box pops up.
- Click the “OK” button to disable the cloud account.
Delete
This function is used to delete the cloud account. The cloud account needs to be disabled before deletion. Deleting a cloud account on OneCloud platform will not affect the resources on the cloud account.
Delete
- On the cloud account page, click the “More” button in the action bar to the right of the “disabled” cloud account, select the drop-down menu “Delete” menu item, and the action confirmation dialog box pops up.
- Click the “OK” button to complete the operation.
Batch Delete
- Check one or more “disabled” cloud accounts in the cloud account list, click the**_“Batch Operation”_** button at the top of the list, select the drop-down menu **_“Delete”_** menu item, and the operation confirmation dialog box pops up.
- Click the “OK” button to complete the operation.
View cloud account details
This function is used to view the details of the cloud account.Batch Action
- In the cloud account page, click the specified cloud account name item to enter the cloud account details page.
- The menu item at the top of the details page supports the following operations for the cloud account: Update account password, Full sync, Set auto sync, Connection test, Set as shared, Set as private, Enable, Disable, and Delete.
- View the following information.
- Basic Information: Including Cloud ID, ID, name, status, domain, project, shared range, platform, account, agent, enabled status, sync time, created at, updated at, and description.
- Account information: Including environment, health status, balance, number of servers, number of hosts.
View host information
This function is used to view the host information of the private cloud platform as well as the VMware platform. This page is not available for public cloud accounts.
- On the cloud account page, click the “Hosts” tab to enter the Hosts page.
- View the host information and support the management of the host. Batch Action
View Resource Statistics
This function is used to count the resource information under the cloud account.
- On the cloud account details page, click the “Resource Statistics” tab to enter the resource statistics page.
- View the following information.
- View the number of servers, number of LB instances, number of RDS instances, number of Redis instances, number of storage buckets, object storage capacity, number of EIPs, number of public IPs, number of snapshots, number of VPCs, number of IP subnets, and total IPs.
- View Percentage of stopped servers: the percentage of servers in the stopped state to the total number of servers. including the number of VMs in stopped state, the number of VMs in unstopped state (including abnormal, running, etc.), and the total number of VMs.
- #Disk in user: The number of disks mounted to servers as a percentage of the total number of disks. including the number of disks mounted to servers, the number of disks not mounted to servers, and the total number of disks.
- EIP Usage: the number of EIPs mounted to servers as a percentage of the total number of EIPs. including the number of EIPs used, the number not used, and the total number of EIPs.
- IP Usage: the number of IPs used as a percentage of the total number of IPs; includes the number of IPs used, the number of IPs unused, and the total number of IPs.
Subscription Management
Batch Action Subscriptions are similar to sub-accounts. The available resources on the public cloud are determined through cloud accounts and subscriptions. The cloud management platform actually purchases resources on the corresponding public cloud platform through subscriptions. Subscriptions are domain resources just like cloud accounts. The resources synced down by subscriptions are attributed to the same project as the cloud account, indicating that users under the project’s domain have permission to create resources using the subscription.
- VMware, OpenStack, ZStack, DStack, AWS, Alibaba Cloud, and Tencent Cloud platforms have only one subscription under their cloud accounts.
- Azure, Huawei Cloud, and UCloud platforms support multiple subscriptions under their cloud accounts, with one subscription belonging to one region for Huawei Cloud.
Create Subscriptions
Create subscriptions are currently supported only for Azure International cloud accounts.
- On the cloud account details page, click the “Subscriptions” tab to enter the subscriptions page.
- Click the “New” button at the top of the list to bring up the New Subscription dialog box.
- Configure the following information.
- EA account: You need to specify the EA account for creating cloud subscriptions.
- Subscription name: Set the name of the subscription.
- Usage: Set the usage of the subscription, including development/testing and production.
- Click the “OK” button to complete the operation.
Change project
This feature is used to change the item to which the subscription belongs, which is essentially changing the domain to which the subscription belongs. When the cloud account sets up a shared cloud subscription and specifies the shared scope, the administrator can modify the domain to which the subscription belongs through the change project function, and the optional domain is the shared scope of the cloud subscription, and only the users in the domain to which the subscription belongs have permission to use the subscription resources after the modification is completed.
subscription change project.
- On the cloud account details page, click the “Subscriptions” tab to enter the subscriptions page.
- Click the “Change Project” button on the right action bar of the subscription to bring up the Change Project dialog box.
- Click the “OK” button to complete the operation.
Batch Change Projects
- On the cloud account details page, click the “Subscriptions” tab to enter the subscriptions page.
- Check one or more subscriptions in the list, and click the “Change Project” button at the top of the list to bring up the Change Project dialog box.
- Click “OK” button to finish the operation.
Full Synchronization
This function is used to fully synchronize the subscription information.
Description
- When the cloud account has only one subscription, full sync subscription is equivalent to full sync cloud account.
- When the cloud account has multiple subscriptions, such as Huawei Cloud, the full sync subscription only syncs the region information under the subscription.
- On the cloud account details page, click the “Subscriptions” tab to enter the subscriptions page.
- Click the “Full Sync” button on the right column of the subscription to sync the subscription information.
Enable Subscriptions
When the subscription is “Enabled” and the status is “Connected”, users can use the subscription to create resources in the corresponding region of the public cloud platform normally.
Enabled
- On the cloud account details page, click the “Subscriptions” tab to enter the subscriptions page.
- Click the “More” button on the right action bar of the subscription in the “Disabled” state, and select the drop-down menu “Enable” menu item to bring up the action confirmation dialog.
- Click the “OK” button to complete the operation.
Batch Enable
- On the cloud account details page, click the “Subscriptions” tab to enter the subscriptions page.
- Select one or more “disabled” subscriptions in the list, and click the “Enable” button at the top of the list to bring up the action confirmation dialog.
- Click the “OK” button to complete the operation.
Disable Subscriptions
When a subscription is in the “disabled” state, users cannot use the subscription to create resources in the corresponding region of the public cloud platform.
Individually Disable
- On the cloud account details page, click the “Subscriptions” tab to enter the subscriptions page.
- Click the “More” button on the right action bar of the subscription in the “Enabled” status and select the drop-down menu “Disable” menu item to bring up the action confirmation dialog.
- Click the “OK” button to complete the operation.
Batch Disable
- On the cloud account details page, click the “Subscriptions” tab to enter the subscriptions page.
- Select one or more “enabled” subscriptions in the list, and click the “Disable” button at the top of the list to bring up the action confirmation dialog.
- Click the “OK” button to complete the operation.
Delete Subscriptions
Currently, only Azure international cloud accounts support the function of deleting subscriptions.
- On the cloud account details page, click the “Subscriptions” tab to enter the subscriptions page.
- Click the “More” button in the action bar on the right side of the subscription, and select the drop-down menu “Delete” to bring up the action confirmation dialog.
- Click the “OK” button to complete the operation.
View the subscription details page
- On the cloud account details page, click the Subscriptions tab to enter the Subscriptions page.
- Click the subscription name item to enter the subscription details page.
- View the following information.
- Basic Information: Including Cloud ID, ID, name, status, domain, project, platform, account, enable status, sync time, created at, updated at, and description.
- Other information: Including health status, etc.
View the regions under the subscription
This function is used to view the region information under the subscription. The regions supported by the subscriptions under different platforms are different, among which the public cloud platforms except Huawei Cloud support multiple regions under one subscription, and Huawei Cloud supports one region under one subscription. Users need to select the corresponding platform available region according to the geographical location when creating servers in the public cloud platform, etc.
Setting synchronization
Users can set whether to synchronize the resources of the region according to the usage, e.g. if users do not use the resources of Alibaba Cloud foreign region, they can turn off the synchronization function of Alibaba Cloud foreign region through the batch setting synchronization function, and the subsequent users will not synchronize the resources of Alibaba Cloud foreign region when they fully synchronize their cloud accounts or subscriptions, saving the time of full synchronization.
Region Settings Sync
- In the subscription details page, click the “Region” tab to enter the region page.
- Click the “Set Sync” button on the right column of the region to bring up the Set Sync dialog box.
- Select whether to synchronize the resources of the region and click “OK” button.
Batch Settings Sync
- On the subscription details page, click the “Region” tab to enter the region page.
- Check one or more regions in the list, and click the “Set Sync” button at the top of the list to bring up the Set Sync dialog box.
- Select whether to synchronize the resources of the region, and click the “OK” button.
Full Sync
This function is used to fully synchronize the resources of the specified region under the subscription.
- On the subscription details page, click the Region tab to enter the region page.
- Click the “Full Sync” button on the right action bar of the region to fully sync the resources of the region.
View the subscribed quota on the cloud
This feature is used to view the quota information on the public cloud platform.
- On the subscription details page, click the “Quota on Cloud” tab to enter the Quota on Cloud page.
- View the quota usage for different resources.
View the resource statistics under the subscription
This feature is used to count the resource information under the subscription. When there are multiple subscriptions under the cloud account, the resource statistics of all subscriptions are added together to equal the resource statistics under the cloud account.
- On the subscription details page, click the “Resource Statistics” tab to enter the resource statistics page.
- View the following information.
- View the number of servers, number of LB instances, number of RDS instances, number of Redis instances, number of storage buckets, object storage capacity, number of EIPs, number of public IPs, number of snapshots, number of VPCs, number of IP subnets, and total IPs.
- View Percentage of stopped servers: the percentage of servers in the stopped state to the total number of servers. including the number of VMs in stopped state, the number of VMs in unstopped state (including abnormal, running, etc.), and the total number of VMs.
- #Disk in user: The number of disks mounted to servers as a percentage of the total number of disks. including the number of disks mounted to servers, the number of disks not mounted to servers, and the total number of disks.
- EIP Usage: the number of EIPs mounted to servers as a percentage of the total number of EIPs. including the number of EIPs used, the number not used, and the total number of EIPs.
- IP Usage: the number of IPs used as a percentage of the total number of IPs; includes the number of IPs used, the number of IPs unused, and the total number of IPs.
SAML users
This function is used to manage users in the system that can log in to the public cloud and HCSO platform without password.
Create SAML users
This function is used to set the local users in the system as the unencrypted login users of the public cloud platform.
- On the cloud account page, click the cloud account name item of the public cloud platform to enter the cloud account details page.
- Click the “SAML Users” tab to enter the SAML Users page.
- Click the “Create” button to create a new user.
- Associate the local user and select the corresponding cloud user group.
- Click the
button to complete the operation.
Delete SAML users
This function is used to delete the unclassified login user. After deletion, the user in the system will not be able to login to the public cloud unclassified again.
Delete SAML users
- In the cloud account page, click the cloud account name of the public cloud platform to enter the cloud account details page.
- Click the “SAML Users” tab to enter the SAML Users page.
- Click the “Delete” button in the operation column on the right side of the user to bring up the operation confirmation dialog.
- Click “OK” button to finish the operation.
Batch delete SAML users
- On the cloud account page, click the cloud account name item of the public cloud platform to enter the cloud account details page.
- Click the “SAML Users” tab to enter the SAML Users page.
- Select one or more users in the list, and click the “Delete” button to bring up the operation confirmation dialog.
- Click the “OK” button to complete the operation.
Cloud User Management
Cloud users, that is, users on the public cloud platform (eCloud and UCloud are not supported), this function is used to manage the cloud user information under the public cloud cloud account.
Source of cloud users
- When the cloud management platform manages public cloud platform cloud account, it will synchronize the sub accounts and collaborators on the public cloud platform to the cloud management platform.
- Create cloud subscriber.
Description
- System administrators can manage cloud subscribers from any domain cloud account.
- Domain administrators can only manage cloud subscribers from cloud accounts under their domain.
Create cloud user
This function is used to create a new cloud user, i.e. a new user on the corresponding public cloud platform, and supports associating the user with a local user of the OneCloud platform. After associating a local user, the local user can view the information of the associated cloud user in the user information at the user information on the cloud, and support convenient login to the public cloud platform using the cloud user.
- On the cloud account page, click the cloud account name item of the public cloud platform to enter the cloud account details page.
- Click the “Cloud Users” tab to enter the Cloud Users page.
- Click the “Create” button at the top of the list, and then click the Create Cloud User dialog box.
- Configure the following parameters.
- Cloud subscriptions: Only Google Cloud needs to set this parameter, Google Cloud subscriptions correspond to Google Cloud projects. Specify the cloud subscription that corresponds to the projects for the specified Google Cloud account.
- User name: Set the name of the cloud user that will be used to create users in the corresponding public cloud platform (except Google Cloud). Google Cloud must be filled in with an existing account.
Description
For Google Cloud, the Create Cloud User action associates an existing Google Cloud account with the Google Cloud account that the platform is managed to via the project.
- Cloud user group: Add the cloud user to the cloud user group and the cloud user will have all the permissions of the cloud user group.
- Associate local users: Select the local users that have joined the project.
Description
System View
- When the cloud account shared scope is private or shared cloud subscription, only users who have joined the project under the domain where the cloud account is located can be selected.
- When the scope of cloud account sharing is Global share, you can choose to join users who join projects under any domain.
Domain System View
- Regardless of the cloud account sharing scope, only users who can join projects under this domain can be selected.
- Email: Configure the mailbox to receive the creation of cloud user information. When “Send create cloud user email” is checked, creation information will be sent the Email address.
Description
Make sure that the Mail service is configured in the channels.
- Click the “OK” button to complete the operation.
Sync Status
This function is used to get the current status of the cloud subscriber.
- In the cloud account page, click the cloud account name item of the public cloud platform to enter the cloud account details page.
- Click the “Cloud User” tab to enter the cloud user page.
- Click the “Sync Status” button on the right column of the cloud user to synchronize the cloud user status.
Modify Local User
This function is used to modify the local user associated with the cloud subscriber. The Modify Local User action will reset the cloud subscriber’s password.
Note
Google Cloud Platform cloud users will not reset their passwords when they are associated with local users.
- On the Accounts page, click the Public Cloud Platform cloud account name item to enter the cloud account details page.
- Click the Cloud Users tab to enter the Cloud Users page.
- Click the “More” button in the operation column on the right side of the cloud user, and select the drop-down menu item “Modify Local User” to bring up the Modify Local User dialog box.
- Select the local user and click the “OK” button.
Description
System View
- When the scope of cloud account sharing is private or shared cloud subscription, only users who join projects under the domain where the cloud account is located can be selected.
- When the scope of cloud account sharing is Global share, you can choose to join users who join projects under any domain.
Domain System View
- Regardless of the cloud account sharing scope, only users who can join projects under this domain can be selected.
Associated cloud user group
This feature is used to join the cloud subscriber to a cloud user group. The cloud subscriber will have all the privileges of this cloud user group.
- On the cloud account page, click the public cloud platform cloud account name item to enter the cloud account details page.
- Click the Cloud Users tab to enter the Cloud Users page.
- Click the “More” button in the operation column on the right side of the cloud user, and select the drop-down menu item “Associate Cloud User Group” to bring up the Associate Cloud User Group dialog box.
- Select the cloud user group and click the “OK” button to complete the operation.
Delete
This function is used to delete a cloud subscriber. The deletion operation will delete the corresponding user on the corresponding public cloud platform.
Delete
- On the cloud account page, click the cloud account name item of the public cloud platform to enter the cloud account details page.
- Click the Cloud Users tab to enter the Cloud Users page.
- Click the “More” button in the operation column on the right side of the cloud user, and select the “Delete” menu item to bring up the operation confirmation dialog.
- Click the “OK” button to complete the operation.
Batch Delete
- On the cloud account page, click the cloud account name item of the public cloud platform to enter the cloud account details page.
- Click the “Cloud Users” tab to enter the Cloud Users page.
- Select one or more cloud users in the list, click the**_“Batch Operation”_** button at the top of the list, select the drop-down menu **_“Delete”_** menu item, and the operation confirmation dialog box pops up.
- Click the “OK” button to complete the operation.
View cloud subscriber details
This function is used to view cloud subscriber details.
- In the cloud account page, click the cloud account name item of the public cloud platform to enter the cloud account details page.
- Click the Cloud Users tab to enter the Cloud Users page.
- Click the cloud subscriber name item to enter the cloud subscriber details page.
- View the following information: Cloud ID, ID, name, status, domain, project, platform, login address, associated local user, console login, created at, updated at, and description.
View cloud subscriber associated cloud user group
This feature is used to view the cloud user groups associated with the cloud subscriber and supports the operation to remove the cloud subscriber from the cloud user group.
Remove cloud subscriber group
This function is used to remove the cloud subscriber from the cloud user group.
Remove
- On the cloud account page, click the public cloud platform cloud account name item to enter the cloud account details page.
- Click the Cloud Users tab to enter the Cloud Users page.
- Click the cloud user name item to enter the cloud user details page.
- Click the “Cloud User Group” tab to enter the cloud user group page.
- Click the “Delete” button on the right action column of the cloud user group to bring up the action confirmation dialog.
- Click the “OK” button to complete the operation.
Batch Remove
- On the cloud account page, click the cloud account name item of the public cloud platform to enter the cloud account details page.
- Click the Cloud Users tab to enter the Cloud Users page.
- Click the cloud user name item to enter the cloud user deBatch Action
- Click the Cloud User Group tab to enter the Cloud User Group page.
- Select one or more cloud user groups in the list and click the “Delete” button at the top of the list to bring up the action confirmation dialog.
- Click the “OK” button to complete the operation.
View the operation log of the cloud subscriber
This function is used to view the operation logs of the cloud subscriber related operations.
- On the cloud account page, click the cloud account name item of the public cloud platform to enter the cloud account details page.
- Click the Cloud Users tab to enter the Cloud Users page.
- Click the cloud user name item to enter the cloud user details page.
- Click the “Operation Log” tab to enter the Operation Log page.
- Load More Logs: In the Operation Logs page, the list shows 20 operation logs by default. To view more operation logs, please click the “Load More” button to get more logs.
- View Log Details: Click the “View” button on the right column of the operation log to view the log details. Copy details are supported.
- View logs of specified time period: If you want to view the operation logs of a certain time period, set the specific date in the start date and end date at the top right of the list to query the log information of the specified time period.
- Export logs: Currently, only the logs displayed on this page are supported to be exported. Click the upper-right corner of
 icon, set the export data column in the pop-up export data dialog, and click the “OK” button to export the logs.
Cloud User Group Management
This function is used to view the cloud user groups available in the public cloud platform corresponding to the cloud account. If the current cloud user group does not meet the requirements, a new cloud user group can be created.
- On the cloud account page, click the cloud account name item of the public cloud platform to enter the cloud account details page.
- Click the “Cloud User Group” tab to enter the Cloud User Group page.
- To manage the cloud user group, please see cloud user group for details.
View Cloud Project
This feature is used to view the mapping of projects on the cloud platform to local projects. Among them, projects on VMware, OpenStack, Alibaba Cloud, Huawei Cloud, Tencent Cloud, and Azure platforms support bi-directional synchronization with local projects.
Description
- Creating resources in the corresponding project on the cloud will be synchronized to the corresponding project on the cloud.
- Creating a resource in a project that does not have a corresponding project on the cloud will synchronize to the project with the same name if there is a project with the same name on the cloud platform; if there is no project with the same name, it will create a project with the same name on the cloud and synchronize the resource to the project with the same name.
Switching local projects
This function is used to change the mapping relationship between local projects and projects on the cloud. After switching the local project, the resources of the cloud account will also be synced to the new project.
Description
- If the resources of the cloud account have changed projects on the OneCloud platform, switching local projects will not affect the resources of the changed projects.
- After switching the local project, the billing will also be synchronized to the new project.
- The optional scope of the domain is related to the shared scope of the cloud account; when the cloud account is private, only the domain that the cloud account belongs to can be selected; when the cloud account shares cloud subscriptions, only the domain that the cloud subscriptions belong to can be selected, and when the cloud account is shared by multiple domains, both the domain that the cloud account belongs to and the shared domain can be selected.
Switch local projects
- On the cloud account details page, click the “Cloud Project” tab to enter the Cloud Project page.
- Click the “Switch Local Project” button in the corresponding action column of the project to bring up the Switch Local dialog box.
- Select the domain and project, click “OK” button.
Switch Local Projects in Batch
- On the cloud account details page, click the “Cloud Project” tab to enter the Cloud Project page.
- Select one or more projects in the list, and click the “Switch Local Projects” button at the top of the list to bring up the Switch Local dialog box.
- Select the domain and project, click “OK” button.
View Operation Log
This function is used to view the log information of the operations related to the cloud account
- In the cloud account page, click the specified cloud account name item to enter the cloud account details page.
- Click the “Operation Log” tab to enter the operation log page.
- Load More Logs: In the Operation Logs page, the list shows 20 operation logs by default. To view more operation logs, please click the “Load More” button to get more logs.
- View Log Details: Click the “View” button on the right column of the operation log to view the log details. Copy details are supported.
- View logs of specified time period: If you want to view the operation logs of a certain time period, set the specific date in the start date and end date at the top right of the list to query the log information of the specified time period.
- Export logs: Currently, only the logs displayed on this page are supported to be exported. Click the upper-right corner of icon, set the export data column in the pop-up export data dialog box, and click the “OK” button to export the logs.
How to login to the public cloud platform without password through this system?
The public cloud platform supports single sign-on based on SAML protocol. Through the identity provider function, enterprise users can achieve single sign-on to the public cloud platform through their own account system and manage the resources of the public cloud platform.
Identity Provider
The Identity Provider (IdP) is used to provide authentication. External users will use the role to log in to the public cloud platform after authenticating with a known identity provider. External users will have limited access to resources within the scope of the role. Since external identity users use roles to log in to Tencent Cloud, and roles use temporary keys, you can avoid security issues caused by long-term use of keys (e.g. cloud API keys), which makes it difficult to rotate keys and leak them after being intercepted.
Configure Azure External Identies
Description
Set the OneCloud platform to domain access and set the access domain in the Global Settings - Console Address. Platforms that are not domain accessible are otherwise not available as External Identies for Azure.
-
Get the ID of the Azure account on the OneCloud platform.
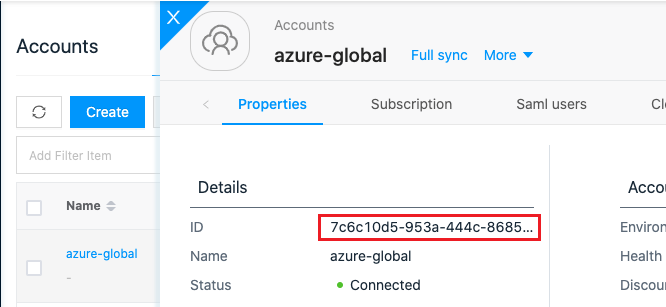
-
Enter “https://
/api/saml/idp/metadata/ ” in the browser and save the content of the displayed XML file. For example: “[https://saml.test.cn/api/saml/idp/metadata/7c6c10d5-953a-444c-8685-d0b8f53984b2](#configure azure-external-identies) “, and save the file. 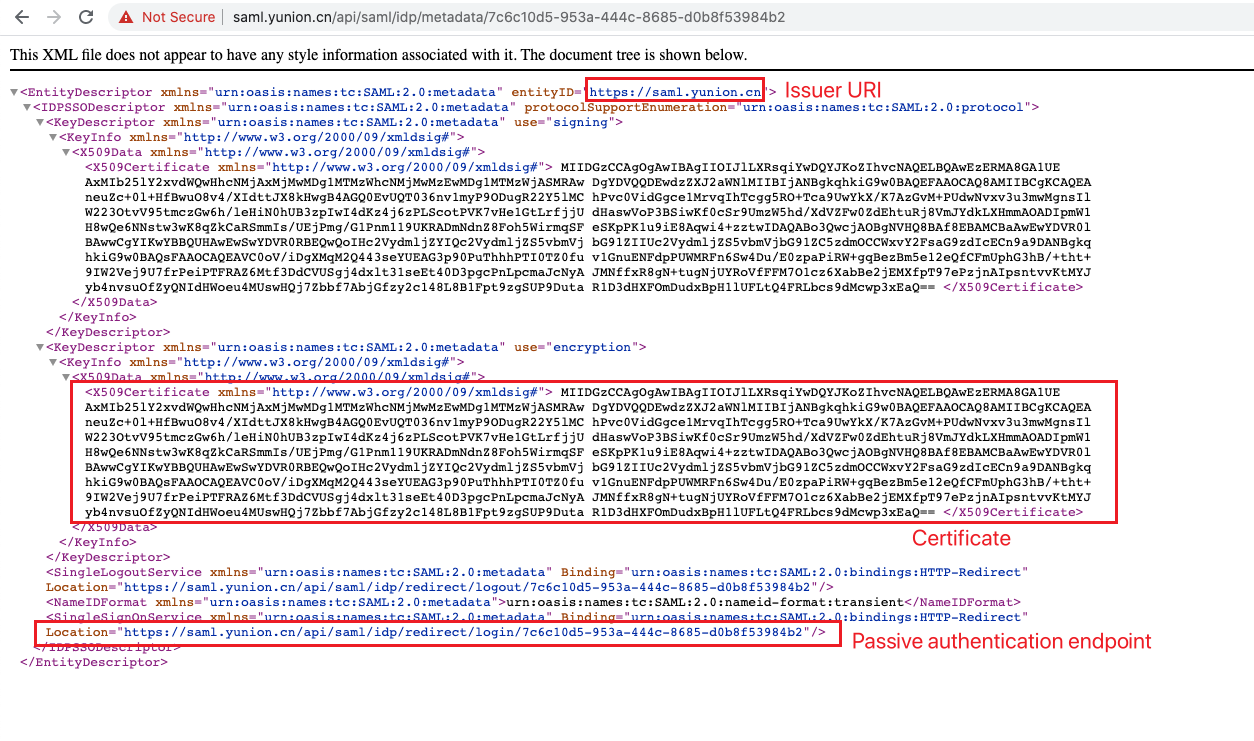
-
In the Azure console, search for “external identies” and go to this page.

-
Click on the left menu item “All identity providers” to enter the “All identity providers” page.
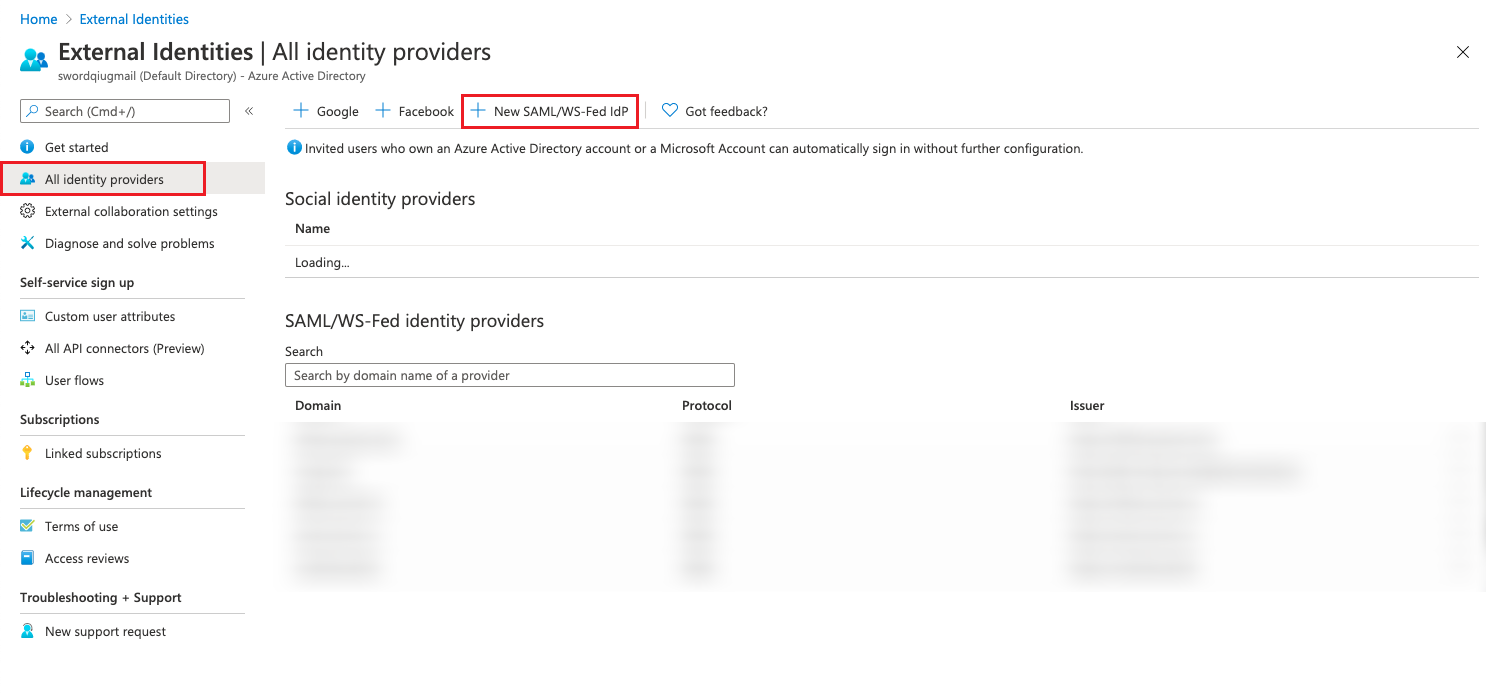
-
Click “New SAML/WS-Fed Idp” and configure the following parameters in the pop-up dialog box.
- Identity provider protocol: Select SAML.
- Domain name of federating IdP: Set it as the domain name of the platform. e.g. saml.test.cn.
- Select a method for populating metadata: It is recommended to select “Parse metadata file”, and upload the xml file saved in the above step, and click “Parse “, the following parameters will be filled automatically. If you choose “Input metadata manually”, you need to install the corresponding items in the screenshot above and fill them in respectively.Note that there are spaces in the directly copied Certificate item, so you need to remove them completely.
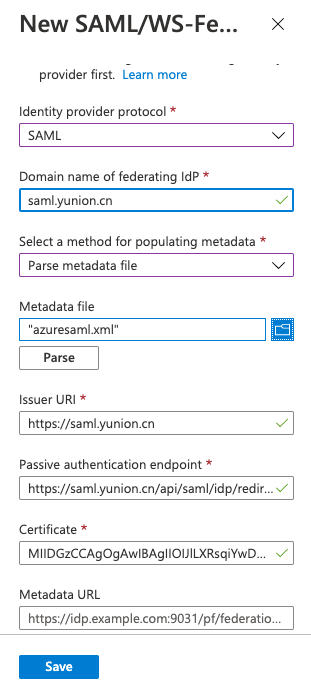
-
In addition, you need to add user permissions for Azure applications, which can be found in How to get the Tenant ID and Client information for Azure.
-
In the application details page, click “API permission” to enter the API permission page, and make sure the application has “User.Invite.All” “ReadWrite.All” permission under Microsoft Graph, if not, you need to click “add a permission” to add the corresponding permission.
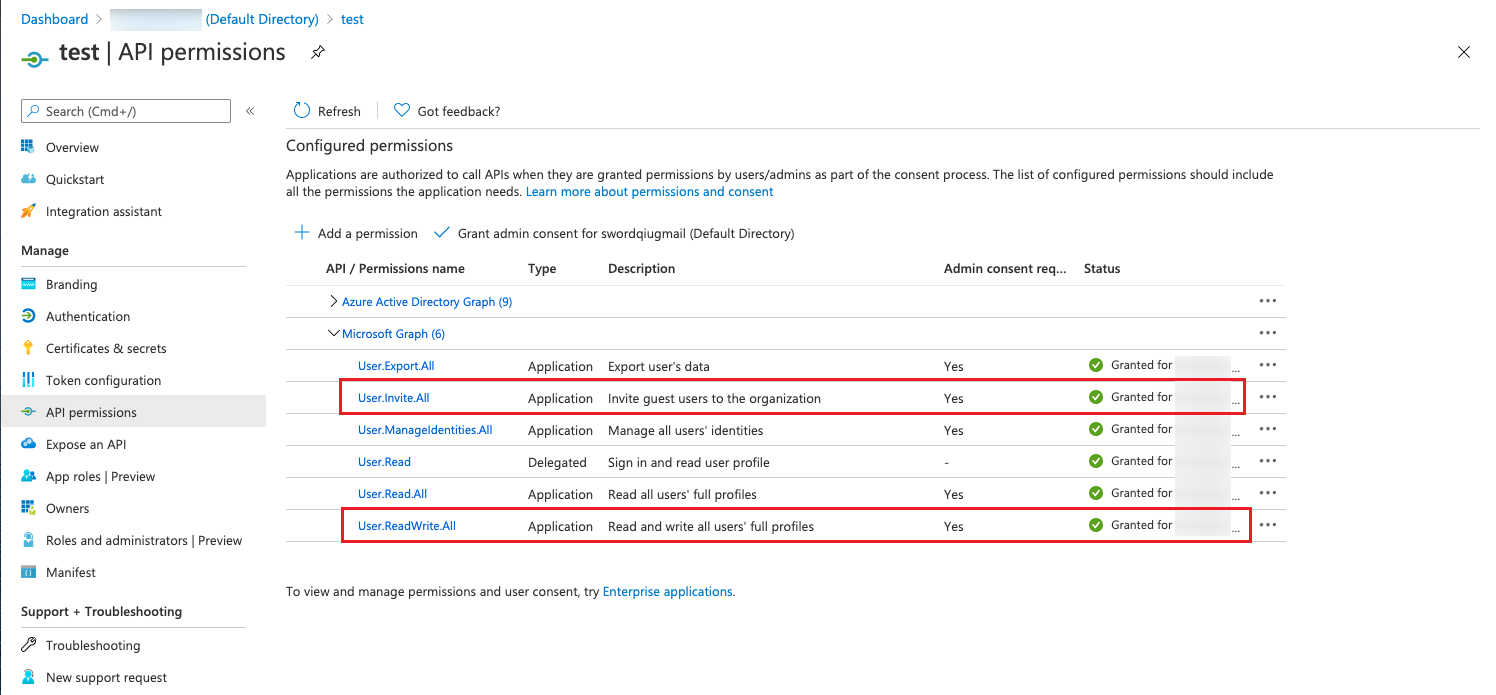
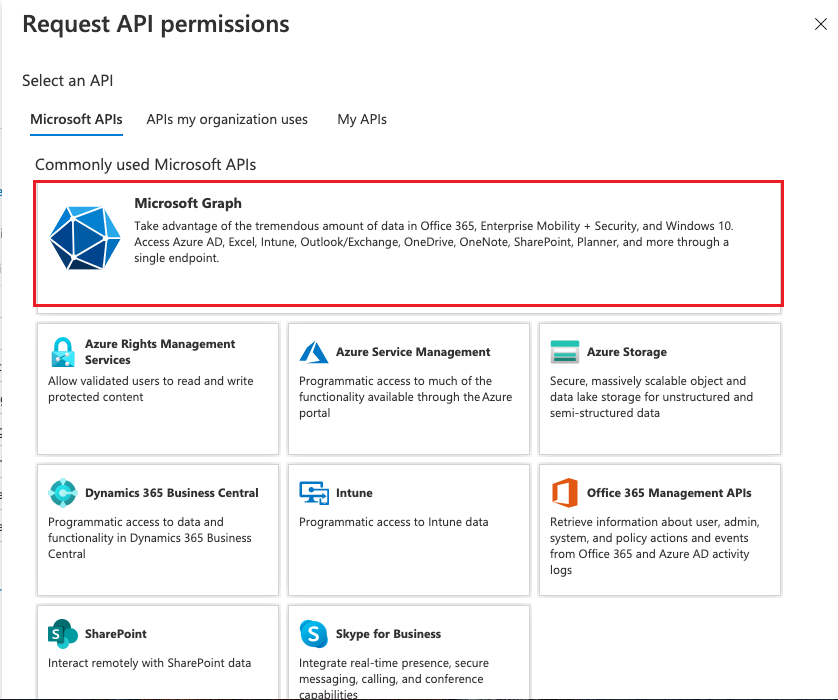
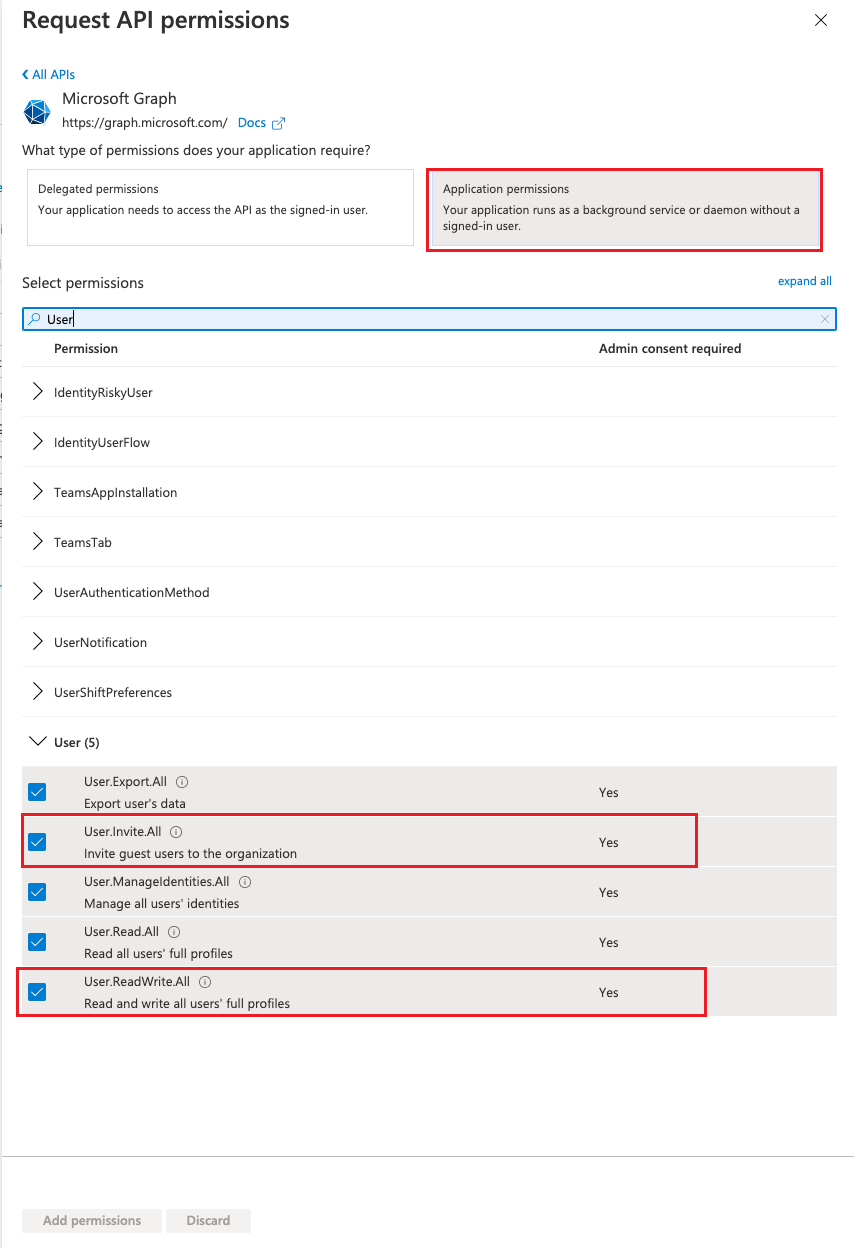
Setup Chrome
When signing in Azure platform with SSO on OneCloud platform, you need to carry cookies back to the OneCloud platform. Chrome does not allow cookies to be carried across websites by default, so the following configuration is required.
-
Type “chrome://flags/” in the address of Chrome browser and search for “SameSite by default cookies”.
-
Disabled “SameSite by default cookies” and “Cookies without SameSite must be secure”。
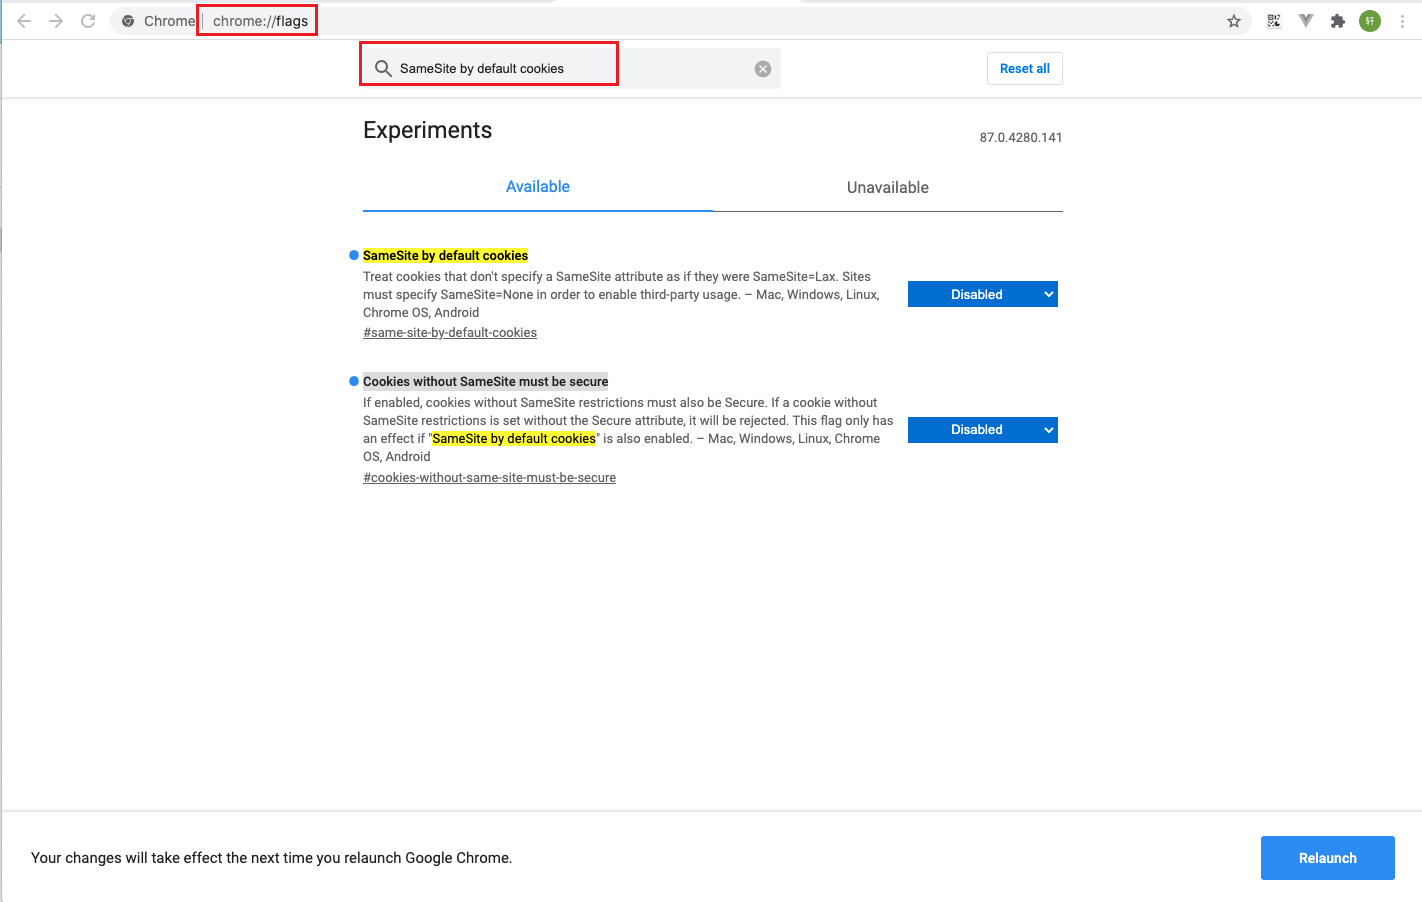
-
Relaunch Chrome to make the change take effect.
Usage flow
- When creating a cloud account on the OneCloud platform, turn on the SSO login feature, which will then upload the system’s SAML information to the public cloud platform, making the system act as the identity provider for the public cloud platform.
- In the cloud user group page, create the corresponding platform cloud user group and select the corresponding permission.
- In the Cloud account details - Free login user page, create a new free login user, associate a local user and specify the cloud user group to which the user belongs. This operation is used to grant the system users the permission to log in to the public cloud without confidentiality.
- Subsequently, local users who are associated with SAML users on the cloud can click “User Information - Cloud SSO- SSO login user” in the “SSO login” button, and they will sign in to the public cloud platform free of charge with the specified privileges.
Note
When signing in the Azure platform SSO on the OneCloud platform, you still need to enter the user’s account number. Currently the login account is not displayed on the front-end and has the format: username@domain. E.g. test user on saml.test.cn environment has SSO access to Azure platform, User account is test@saml.test.cn.