LB Instance
Load balancing service means that in order to ensure high availability of business, multiple business servers or servers, etc. are virtualized into a logical pool of application services, and the services are provided outward through virtual IPs. When users access the virtual IPs, the lb service will listen to the specified ports to distribute the requests from users to the backend servers or servers for processing.
A complete lb consists of 3 main parts, lb instance, listener and backend server group. When you configure the load balancing service, you need to create a lb instance first, then bind the backend server group when configuring lb listener .
- LB Instance: A lb instance is a running lb service that receives traffic and forwards it to the backend servers through the set virtual IP.
- Listener: Configure a listener for the lb instance to listen for requests on the lb instance and distribute the traffic to the backend servers according to the set policy.
- Backend server group: Bind with the lb instance to handle the corresponding forwarding requests.
Description
- Before creating a lb instance of OneCloud , the administrator needs to have configured the lb cluster and nodes.
- Before creating a public cloud lb instance, the administrator needs to have docked and imported the cloud account resources of the relevant public cloud platform. Currently, the cloud management platform supports lb services for Alibaba Cloud, Tencent cloud, Huawei cloud, AWS and other public cloud platforms.
- Currently the OneCloud platform is read-only docked to the LB and APPGateway of the Azure platform. LB, the Layer 4/Network Layer LB, and APPgateway, the Layer 7/Application Layer LB. Because Azure LB is different from other platforms, sync Azure LB and Appgateway to OneCloud has done some special processing. See Azure LB Sync Details.
- Currently the OneCloud platform only reads LBs that dock to the Google platform, see Google LB Sync Details
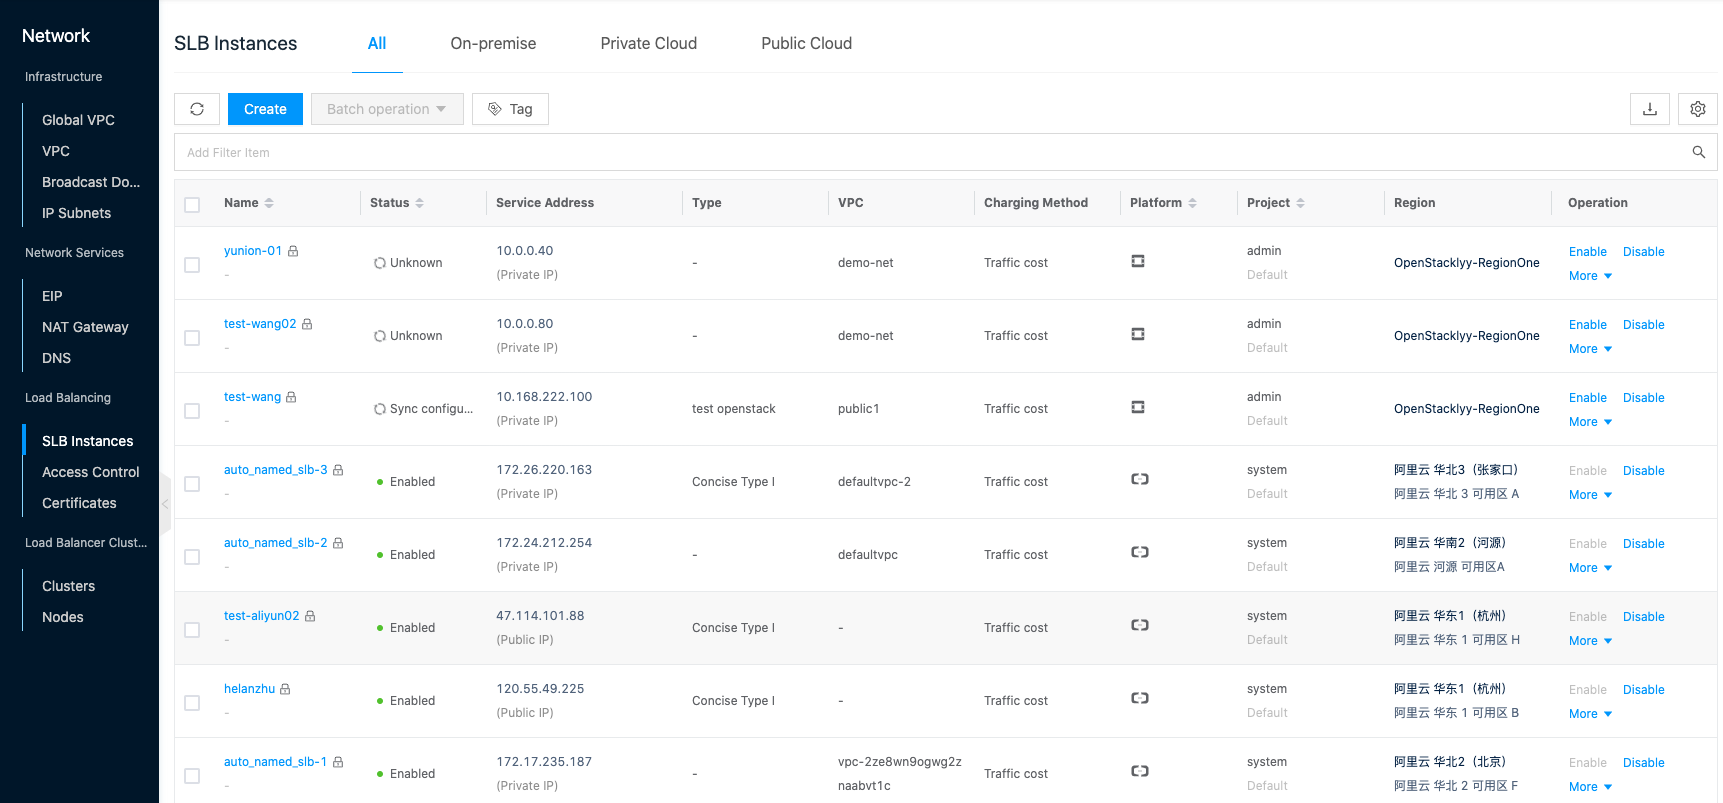
Entry: In the cloud management platform, click the top left corner of  navigation menu, and click “Network/LB/SLB Instance” menu item in the left menu bar that pops up to enter the SLB Instance page.
Create load balanced instance
This function is used to create lb instances on OneCloud , OpenStack, Alibaba Cloud, Tencent Cloud, Huawei Cloud, AWS platform.
Description
On the Create LB Instance page, you can click the “On-premise”, “Private Cloud”, and “Public Cloud” tabs at the top to switch to create lb instances on different platforms.
Create On-premise lb instance
Before creating On-premise lb instance, you need to create a lb cluster and nodes first.
In the LB Instance page, click the “All” or “On-premise” tab at the top, and click the “Create” button at the top of the list to enter the Create On-premise LB Instance page. 2. Set the following parameters. - Specify Project: Specify the project to which the lb instance belongs when creating the lb instance. - Region: Select the region and zone to which the lb instance belongs. - Name: Set the name of the lb instance. - Platform: Only OneCloud platform is supported. - Cluster: Select the lb cluster under the same region and zone. - Network: Select IP subnet, an IP address will be randomly assigned in this IP subnet as the virtual service IP of lb. currently, only classic network (default VPC) is supported. 3. Click the “OK” button to complete the operation.
Create OpenStack lb instance
Before creating an OpenStack lb instance, please make sure you have an OpenStack platform cloud account, and the OpenStack platform you are connecting to supports lb components.
- On the lb instance page, click the “Private Cloud” tab at the top, click the “Create” button at the top of the list to enter the Create On-premise LB Instance page.
- Set the following parameters.
- Specify Project: Specify the project that the lb instance belongs to when creating the lb instance.
- Region: Select the region and zone to which the lb instance belongs.
- Name: Set the name of the lb instance.
- Network: Select IP subnet, an IP address will be randomly assigned in this IP subnet as the virtual service IP of lb.
Description
Make sure there are at least 8 available IP addresses in the IP subnet.
- Click the “OK” button to complete the operation.
Create Alibaba Cloud LB Instance
Before creating Alibaba Cloud lb instance, please make sure you have an Alibaba Cloud account.
-
On the lb instance page, click the “Public Cloud” tab at the top, click the “Create” button at the top of the list to enter the new public cloud lb instance page.
-
Set the following parameters.
- Specify Project: Specify the project to which the lb instance belongs when creating the lb instance.
- Name: Set the name of the lb instance.
- Region: Select the available region to which the lb instance belongs. You can filter the appropriate region and available region by city and platform quickly, and choose Alibaba Cloud as the platform in this example.
- Specification: Select the specification of Alibaba Cloud lb instance, the maximum number of connections (the maximum number of connections that the lb instance can carry), the number of new connections per second (the rate of new connections) and the number of queries per second (the number of HTTP/HTTPS queries (requests) that can be completed per second) are different for different specifications.
specifications maximum connections new connections per second queries per second Simplicity I 5000 3000 1000 Standard I 50,000 5000 5000 Standard Type II 10000 10000 10000 High-order I 20000 20000 20000 20000 High-order type II 50,000 50,000 30,000 Super Type I 100000 100000 50000 - Network: Select to create a public network lb instance or a private network lb instance.
- When public network is selected, the public network lb instance provides public network IP and can access the lb through Internet.
- Network billing method: Select the billing method as per traffic or per bandwidth, and you also need to set the bandwidth when you select per bandwidth billing.
- IP Version: Currently, only IPv4 version is supported.
- Specify cloud subscription: Select the cloud subscription for creating lb instances.
- When private network is selected, the private network lb instance only provides Alibaba Cloud private network IP, and the lb service can only be accessed through the internal network of VPC, and cannot be accessed from the Internet.
- IP Version: Currently, only IPv4 version is supported.
- Network: Select the VPC and IP subnet under the zone. An IP address will be randomly assigned in this IP subnet as the virtual service IP for lb.
Description
Make sure there are at least 8 available IP addresses in the IP subnet.
- When public network is selected, the public network lb instance provides public network IP and can access the lb through Internet.
-
Click the “OK” button to create the Alibaba Cloud lb instance.
Create Tencent Cloud lb instance
Please make sure you have a Tencent Cloud account before creating a Tencent Cloud lb instance.
In the lb instance page, click the “Public Cloud” tab at the top, click the “Create” button at the top of the list to enter the new public cloud lb instance page. 2. Configure the following parameters. - Specify Project: Specify the project to which the lb instance belongs when creating the lb instance. - Name: Set the name of the lb instance. - Region: Select the available region to which the lb instance belongs. You can filter the appropriate region and available region by city and platform quickly. - Network Type: Choose to create a public network lb instance or a private network lb instance. - When you choose public network, the public lb instance only provides public IP and can access the lb through Internet. - IP Version: Currently, only IPv4 version is supported. - Network: Select the VPC under the zone. - When private network is selected, the private network lb instance only supports access in the internal network of the VPC and cannot be accessed through the Internet. - IP Version: Currently, only the IPv4 version is supported. - Network: Select the VPC and IP subnet under the zone. An IP address will be randomly assigned in this IP subnet as the virtual service IP for lb.
Description
Make sure there are at least 8 available IP addresses in the IP subnet.
Create Huawei Cloud lb instance
Before creating a Huawei Cloud lb instance, please make sure you have a Huawei Cloud account.
- On the lb instance page, click the “Public Cloud” tab at the top, and click the “Create” button at the top of the list to enter the new public cloud lb instance page.
- Configure the following parameters.
- Specify Project: Specify the project to which the lb instance belongs when creating the lb instance.
- Name: Set the name of the lb instance.
- Region: Select the available region to which the lb instance belongs. You can filter the appropriate region and available region by city and platform quickly.
- Network Type: Choose to create a public network lb instance or a private network lb instance.
- When choosing public network, the public network lb instance can specify public network IP and private network IP, which can not only access lb through Internet, but also support VPC internal private network access lb.
- IP Version: Currently, only IPv4 version is supported.
- Network: Select the VPC and IP subnet under the zone. An IP address will be randomly assigned in this IP subnet as the virtual service IP for lb.
- EIP: Select EIP, which supports selecting an existing public IP or a new public IP.
- When private network is selected, the private network lb instance is only supported to be accessed in the internal network of VPC and cannot be accessed through Internet.
- IP Version: Currently, only IPv4 version is supported.
- Network: Select the VPC and IP subnet under the zone. An IP address will be randomly assigned in this IP subnet as the virtual service IP for lb.
Description
Make sure there are at least 8 available IP addresses in the IP subnet.
- When choosing public network, the public network lb instance can specify public network IP and private network IP, which can not only access lb through Internet, but also support VPC internal private network access lb.
- Click the “OK” button to create the Huawei Cloud lb instance.
Create AWS lb instance
Before creating an AWS lb instance, please create AWS cloud account resources in Multi-Cloud Management.
- On the lb instance page, click the “Create” button at the top of the list, and select the drop-down menu “AWS” menu item to enter the Create AWS lb instance page.
- Configure the following parameters.
- Specify Project: Specify the project that the lb instance belongs to when creating the lb instance.
- Name: Set the name of the lb instance.
- Instance type: Including application type and network type.
- Application Type: Application type lb instances work in the application layer. Application type lb only supports listening to HTTP and HTTPS protocols.
- Network type: The network type lb instance works in the transport layer, and the network type lb only supports listening to TCP and UDP protocols.
- Region: Select the available region and zone to which the lb instance belongs to. You can filter the appropriate region and zone by city and platform quickly, and choose the platform as AWS in this example.
- Network Type: Choose to create a public network lb instance or a private network lb instance.
- IP Version: Currently, only IPv4 version is supported.
- Network: Select the VPC and IP subnet under the zone. An IP address will be randomly assigned in this IP subnet as the virtual service IP for lb.
Description
Make sure there are at least 8 available IP addresses in the IP subnet.
- Click the “OK” button to create the lb instance for AWS.
Enable
This feature is used to enable a lb instance in the “disabled” state so that it can provide lb services.
Enable
- On the LB Instance page, click the “Enable” button on the right column of the instance to bring up the action confirmation dialog box.
- Click the “OK” button to complete the operation.
Batch Enable
- Select one or more instances with “Disabled” status in the list of lb instances, click the**_“Batch Action”_** button at the top of the list, select the drop-down menu **_“Enable”_** menu item, and the operation confirmation dialog box pops up.
- Click the “OK” button to complete the operation.
Disable
This function is used to disable the lb instances in the “enabled” state, and the instances in the disabled state cannot provide lb services.
**The following is a list of the lb instances.
- On the LB Instance page, click the “Disable” button on the right side of the instance to bring up the operation confirmation dialog box.
- Click the “OK” button to complete the operation.
Batch Disable
- Select one or more “enabled” instances in the list of lb instances, click the**_“Batch Action”_** button at the top of the list, select the drop-down menu **_“Disable”_** menu item, and the operation confirmation dialog box will pop up.
- Click the “OK” button to complete the operation. This function is used to change the cluster to which the lb instance belongs to, and is only supported by OneCloud platform.
Change Cluster for Instance
- On the lb instance page, click the “More” button on the right column of the instance, select the drop-down menu “Change Cluster” menu item to bring up the Change Cluster dialog box.
- Select the cluster and click the “OK” button.
Batch Change Cluster
- Select one or more instances of OneCloud platform in the list of lb instances, click the “Batch Action” button at the top of the list, and select the drop-down menu “Change Cluster” menu item to bring up the Change Cluster dialog box.
- Select the cluster and click the “OK” button.
Delete LB Instance
This function is used to delete a lb instance.
Delete.
- On the lb instance page, click the “More” button on the right column of the instance, select the drop-down menu “Delete” menu item, and the action confirmation dialog box will pop up.
- Click the “OK” button to delete the instance.
Batch Delete
- Select one or more instances in the lb instance list, click the**_“Batch Action”_** button at the top of the list, select the drop-down menu **_“Delete”_** menu item, and the operation confirmation dialog box pops up.
- Click the “OK” button to complete the operation.
View LB Instance Details
This function is used to view the detailed information of the lb instance.
- On the LB Instance page, click the Instance Name item to enter the LB Instance Details page.
- Check the following information:
- Basic Information: Including Cloud ID, ID, name, status, domain, project, type, cluster, platform, billing method, region, zone (if there is a backup zone, it will also be displayed here), cloud account, created at, updated at, and description.
- Configuration information: Including service address, VPC.
Listener Management
After creating a lb instance, you need to configure a listener for the instance. The listener is used to listen for connection requests on the lb instance and distribute the requests to the backend servers based on the scheduling algorithm, backend server weights, etc.
Description
AWS lb instances are divided into network and application instances, and their configurable listening protocols differ depending on the instance type, where network lb instances only support listening to TCP and UDP protocols, and application lb instances only support listening to HTTP and HTTPS protocols. The listening method is the same for instances of other platforms.
Create TCP Listener
TCP listeners are suitable for scenarios that focus on reliability, require high data accuracy, and can be relatively slow, such as file transfer, sending and receiving emails, remote login, etc.; users can create TCP listeners to forward TCP requests opened from clients.
Note
When you want to listen to port 22 via TCP protocol, you need to modify the sshd configuration file on the forwarding node (server, host or external machine). Replace #ListenAddress 0.0.0.0 with ListenAddress <forwarding node IP> in the “/etc/ssh/sshd_config” configuration file.
On-premise
-
On the lb instance page, click the instance name item of OneCloud platform to enter the instance details page.
-
Click the “Listener” tab to enter the Listener page.
-
Click the “Create” button at the top of the list to bring up the Create LB Listener dialog box, and configure the protocol & listener related parameters.
- Name: Set the name of the listener.
- Port: The port used to receive requests and forward them to the backend server, the port range is 1-65535.
- Protocol: Support listening to TCP, UDP, HTTP, HTTPS protocols, and select “TCP” as the protocol.
Advanced Settings: Hidden by default, can be configured according to your needs.
- Scheduling algorithm: Set the scheduling algorithm of lb.
- Polling (RR): Distribute the external requests to the backend server group in order of access.
- Weighted polling (WRR): The higher the weight value of the backend server, the higher the number (probability) of being polled to.
- Weighted Least Connections (WLC): In addition to polling based on the weight value set for each backend server, the actual load of the backend server (i.e. the number of connections) is also considered. When the weight values are the same, the smaller the current number of connections, the higher the number (probability) that the backend server will be polled.
- Source IP Consistent Hash (SCH): Based on the consistent hash of the source IP address, the same source address will be dispatched to the same backend server.
- Enable access control: Set whether to enable access control, such as after checking Enable access control, you need to set the access control method and access policy control group.
- Access control mode: whitelist that allows the IPs in the access control policy group to access lb; blacklist that prohibits the IPs in the access control policy group to access lb.
- Access Control Policy Group: Select the access control policy group, please create the policy group in the access control page first.
- Backend Connection Timeout Time: The timeout time of requesting the backend server after the forwarding node receives the client request.
- Backend connection idle time: Set the connection idle time between the forwarding node and the backend server.
- Connection idle timeout: the idle time allowed after the connection session suggestion. If there is no access request within the timeout time, the current connection will be temporarily interrupted.
- Set the Proxy protocol: Get the real IP of the client through the Proxy protocol, which is usually used in V2 version.
-
Click “Next: Backend Server Group” button to select the backend server group, if there is no backend server group, you can create a new one. Click “Next: Backend Server Group” button to select the backend server group.
-
Click the “Next: Health Check” button to configure health check related parameters.
- Turn on health check: Select whether to turn on health check. If you check Turn on health check, configure the following parameters.
- Health Check Protocol: Select the health check protocol, including TCP and HTTP. The TCP protocol health check checks whether the server port is alive by sending SYN handshake messages; the HTTP protocol health check checks whether the server application is healthy by sending HEAD/GET requests to simulate the browser’s access behavior.
- Health check path (HTTP only): Set the path of the URL address for health check.
- Health check domain name (HTTP only): set the domain name of the request for health check.
- Normal status code (HTTP only): set the HTTP status code of the health check normal.
- Health check response timeout time: the maximum timeout time of health check response, if no response within the response time, the health check is determined to be abnormal.
- Health check interval time: the time interval for lb to perform health check.
- Health Check Health Threshold: If the result of health check received for n consecutive times (n is the set value) is successful, the display status is healthy.
- Health Check Unhealthy Threshold: If the result of the health check received for n (n is the set value) times in a row is identified, the status is displayed as abnormal.
-
Click the “OK” button to complete the operation.
OpenStack
-
On the LB Instance page, click the instance name item of OpenStack platform to enter the instance details page.
-
Click Click the “Listener” tab to enter the Listener page.
-
Click the “Create” button at the top of the list to bring up the Create LB Listener dialog box and configure the protocol & listener related parameters.
- Name: Set the name of the listener.
- Port: The port used to receive requests and forward them to the backend server, the port range is 1-65535.
- Protocol: Support listening to TCP, UDP, HTTP, HTTPS protocols, and select “TCP” as the protocol.
Advanced Settings: Hidden by default, can be configured according to your needs.
- Scheduling algorithm: Set the scheduling algorithm of lb.
- Polling (RR): Distribute the external requests to the backend server group in order of access.
- Weighted polling (WRR): The higher the weight value of the backend server, the higher the number (probability) of being polled to.
- Weighted Least Connections (WLC): In addition to polling based on the weight value set for each backend server, the actual load of the backend server (i.e. the number of connections) is also considered. When the weight values are the same, the smaller the current number of connections, the higher the number (probability) that the backend server will be polled.
- Source IP Consistent Hash (SCH): Based on the consistent hash of the source IP address, the same source address will be dispatched to the same backend server.
- Enable access control: Set whether to enable access control, such as after checking Enable access control, you need to set the access control method and access policy control group.
- Access control mode: whitelist means allow IPs in the access control policy group to access lb; blacklist means prohibit IPs in the access control policy group to access lb. Only whitelist is supported.
- Access Control Policy Group: Select the access control policy group, please create the policy group in the access control page first.
- Backend Connection Timeout Time: The timeout time of requesting the backend server after the forwarding node receives the client request.
- Backend connection idle time: Set the connection idle time between the forwarding node and the backend server.
- Connection idle timeout: the idle time allowed after the connection session is proposed. If there is no access request within the timeout period, the current connection will be temporarily disconnected.
-
Click “Next: Backend Server Group” button to select the backend server group, if there is no backend server group, you can create a new one.
-
Click the “Next: Health Check” button to configure health check related parameters.
- Enable health check: Select whether to enable health check or not. If you check Enable health check, configure the following parameters.
- Health Check Protocol: Select the health check protocol, including TCP and HTTP. The TCP protocol health check checks whether the server port is alive by sending SYN handshake messages; the HTTP protocol health check checks whether the server application is healthy by sending HEAD/GET requests to simulate the browser’s access behavior.
- Health check path (HTTP only): Set the path of the URL address for health check.
- Health check domain name (HTTP only): set the domain name of the request for health check.
- Normal status code (HTTP only): set the HTTP status code of the health check normal.
- Health check response timeout time: the maximum timeout of health check response, if no response within the response time, the health check is determined to be abnormal.
- Health check health threshold: n (n is the set value) consecutive times to receive the health check result is successful, then the display status is healthy.
- Health check unhealthy threshold: If the result of the health check received for n (n is the set value) consecutive times is identified, the display status is abnormal.
-
Click the “OK” button to complete the operation.
Alibaba Cloud
-
On the lb instance page, click the instance name item of Alibaba Cloud platform to enter the instance details page.
-
Click Click the “Listener” tab to enter the Listener page.
-
Click the “Create” button at the top of the list to bring up the Create LB Listener dialog box and configure the protocol & listener related parameters.
- Name: Set the name of the listener.
- Port: The port used to receive requests and forward them to the backend server, the port range is 1-65535.
- Protocol: Support listening to TCP, UDP, HTTP, HTTPS protocols, and select “TCP” as the protocol.
Advanced Settings: Hidden by default, can be configured according to your needs.
- Scheduling algorithm: Set the scheduling algorithm of lb.
- Polling (RR): Distribute the external requests to the backend server group in order of access.
- Weighted polling (WRR): The higher the weight value of the backend server, the higher the number (probability) of being polled to.
- Weighted Least Connections (WLC): In addition to polling based on the weight value set for each backend server, the actual load of the backend server (i.e. the number of connections) is also considered. When the weight values are the same, the smaller the current number of connections, the higher the number (probability) that the backend server will be polled.
- Enable Access Control: Set whether to enable access control. If you check Enable Access Control, you need to set the access control method and access policy control group.
- Access control mode: whitelist that allows IPs in the access control policy group to access lb; blacklist that prohibits IPs in the access control policy group to access lb.
- Access Control Policy Group: Select the access control policy group, please create the policy group in the access control page first.
-
Click “Next: Backend Server Group” button to select the backend server group, if there is no backend server group, you can create a new one. Click “Next: Backend Server Group” button to select the backend server group.
-
Click the “Next: Health Check” button to configure the health check related parameters.
- Enable health check: Select whether to enable health check or not. If you check Enable health check, configure the following parameters.
- Health Check Protocol: Select the health check protocol, including TCP and HTTP. The TCP protocol health check detects whether the server port is alive by sending SYN handshake messages; the HTTP protocol health check checks whether the server application is healthy by sending HEAD/GET requests to simulate the browser’s access behavior.
- Health check interval time: the time interval for lb to perform health check
- Health check health threshold: If the result of health check received for n consecutive times (n is the set value) is successful, the status is displayed as healthy.
- Health check unhealthy threshold: If the result of health check received for n (n is the set value) times in a row is identified, the status is displayed as abnormal.
-
Click the “OK” button to complete the operation.
Tencent Cloud
-
On the lb instance page, click the instance name item of Tencent Cloud Platform to enter the instance details page.
-
Click Click the “Listener” tab to enter the Listener page.
-
Click the “Create” button at the top of the list to bring up the Create LB Listener dialog box and configure the protocol & listener-related parameters.
- Name: Set the name of the listener.
- Port: The port used to receive requests and forward them to the backend server, the port range is 1-65535.
- Protocol: Support listening to TCP, UDP, HTTP, HTTPS protocols, and select “TCP” as the protocol.
Advanced Settings: Hidden by default, can be configured according to your needs.
- Scheduling algorithm: Set the scheduling algorithm of lb.
- Weighted polling (WRR): The higher the weight value of the backend server, the higher the number (probability) of being polled.
- Weighted Least Connections (WLC): In addition to polling based on the weight value set for each backend server, the actual load of the backend server (i.e. the number of connections) is also considered. When the weight values are the same, the smaller the current number of connections, the higher the number of times (probability) that the backend server will be polled.
- Turn on session hold: Choose whether to turn on session hold. When session hold is turned on, the lb listener will distribute requests from the same client to the same server. Session hold is not supported when the scheduling algorithm is a weighted minimum number of connections.
- Session Timeout Time: When the set time is exceeded and there is no new request in the connection, the session will be automatically disconnected from the session hold.
-
Click “Next: Backend Server Group” button to select a backend server group, or create a new one if there is no backend server group.
-
Click the “Next: Health Check” button to configure health check related parameters.
- Turn on health check: Select whether to turn on health check or not. If turn on health check is checked, configure the following parameters.
- Health check interval time: The time interval for lb health check.
- Health check health threshold: If the result of health check received for n consecutive times (n is the set value) is successful, the display status is healthy.
- Health Check Unhealthy Threshold: If the result of the health check received for n (n is the set value) times in a row is identified, the status is displayed as abnormal.
-
Click the “OK” button to complete the operation.
Huawei Cloud
-
On the lb instance page, click the instance name item of Huawei Cloud Platform to enter the instance details page.
-
Click Click the “Listener” tab to enter the Listener page.
-
Click the “Create” button at the top of the list to bring up the Create LB Listener dialog box and configure the protocol & listener-related parameters.
- Name: Set the name of the listener.
- Port: The port used to receive requests and forward them to the backend server, the port range is 1-65535.
- Protocol: Support listening to TCP, UDP, HTTP, HTTPS protocols, and select “TCP” as the protocol.
Advanced Settings: Hidden by default, can be configured according to your needs.
- Scheduling algorithm: Set the scheduling algorithm of lb.
- Weighted polling (WRR): The higher the weight value of the backend server, the higher the number (probability) of being polled.
- Weighted Least Connected (WLC): In addition to polling based on the weight value set for each backend server, the actual load of the backend server (i.e. the number of connections) is also considered. When the weight values are the same, the smaller the current number of connections, the higher the number (probability) that the backend server will be polled.
- Source IP Consistent Hash (SCH): Based on the consistent hash of the source IP address, the same source address will be dispatched to the same backend server.
- Enable Session Hold: Choose whether to enable session hold or not. When session hold is enabled, the lb listener will distribute the requests from the same client to the same server.
- Session Timeout: When the set time is exceeded and there is no new request in the connection, the session will be automatically disconnected.
- Enable Access Control: Set whether to enable access control, if you check Enable Access Control, you need to set the access control method and access policy control group.
- Access control mode: white list means allow IP access to lb in the access control policy group; black list means prohibit IP access to lb in the access control policy group.
- Access Control Policy Group: Select the access control policy group, please create the policy group in the access control page first.
-
Click “Next: Backend Server Group” button to select the backend server group, if there is no backend server group, you can create a new one. Click “Next: Backend Server Group” button to select the backend server group.
-
Click the “Next: Health Check” button to configure the health check related parameters.
- Enable health check: Select whether to enable health check or not. If you check Enable health check, configure the following parameters.
- Health Check Protocol: Select the health check protocol, including TCP and HTTP. The TCP protocol health check detects whether the server port is alive by sending SYN handshake messages; the HTTP protocol health check checks whether the server application is healthy by sending HEAD/GET requests to simulate the browser’s access behavior.
- Health check interval time: the time interval for lb to perform health check.
- Health Check Health Threshold: If the result of health check received for n consecutive times (n is the set value) is successful, the status is displayed as healthy.
- Health Check Unhealthy Threshold: If the result of the health check received for n (n is the set value) times in a row is identified, the status is displayed as abnormal.
-
Click the “OK” button to complete the operation.
AWS Network Load Balancer
- On the LB Instance page, click the Network Type instance name item of AWS platform to enter the instance details page.
- Click Click the “Listener” tab to enter the Listener page.
- Click the “Create” button at the top of the list to bring up the Create LB Listener dialog box and configure the protocol & listener related parameters.
- Name: Set the name of the listener.
- Port: The port used to receive requests and forward them to the backend server, the port range is 1-65535.
- Protocol: Support listening to TCP, UDP, HTTP, HTTPS protocols, and select “TCP” as the protocol.
- Click “Next: Backend Server Group” button to select the backend server group, if there is no backend server group, you can create a new one.
- Click the “Next: Health Check” button to configure health check related parameters.
- Turn on health check: AWS' listeners do not support turning off health check, configure the following parameters.
- Health check protocol: select health check protocols, including TCP, HTTP, HTTPS. TCP protocol health check checks whether the server port is alive by sending SYN handshake messages; HTTP protocol health check checks whether the server application is healthy by sending HEAD/GET requests to simulate the browser’s access behavior; HTTPS protocol health check, i.e. load The lb instance sends HTTPS requests to the specified server port for health checking.
- Health check interval time: the time interval for lb to perform health check.
- Health Check Health Threshold: If the result of the health check received for n consecutive times (n is the set value) is successful, the status is displayed as healthy.
- Click the “OK” button to complete the operation.
Create UDP Listener
UDP protocol is suitable for scenarios that focus on real-time and not on reliability, such as video chat, games, etc. Users can create UDP listeners to forward UDP requests opened from clients.
On-premise
-
On the lb instance page, click the instance name item of OneCloud platform to enter the instance details page.
-
Click Click the “Listener” tab to enter the Listener page.
-
Click the “Create” button at the top of the list to bring up the Create LB Listener dialog box, and configure the protocol & listener related parameters.
- Name: Set the name of the listener.
- Port: The port used to receive requests and forward them to the backend server, the port range is 1-65535.
- Protocol: Support listening to TCP, UDP, HTTP, HTTPS protocols, and choose “UDP” as the protocol.
Advanced Settings: Hidden by default, can be configured according to your needs.
- Scheduling algorithm: Set the scheduling algorithm of lb.
- Polling (RR): Distribute the external requests to the backend server group in order of access.
- Weighted polling (WRR): The higher the weight value of the backend server, the higher the number (probability) of being polled to.
- Weighted Least Connections (WLC): In addition to polling based on the weight value set for each backend server, the actual load of the backend server (i.e. the number of connections) is also considered. When the weight values are the same, the smaller the current number of connections, the higher the number (probability) that the backend server will be polled.
- Source IP Consistent Hash (SCH): Based on the consistent hash of the source IP address, the same source address will be dispatched to the same backend server.
- Enable access control: Set whether to enable access control, such as after checking Enable access control, you need to set the access control method and access policy control group.
- Access control mode: whitelist that allows the IPs in the access control policy group to access lb; blacklist that prohibits the IPs in the access control policy group to access lb.
- Access Control Policy Group: Select the access control policy group, please create the policy group in the access control page first.
- Backend Connection Timeout Time: The timeout time of requesting the backend server after the forwarding node receives the client request.
- Backend connection idle time: Set the connection idle time between the forwarding node and the backend server.
- Connection idle timeout: the idle time allowed after the connection session is proposed. If there is no access request within the timeout period, the current connection will be temporarily disconnected.
-
Click “Next: Backend Server Group” button to select the backend server group, if there is no backend server group, you can create a new one.
-
Click the “Next: Health Check” button to configure the health check related parameters.
- Turn on health check: Select whether to turn on health check. If you check Turn on health check, configure the following parameters.
- Health check protocol: Select the health check protocol, including UDP protocol, which obtains status information through UDP message probing.
- Health check response timeout: The maximum timeout of health check response. If no response is made within the response time, the health check is determined to be abnormal.
- Health check interval time: the time interval for lb to perform health check.
- Health Check Health Threshold: If the result of health check received for n consecutive times (n is the set value) is successful, the display status is healthy.
- Health Check Unhealthy Threshold: If the result of the health check received for n (n is the set value) times in a row is identified, the status is displayed as abnormal.
-
Click the “OK” button to complete the operation.
OpenStack
-
On the LB Instance page, click the instance name item of OpenStack Platform to enter the instance details page.
-
Click Click the “Listener” tab to enter the Listener page.
-
Click the “Create” button at the top of the list to bring up the Create LB Listener dialog box and configure the protocol & listener related parameters.
- Name: Set the name of the listener.
- Port: The port used to receive requests and forward them to the backend server, the port range is 1-65535.
- Protocol: Support listening to TCP, UDP, HTTP, HTTPS protocols, and choose “UDP” as the protocol.
Advanced Settings: Hidden by default, can be configured according to your needs.
- Scheduling algorithm: Set the scheduling algorithm of lb.
- Polling (RR): Distribute the external requests to the backend server group in order of access.
- Weighted polling (WRR): The higher the weight value of the backend server, the higher the number (probability) of being polled to.
- Weighted Least Connections (WLC): In addition to polling based on the weight value set for each backend server, the actual load of the backend server (i.e. the number of connections) is also considered. When the weight values are the same, the smaller the current number of connections, the higher the number (probability) that the backend server will be polled.
- Source IP Consistent Hash (SCH): Based on the consistent hash of the source IP address, the same source address will be dispatched to the same backend server.
- Enable access control: Set whether to enable access control, such as after checking Enable access control, you need to set the access control method and access policy control group.
- Access control mode: whitelist means allow IPs in the access control policy group to access lb; blacklist means prohibit IPs in the access control policy group to access lb. Only whitelist is supported.
- Access Control Policy Group: Select the access control policy group, please create the policy group in the access control page first.
- Backend Connection Timeout Time: The timeout time of requesting the backend server after the forwarding node receives the client request.
- Backend connection idle time: Set the connection idle time between the forwarding node and the backend server.
- Connection idle timeout: the idle time allowed after the connection session is proposed. If there is no access request within the timeout period, the current connection will be temporarily disconnected.
-
Click “Next: Backend Server Group” button to select the backend server group, if there is no backend server group, you can create a new one.
-
Click the “Next: Health Check” button to configure health check related parameters.
- Enable health check: Select whether to enable health check or not. If you check Enable health check, configure the following parameters.
- Health check protocol: Select the health check protocol, including UDP protocol, which obtains status information through UDP message probing.
- Health check response timeout time: the maximum timeout of health check response, if no response within the response time, the health check is determined to be abnormal.
- Health check health threshold: n (n is the set value) consecutive times to receive the health check result is successful, then the display status is healthy.
- Health check unhealthy threshold: If the result of the health check received for n (n is the set value) consecutive times is identified, the display status is abnormal.
-
Click the “OK” button to complete the operation.
Alibaba Cloud
-
On the lb instance page, click the instance name item of Alibaba Cloud platform to enter the instance details page.
-
Click Click the “Listener” tab to enter the Listener page.
-
Click the “Create” button at the top of the list to bring up the Create LB Listener dialog box and configure the protocol & listener related parameters.
- Name: Set the name of the listener.
- Port: The port used to receive requests and forward them to the backend server, the port range is 1-65535.
- Protocol: Support listening to TCP, UDP, HTTP, HTTPS protocols, and choose “UDP” as the protocol.
Advanced Settings: Hidden by default, can be configured according to your needs.
- Scheduling algorithm: Set the scheduling algorithm of lb.
- Polling (RR): Distribute the external requests to the backend server group in order of access.
- Weighted polling (WRR): The higher the weight value of the backend server, the higher the number (probability) of being polled to.
- Weighted Least Connections (WLC): In addition to polling based on the weight value set for each backend server, the actual load of the backend server (i.e. the number of connections) is also considered. When the weight values are the same, the smaller the current number of connections, the higher the number (probability) that the backend server will be polled.
- Source IP Consistent Hash (SCH): Based on the consistent hash of source IP addresses, the same source address is dispatched to the same backend server. Only performance guaranteed instances are supported, for more detail, please see Alibaba Cloud help documentation
- Consistent Hash of Quaternions (TCH): Based on the consistent hash of quaternions (source IP + destination IP + source port + destination port), the same flows are dispatched to the same backend server. Only performance-guaranteed instances are supported, for more detail, please see Alibaba Cloud help documentation.
- QUIC Connection ID Consistent Hash (QCH): Based on QUIC Connection ID Consistent Hash, the same QUIC Connection ID will be dispatched to the same backend server. Only performance guaranteed instances are supported, for more detail, please see Alibaba Cloud help documentation.
- Access control: Set whether to enable access control, such as check the enable access control, you need to set the access control mode and access policy control group.
- Access control mode: whitelist that allows IPs in the access control policy group to access lb; blacklist that prohibits IPs in the access control policy group to access lb.
- Access Control Policy Group: Select the access control policy group, please create the policy group in the access control page first.
-
Click “Next: Backend Server Group” button to select the backend server group, if there is no backend server group, you can create a new one. Click “Next: Backend Server Group” button to select the backend server group.
-
Click the “Next: Health Check” button to configure the health check related parameters.
- Enable health check: Select whether to enable health check or not. If you check Enable health check, configure the following parameters
- Health check interval time: the time interval for lb health check.
- Health Check Health Threshold: If the result of health check received for n consecutive times (n is the set value) is successful, the display status is healthy.
- Health check unhealthy threshold: If the result of health check received for n (n is the set value) times in a row is identified, then the display status is abnormal.
- Health check request: Set the health check request content.
- Health check return result: Set the health check return result. When the health check request sent by lb and the return result are consistent with the setting, it means the health check is successful.
-
Click “OK” button to finish the operation.
Tencent Cloud
-
On the lb instance page, click the instance name of Tencent Cloud Platform to enter the instance details page.
-
Click Click the “Listener” tab to enter the Listener page.
-
Click the “Create” button at the top of the list to bring up the Create LB Listener dialog box and configure the protocol & listener-related parameters.
- Name: Set the name of the listener.
- Port: the port used to receive requests and forward them to the backend server, the port range is 1-65535.
- Protocol: Support listening to TCP, UDP, HTTP, HTTPS protocols, and choose “UDP” as the protocol.
Advanced Settings: Hidden by default, can be configured according to your needs.
- Scheduling algorithm: Set the scheduling algorithm of lb.
- Weighted polling (WRR): The higher the weight value of the backend server, the higher the number (probability) of being polled.
- Weighted Least Connections (WLC): In addition to polling based on the weight value set for each backend server, the actual load of the backend server (i.e. the number of connections) is also considered. When the weight values are the same, the smaller the current number of connections, the higher the number of times (probability) that the backend server will be polled.
- Turn on session hold: Choose whether to turn on session hold. When session hold is turned on, the lb listener will distribute requests from the same client to the same server. Session hold is not supported when the scheduling algorithm is a weighted minimum number of connections.
- Session Timeout Time: When the set time is exceeded and there is no new request in the connection, the session will be automatically disconnected from the session hold.
-
Click “Next: Backend Server Group” button to select a backend server group, or create a new one if there is no backend server group.
-
Click the “Next: Health Check” button to configure health check related parameters.
- Turn on health check: Select whether to turn on health check or not. If turn on health check is checked, configure the following parameters.
- Health check response timeout: the maximum timeout of health check response, if no response within the response time, the health check will be abnormal.
- Health check interval time: The time interval for lb to perform health check.
- Health Check Health Threshold: If the result of health check received for n consecutive times (n is the set value) is successful, the display status is healthy.
- Health Check Unhealthy Threshold: If the result of the health check received for n (n is the set value) times in a row is identified, the status is displayed as abnormal.
-
Click the “OK” button to complete the operation.
Huawei Cloud
-
On the lb instance page, click the instance name item of Huawei Cloud Platform to enter the instance details page.
-
Click Click the “Listener” tab to enter the Listener page.
-
Click the “Create” button at the top of the list to bring up the Create LB Listener dialog box and configure the protocol & listener-related parameters.
- Name: Set the name of the listener.
- Port: the port used to receive requests and forward them to the backend server, the port range is 1-65535.
- Protocol: Support listening to TCP, UDP, HTTP, HTTPS protocols, and choose “UDP” as the protocol.
Advanced Settings: Hidden by default, can be configured according to your needs.
- Scheduling algorithm: Set the scheduling algorithm of lb.
- Weighted polling (WRR): The higher the weight value of the backend server, the higher the number (probability) of being polled.
- Weighted Least Connections (WLC): In addition to polling based on the weight value set for each backend server, the actual load of the backend server (i.e. the number of connections) is also considered. When the weight values are the same, the smaller the current number of connections, the higher the number (probability) that the backend server will be polled.
- Source IP Consistent Hash (SCH): Based on the consistent hash of the source IP address, the same source address will be dispatched to the same backend server.
- Enable Session Hold: Choose whether to enable session hold. When session hold is enabled, the lb listener will distribute requests from the same client to the same server.
- Session Timeout: When the set time is exceeded and there is no new request in the connection, the session will be automatically disconnected.
- Enable Access Control: Set whether to enable access control, if you check Enable Access Control, you need to set the access control method and access policy control group.
- Access control mode: white list means allow IP access to lb in the access control policy group; black list means prohibit IP access to lb in the access control policy group.
- Access Control Policy Group: Select the access control policy group, please create the policy group in the access control page first.
-
Click “Next: Backend Server Group” button to select the backend server group, if there is no backend server group, you can create a new one. Click “Next: Backend Server Group” button to select the backend server group.
-
Click the “Next: Health Check” button to configure the health check related parameters.
- Turn on health check: Select whether to turn on health check or not. If you check Turn on health check, configure the following parameters
- Health check protocol: Select the health check protocol, including UDP protocol, which obtains the status information through UDP message probing.
- Health check interval time: the time interval for lb to perform health check.
- Health check health threshold: If the result of health check received for n consecutive times (n is the set value) is successful, the status is displayed as healthy.
-
Click the “OK” button to complete the operation.
AWS Network Load Balancer
- On the LB Instance page, click the Network Type instance name item of AWS platform to enter the instance details page.
- Click Click the “Listener” tab to enter the Listener page.
- Click the “Create” button at the top of the list to bring up the Create LB Listener dialog box and configure the protocol & listener related parameters.
- Name: Set the name of the listener.
- Port: the port used to receive requests and forward them to the backend server, the port range is 1-65535.
- Protocol: Support listening to TCP, UDP, HTTP, HTTPS protocols, and choose “UDP” as the protocol.
- Click “Next: Backend Server Group” button to select the backend server group, if there is no backend server group, you can create a new one.
- Click the “Next: Health Check” button to configure health check related parameters.
- Turn on health check: AWS' listeners do not support turning off health check, configure the following parameters.
- Health check interval time: The time interval for lb to perform health check.
- Health check health threshold: If the result of health check received for n consecutive times (n is the set value) is successful, then the display status is healthy.
- Click the “OK” button to complete the operation.
Create HTTP Listener
HTTP protocol is suitable for applications that need to identify the content of requests, such as web applications, app services, etc. Users can create HTTP listeners to forward HTTP requests opened from the client.
On-premise
-
On the lb instance page, click the instance name item of OneCloud platform to enter the instance details page.
-
Click Click the “Listener” tab to enter the Listener page.
-
Click the “Create” button at the top of the list to bring up the Create LB Listener dialog box, and configure the protocol & listener related parameters.
- Name: Set the name of the listener.
- Port: The port used to receive requests and forward them to the backend server, the port range is 1-65535.
- Protocol: Support listening to TCP, UDP, HTTP and HTTPS protocols, and select “HTTP” as the protocol.
- Redirection: When user initiates HTTP access request, configure redirection to redirect HTTP access to the redirected URL address configured by user. When redirection is enabled, there is no need to configure the backend server group and health check and parameters related to the backend server.
- Redirection methods: Including permanent redirection (301), temporary redirection (302), and temporary redirection (307).
- Permanent redirection (301): When a user requests a URL resource that is permanently migrated to a new URL, a permanent redirection (301) can be used, making it possible to directly replace the redirected URL with the old URL when the user visits it.
- Temporary redirection (302): when the user requests a URL resource temporarily changed location, you can use the temporary redirection, but 302 can only achieve GET to GET redirection, non-GET requests may be redirected to GET requests.
- Temporary redirection (307): When the URL resource requested by the user has temporarily changed its location, a temporary redirection can be used. 307 can keep the request method unchanged, such as a POST request still redirects to a POST request.
- Redirect to: Set the URL address after redirection. Just modify any of HTTP protocol, domain name (IP or IP+port), and URL path. E.g. to force HTTP requests to be accessed through HTTPS protocol, change the redirect to to HTTPS protocol, and leave the others blank.
Advanced Settings: Hidden by default, can be configured according to your needs.
- Scheduling algorithm: Set the scheduling algorithm of lb.
- Polling (RR): Distribute external requests to the backend server group in order of access.
- Weighted polling (WRR): The higher the weight value of the backend server, the higher the number (probability) of being polled to.
- Weighted Least Connections (WLC): In addition to polling based on the weight value set for each backend server, the actual load of the backend server (i.e. the number of connections) is also considered. When the weight values are the same, the smaller the current number of connections, the higher the number (probability) that the backend server will be polled.
- Source IP Consistent Hash (SCH): Based on the consistent hash of the source IP address, the same source address will be dispatched to the same backend server.
- Turn on session hold: Choose whether to turn on session hold or not. When session hold is turned on, the lb listener will distribute requests from the same client to the same server.
- Cookie handling method: Including implanting cookie and rewriting cookie, when you choose “implant cookie”, you need to set the session timeout time, when the client visits for the first time, lb will implant cookie in the return request, next time the client will carry this cookie The next time the client visits with this cookie, the lb service will redirect the request to the previously recorded backend server. When you choose “Rewrite Cookie”, you need to configure the cookie on the backend server and set the cookie name. The next time a client visits with a new cookie, the lb service will forward the request to the previously recorded backend server.
- Session timeout (set this parameter for implanted cookies): When the set time is exceeded and there are no new requests in the connection, the session will be automatically disconnected and held.
- Cookie name (Rewrite Cookie set this parameter): Set the cookie name to the cookie name configured on the backend server.
- Enable access control: Set whether to enable access control, such as check Enable access control, you need to set the access control method and access policy control group.
- Access control mode: whitelist that allows the IPs in the access control policy group to access lb; blacklist that prohibits the IPs in the access control policy group to access lb.
- Access Control Policy Group: Select the access control policy group, please create the policy group in the access control page first.
- Backend Connection Timeout Time: The timeout time of requesting the backend server after the forwarding node receives the client request.
- Backend connection idle time: Set the connection idle time between the forwarding node and the backend server.
- Connection idle timeout time: the idle time allowed after the connection session suggestion. If there is no access request within the timeout time, the current connection will be temporarily disconnected.
- Connection request timeout: If the server does not respond within the timeout period, lb will give up waiting.
- Limit receive request rate: Limit the maximum rate of listening to receive requests. 0 is the default value, which means no speed limit.
- Limit same source IP request rate: limit the maximum rate of each source IP to send requests to this listener, 0 is the default value, which means no speed limit.
- Gzip data compression: whether to enable Gzip data compression, it will compress specific file types when it is enabled, currently Gzip supports compression types including: text/xml, text/plain, text/css, application/javascript, application/x-javascript application/rss+xml, application/atom+xml, application/xml.
- Set Proxy protocol: Get the real IP of the client through the Proxy protocol. v2 is commonly used.
- Additional HTTP header field: choose whether to get the real IP of the client through X-Forwarded-For.
-
Click “Next: Backend Server Group” button to select the backend server group, if there is no backend server group, you can create a new one.
-
Click the “Next: Health Check” button to configure health check related parameters.
- Enable health check: Select whether to enable health check or not. If you check Enable health check, configure the following parameters.
- Health Check Protocol: Select the health check protocol, including TCP and HTTP. The TCP protocol health check checks whether the server port is alive by sending SYN handshake messages; the HTTP protocol health check checks whether the server application is healthy by sending HEAD/GET requests to simulate the browser’s access behavior.
- Health check path (HTTP only): Set the path of the URL address for health check.
- Health check domain name (HTTP only): set the domain name of the request for health check.
- Normal status code (HTTP only): set the HTTP status code of the health check normal.
- Health check response timeout time: the maximum timeout time of health check response, if no response within the response time, the health check is determined to be abnormal.
- Health check interval time: the time interval for lb to perform health check.
- Health Check Health Threshold: If the result of health check received for n consecutive times (n is the set value) is successful, the display status is healthy.
- Health Check Unhealthy Threshold: If the result of the health check received for n (n is the set value) times in a row is identified, the status is displayed as abnormal.
-
Click the “OK” button to complete the operation.
OpenStack
-
On the LB Instance page, click the instance name item of OpenStack platform to enter the instance details page.
-
Click Click the “Listener” tab to enter the Listener page.
-
Click the “Create” button at the top of the list to bring up the Create LB Listener dialog box and configure the protocol & listener related parameters.
- Name: Set the name of the listener.
- Port: The port used to receive requests and forward them to the backend server, the port range is 1-65535.
- Protocol: Support listening to TCP, UDP, HTTP and HTTPS protocols, and select “HTTP” as the protocol.
Advanced Settings: Hidden by default, can be configured according to your needs.
- Scheduling algorithm: Set the scheduling algorithm of lb.
- Polling (RR): Distribute the external requests to the backend server group in order of access.
- Weighted polling (WRR): The higher the weight value of the backend server, the higher the number (probability) of being polled to.
- Weighted Least Connections (WLC): In addition to polling based on the weight value set for each backend server, the actual load of the backend server (i.e. the number of connections) is also considered. When the weight values are the same, the smaller the current number of connections, the higher the number (probability) that the backend server will be polled.
- Source IP Consistent Hash (SCH): Based on the consistent hash of the source IP address, the same source address will be dispatched to the same backend server.
- Enable session hold: choose whether to enable session hold or not. When session hold is enabled, the lb listener will distribute requests from the same client to the same server.
- Cookie Handling: Only support rewrite cookie, lb service will rewrite the original cookie if it finds that the user has customized the cookie, and the next time the client visits with the new cookie, the lb service will forward the request to the previously recorded backend server.
- Cookie name: Set the cookie name to the cookie name configured on the backend server.
- Enable Access Control: Set whether to enable access control. If you check Enable Access Control, you need to set the access control method and the access policy control group.
- Access control mode: whitelist that allows IPs in the access control policy group to access lb; blacklist that prohibits IPs in the access control policy group to access lb. Only whitelist is supported.
- Access Control Policy Group: Select the access control policy group, please create the policy group in the access control page first.
- Backend Connection Timeout Time: The timeout time of requesting the backend server after the forwarding node receives the client request.
- Backend connection idle time: Set the connection idle time between the forwarding node and the backend server.
- Connection idle timeout: the idle time allowed after the connection session suggestion. If there is no access request within the timeout time, the current connection will be temporarily disconnected.
- Gzip data compression: whether to enable Gzip data compression, it will compress specific file types when it is enabled, currently Gzip supports compression types including: text/xml, text/plain, text/css, application/javascript, application/x-javascript application/rss+xml, application/atom+xml, application/xml.
- Additional HTTP header field: select whether to get the real IP of the client through X-Forwarded-For.
-
Click “Next: Backend Server Group” button to select the backend server group, if there is no backend server group, you can create a new one.
-
Click the “Next: Health Check” button to configure the health check related parameters.
- Turn on health check: Select whether to turn on health check or not. If you check Turn on health check, configure the following parameters.
- Health Check Protocol: Select the health check protocol, including TCP and HTTP. The TCP protocol health check checks whether the server port is alive by sending SYN handshake messages; the HTTP protocol health check checks whether the server application is healthy by sending HEAD/GET requests to simulate the browser’s access behavior.
- Health check path (HTTP only): Set the path of the URL address for health check.
- Health check domain name (HTTP only): set the domain name of the request for health check.
- Normal status code (HTTP only): set the HTTP status code of the health check normal.
- Health check response timeout time: the maximum timeout time of health check response, if no response within the response time, the health check is determined to be abnormal.
- Health check interval time: the time interval for lb to perform health check.
- Health Check Health Threshold: If the result of health check received for n consecutive times (n is the set value) is successful, the display status is healthy.
- Health Check Unhealthy Threshold: If the result of the health check received for n (n is the set value) times in a row is identified, the status is displayed as abnormal.
-
Click the “OK” button to complete the operation.
Alibaba Cloud
-
On the lb instance page, click the instance name item of Alibaba Cloud platform to enter the instance details page.
-
Click Click the “Listener” tab to enter the Listener page.
-
Click the “Create” button at the top of the list to bring up the Create LB Listener dialog box and configure the protocol & listener related parameters.
- Name: Set the name of the listener.
- Port: The port used to receive requests and forward them to the backend server, the port range is 1-65535.
- Protocol: Support listening to TCP, UDP, HTTP and HTTPS protocols, and select “HTTP” as the protocol.
Advanced Settings: Hidden by default, can be configured according to your needs.
- Scheduling algorithm: Set the scheduling algorithm of lb.
- Polling (RR): Distribute the external requests to the backend server group in order of access.
- Weighted polling (WRR): The higher the weight value of the backend server, the higher the number (probability) of being polled to.
- Weighted Least Connections (WLC): In addition to polling based on the weight value set for each backend server, the actual load of the backend server (i.e. the number of connections) is also considered. When the weight values are the same, the smaller the current number of connections, the higher the number of times (probability) that the backend server will be polled.
- Turn on session hold: Choose whether to turn on session hold. When session hold is turned on, the lb listener will distribute requests from the same client to the same server.
- Cookie handling method: Including implanting cookies and rewriting cookies, when you choose “implanting cookies”, you need to set the session timeout time, when the client visits for the first time, lb will implant cookies in the return request, and the next time the client will carry this cookie. The next time the client visits with this cookie, the lb service will redirect the request to the previously recorded backend server. When you choose “Rewrite Cookie”, you need to configure the cookie on the backend server and set the cookie name. The next time a client visits with a new cookie, the lb service will forward the request to the previously recorded backend server.
- Session timeout (set this parameter for implanted cookies): When the set time is exceeded and there are no new requests within the connection, the session will be automatically disconnected and held.
- Cookie name (Rewrite Cookie set this parameter): Set the cookie name to the cookie name configured on the backend server.
- Enable access control: Set whether to enable access control, such as check Enable access control, you need to set the access control method and access policy control group.
- Access control mode: whitelist that allows the IPs in the access control policy group to access lb; blacklist that prohibits the IPs in the access control policy group to access lb.
- Access Control Policy Group: Select the access control policy group, please create the policy group in the access control page first.
- Connection Idle Timeout: The idle time allowed after the connection session is proposed. If there is no access request within the timeout period, the current connection will be temporarily interrupted.
- Connection request timeout time: If there is no response from the server within the timeout time, lb will give up waiting.
- Gzip Data Compression: Whether to enable Gzip data compression, it will compress specific file types after it is turned on. Currently, Gzip supports compression types including: text/xml, text/plain, text/css, application/javascript, application/x-javascript application/rss+xml, application/atom+xml, application/xml.
- Get client real IP: Select whether to get client real IP through X-Forwarded-For.
-
Click “Next: Backend Server Group” button to select the backend server group, if there is no backend server group, you can create a new one.
-
Click the “Next: Health Check” button to configure health check related parameters.
- Turn on health check: Select whether to turn on health check or not. If turn on health check is checked, configure the following parameters.
- Health check path: Set the path of the URL address of the health check.
- Health check domain name: Set the request domain name of health check.
- Normal status code: Set the normal HTTP status code of the health check.
- Health check response timeout time: the maximum timeout time of health check response, if no response within the response time, the health check is determined to be abnormal.
- Health check interval time: the time interval for lb to perform health check.
- Health Check Health Threshold: If the result of health check received for n consecutive times (n is the set value) is successful, the display status is healthy.
- Health Check Unhealthy Threshold: If the result of the health check received for n (n is the set value) times in a row is identified, the status is displayed as abnormal.
-
Click the “OK” button to complete the operation.
Tencent Cloud
-
On the lb instance page, click the instance name item of Tencent Cloud Platform to enter the instance details page.
-
Click Click the “Listener” tab to enter the Listener page.
-
Click the “Create” button at the top of the list to bring up the Create LB Listener dialog box and configure the protocol & listener-related parameters.
- Name: Set the name of the listener.
- Port: The port used to receive requests and forward them to the backend server, the port range is 1-65535.
- Protocol: Support listening to TCP, UDP, HTTP and HTTPS protocols, and select “HTTP” as the protocol.
Advanced Settings: Hidden by default, can be configured according to your needs.
- Scheduling algorithm: Set the scheduling algorithm of lb.
- Weighted polling (WRR): The higher the weight value of the backend server, the higher the number (probability) of being polled.
- Weighted Least Connections (WLC): In addition to polling based on the weight value set for each backend server, the actual load of the backend server (i.e. the number of connections) is also considered. When the weights are the same, the smaller the current number of connections, the higher the number (probability) that the backend server will be polled.
- Gzip data compression: whether to enable Gzip data compression, when enabled, it will compress specific file types, currently Gzip supports compression types including: text/xml, text/plain, text/css, application/javascript, application/x-javascript application/rss+xml, application/atom+xml, application/xml.
- Get client real IP: Select whether to get client real IP through X-Forwarded-For.
-
Click “Next: Backend Server Group” button to select the backend server group, if there is no backend server group, you can create a new one.
-
Click the “Next: Health Check” button to configure health check related parameters.
- Enable health check: Select whether to enable health check or not. If you check Enable health check, configure the following parameters.
- Health check protocol: HTTP protocol health check checks the health of the server application by sending HEAD/GET requests to simulate the browser’s access behavior.
- Health check path: Set the path of the URL address of the health check.
- Health check domain name: Set the domain name of the request for health check.
- Normal status code: set the HTTP status code of the health check normal.
- Health check response timeout time: the maximum timeout of health check response. If no response within the response time, the health check is determined to be abnormal.
- Health check interval time: the time interval for lb to perform health check.
- Health Check Health Threshold: If the result of health check received for n consecutive times (n is the set value) is successful, the display status is healthy.
- Health Check Unhealthy Threshold: If the result of the health check received for n (n is the set value) times in a row is identified, the status is displayed as abnormal.
-
Click the “OK” button to complete the operation.
Huawei Cloud
-
On the lb instance page, click the instance name item of Huawei Cloud Platform to enter the instance details page.
-
Click Click the “Listener” tab to enter the Listener page.
-
Click the “Create” button at the top of the list to bring up the Create LB Listener dialog box and configure the protocol & listener-related parameters.
- Name: Set the name of the listener.
- Port: The port used to receive requests and forward them to the backend server, the port range is 1-65535.
- Protocol: Support listening to TCP, UDP, HTTP and HTTPS protocols, and select “HTTP” as the protocol.
Advanced Settings: Hidden by default, can be configured according to your needs.
- Scheduling algorithm: Set the scheduling algorithm of lb.
- Weighted polling (WRR): The higher the weight value of the backend server, the higher the number (probability) of being polled.
- Weighted Least Connected (WLC): In addition to polling based on the weight value set for each backend server, the actual load of the backend server (i.e. the number of connections) is also considered. When the weight values are the same, the smaller the current number of connections, the higher the number (probability) that the backend server will be polled.
- Source IP Consistent Hash (SCH): Based on the consistent hash of the source IP address, the same source address will be dispatched to the same backend server.
- Turn on session hold: Choose whether to turn on session hold or not. When session hold is turned on, the lb listener will distribute requests from the same client to the same server.
- Cookie handling method: Including implanting cookie and rewriting cookie, when you choose “implant cookie”, you need to set the session timeout time, when the client visits for the first time, lb will implant cookie in the return request, next time the client will carry this cookie The next time the client visits with this cookie, the lb service will redirect the request to the previously recorded backend server. When you choose “Rewrite Cookie”, you need to configure the cookie on the backend server and set the cookie name. The next time a client visits with a new cookie, the lb service will forward the request to the previously recorded backend server.
- Session timeout (set this parameter for implanted cookies): When the set time is exceeded and there are no new requests in the connection, the session will be automatically disconnected and held.
- Cookie name (Rewrite Cookie set this parameter): Set the cookie name to the cookie name configured on the backend server.
- Enable access control: Set whether to enable access control, such as check Enable access control, you need to set the access control method and access policy control group.
- Access control mode: whitelist that allows the IPs in the access control policy group to access lb; blacklist that prohibits the IPs in the access control policy group to access lb.
- Access Control Policy Group: Select the access control policy group, please create the policy group in the access control page first.
-
Click “Next: Backend Server Group” button to select the backend server group, if there is no backend server group, you can create a new one.
-
Click the “Next: Health Check” button to configure the health check related parameters.
- Turn on health check: Select whether to turn on health check or not. If you check Turn on health check, configure the following parameters.
- Health check protocol: select the health check protocol, including TCP and HTTP. TCP protocol health check detects whether the server port is alive by sending SYN handshake messages; HTTP protocol health check checks whether the server application is healthy by sending HEAD/GET requests to simulate the browser’s access behavior.
- Health check path: Set the path of the URL address for health check.
- Health check domain name: set the domain name of the request for health check.
- Normal status code: set the HTTP status code of the health check normal.
- Health check response timeout time: the maximum timeout of health check response. If no response within the response time, the health check is determined to be abnormal.
- Health check interval time: the time interval for lb to perform health check.
- Health Check Health Threshold: If the result of the health check received for n consecutive times (n is the set value) is successful, the display status is healthy.
-
Click the “OK” button to complete the operation.
AWS Application Load Balancer
- On the LB Instance page, click the application type instance name item of AWS platform to enter the instance details page.
- Click Click the “Listener” tab to enter the Listener page.
- Click the “Create” button at the top of the list to bring up the Create LB Listener dialog box and configure the protocol & listener related parameters.
- Name: Set the name of the listener.
- Port: the port used to receive requests and forward them to the backend server, the port range is 1-65535.
- Protocol: Support listening to TCP, UDP, HTTP and HTTPS protocols, and select “HTTP” as the protocol.
- Click “Next: Backend Server Group” button to select the backend server group, if there is no backend server group, you can create a new one.
- Click the “Next: Health Check” button to configure health check related parameters.
- Turn on health check: AWS' listeners do not support turning off health check, configure the following parameters.
- Health check protocol: Select the health check protocol, including HTTP and HTTPS. HTTP protocol health check checks whether the server application is healthy by sending HEAD/GET requests to simulate the browser’s access behavior; HTTPS protocol health check means the lb instance sends HTTPS requests to the specified server port for health check.
- Health Check Path: Set the path of the URL address of the health check.
- Normal Status Code: Set the HTTP status code for the normal health check.
- Health check response timeout time: the maximum timeout of health check response. If no response within the response time, the health check is determined to be abnormal.
- Health check interval time: the time interval for lb to perform health check.
- Health Check Health Threshold: If the result of health check received for n consecutive times (n is the set value) is successful, the display status is healthy.
- Health Check Unhealthy Threshold: If the result of the health check received for n (n is the set value) times in a row is identified, the status is displayed as abnormal.
- Click the “OK” button to complete the operation.
Create HTTPS Listener
The HTTPS protocol is applicable to applications that require encrypted transmission. Users can create an HTTPS listener to forward HTTPS requests opened from the client.
On-premise
-
On the LB Instance page, click the instance name item of OneCloud platform to enter the instance details page.
-
Click Click the “Listener” tab to enter the Listener page.
-
Click the “Create” button at the top of the list to bring up the Create LB Listener dialog box, and configure the protocol & listener related parameters.
- Name: Set the name of the listener.
- Port: The port used to receive requests and forward them to the backend server, the port range is 1-65535.
- Protocol: Support listening to TCP, UDP, HTTP and HTTPS protocols, and select “HTTPS” as the protocol.
- Certificate: Select the lb certificate.
- Redirect: When user initiates HTTPS access request, configure redirection to redirect HTTPS access to the URL address after redirection configured by user. When redirection is enabled, there is no need to configure backend server groups and health checks and parameters related to backend servers, etc.
- Redirection methods: Including permanent redirection (301), temporary redirection (302), and temporary redirection (307).
- Permanent redirection (301): When a user requests a URL resource that is permanently migrated to a new URL, a permanent redirection (301) can be used, making it possible to directly replace the redirected URL with the old URL when the user visits it.
- Temporary redirection (302): when the user requests a URL resource temporarily changed location, you can use the temporary redirection, but 302 can only achieve GET to GET redirection, non-GET requests may be redirected to GET requests.
- Temporary redirection (307): When the URL resource requested by the user has temporarily changed its location, a temporary redirection can be used. 307 can keep the request method unchanged, such as a POST request still redirects to a POST request.
- Redirect to: Set the URL address after redirection. Just modify any of HTTP protocol, domain name (IP or IP+port), and URL path. E.g. to force HTTP requests to be accessed through HTTPS protocol, change the redirect to to HTTPS protocol, and leave the others blank.
Advanced Settings: Hidden by default, can be configured according to your needs.
- Scheduling algorithm: Set the scheduling algorithm of lb.
- Polling (RR): Distribute external requests to the backend server group in order of access.
- Weighted polling (WRR): The higher the weight value of the backend server, the higher the number (probability) of being polled to.
- Weighted Least Connections (WLC): In addition to polling based on the weight value set for each backend server, the actual load of the backend server (i.e. the number of connections) is also considered. When the weight values are the same, the smaller the current number of connections, the higher the number (probability) that the backend server will be polled.
- Source IP Consistent Hash (SCH): Based on the consistent hash of the source IP address, the same source address will be dispatched to the same backend server.
- Turn on session hold: Choose whether to turn on session hold or not. When session hold is turned on, the lb listener will distribute requests from the same client to the same server.
- Cookie handling method: Including implanting cookie and rewriting cookie, when you choose “implant cookie”, you need to set the session timeout time, when the client visits for the first time, lb will implant cookie in the return request, next time the client will carry this cookie The next time the client visits with this cookie, the lb service will redirect the request to the previously recorded backend server. When you choose “Rewrite Cookie”, you need to configure the cookie on the backend server and set the cookie name. The next time a client visits with a new cookie, the lb service will forward the request to the previously recorded backend server.
- Session timeout (set this parameter for implanted cookies): When the set time is exceeded and there are no new requests in the connection, the session will be automatically disconnected and held.
- Cookie name (Rewrite Cookie set this parameter): Set the cookie name to the cookie name configured on the backend server.
- Enable access control: Set whether to enable access control, such as check Enable access control, you need to set the access control method and access policy control group.
- Access control mode: whitelist that allows the IPs in the access control policy group to access lb; blacklist that prohibits the IPs in the access control policy group to access lb.
- Access Control Policy Group: Select the access control policy group, please create the policy group in the access control page first.
- Limit Accept Request Rate: Limit the maximum rate of listener to inbound requests, 0 is the default value, which means no speed limit.
- Limit same source IP request rate: Limit the maximum rate of each source IP to send requests to this listener, 0 is the default value, which means no speed limit.
- Enable HTTP 2.0: Select whether to enable HTTP 2.0 protocol.
- Gzip data compression: whether to enable Gzip data compression, it will compress specific file types when it is turned on, currently Gzip supports compression types including: text/xml, text/plain, text/css, application/javascript, application/x-javascript application/rss+xml, application/atom+xml, application/xml.
- Set Proxy protocol: Get the real IP of the client through the Proxy protocol. v2 is commonly used.
- Additional HTTP header field: choose whether to get the real IP of the client through X-Forwarded-For.
-
Click “Next: Backend Server Group” button to select the backend server group, if there is no backend server group, you can create a new one.
-
Click the “Next: Health Check” button to configure health check related parameters.
- Enable health check: Select whether to enable health check or not. If you check Enable health check, configure the following parameters.
- Health Check Protocol: Select the health check protocol, including TCP and HTTP. The TCP protocol health check checks whether the server port is alive by sending SYN handshake messages; the HTTP protocol health check checks whether the server application is healthy by sending HEAD/GET requests to simulate the browser’s access behavior.
- Health check path (HTTP only): Set the path of the URL address for health check.
- Health check domain name (HTTP only): set the domain name of the request for health check.
- Normal Status Code (HTTP only): Set the HTTP status code for the health check to be normal.
- Health Check Interval Time: the time interval for lb to perform health check.
- Health Check Health Threshold: If the result of health check received for n consecutive times (n is the set value) is successful, the status is displayed as healthy.
- Health Check Unhealthy Threshold: If the result of the health check received for n (n is the set value) times in a row is identified, the status is displayed as abnormal.
-
Click the “OK” button to complete the operation.
OpenStack
-
On the LB Instance page, click the instance name item of OpenStack platform to enter the instance details page.
-
Click Click the “Listener” tab to enter the Listener page.
-
Click the “Create” button at the top of the list to bring up the Create LB Listener dialog box and configure the protocol & listener related parameters.
- Name: Set the name of the listener.
- Port: the port used to receive requests and forward them to the backend server, the port range is 1-65535.
- Protocol: Support listening to TCP, UDP, HTTP and HTTPS protocols, select “HTTPS” as the protocol.
Advanced Settings: Hidden by default, can be configured according to your needs.
- Scheduling algorithm: Set the scheduling algorithm of lb.
- Polling (RR): Distribute the external requests to the backend server group in order of access.
- Weighted polling (WRR): The higher the weight value of the backend server, the higher the number (probability) of being polled to.
- Weighted Least Connections (WLC): In addition to polling based on the weight value set for each backend server, the actual load of the backend server (i.e. the number of connections) is also considered. When the weight values are the same, the smaller the current number of connections, the higher the number (probability) that the backend server will be polled.
- Source IP Consistent Hash (SCH): Based on the consistent hash of the source IP address, the same source address will be dispatched to the same backend server.
- Enable session hold: choose whether to enable session hold or not. When session hold is enabled, the lb listener will distribute requests from the same client to the same server.
- Cookie Handling: Only support rewrite cookie, lb service will rewrite the original cookie if it finds that the user has customized the cookie, and the next time the client visits with the new cookie, the lb service will forward the request to the previously recorded backend server.
- Cookie name: Set the cookie name to the cookie name configured on the backend server.
- Enable Access Control: Set whether to enable access control. If you check Enable Access Control, you need to set the access control method and the access policy control group.
- Access control mode: whitelist that allows IPs in the access control policy group to access lb; blacklist that prohibits IPs in the access control policy group to access lb. Only whitelist is supported.
- Access Control Policy Group: Select the access control policy group, please create the policy group in the access control page first.
- Additional HTTP Header Field: Select whether to get the real IP of the client through X-Forwarded-For.
-
Click “Next: Backend Server Group” button to select the backend server group, if there is no backend server group, you can create a new one.
-
Click the “Next: Health Check” button to configure the health check related parameters.
- Turn on health check: Select whether to turn on health check or not. If you check Turn on health check, configure the following parameters.
- Health Check Protocol: Select the health check protocol, including TCP and HTTP. The TCP protocol health check checks whether the server port is alive by sending SYN handshake messages; the HTTP protocol health check checks whether the server application is healthy by sending HEAD/GET requests to simulate the browser’s access behavior.
- Health check path (HTTP only): Set the path of the URL address for health check.
- Health check domain name (HTTP only): set the domain name of the request for health check.
- Normal Status Code (HTTP only): Set the HTTP status code for the health check to be normal.
- Health Check Interval Time: the time interval for lb to perform health check.
- Health Check Health Threshold: If the result of health check received for n consecutive times (n is the set value) is successful, the status is displayed as healthy.
- Health Check Unhealthy Threshold: If the result of the health check received for n (n is the set value) times in a row is identified, the status is displayed as abnormal.
-
Click the “OK” button to complete the operation.
Alibaba Cloud
-
On the lb instance page, click the instance name item of Alibaba Cloud platform to enter the instance details page.
-
Click Click the “Listener” tab to enter the Listener page.
-
Click the “Create” button at the top of the list to bring up the Create LB Listener dialog box and configure the protocol & listener related parameters.
- Name: Set the name of the listener.
- Port: The port used to receive requests and forward them to the backend server, the port range is 1-65535.
- Protocol: Support listening to TCP, UDP, HTTP and HTTPS protocols, and select “HTTPS” as the protocol.
- Certificate: Select the lb certificate.
Advanced Settings: Hidden by default, can be configured according to your needs.
- Scheduling algorithm: Set the scheduling algorithm of lb.
- Polling (RR): Distribute external requests to the backend server group in order of access.
- Weighted polling (WRR): The higher the weight value of the backend server, the higher the number (probability) of being polled to.
- Weighted Least Connections (WLC): In addition to polling based on the weight value set for each backend server, the actual load of the backend server (i.e. the number of connections) is also considered. When the weight values are the same, the smaller the current number of connections, the higher the number (probability) that the backend server will be polled.
- Enable Access Control: Set whether to enable access control. If you check Enable Access Control, you need to set the access control method and access policy control group.
- Access control mode: whitelist that allows IPs in the access control policy group to access lb; blacklist that prohibits IPs in the access control policy group to access lb.
- Access Control Policy Group: Select the access control policy group, please create the policy group in the access control page first.
- Connection Idle Timeout: The idle time allowed after the connection session is proposed. If there is no access request within the timeout period, the current connection will be temporarily interrupted.
- Connection request timeout time: If there has been no response from the server within the timeout time, lb will give up waiting.
- Enable HTTP 2.0: Select whether to enable HTTP 2.0 protocol.
- Gzip data compression: Whether to enable Gzip data compression, it will compress specific file types when it is turned on. Currently, Gzip supports the following types of compression: text/xml, text/plain, text/css, application/javascript, application/x-javascript application/rss+xml, application/atom+xml, application/xml.
- Get client real IP: Select whether to get client real IP through X-Forwarded-For.
-
Click “Next: Backend Server Group” button to select the backend server group, if there is no backend server group, you can create a new one.
-
Click the “Next: Health Check” button to configure health check related parameters.
- Turn on health check: Select whether to turn on health check or not. If turn on health check is checked, configure the following parameters.
- Health check path: Set the path of the URL address of the health check.
- Health check domain name: Set the request domain name of health check.
- Normal status code: Set the normal HTTP status code of the health check.
- Health check response timeout time: the maximum timeout time of health check response, if no response within the response time, the health check is determined to be abnormal.
- Health check interval time: the time interval for lb to perform health check.
- Health Check Health Threshold: If the result of health check received for n consecutive times (n is the set value) is successful, the display status is healthy.
- Health Check Unhealthy Threshold: If the result of the health check received for n (n is the set value) times in a row is identified, the status is displayed as abnormal.
-
Click the “OK” button to complete the operation.
Tencent Cloud
-
On the lb instance page, click the instance name item of Tencent Cloud Platform to enter the instance details page.
-
Click Click the “Listener” tab to enter the Listener page.
-
Click the “Create” button at the top of the list to bring up the Create LB Listener dialog box and configure the protocol & listener-related parameters.
- Name: Set the name of the listener.
- Port: The port used to receive requests and forward them to the backend server, the port range is 1-65535.
- Protocol: Support listening to TCP, UDP, HTTP and HTTPS protocols, and select “HTTPS” as the protocol.
- Certificate: Select the lb certificate.
Advanced Settings: Hidden by default, can be configured according to your needs.
- Scheduling algorithm: Set the scheduling algorithm of lb.
- Weighted polling (WRR): The higher the weight value of the backend server, the higher the number (probability) of being polled to.
- Weighted Least Connections (WLC): In addition to polling based on the weight value set for each backend server, the actual load of the backend server (i.e. the number of connections) is also considered. When the weight values are the same, the smaller the current number of connections, the higher the number (probability) that the backend server will be polled.
- Enable HTTP 2.0: Select whether to enable HTTP 2.0 protocol.
- Gzip data compression: whether to enable Gzip data compression, it will compress specific file types after opening, currently Gzip supports compression types including: text/xml, text/plain, text/css, application/javascript, application/x-javascript application/rss+xml, application/atom+xml, application/xml.
- Get client real IP: Select whether to get client real IP through X-Forwarded-For.
-
Click “Next: Backend Server Group” button to select the backend server group, if there is no backend server group, you can create a new one.
-
Click the “Next: Health Check” button to configure health check related parameters.
- Enable health check: Select whether to enable health check or not. If you check Enable health check, configure the following parameters.
- Health check protocol: HTTP protocol health check checks the health of the server application by sending HEAD/GET requests to simulate the browser’s access behavior.
- Health check path: Set the path of the URL address of the health check.
- Health check domain name: Set the domain name of the request for health check.
- Normal status code: set the HTTP status code of the health check normal.
- Health check response timeout time: the maximum timeout of health check response. If no response within the response time, the health check is determined to be abnormal.
- Health check interval time: the time interval for lb to perform health check.
- Health Check Health Threshold: If the result of health check received for n consecutive times (n is the set value) is successful, the display status is healthy.
- Health Check Unhealthy Threshold: If the result of the health check received for n (n is the set value) times in a row is identified, the status is displayed as abnormal.
-
Click the “OK” button to complete the operation.
Huawei Cloud
-
On the lb instance page, click the instance name item of Huawei Cloud Platform to enter the instance details page.
-
Click Click the “Listener” tab to enter the Listener page.
-
Click the “Create” button at the top of the list to bring up the Create LB Listener dialog box and configure the protocol & listener-related parameters.
- Name: Set the name of the listener.
- Port: The port used to receive requests and forward them to the backend server, the port range is 1-65535.
- Protocol: Support listening to TCP, UDP, HTTP and HTTPS protocols, and select “HTTPS” as the protocol.
- Certificate: Select the lb certificate.
Advanced Settings: Hidden by default, can be configured according to your needs.
- Scheduling algorithm: Set the scheduling algorithm of lb.
- Weighted polling (WRR): The higher the weight value of the backend server, the higher the number (probability) of being polled to.
- Weighted Least Connections (WLC): In addition to polling based on the weight value set for each backend server, the actual load of the backend server (i.e. the number of connections) is also considered. When the weight values are the same, the smaller the current number of connections, the higher the number (probability) that the backend server will be polled.
- Source IP Consistent Hash (SCH): Based on the consistent hash of the source IP address, the same source address will be dispatched to the same backend server.
- Enable Session Hold: Choose whether to enable session hold. When session hold is enabled, the lb listener will distribute requests from the same client to the same server.
- Session Timeout: When the set time is exceeded and there is no new request in the connection, the session will be automatically disconnected.
- Enable Access Control: Set whether to enable access control, if you check Enable Access Control, you need to set the access control method and access policy control group.
- Access control mode: white list means allow IP access to lb in the access control policy group; black list means prohibit IP access to lb in the access control policy group.
- Access Control Policy Group: Select the access control policy group, please create the policy group in the access control page first.
- Enable HTTP 2.0: Select whether to enable HTTP 2.0 protocol.
-
Click “Next: Backend Server Group” button to select the backend server group, if there is no backend server group, you can create a new one. Click “Next: Backend Server Group” button to select the backend server group.
-
Click the “Next: Health Check” button to configure the health check related parameters.
- Enable health check: Select whether to enable health check or not. If you check Enable health check, configure the following parameters.
- Health Check Protocol: Select the health check protocol, including HTTP and HTTPS. HTTP protocol health check checks the health of the server application by sending HEAD/GET requests to simulate the access behavior of the browser; HTTPS protocol health check means the lb instance sends HTTPS requests to the specified server port for health check.
- Health check path: Set the path of the URL address for health check.
- Health Check Domain: Set the domain name of the request for health check.
- Normal Status Code: Set the HTTP status code for the health check to be normal.
- Health check response timeout time: the maximum timeout time of health check response, if no response within the response time, the health check is determined to be abnormal.
- Health check interval time: the time interval for lb to perform health check.
- Health Check Health Threshold: If the result of the health check received for n consecutive times (n is the set value) is successful, the display status is healthy.
-
Click the “OK” button to complete the operation.
AWS Application Load Balancer
- On the LB Instance page, click the application type instance name item of AWS platform to enter the instance details page.
- Click Click the “Listener” tab to enter the Listener page.
- Click the “Create” button at the top of the list to bring up the Create LB Listener dialog box and configure the protocol & listener related parameters.
- Name: Set the name of the listener.
- Port: The port used to receive requests and forward them to the backend server, the port range is 1-65535.
- Protocol: Support listening to TCP, UDP, HTTP and HTTPS protocols, and select “HTTPS” as the protocol.
- Certificate: Select the lb certificate. Click “Next: Backend Server Group” button to select the backend server group, if there is no backend server group, you can create a new one.
- Click the “Next: Health Check” button to configure the health check related parameters.
- Turn on health check: AWS' listeners do not support turning off health check, configure the following parameters.
- Health check protocol: select the health check protocol, including HTTP and HTTPS. HTTP protocol health check checks the health of the server application by sending HEAD/GET requests to simulate the access behavior of the browser; HTTPS protocol health check means the lb instance sends HTTPS requests to the specified server port for health check
- Health Check Path: Set the path of the URL address of the health check.
- Normal Status Code: set the HTTP status code of the normal health check.
- Health check response timeout time: the maximum timeout time of health check response, if no response within the response time, the health check is determined to be abnormal.
- Health check interval time: the time interval for lb to perform health check.
- Health Check Health Threshold: If the result of health check received for n consecutive times (n is the set value) is successful, the display status is healthy.
- Health Check Unhealthy Threshold: If the result of the health check received for n (n is the set value) times in a row is identified, the status is displayed as abnormal.
- Click the “OK” button to complete the operation.
Modify listener
This function is used to modify the listeners.
- On the instance details page, click the “Listener” tab to enter the listener page. Click the “Modify” button on the right side of the listener to bring up the Modify LB Listener dialog box.
- Modify the relevant parameters, and click “OK” button.
Delete Listener
This function is used to delete a listener.
Delete
- On the instance details page, click the “Listeners” tab to enter the listener page.
- Click the “Delete” button on the right column of the listener to bring up the action confirmation dialog box.
- Click the “OK” button to complete the operation.
Batch Delete
- On the instance details page, click Click the “Listener” tab to enter the Listener page.
- Select one or more listeners in the list, and click the “Delete” button at the top of the list to bring up the operation confirmation dialog box.
- Click the “OK” button to complete the operation.
Enable Listener
This function is used to enable listener in the “disabled” state.
- On the instance details page, click Click the “Listener” tab to enter the Listener page.
- Click the “More” button on the right side of the listener, and select the “Enable” menu item to bring up the action confirmation dialog. Click the “OK” button to complete the operation.
Disable Listener
This function is used to disable listener in the “enabled” state.
- On the instance details page, click Click the “Listener” tab to enter the Listener page.
- Click the “More” button on the right side of the listener, and select the “Disable” menu item to bring up the action confirmation dialog.
- Click the “OK” button to complete the operation.
Adjust Access Control
This function sets the access control policy of the listener.
- On the instance details page, click Click the “Listener” tab to enter the Listener page.
- Click the “More” button on the right column of the listener, and select the “Adjust Access Control” menu item to bring up the Adjust Access Control dialog box.
- Set whether to enable access control, if you check Enable access control, you need to set the access control method and access policy control group.
- Access control mode: whitelist that allows the IPs in the access control policy group to access lb; blacklist that prohibits the IPs in the access control policy group to access lb.
- Access Control Policy Group: Select the access control policy group, please create the policy group in the access control page first.
- Click “OK” button to finish the operation.
Enable Health Check
This function is used to enable health checks for listeners that do not have health checks enabled. Setting health checks is not supported for redirect type listeners.
- On the instance details page, click the “Listener” tab to enter the listener page.
- Click the “More” button in the action bar on the right side of the listener, and select the “Enable Health Check” menu item in the drop-down menu to bring up the action confirmation dialog.
- Click the “OK” button to complete the operation.
Disable Health Check
This function is used to disable health check for listeners that have health check enabled. Setting health checks is not supported for redirect type listeners.
- On the instance details page, click the “Listeners” tab to enter the listener page.
- Click the “More” button in the action bar on the right side of the listener, and select the “Disable Health Check” menu item to bring up the action confirmation dialog.
- Click the “OK” button to complete the operation.
View listener Details
This function is used to view the listener details.
- On the instance details page, click the “Listener” tab to enter the listener page. Click the listener name item to enter the listener details page.
- View the following information.
- Basic Information: Including Cloud ID, ID, name, status, domain, project, platform, created at, updated at, and description.
- Configuration information: Including front-end protocol/port, lb instance, backend server group.
- Advanced information: Including scheduling algorithm, session hold, cookie handling method, cookie name, session timeout time, access control, redirect, redirect method, redirect to, backend connection timeout time, backend connection idle time, connection idle timeout time, connection request timeout time, limited request rate sent from the same IP, HTTP2.0, Gzip data compression, get client real IP, bandwidth peak, set Proxy protocol, attach HTTP header field.
- Health check: enable health check, health check protocol, health check path, health check domain, normal status code, health check response timeout, health check interval, health check health threshold, health check unhealthy threshold, health check request, health check return result.
Forwarding policy management
Only HTTP and HTTPS type listeners support setting forwarding policy. Configuring a forwarding policy forwards requests from different domains or URLs to a different set of backend servers for processing.
Description
When a user initiates an HTTP/HTTPS request, the request will be redirected or forwarded to the corresponding backend server group by matching the configuration on the forwarding policy first, or if it cannot match the forwarding policy, the request will be redirected or forwarded to the corresponding backend server group by matching the configuration on the listener.
Create Forwarding Policy
This function is used to create a new forwarding policy.
- On the HTTP/HTTPS listener details page, click the “Forwarding Policy” tab to enter the Forwarding Policy page.
- Click the “Create” button at the top of the list to bring up the Create Forwarding Policy dialog box.
- Configure the following parameters.
- Name: Set the name of the forwarding policy.
- Domain name: The domain name of the request to be forwarded, the domain name only supports exact match, if it is empty, it will match all domain names.
- URL path: Set the path of the request, URL path supports prefix matching, match all URL paths that start with the set path.
- Redirection (only supported by OneCloud platform): When user initiates HTTP/HTTPS access request, configure redirection to redirect HTTP/HTTPS access to the URL address after redirection configured by user. When redirection is enabled, there is no need to configure backend server groups and speed limit parameters, etc.
- Redirection methods (only supported by
OneCloud
platform): Including permanent redirect (301), temporary redirect (302), and temporary redirect (307).
- Permanent redirection (301): When the URL resource requested by the user is permanently migrated to a new URL, permanent redirection (301) can be used to make the user access the old URL directly replaced with the redirected URL.
- Temporary redirection (302): when the user requests a URL resource temporarily changed location, you can use the temporary redirection, but 302 can only achieve GET to GET redirection, non-GET requests may be redirected to GET requests.
- Temporary redirection (307): When the URL resource requested by the user has temporarily changed its location, a temporary redirection can be used. 307 can keep the request method unchanged, such as a POST request that still redirects to a POST request.
- Redirect to (only supported by OneCloud platform): Set the URL address after redirection. Just modify any of HTTP protocol, domain name (IP or IP+port), and URL path. E.g. to force HTTP requests to be accessed via HTTPS protocol, at this time, modify the redirect to HTTPS protocol, and leave the others blank.
- Backend server group: Select the backend server group that will handle requests matching the forwarding policy.
- Limit inbound request rate (only supported by OneCloud platform): Limit the maximum rate of listener to inbound requests, 0 is the default value, which means no speed limit.
- Limit same source IP request rate (only supported by OneCloud platform): Limit the maximum rate that each source IP can send requests to this listener, 0 is the default value, which means no speed limit.
- Click the “OK” button to complete the operation.
Modify Forwarding Policy
This function is used to modify the forwarding policy.
- On the HTTP/HTTPS listener details page, click the Forwarding Policy tab to enter the Forwarding Policy page.
- Click the “Modify” button on the right column of the forwarding policy to bring up the Modify Forwarding Policy dialog box.
- Modify the relevant parameters and click the “OK” button.
Delete Forwarding Policy
This function is used to delete the forwarding policy.
- On the HTTP/HTTPS Listener Details page, click the Forwarding Policy tab to enter the Forwarding Policy page.
- Click the “Delete” button on the right column of the forwarding policy to bring up the operation confirmation dialog box.
- Click the “OK” button to complete the operation.
View Forwarding Policy Details
This function is used to view the details of the forwarding policy.
- On the HTTP/HTTPS Listener Details page, click the Forwarding Policy tab to enter the Forwarding Policy page.
- Click the Forwarding Policy Name item to enter the Forwarding Policy Details page.
- View the following information.
- Basic Information: Including Cloud ID, ID, name, status, domain, project, platform, created at, updated at, and description.
- Configuration information: Including lb instance, listener, domain name, URL path, redirect, redirect method, redirect to, backend server group, limit inbound request rate, limit request rate sent from the same source IP.
View Listener information
This function is used to view the monitoring information corresponding to the listener and forwarding policy.
- On the Listener details page, click the Monitoring tab to enter the Monitoring page.
- View the monitoring information of the listener and forwarding policies under the listener.
Backend Server Group Management
The backend server group is a collection of business servers, which is used to receive requests forwarded by lb instances.
Create Backend Server Group
This function is used to create a new backend server group. It is recommended to create a backend server group before creating a listener.
- On the instance details page, click the “Backend Server Group” tab to enter the Backend Server Group page.
- Click the “Create” button at the top of the list, and then click the Create dialog box.
- Set the name of the backend server group and click the “OK” button.
Delete backend server group
This function is used to delete the backend server group. You cannot delete a backend server group when it is already associated with a listener.
Individual deletion
- On the instance details page, click the “Backend server group” tab to enter the backend server group page.
- Click the “Delete” button on the right column of the backend server group to bring up the operation confirmation dialog box.
- Click the “OK” button to complete the operation.
Batch Delete
- On the instance details page, click the “Backend Server Group” tab to enter the Backend Server Group page.
- Select one or more backend server groups in the list, and click the “Delete” button at the top of the list to bring up the operation confirmation dialog box.
- Click the “OK” button to complete the operation.
View backend server group details
This function is used to view the details of the backend server group.
- On the instance details page, click the “Backend server group” tab to enter the backend server group page.
- Click the Backend Server Group Name item to enter the Backend Server Group Details page.
- View the following information.
- Basic Information: Including Cloud ID, ID, name, status, domain, project, platform, created at, updated at, and description.
- Other information: Including lb instance, VPC, region, and zone.
Backend server management
The backend server is the business server that specifically handles requests.
Create backend server
This function is used to add a business server to the backend server group.
- On the Backend Server Group details page, click the Backend Server tab to enter the Backend Server page.
- Click the “Create” button at the top of the list to bring up the Create dialog box.
- Configure the following parameters.
- Type: Support adding servers, hosts and external machines as backend servers.
- Port: The backend port used by the backend server to receive requests.
- Weight: Set the weight of the backend server. The higher the weight, the more access requests will be assigned to the server.
- SSL (only supported by OneCloud platform): Access the backend server by tls encryption.
- Click “OK” button to complete the operation.
Modify Port
This function is used to modify the port of the backend server.
- On the backend server group details page, click the “Backend server” tab to enter the backend server page.
- Click the “Modify Port” button on the right side of the backend server to bring up the Modify Port dialog box.
- Set the port number and click “OK” button.
Modify Weights
This function is used to modify the weight of the backend server.
- On the backend server group details page, click the “Backend server” tab to enter the backend server page.
- Click the “Modify Weight” button on the right column of the backend server to bring up the Modify Weight dialog box.
- Set the weight and click the “OK” button.
Delete Backend Server
This function is used to delete the backend server.
- On the Backend Server Group Details page, click the Backend Server tab to enter the Backend Server page.
- Click the “Delete” button on the right column of the backend server to bring up the operation confirmation dialog box.
- Click the “OK” button to complete the operation.
View backend server details
This function is used to view the detailed information of the backend server.
- On the Backend Server Group Details page, click the Backend Server tab to enter the Backend Server page.
- Click the Backend Server Name item to enter the Backend Server Details page.
- View the following information.
- Basic Information: Including Cloud ID, ID, name, status, domain, project, platform, created at, updated at, and description.
- Other information: Including lb instance, IP address, port, weight, VPC, zone, SSL.
View LB Instance Monitoring
This function is used to view the monitoring data of the load balancing instance.
- Click the instance name item on the instance page to enter the instance details page. 2.
- Click the “Monitoring” tab to enter the monitoring page.
- The following monitoring information can be viewed.
- Support to view the performance monitoring information of the last 1 hour, the last 1 day, the last 1 week, the last 1 month, the last 3 months, the last 6 months, and support to set the time granularity, the size of the time granularity is related to the length of the view.
- The supported monitoring metrics are listed in the table below.