Dimensional
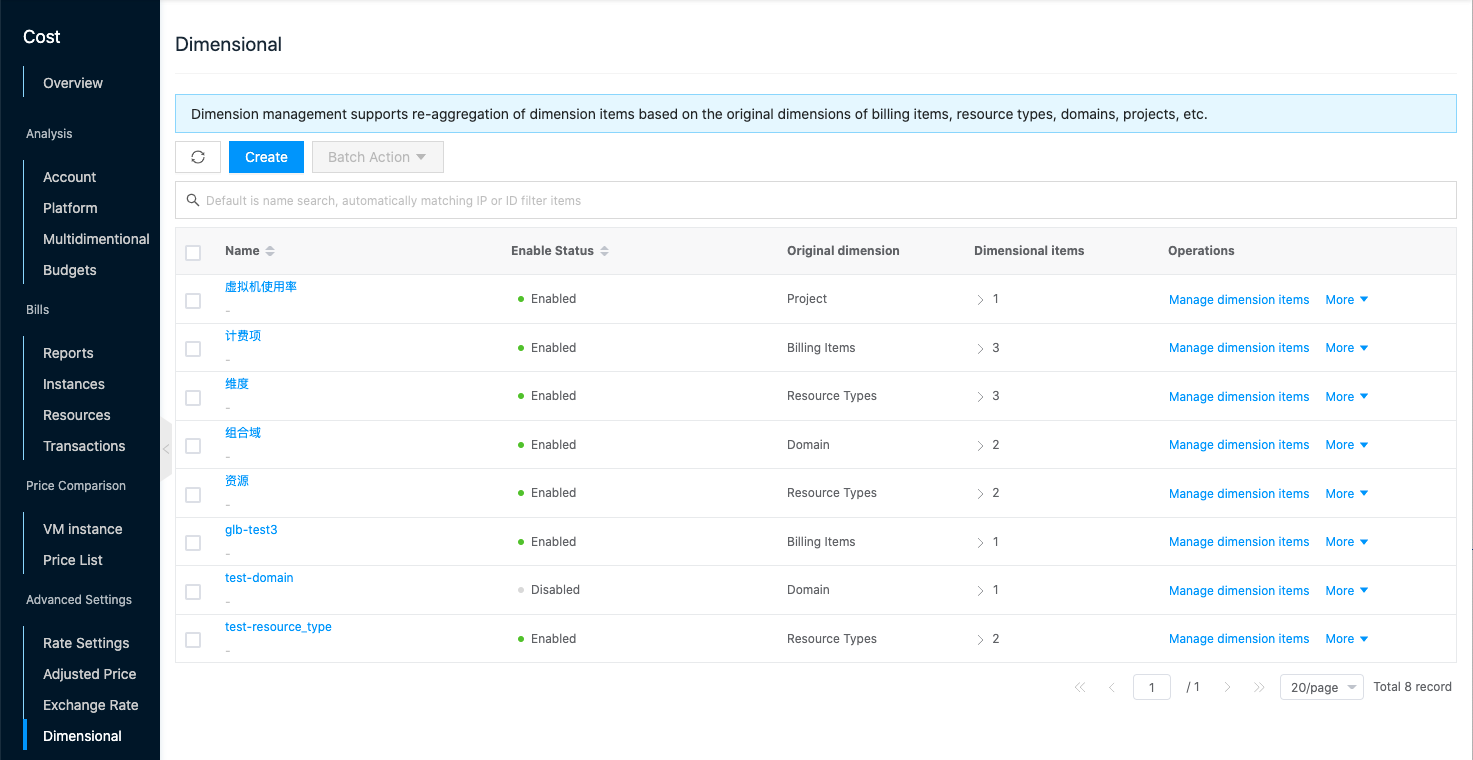
Dimension management is based on the billing items, resource types, domains, projects and other cost original dimensions for the aggregation of dimension items, etc. For example, if the platform has three departments, domain A, domain B and domain C, the default department as the dimension to display the cost information, when the department of domain A and domain B merge, you can re-aggregate the dimension of the domain through the function of dimension management, the original domain A, domain B will correspond to the new dimension items domain AB, domain C still corresponds to domain C, after the configuration is completed, the user can view the new dimension in the cost overview and other pages of the custom dimensions After the configuration is done, users can view the cost information displayed in the new dimensions in the custom dimensions in the cost overview and other pages.
Entry: In the cloud management platform click on the top left corner of the  navigation menu, and click “Expense/Advanced Configuration/Dimension Management” menu item in the left menu bar that pops up to enter the dimension management page.
New Dimension
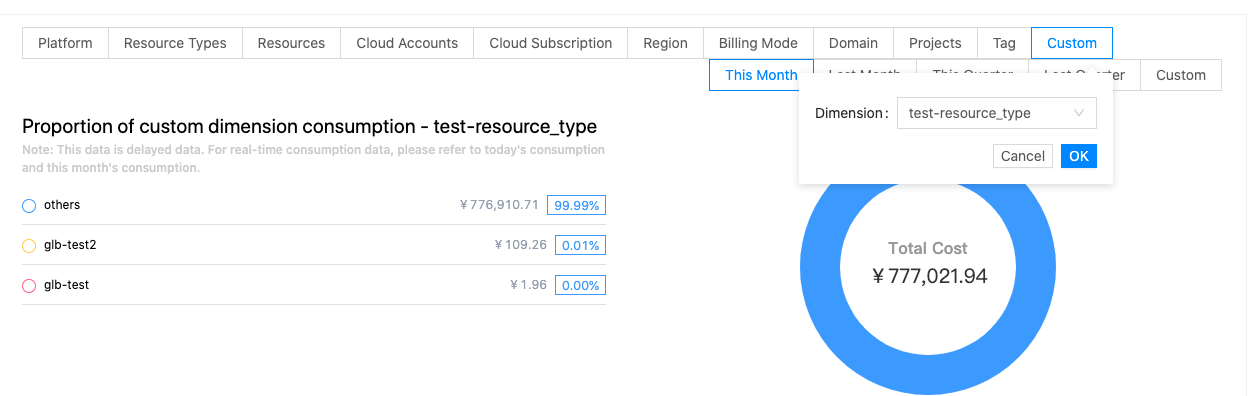
This function is used to create a new custom dimension. The newly created dimension can be viewed in the custom dimension on the Cost Overview etc. page with the cost information displayed in the new dimension.
- On the dimension management page, click the “New” button at the top of the list to enter the New Dimension page.
- Configure the following parameters.
- Name: The name of the new custom dimension.
- Original dimension: The original dimension is the existing dimension analysis of the bill, the new custom dimension is based on the original dimension for recombination, etc.
- Dimension item: The dimension item is the value of the dimension, for example, if the original dimension is a domain, the original dimension item value is all domains, and the dimension item of the custom dimension can aggregate several domains together to form a new dimension item. If the new dimension item does not correspond to all the original dimension items, the original dimension items that do not correspond will be displayed in the form of other.
- Click the “Add Dimension Item” button to bring up the New Dimension Item dialog.
- Set the name of the new dimension item and the corresponding original dimension item for the new dimension item.
- Click the “OK” button and repeat the operation to add the dimension item.
- When the configuration is complete, click the “OK” button to finish the operation.
Manage dimension items
This function is used to manage the dimension items under the new dimension, and supports adding, deleting and modifying the original dimension corresponding to the dimension item. If the original dimension is a domain, the value of the original dimension item is all the domains, while the dimension item of the custom dimension can aggregate several domains together to form a new dimension item. If the new dimension item does not correspond to all the original dimension items, then the original dimension items that do not correspond will be displayed as other.
New dimension item
This function is used to create new dimension items.
- On the dimension management page, click the “Manage Dimension Items” button on the right column of the dimension to enter the Details - Dimension Items page.
- Click the “New” button at the top of the list to bring up the New Dimension Item dialog box.
- Set the name of the new dimension item and the original dimension item corresponding to the new dimension item.
- Click the “OK” button to finish the operation.
Modify dimension item
This function is used to modify the original dimension item corresponding to the dimension item.
- On the dimension management page, click the “Manage Dimension Items” button on the right column of the dimension to enter the Details - Dimension Items page.
- Click the “Modify” button on the right column of the dimension item to bring up the Modify Dimension Item dialog box.
- Support modifying the dimension item name and the original dimension corresponding to the dimension item.
- Click the “OK” button to finish the operation.
Delete dimension item
This function is used to delete dimension items.
Single Delete.
- On the dimension management page, click the “Manage dimension items” button on the right column of the dimension to enter the details-dimension item page.
- Click the “Delete” button on the right column of the dimension item to bring up the action confirmation dialog.
- Click the “OK” button to complete the operation.
Batch Delete.
- On the dimension management page, click the “Manage Dimension Items” button on the right column of the dimension to enter the Details - Dimension Items page.
- Select one or more dimension items in the list of dimension items, and click the “Delete” button at the top of the list to bring up the operation confirmation dialog.
- Click the “OK” button to complete the operation.
Enable Dimension
This function is used to enable a dimension with “disabled” status, the disabled status will not be viewed in the custom dimension.
Single Enable
- On the dimension management page, click the “More” button in the action bar to the right of the disabled dimension, and select the “Enable” menu item to bring up the action confirmation dialog.
- Click the “OK” button to complete the operation.
Batch Enable
- Select one or more “disabled” dimensions in the dimension management list, click the “Batch Action” button at the top of the list, and select the “Enable” menu item to bring up the operation confirmation dialog box.
- Click the “OK” button to complete the operation.
Disable Dimension
This function is used to disable the “enabled” status of the dimension. The disabled status of the dimension will not be viewed in the custom dimension.
Single Disable
- On the dimension management page, click the “More” button in the action bar to the right of the enabled dimension, and select the “Disable” menu item to bring up the action confirmation dialog.
- Click the “OK” button to complete the operation.
Batch Disable
- Select one or more “enabled” dimensions in the dimension management list, click the “Batch Action” button at the top of the list, and select the “Disable” menu item to bring up the action confirmation dialog.
- Click the “OK” button to complete the operation.
Delete Dimension
This function is used to delete dimensions.
Single Delete
- On the dimension management page, click the “More” button in the right column of the dimension, and select the “Delete” button in the drop-down menu to bring up the operation confirmation dialog.
- Click the “OK” button to complete the operation.
Batch Delete
- Select one or more dimensions in the dimension management list, click the “Bulk Operation” button at the top of the list, select the drop-down menu “Delete” button, and the operation confirmation dialog box pops up.
- Click the “OK” button to complete the operation.
View Dimension Details
This function is used to view the dimension details information.
- On the dimension management page, click the dimension name item to enter the dimension details page.
- View the following information, including ID on cloud, ID, name, status, domain, item, enabled status, original dimension, dimension item, create at, update at, and note time.
View Operation Log
This function is used to view the log information of the dimension related operations.
- In the dimension management page, click the dimension name item to enter the dimension details page.
- Click the Operation Log tab to enter the Operation Log page.
- Load More Logs: In the Operation Logs page, the list shows 20 operation logs by default, if you want to view more operation logs, please click “Load More” button to get more log information.
- View Log Details: Click the “View” button on the right column of the operation log to view the log details. Copy details are supported.
- View logs of specified time period: If you want to view the operation logs of a certain time period, set the specific date in the start date and end date at the top right of the list to query the log information of the specified time period.
- Export logs: Currently, only the logs displayed on this page are supported to be exported. Click the upper-right corner of
 icon, set the export data column in the pop-up export data dialog, and click the “OK” button to export the logs.